Report Writer Installation
-
Print
-
DarkLight
-
PDF
Report Writer Installation
-
Print
-
DarkLight
-
PDF
Article summary
Did you find this summary helpful?
Thank you for your feedback!
The installation process takes ~5 minutes and will include the following steps:
1. Set up Microsoft Office
There are a few pre-installation steps to help your experience proceed more smoothly.
Enabling Macros in Excel
- File menu.
- Select Options, and in the list of options on the left, click Trust Center.
- Click the Trust Center Settings button on the right.

- In the new window that opens, click Macro settings on the left.
- On the right, select the fourth option in the list ("Enable"), and check the checkbox ("Trust"). The exact wording of these options will vary a little based on one's version of Office.
.png)
This allows macros to run automatically when Excel is opened, which prevents several errors and simplifies the process of opening Report Writer Excel workbooks.
Disabling OneDrive Office Sync
If your PC has OneDrive installed, turning off the Office Sync option in OneDrive can prevent some incompatibilities with Report Writer Excel files (see File Hosting Services for details) that are stored in folders synced to OneDrive. Details and instructions in how to disable this are available at Working with Excel files in OneDrive.
2. Open the Installer
Download the installer from the link provided in the welcome email, then access the installer file in the location it was saved to on your computer. By default, that location is your Downloads folder, but it may also appear in the download bar at the bottom of your web browser. Right-click on the installer icon and click Run As Administrator to begin the installation process.
.png)
3. Begin the Installation
The installation setup process will begin with providing you details on the process.
An important step is to save and close any Word & Excel files which may be open. Also included in the notes is information on how to update trust settings within Word and Excel.
Click on the Next button when you are ready to begin the installation.
.png)
4 . Set Up Report Writer
The Select Additional Tasks screen will load.
.png)
The Ready to Install screen will load.
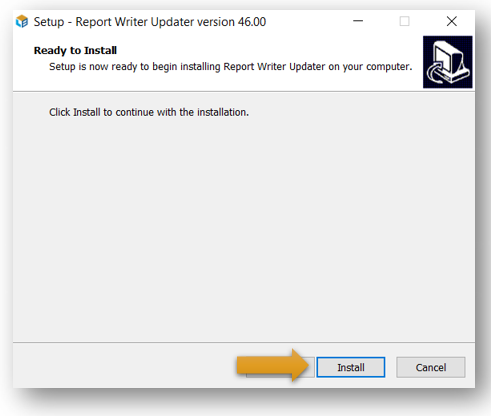
Click Install.
The Completing the Report Writer Updater Setup Wizard screen will load. .png)
Click Finish to close the window.
5. Enter Your User Credentials
The Enter Credentials window will open. 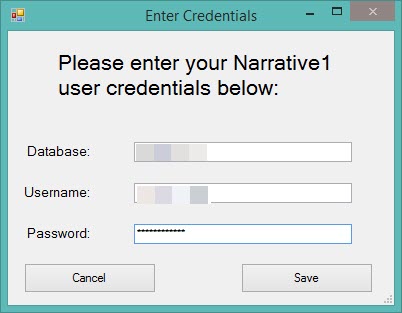
A new window will open and prompt you to enter your user credentials, including Database, Username, and Password. These can be found in the install email you received with the link to the installer.
Click Save after entering in your user credentials.
6. Run the Updater
Upon saving your user credentials, the Report Writer Updater will open. If MS Word or MS Excel are open, close them, then click GO in the upper right-hand corner of the window to update your Report Writer software to the current version.
.png)
If the update is successful, a window should appear that states Update Cycle Completed.
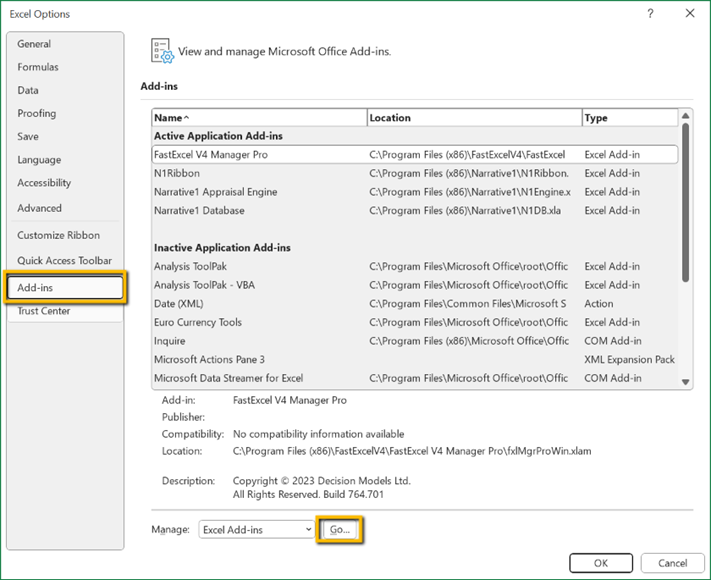
7. Enable Report Writer Add-Ins
You’ll next need to enable the three Report Writer add-ins for Excel. To do so, click the File menu in Excel, then click Options. Click Add-ins on the left, and then the Go button near the bottom.
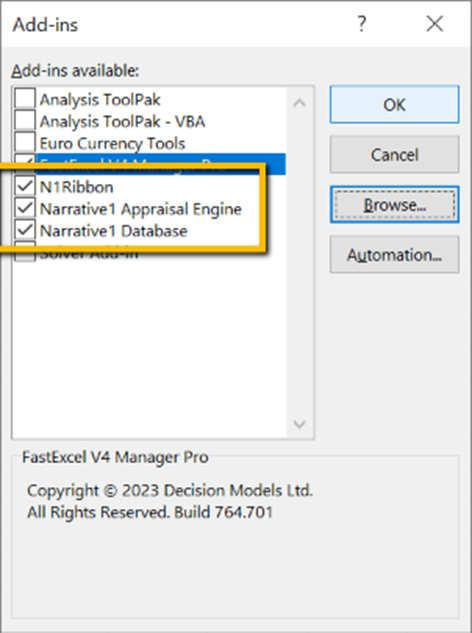
In the next window, click Browse, then navigate to the folder C:\Program Files (x86)\Narrative1.
The three add-ins you’ll want to add are the files N1DB, N1Engine, and N1Ribbon. Excel will only allow these to be added one at a time, so you will just repeat the process of clicking Browse, selecting the file in question, and clicking OK once for each. Once these add-ins are visible and checked, you are ready to continue.
8. Setup Excel Database Link
You may now close the Updater. You will find a new folder in your documents folder:
\Documents\Narrative1\Narrative1 Templates\Default Templates\General Use
.png)
To establish the link between Excel and your database, open the Valuation template, Valuation_Model.xlsm
.png)
Once the Excel file opens, click on the Connection Setup button found on the File Info worksheet.
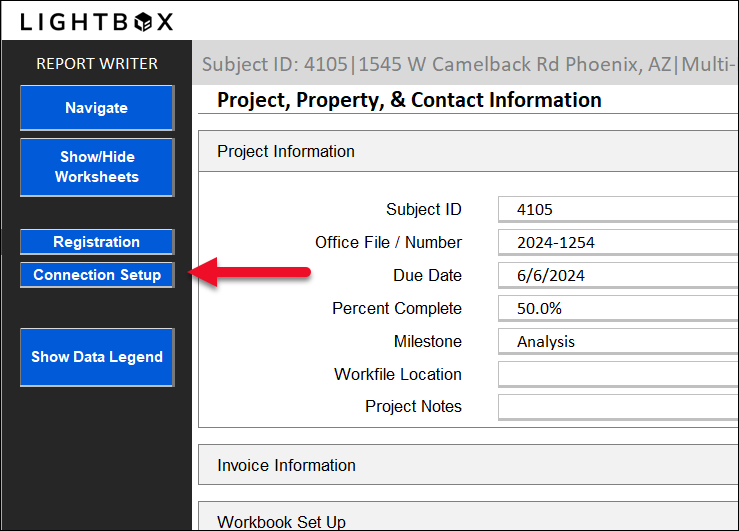
The following window should be pre-populated with the credentials previously entered. Click Apply/Reset to connect Excel to your database.
.png)
Was this article helpful?