- Print
- DarkLight
- PDF
Convert Your Appraisal Report to a Template
- Print
- DarkLight
- PDF
Component: Word.
Symptom(s): N/A
Typical Cause: To use a Report Word document with Report Writer, it must include Report Writer fields and tables.
Time required to fix: 2 - 3 hours, depending on the length of the Report and the number of fields.
Solution: Insert linked Excel fields and tables on a global basis using LightBox Fields and Tables tool in conjunction with Microsoft Word’s search and replace function. Follow these steps to convert a Report document to a Report Template document:
Prerequisite
An Excel/Word merge must be completed at the beginning of the work session, or after a new range name has been added to Excel.
Process for Converting an Appraisal Report
| 1. Open an Excel file and then click on the LightBox Ribbon in the menu bar. |  |
| 2. Click Prep Fields and Tables in the LightBox Ribbon. This will allow you to insert any of the N1 Named fields and tables directly into your Word document. |  |
| 3. Open your original (non-linked) Report document in Word. We will begin with the fields which have uniform content and formatting throughout the Report. For example, the Effective Date of Value of the appraisal. |  |
| 4. Click in the Word document next to the EFFECTIVE DATE OF VALUE value (February 12, 2018) so that your cursor is placed there. |  |
| 5. Click on the LightBox Ribbon in the menu bar, then click on Fields and Tables. |  |
| 6. Find the AsIsValueDate field in the list of fields. You can do this by scrolling through the alphabetized list, or by entering all or part of the field name in the Find in list box and then clicking Find Next to navigate to that field in the list. |  |
| 7. Now that the AsIsValueDate field is selected, click on the Insert in Doc button to insert that field in your Report document. It will be inserted wherever the cursor was placed. Note that the AsIsValueDate in the Report document (shaded gray) is a date. That date value is coming from the Excel document prepped and merged earlier. | .png) |
| 8, After inserting the field into your Report document, copy the gray-shaded field. The easiest way to do this is to click on the right side of the field and then hit the backspace key which will select only that field. Then press ctrl+c on your keyboard to copy the content to the Windows clipboard. | |
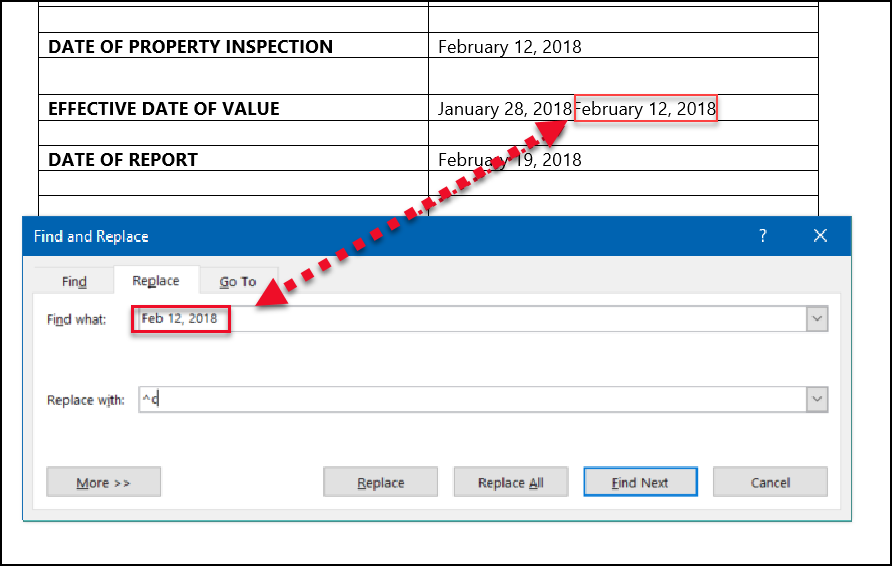
| 9. After copying the field to your clipboard, press ctrl + h on your keyboard to open Word’s Find and Replace function. When the dialog box opens, type in the text string of the value you want to find and replace ("February 12, 2018," in this case) in the upper Find what box. In the lower Replace withbox enter in "^c", without the quotes. The "^" (caret) character is Shift+6; the "c" should be lower-case. This tells Word to replace that particular information ("February 12, 2018") with the contents of the Windows clipboard, which currently holds the Narrative1 AsIsValueDate field. In the example to the right, we see the Report document in the background and Word's Find and Replace feature in the foreground. The text string we've entered in the "Find what" field is the Effective Date that already existed in the Report, and which we want to replace with the AsIsValueDate field. |  |
| 10. Click Find Next. This will go to the next instance of the text string (February 12, 2018) in the Report document. If it is another instance of the Effective Date of Value, click the Replace button. It's important to verify that the content being replaced is actually the Effective Date of Value, however. In the screenshot examples above, both the Effective Date of Value and the Date of Property Inspection are February 12, 2018. If you replace all instances of that date, you will be inserting the AsIsValueDatefield for Property Inspection as well as Effective Date of Value. Note: When the field replaces the text string it will be in whatever Word style it was originally copied. This is simple to correct using Word’s format painter: copy a nearby desired style and paint over the replaced field. Continue to press Find Next and then Replace for each instance of the Effective Date of Value. Once all instances have been replaced with the field, repeat steps 3 - 10 with the other fields and tables included in your Report document. If you need additional help, please contact Support at reportwritersupport@lightboxre.com | |
.png)

.png)