- Print
- DarkLight
- PDF
Building Your First Deal
- Print
- DarkLight
- PDF
Overview
When you first log in, you are greeted with the My Projects page and six sample projects that have been included to demonstrate CashFlow's capabilities. You can reference these sample projects to see how various asset types are modeled in CashFlow, or even make a copy to use them as a starting template.
In this article, we will walk through modeling a simple 2-tenant office building from scratch. This will show you the core workflow and tools that every CashFlow project is built around.
1. Create a new project
To begin, click on the + New Project button:

Enter a name for your project. This can be the project's address or any other name that helps you identify the project. You can also rename your project at any later time from the My Projects page. For this example, I will name my project "Project Watermelon." Once you have named your project, click Create Project.
2. Enter general assumptions
The first step in any new project is entering general assumptions such as the (1) property's address, the (2) total rentable area, and the (3) length of your analysis. Let's enter the values for a 5 year analysis starting on April 2017, on a 20,000 sf building located at 120 E 23rd St. in New York.
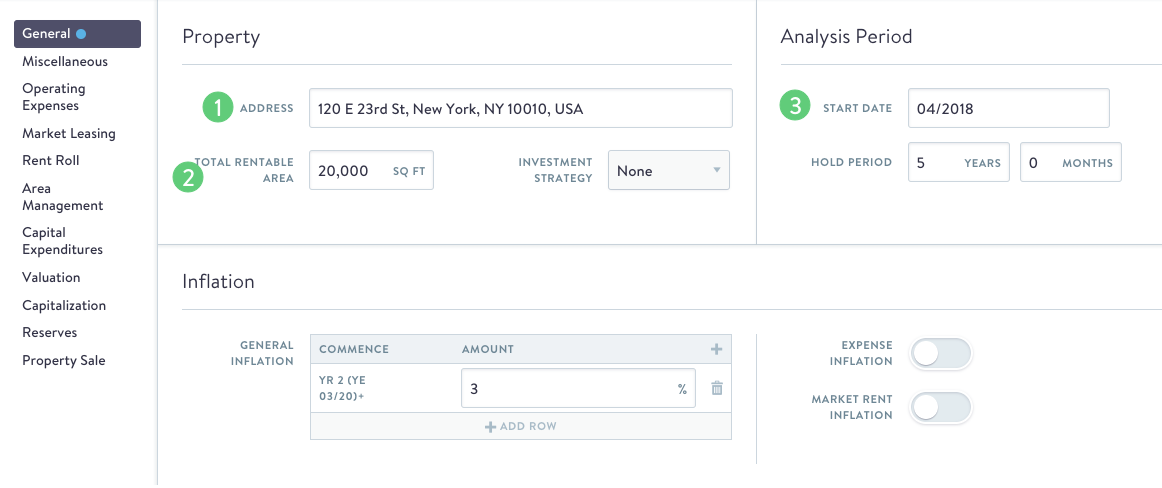
CashFlow has default placeholder values for the Inflation and Tenancy Losses fields here, which you can replace with your own assumptions. For now we will leave them as they are.
3. Enter miscellaneous expenses
Within the Miscellaneous Expenses page, you can add income from antennas, signage, etc. With all miscellaneous expenses, Simple Costs are Operating expenses entered start at the Analysis Start Date, is perpetual, and is affected by the general or expense inflation.
Custom Cost is a more granular form of inputting data. Costs increase by the Expense Inflation Rate or the General Inflation Rate.
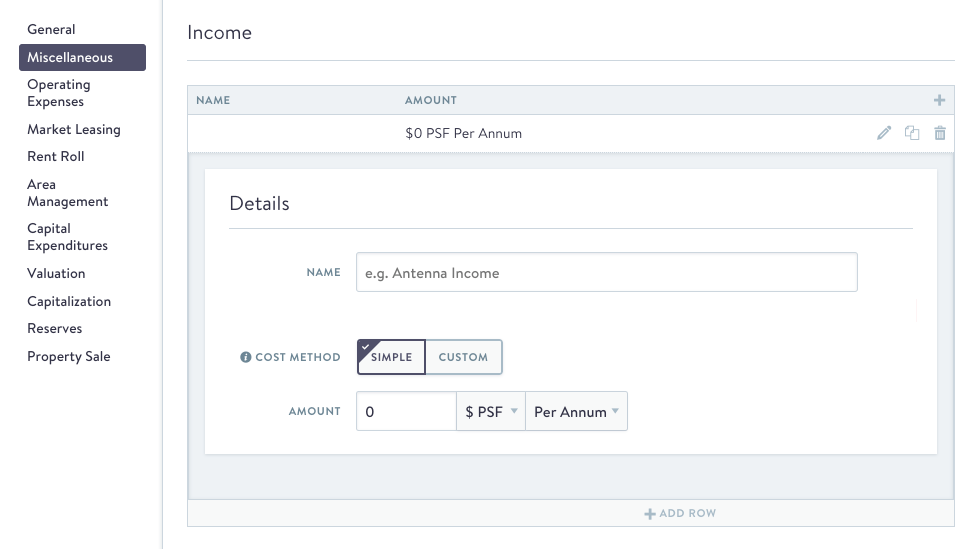
Along with Income, you can add miscellaneous expenses such as parking expenses, and ground leases.
4. Enter operating expenses
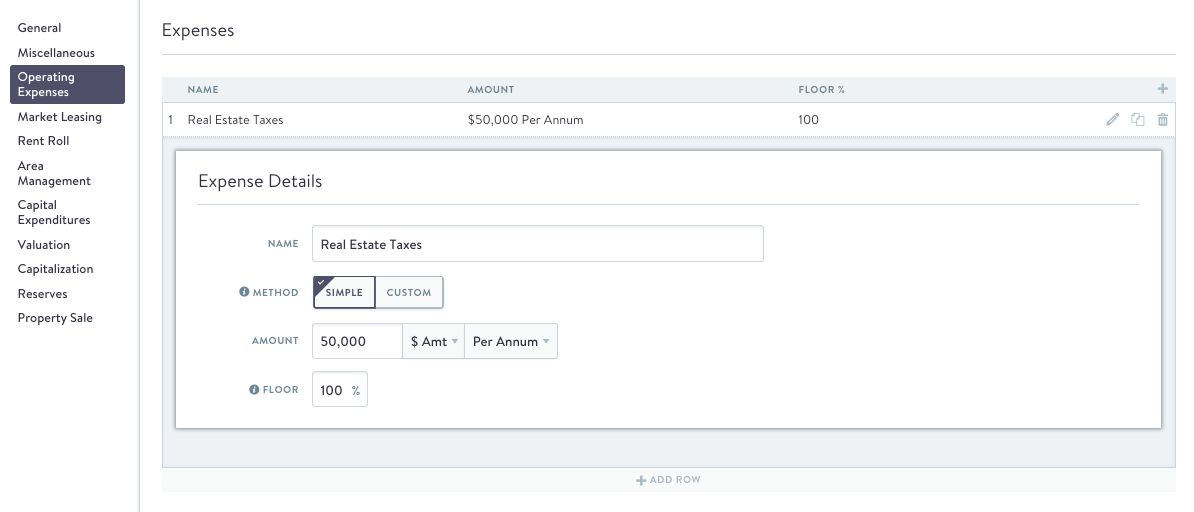
Navigate to the Operating Expenses page, located just under the General page. We will add in a few operating expenses for our property. Click the (+ ADD ROW) button to create a new expense. Name this expense "Real Estate Taxes" and enter 50,000, $ Amt, and Per Annum for the amount. Leave the Floor input at 100%. Here is what it should look like:
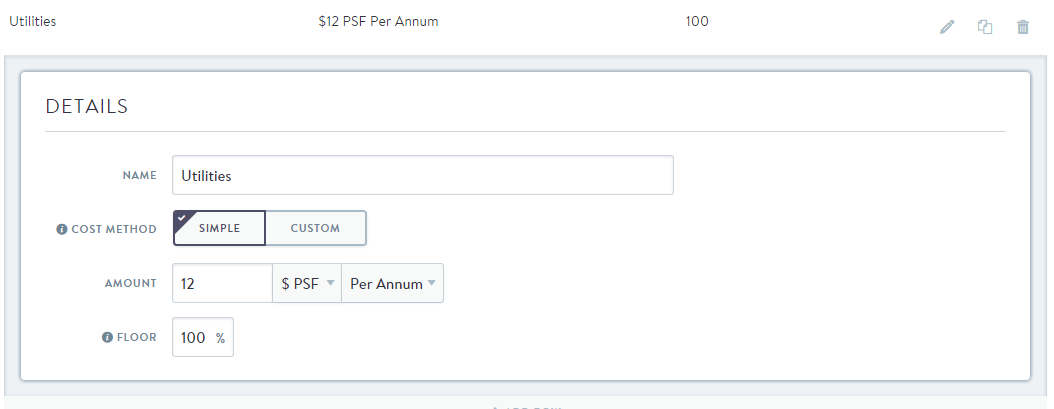
Let's add one more expense, named "Utilities." Once again, click on (+ ADD ROW) to create the new expense item. We will input this expense as a $12 'per square foot' expense. To do this just click on the ($ Amt) button and select ($ PSF) from the drop-down menu. Enter "12" for the amount and the expense should look like this:
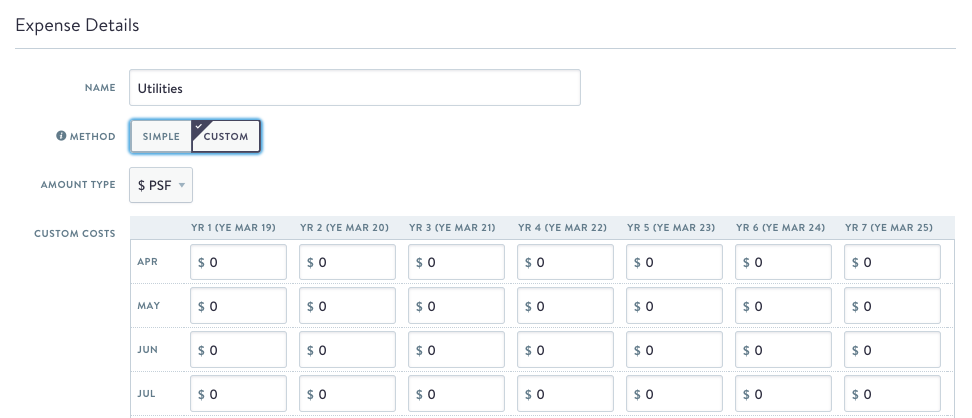
The Custom Cost option is the most granular method for inputting expenses. Costs increase by the Expense Inflation rate (or, if disabled, the General Inflation Rate). When you select the Custom Cost tabs, it will look like this:
4. Enter rent toll tenants
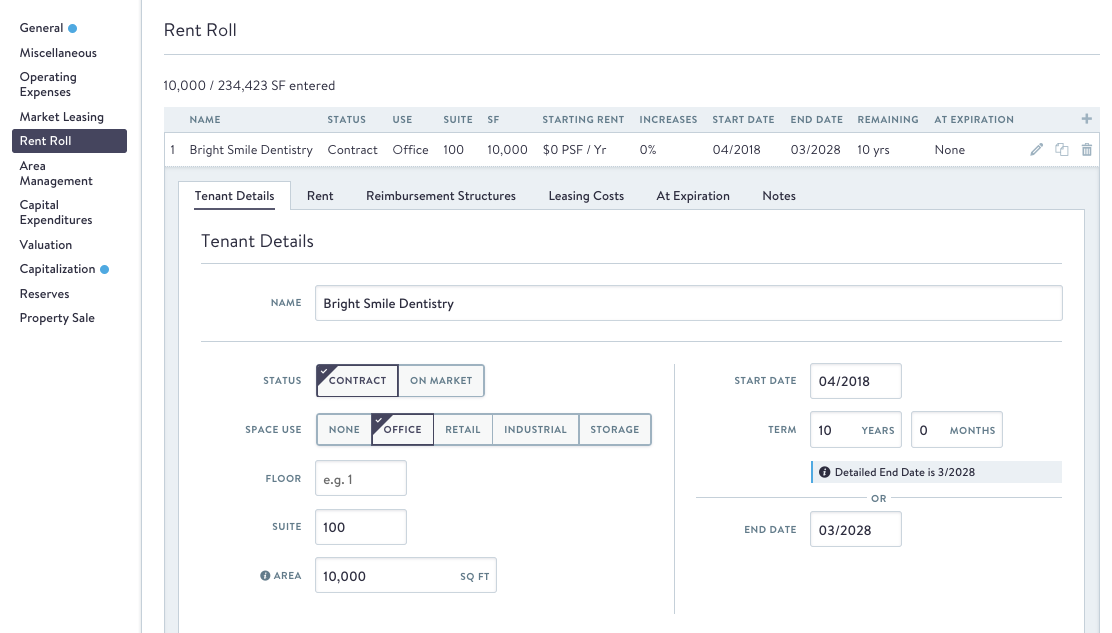
Next, we are going to input a couple tenants into our building. Navigate to the Rent Roll page in the Assumptions tab. Click (+ ADD ROW) to create a new tenant. Our first tenant, Bright Smile Dentistry, will occupy half of our building (10,000 SF) and have a 10 year lease term. For simplicity's sake, we will have the lease start date be the same as the analysis start date (04/2017) from our General Assumptions. The first section of input should look like this:
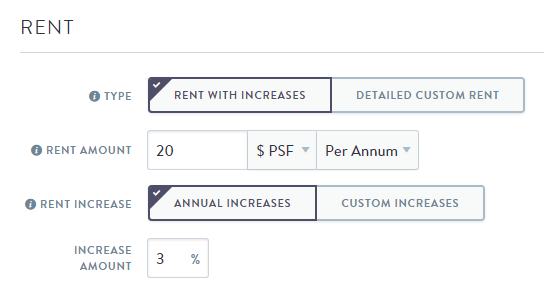
Next, we will enter the rent amount and increase rate for Bright Smile Dentistry. Bright Smile is paying $20 per square foot per year, and their rent increases by 3% every year:
This is a Gross lease, which means Bright Smile Dentistry is not reimbursing any property operating expenses. In the Reimbursement Structures section, click (+ ADD ROW), which will add a Gross reimbursement line. We will leave this as-is, but you can see that there are multiple reimbursement types and options that allow you to model many different lease reimbursement structures.
Finally, we will specify what happens to this tenant at expiration. In the At Expiration section, we will select NONE under Type, since Bright Smile Dentistry's lease expires after the end of our analysis period:

5. Copying a tenant
Our second tenant, Creative Productions, Inc., happens to have a lease that is nearly identical to Bright Smile Dentistry, except they are paying less rent. Let's copy Bright Smile's rent roll entry to use as a base for our second tenant:

Once you have copied the tenant, all you need to do is fill in the tenant name, and new rent amount. We'll enter "Creative Productions, Inc." as the Name and $15 for the Rent Amount. All other assumptions remain unchanged.
6. Acquisition
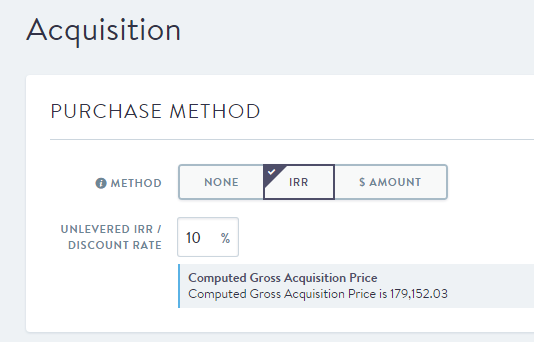
The last two items left to input are property acquisition and property sale assumptions. Let's start on the Acquisition page. We will use a Discount Rate to calculate our purchase price. Let's assume we want to make a 10% unlevered IRR on this deal. Select the IRR method and enter in 10%:
7. Property sale
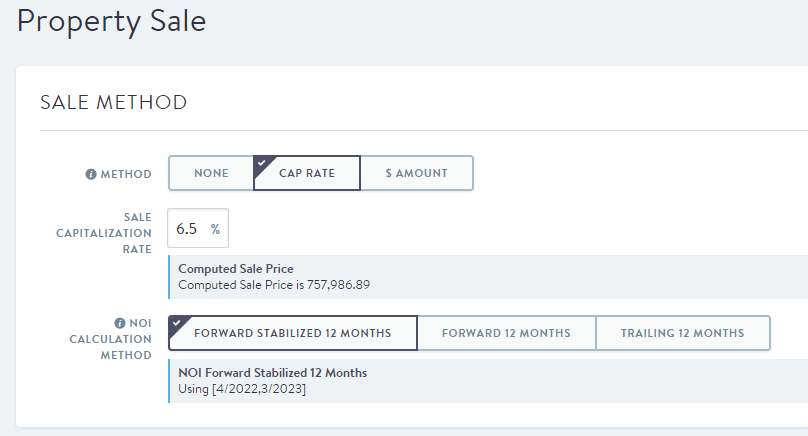
Finally, we will model a property sale at the end of our 5 year analysis period. Navigate to the Property Sale page, select the (CAP RATE) Method and enter 6.5% for the Sale Capitalization Rate:
8. View your dashboard and reports
Now that we have completed inputting all of our assumptions, we can view the property's dashboard and reports! First, let's take a look at the Dashboard:
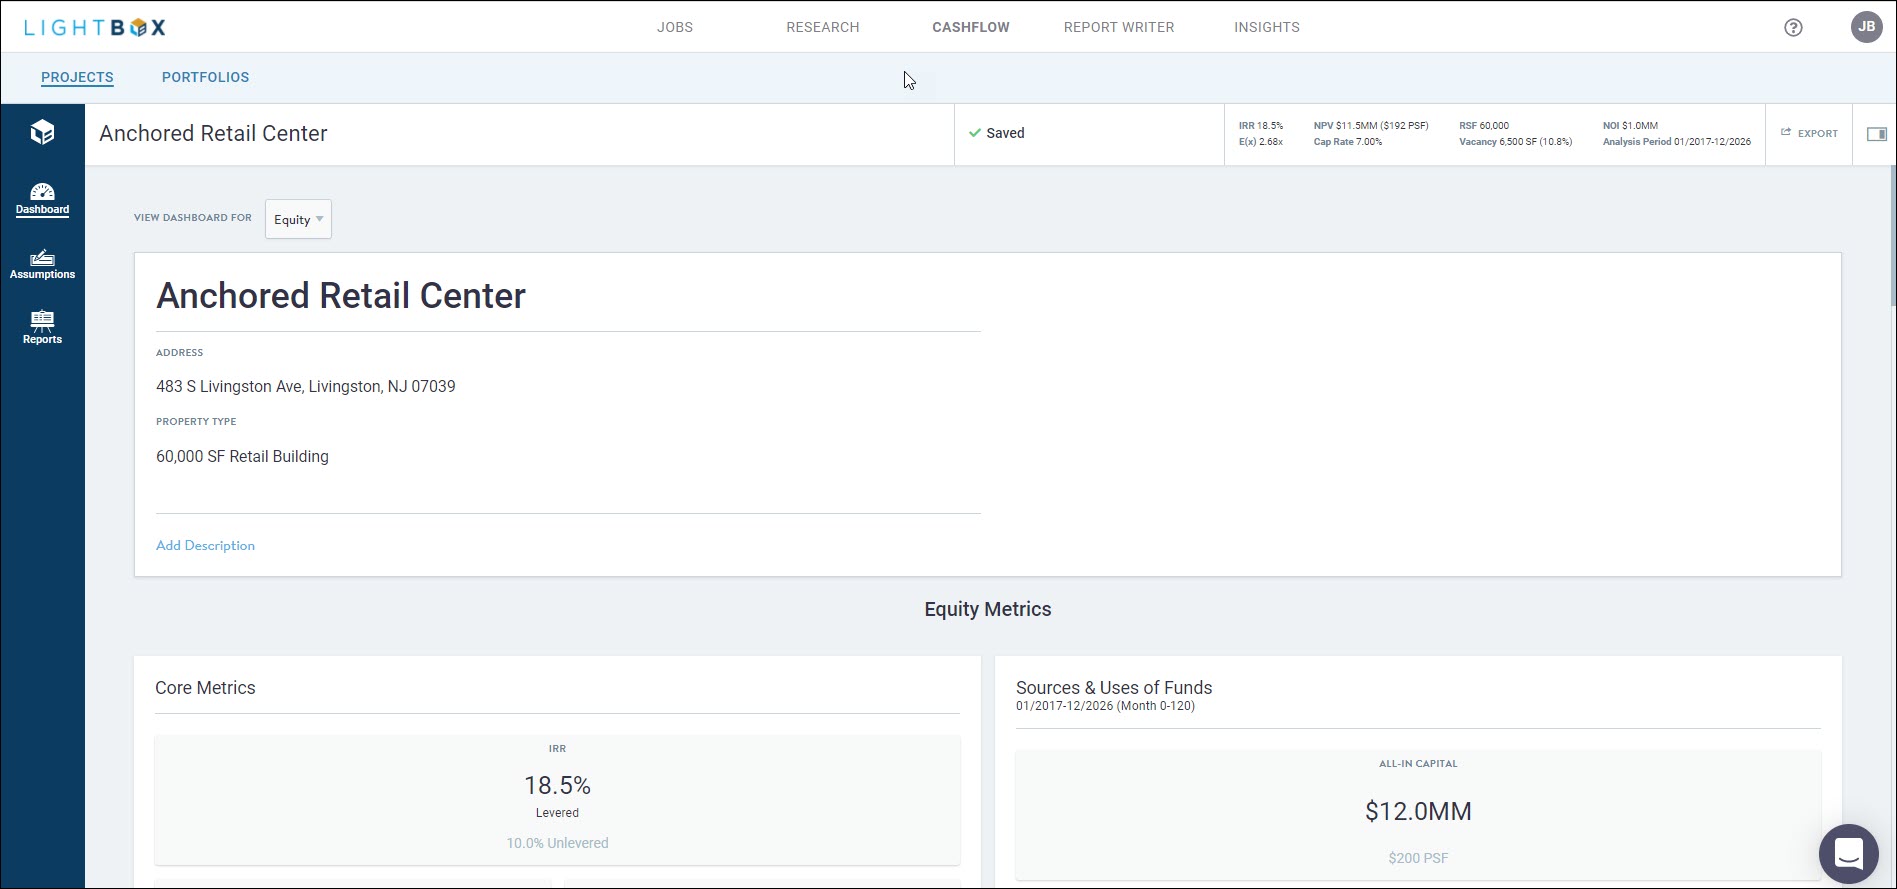
The property dashboard displays a map of your project, as well as other key performance metrics
The Reports tab contains an array of detailed reports including annual and monthly pro formas, and a sources and uses breakdown:

All reports can be exported to either Excel or PDF formats using these two buttons:

That wraps up the core workflow for this deal. There are plenty of other features that were not covered in this guide, you can read about many of them in the How to Use CashFlow section of our Help Desk.
.png)

.png)