- Print
- DarkLight
- PDF
View/Edit Project
- Print
- DarkLight
- PDF
Moving from left to right along the Project Summary toolbar, the View/Edit Project button is next.
This button opens the first page of the Service Request Form.
When the View/Edit Project page opens for the first time, a series of tips will explain the page control features found in the upper right-hand corner of the window.
- Snap to Left: This will snap the window to the left of the screen, taking up 100% of the height and 50% of the width.
- Snap to Top: This will snap the window to the top of the screen, taking up 50% of the height and 100% of the width.
- Snap to Bottom: This will snap the window to the bottom of the screen, taking up 50% of the height and 100% of the width.
- Snap to Right: This will snap the window to the right of the screen, taking up 100% of the height and 50% of the width.
- Open in New Tab: This will open the window in a new browser tab and close the window. Please note that any changes in the new tab will not be reflected on this page; you must refresh the page to get any changes.
- Minimize the window.
- Maximize the window.
- Close the window.
To prevent the tips from appearing in the future, fill in the Do not show this message again checkbox and then click Continue on the final popup window.
The information that appears on the View/Edit Project page is actually the Service Request Form submitted by the Account Officer. The sections on this page can be minimized by clicking on the blue header bars. Clicking on them again will maximize.
The Project Information section is not part of the Service Request Form submitted by the Account Officer. These are fields that are exposed based on a customer’s site settings and needs.
If any information has been entered or changed, click the Save button in the bottom left-hand corner of the page. The window can now be closed by clicking on the X in the upper right-hand corner of the screen.
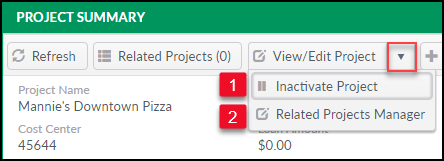
Click the down arrow on the right side of the View/Edit Project button to see additional options.
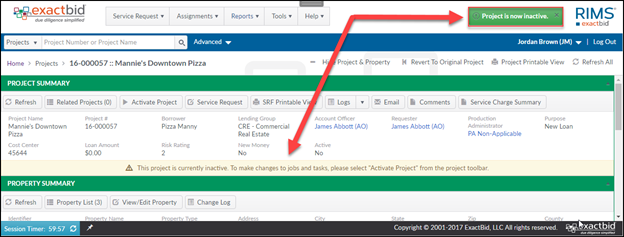
1. Inactivate Project: Click to inactivate the current Project. It will ask for confirmation. Click Yes and the Project will become inactive. A notification will briefly appear in the upper right-hand corner of the page, then disappear. A yellow banner stating that the Project is inactive will remain under the Project Summary section of the Project Console.When a project is Inactive, many fields on the page are locked and will not allow editing based on user permissions.
The View/Edit Project button text will also change to “Activate Project.” Click this button to activate the Project again. Note that not all institutions allow their Job Managers to deactivate or activate Projects. Note that when all Tasks on a Project are closed, the Project will automatically deactivate.
2. Related Projects Manager: Refer to the Related Projects Manager text above for more information about this functionality.
.png)
