- Print
- DarkLight
- PDF
Vendor Service Summary
- Print
- DarkLight
- PDF
The Vendor Service Summary provides Vendor information as well as external and internal Task data, if applicable.
Performing a Search
The Vendor Service Summary Report allows users to specify search parameters.
The first block of search filters relates to the date range.
By default, the Task Complete Date From fields will auto-populate with the beginning day and ending day of the previous month. [Or selected Date Range] allows users to search using predefined ranges, such as Last Week and Quarter to Date.
The next set of filters includes Vendors, Vendor Company, and Lending Groups.
Vendor Company is a text box; enter the name of a Vendor Company to search for Vendors that belong to that company. In the above example, Vendors belonging to the ExactBid Inc. Vendor Company will be returned.
Vendors and Lending Groups can be selected by clicking on the desired items in each list. To select more than one Vendor or Lending Group, hold down the Ctrl key while clicking. Click on the [All] button to include all Lending Groups or Account Officers; click [None] to include none (deselecting all that have been selected).
Click on the magnifying glass next to the Vendors or Lending Groups fields to open a new window.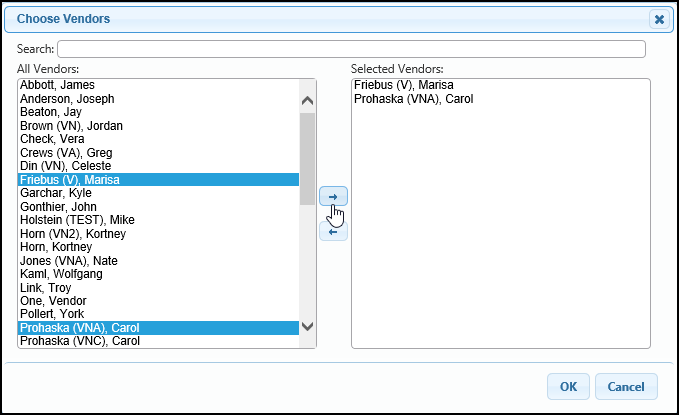
Enter a name in the Search box to find a Vendor. Or click on a desired Vendor in the All Vendors list and click the right-pointing arrow to add them to Selected Vendors list. Hold the Ctrl key to select more than one Vendor. To remove a Vendor, click on his/her name in the Selected Vendors list and then click the left-pointing arrow. Once all desired selections have been made, click OK.
The next block filters allow the user to search for a Vendor by their address.*
The final block of filters relates to Jobs and Tasks.
Job Managers, Job Types, Job Statuses, and Task Statuses operate like the Vendors and Lending Groups fields above. Task Types is a simple drop-down menu that allows the user to select Internal or External Tasks. Note the Inactive Projects checkbox; by default, this will be unchecked.
Starting with few filters is recommended, as results must match least one value from each field in which one or more selections were made. Example: If Brown(JM), Jordan and Crews (JM), Greg were selected in Job Managers and Construction was selected in Job Types, only Construction Jobs for which Brown(JM), Jordan or Crews (JM), Greg was the Job Manager will be returned in the results.
Click Select Columns to define which data fields will appear within the report.
A new window will open with all of the possible columns listed. Note that you may see some fields/columns your institution does not use.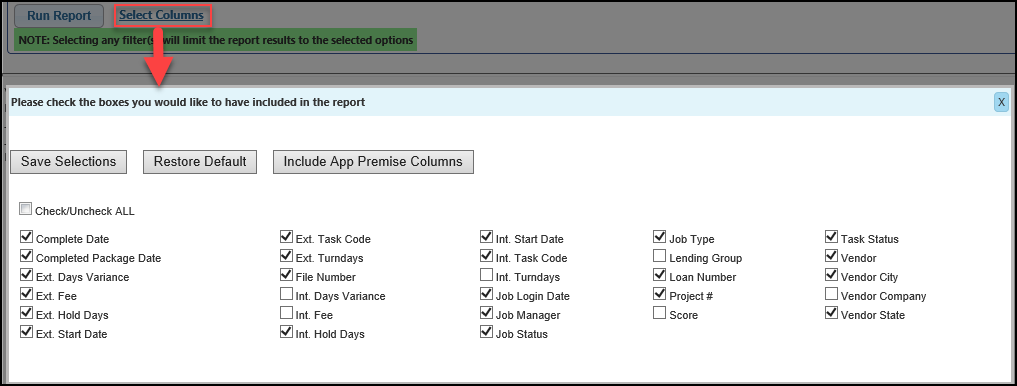
There are three buttons at the top of the screen.
1. Save Selections locks in the column selections and prepares them for use in a new generated report.
2. Restore Default will select only the options that are standard Vendor Service Summary Report options.
3. Include App Premise Columns selects all App Premise Columns.**
IMPORTANT: Saving Selections here will reset your saved layout to default settings, removing customized column order, formulas, filters, groupings, etc.
Viewing the Data
Click Run Report to generate a report using the Report Filters above, displaying only the column data designated using the Select Columns tool.
The results can be sorted in ascending/descending order by any column. Click on a column header to sort the data by that column.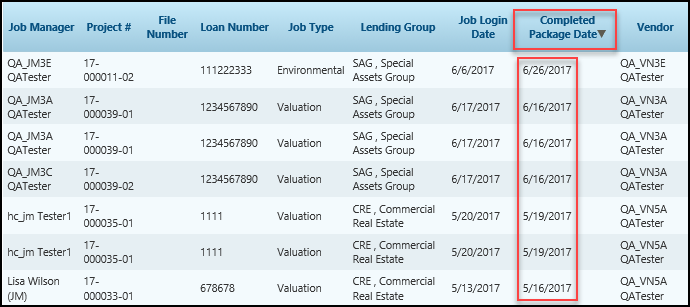
In the above example, the data is being sorted in descending order of the Completed Package Date column. Note the downward-pointing triangle.
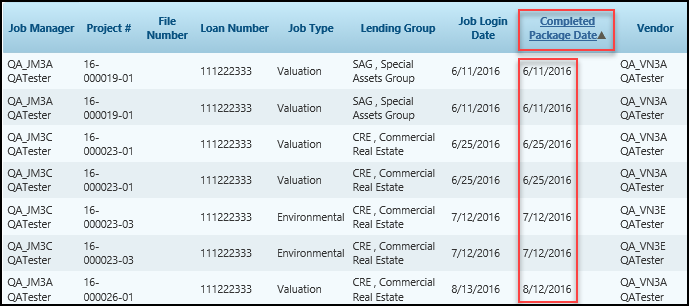 In the above example, the data is being sorted in ascending order of the Completed Package Date column. Note the upward-pointing triangle.
The bottom of the table includes summary data.
The summary data is broken into three types:
- Count - The number of items in the column above.
- Total - The total of the values in the column above. For example, the total External Fees.
- Average - The average of the values in the column above.
Exporting Data
Click on the Export buttons in the right-hand corner of the window to export a copy of the table.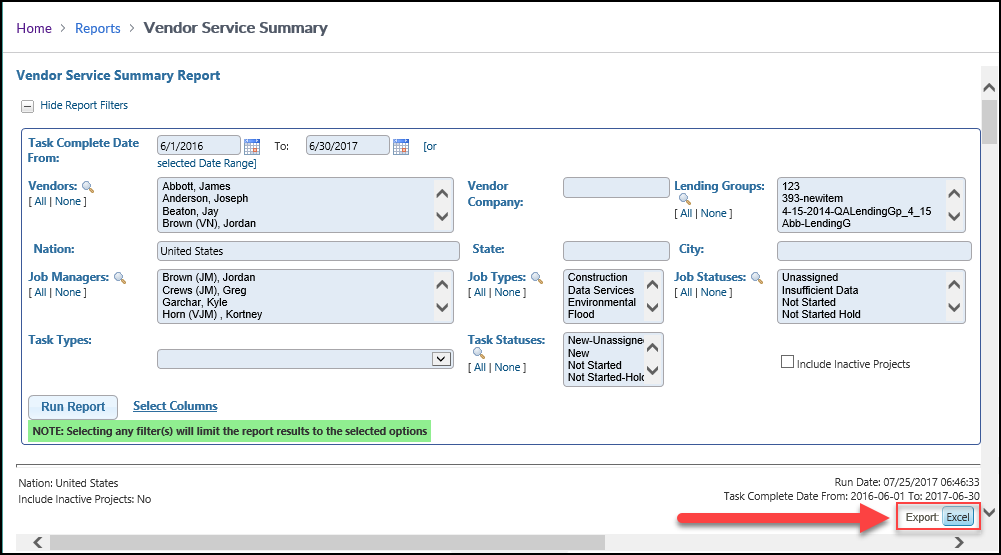
Exporting to Excel will maintain any sorting applied to the table. The summary data - Count, Total, and Average - will appear in the export file.
Notes
*The address functionality is currently bugged and will return errors when attempting to add a City or State. This bug will be addressed soon.
** The Include App Premise Columns button in the Select Columns tool is unnecessary, as there are no App Premise Columns in the Vendor Service Summary Report.
It will be removed in the future.
.png)
