- Print
- DarkLight
- PDF
Online Review Document
- Print
- DarkLight
- PDF
Purpose
The purpose of this documentation is to describe the Document Management tool for Online Review Documents. For a video on this topic, view RIMS Online Review Document.
Audience
Content Administrators
Introduction
The Online Review Document template tool allows Content Administrators to create and modify Review Document Templates used to generate Review Documents in RIMS.
The editing tool has been tested in Chrome and Edge with Internet Explorer enabled. It is recommended that the Document Template be created using Chrome for the best user experience. We will attempt to describe areas that operate differently between browsers in this document.
Initial Document Creation
The Review Document template tool can be accessed by navigating to the Settings button on the top menu, then clicking Document Management V2 under the System Maintenance & Configuration category.

The page will load with the Review Document Templates that have been created previously.

Once a Review Template exists, a Content Administrator will have the ability to delete a Review Document Template with the trash can icon or edit a document with the pencil icon.
The Content Administrator can control whether a Review Document Template is available to be used to generate a Review Document by checking the checkbox under the Active column.
Click Add Document Template in the bottom left corner of the Document Management page to create a new review document template.
In the Settings section, enter the template Name, Template Type, Job Type, Portfolio and Description.

Template Name: (Required field - 50-character maximum) The Template Name must be unique. If the Template Name is a duplicate, you will be presented with a message. You will be unable to save with the same document name.
Template Type: Review Document is the only valid Template Type for creating/modifying a Review Document. NOTE: This tool may be used for other document types in the future.
Job Type: Valid Job Types are APPR – Valuation, DS – Data Services, CST – Construction, and ENVI – Environmental. NOTE: Your site could have similar Job Type names that have been customized for your site.
Portfolio: Both is the only valid option for Review Document Templates.
Description: (Required - 100-character maximum) Enter a description for the Review Document Template.
In the Defaults section, select Currency Format, Date Format and Draft Name (optional).

Currency Format variables:
$1,234 (currency symbol and thousands separator)
$1234 (currency symbol and no thousands separator)
$1234.00 (currency symbol and two decimal points)
$1,234.00 (currency symbol, thousands separator, and two decimal points)
1234 (no currency symbol, thousands separator, or decimal points)
1,234 (thousands separator)
1234.00 (two decimal points)
1,234.00 (thousands separator and two decimal points)
Date Format variables:
M/d/yy
M-d-yy
MM/dd/yy
MM-dd-yy
M/d/yyyy
M-d-yyyy
MM/dd/yyyy
MM-dd-yyyy
Yy/M/d
YY-M-d
Yy/MM/dd
yy-MM-dd
yyyy/M/d
yyyy-M-d
yyyy/MM/dd
yyyy-MM-dd
dd-MMM-yy
MMM.d, yy
MMM.dd, yy
MMM.d, yyyy
MMM.dd, yyyy
MMMM d, yy
MMMM dd, yy
MMMM d, yyyy
MMMM dd, yyyy
M/d/yyyy h:mm:ss tt

Draft Name: (Optional – 150 characters maximum) When creating a Review Document from the Review Task, this will be the initial text that will appear when you save the document. You cannot include a smart field in the draft name.

Click Save Template when all of the above fields have been entered.
Note
If you change the name of a template and click Save, it will overwrite the original template name.
Use Save as New Template and give it a new template Name before making edits to a good Review Document Template.
Note
If you enable Auto Save, be careful when making changes to your template so that you do not accidentally overwrite a good Review Document Template.
If desired, check Enable Auto Save. The document will automatically be saved every 5 minutes.

Cancel button will cancel any changes that you started that were not saved or automatically saved.
Toolbar Elements

Page Settings

Click the Page Settings button.

Size Type variables:
Letter
Legal
Ledger
A0
A1
A2
A3
A4
A5
Layout variables:
Portrait
Landscape
Margin Settings variables:
Top
Bottom
Left
Right
Units variables:
in = inch
px = pixel
cm = centimeter
mm = millimeter
Header Settings
Header Display Mode variables:
All: Selected when the same header should appear on all pages of the document.
First page: Selected when there is a first-page header which is not part of the body of the first page of the document.
Noninitial: Selected when there is the same page heading on all pages except the first page of the document.
Pagination Settings
Template:
Page # of ##: Default page indicator in a document. ‘Page’ or ‘of ##’ can be removed as desired.
Default Font Settings
Default Font variables:
Arial
Calibri
Comic Sans MS
Courier New
Georgia
Lucida Sans Unicode
Tahoma
Times New Roman
Trebuchet MS
Verdana
Default Font Size variables: 8 pixels thru 24 pixels.
Font sizes are not the same as in Microsoft Word. Here is a chart that converts points to pixels. It is an approximation which will depend on font, browser and OS, but it is a good starting point.

Toolbar Elements, Cont.
Preview: Previews the document in a new tab or window. The user can see the document without any formatting for margins and page breaks. | |
Print: Opens the modal for Print options on your computer. The user can print the document for proofreading or storing the template without smart field information populated. The document will page as needed or with hard-coded page breaks. | |
Templates: Sample content templates to use within the document. |

Property Address Full- For circumstances where property address can be used formatted in two rows, you can use the property address template for convenience.
Valuation Templates – There are twelve valuation templates that have been pre-programmed for your convenience. The templates are all formatted to a 75% table width. If you want to expand to 100% width, simply place your cursor in the valuation template table and select Table Properties to change the width from 75% to 100%.
You can create your own valuation table by adding a table and selecting two rows and the designated number of columns you want in your table. The first row of the table will be your column headings. Highlight all the columns in the second row of the table.
In the toolbar, select Setup Repeater and select Valuation Data to make the second row of your table the valuation data from the appraisal summary/review page.

Valuation Smart Fields list displays when clicking in the blue repeater row. User can search for a valuation smart field or scroll through the list. In Edge with IE enabled, the search field does not completely expand. You can hover over field to see the full context of any smart field.
Valuation Smart Fields Search

You can remove the valuation repeater from the row in your table by highlighting the entire blue row and clicking Remove Repeater.
If you only want the Reviewer’s Approved Value to display for the valuation repeater row, right-click in the repeater row and select Show Reviewer Approved Only.

The valuation repeater row will now display in green, rather than blue.

To remove the Reviewer Approved Only from the valuation repeater row, right-click in the repeater row and select Show All Valuation Data.

The valuation repeater row will return to the blue color.

Cut (Ctrl+X): Cuts the currently selected text in the template. For best results, it is recommended to use Ctrl+X rather than the icon. | |
Copy (Ctrl+C): Copies the currently selected text in the template. For best results, it is recommended to use Ctrl+C rather than the icon. | |
Paste (Ctrl+V): Pastes text that has been cut or copied from within the template. For best results, it is recommended to use Ctrl+V rather than the icon. | |
Paste as plain text (Ctrl+Shift+V): Pastes text without formatting. | |
Undo (Ctrl+Z): Undoes the last change made to the document. | |
Redo (Ctrl+Y): Reverses the action of the last Undo. |
Find and Replace
Since Find and Replace have similar functions, they are contained on two tabs in the same dialog box. They both have these fields:
Find what: A text field where you enter the word or phrase that you want to find.
Match case: Check this option to limit the search operation to words whose case matches the spelling (uppercase and lowercase letters) entered in the Find What field. This means that the search becomes case-sensitive. For example, when Match case is checked and the search term is: "option", you find all instances of "option" with this exact spelling but not when the word is spelled "Option" or "OPTION".
Match whole word: Check this option to find entire words only. For example, when Match whole word is selected and the search term is "condition", you find all instances of "condition", but not the words "conditional" or "conditions".
Match cyclic: Check this option to continue the search from the beginning of the document after the end of the document is reached.
The Find tab also contains the following field:
Find: Starts the search.
The Replace tab also contains the following fields:
Replace with: A text field where you enter the word or phrase that replaces the found text or phrase.
Replace: Replaces the text in the Find What field with the word or phrase from the Replace With field.
Replace All: Replaces all instances of the text in the Find What field with the word or phrase in the Replace With field.
Find


Replace


Select All
Selects all text and images within the template. To deselect, click anywhere on the page.

Checkboxes & Radio Buttons
Checkboxes and radio buttons are elements for making selections. Checkboxes allow the user to choose items from a fixed number of alternatives, while radio buttons allow the user to choose exactly one item from a list of several predefined alternatives.

Checkbox: Inserts a checkbox into the document.
Checkboxes are used to choose as many options as desired at a time from a limited number of options.
You can select none, one, or as many options as desired in a group of checkboxes.
There may also be only one checkbox.

Modal when right-clicking on the checkbox in the document.
Clicking ‘OK’ in the Checkbox Properties will default the checkbox to enabled by default.

Radio Button: Inserts a radio button into the document.
.png)
Radio buttons are used to choose one option at a time from a limited number of options.
Arrange radio buttons in groups. Put at least two radio buttons in one group.
One radio button in a group must always be selected.
If the user should have the chance to choose no item from the offered options, create a separate radio button with a "No selection" label or similar text that turns off the other contents-related options.
Modal when right-clicking on the radio button in the document.

Clicking ‘OK’ in the Radio Button Properties will enable the radio button by default.

Radio Set: (Used for radio buttons in a row or rows.) When a table has multiple rows which contain column selections for radio buttons that need to be mutually exclusive, user can highlight all the cells which need radio buttons and click Radio Set. Only one radio button selection per row in the radio button grouping will be allowed. Once one of the radio buttons has been selected in the row, it can only be unselected by selecting another radio button.

Group Radio: (Used for radio buttons in a single column.) When there are multiple rows in a table with a single column of radio buttons, select Group Radio to allow only one radio button to be selected from the radio buttons in the column.

Text Field
The Text field is one of the most common data entry fields used to capture text type data. Although the Text field will display with a border for entry, the text will not have a border when printing the document.

Modal when right-clicking on the text field in the document.

The Value field is not relevant for this type of document.

Selection Field: Selection fields allow the user to select from a group of choices in your document.

Type each entry to be included in the drop-down list and click Add. Highlight the default value to appear in the document and click Set as selected value. The default value will populate in the Value field of the Selection Field Properties modal. When creating a drop-down list for your document, it is recommended not to add a space at the end of the text. Your document should include the space that would appear after the Selection Field text.


Text Formatting

Bold (Ctrl + B) | |
Italic (Ctrl+I) | |
Underline (Ctrl+U) | |
Strikethrough | |
Subscript | |
Superscript | |
Copy Formatting (Ctrl+Shift+C) | |
Remove Format | |
Insert/Remove Numbered List | |
Insert/Remove Bulleted List | |
Decrease Indent | |
Increase Indent | |
Block Quote: Block Quote is used when a large quote is present on the page, and typically a block quotation stands alone, separate from surrounding text. The text will be set off from the main text by indenting in a block format. | |
Align Left | |
Center | |
Align Right | |
Justify |
Image


You can create an image by using your tool to snap a screenshot.
An Image can be inserted into a document in several ways:
Drag and drop the image into the document template.
Copy and paste the image into the document template.
Click Image icon and type the URL of an image.
Click Image icon and Insert Logo from RIMS log in page.
Once you insert an image into your document, you can highlight the image to resize in different ways:
Drag from the corner to resize.
Click on the Image icon or right-click on the image and select Image Properties and enter the Width or Height setting and click OK.
Table
Opens a secondary menu which allows the user to select a number of rows and columns and then insert a table of that size.

A table will automatically expand to 100% width and size the columns according to the text entered. The user sets the percentage associated with a column by highlighting the column and selecting cell properties. The width of the cells in a column should be defined. If the cell width is not defined, the cell width will automatically float to fit the text which is not desirable.
Example of the Table Properties modal

Rows
Columns
Headers
None
First Row
First Column
Both
Border Size (‘0’ for no border)
Alignment
Left
Center
Right
Caption
Width (include %)
Height (include %)
Cell Spacing
Cell Padding
Border Collapse
Collapse
Separate
Example of the Cell Properties modal


Insert Cell Before
Insert Cell After
Delete Cells
Merge Cells
Merge Right
Merge Down
Split Cell Horizontally
Split Cell Vertically
Cell Properties
Width box
Pixels
Percent
Height
Pixels
Percent
Word Wrap
Horizontal Alignment
Left
Center
Right
Justify
Vertical Alignment
Top
Middle
Bottom
Baseline
Cell Type
Data
Header
Rows Span
Columns Span
Background Color
Border Top
Border Bottom
Border Left
Border Right
Cell borders are associated with a table which contains at least two cells. Null entry in border top, bottom, left and right indicates that there is a border. Entering a ‘0’ removes the border. To remove a border between cells, user needs to set both the top and bottom border fields or the left and right border fields to ‘0’. The outline of a table is not a cell border but rather a table border.
Look at your page and decide how many columns you will need. Remember to consider if you need a blank column to create spacing between columns with data.
If you have rows with a different number of columns, each row will be a table with a different number of columns.
After determining the number of columns in a row, set the width of each column using Cell Properties. The total width percentage of each column should equal 100%.
Even if you don’t need a border, it might be easier to create the table with a border so that you can see the column borders more clearly. You can easily eliminate table borders by setting Border Size to ‘0’.
Insert Horizontal Line: Inserts a horizontal line at the current location of the cursor within the template. | |
Insert Pagination: Pagination Settings are controlled from the Page Settings area. The default Template value is ‘Page # of ##’. The Pagination icon will insert the page value where indicated in the Header or Footer of the document. | |
Insert Special Character: Opens a modal that allows the user to insert a special character from the special character modal. 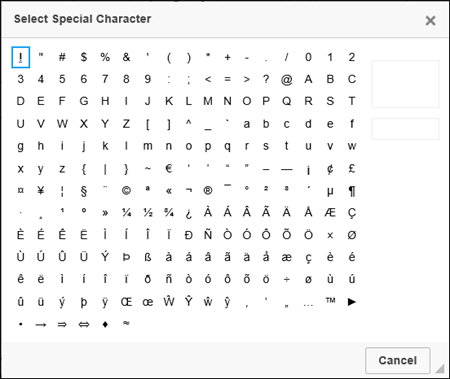 | |
Insert Page Break for Printing: Inserts a page break at the current location of the cursor within the template. |
Paragraph Format
Paragraph Format variables:
Normal: Pressing Enter will insert a full line space between paragraphs.
Heading 1: Heading 1 through Heading 6 is block-level text formatting. The formats work on block level which means that the entire block of text will be affected by the selection.
Heading 2
Heading 3
Heading 4
Heading 5
Heading 6
Formatted: To be removed as option in future release.
Address: Selecting ADDRESS as paragraph option will italicize the entire text of a paragraph.
Normal (DIV): Pressing Enter will not insert a line between paragraphs.

Font Name variables:
Arial
Calibri
Comic Sans MS
Courier New
Georgia
Lucida Sans Unicode
Tahoma
Times New Roman
Trebuchet MS
Verdana

Font Size

Text Color: The color of the text or characters in the document.


Background Color: The color of the area behind the text.


Show Blocks: Toggle On/Off ability to visualize all block-level elements by surrounding them with an outline and displaying their element name at the top-left. | |
Unlock/Lock Section: By default all elements in the template are locked. A section or cell can be unlocked. NOTE: An unlocked cell or section should not contain a smart field or valuation template which contains smart fields. | |
See documentation about the Repeater above.  | |
Maximize: Displays the template in full-screen mode. This will hide everything but the template itself and the template toolbar. | |
Add Smart Field Smart Field Search: User can begin typing in the Search area to filter through the search fields. Hovering on a Smart Field will display the full Smart Field name. 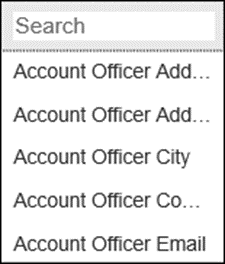 | |
Modal when right-clicking on the Smart Field in the document. 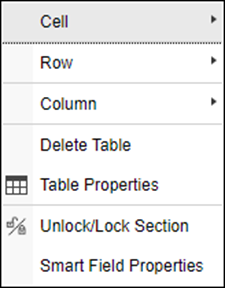 | |
Smart Fields are Read Only by design. To unlock a Smart Field, right-click within the Smart Field, select Smart Field Properties, uncheck Read Only and Click ‘OK’. 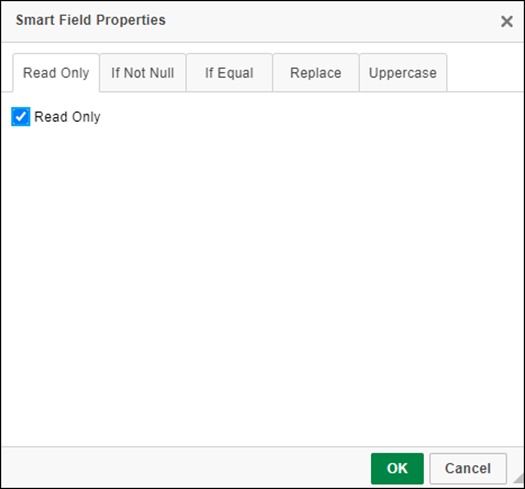 | |
Other Options for Smart Field Properties | |
If Not Null 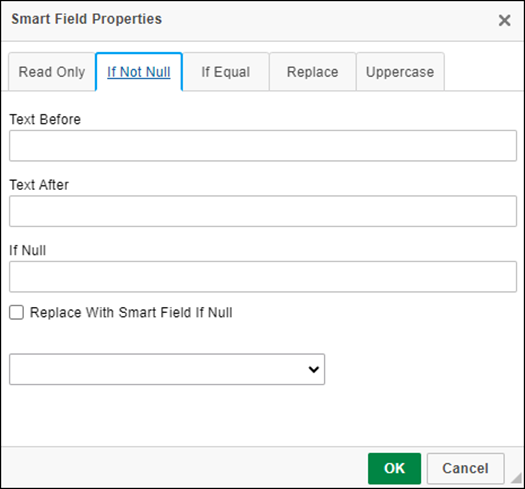 | |
If Equal 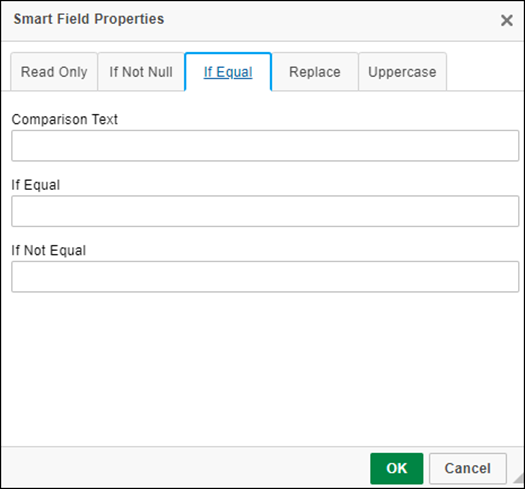 | |
Replace 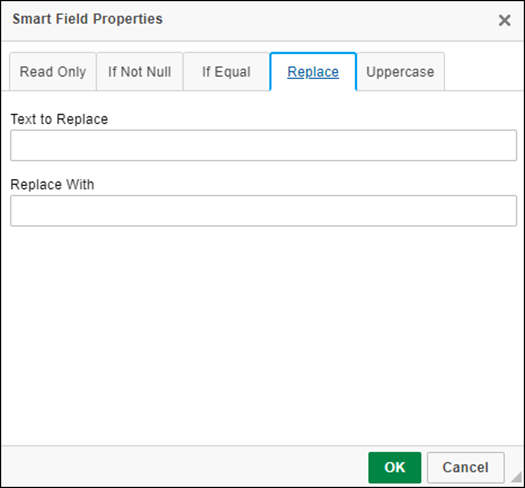 | |
Uppercase 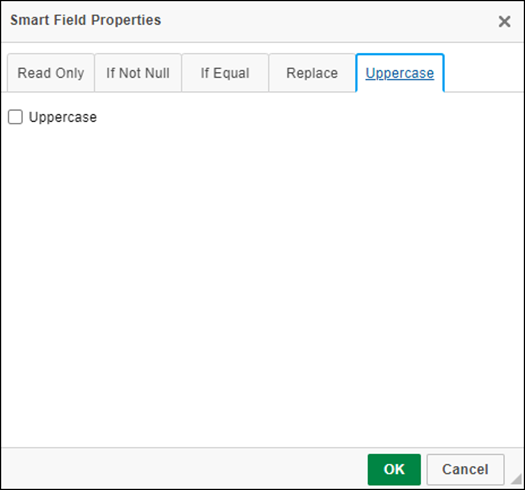 |
Body, Header, Noninitial Header & Footer

The icon will be greyed out when user’s cursor is positioned on that section of the document.
Header Icon: Used when the same header will appear on all pages of the document. | |
Noninitial Header Icon: Used when a document contains a heading on pages other than the first page. | |
Body Icon: Used when creating the body of the document. The first-page header is typically part of the first-page body of the document. | |
Footer Icon: Used when creating the footer section of the document. |
Items to Consider When Building A Review Document Template
Enter will insert a line between paragraphs.
Shift+Enter will not insert lines between paragraphs. For example, this could be necessary when creating headers and footers.
If a formatted table (without any text) could be used multiple times in a document, user can copy (Ctrl+C) and paste (Ctrl+V) the table in other areas in a document.
A single word cannot be copied from a cell and pasted into another cell. The editor tool will highlight the entire cell rather than the single word. A user can copy (Ctrl+C) multiple words from a single table cell and paste (Ctrl+V) into another single table cell.
When a table contains a different number of columns in a row, it is best to create the rows as different tables. The tables will link together so they will not appear as separate tables.
Unless default text is entered in an unlocked section, text is locked when creating the Review Document. The reviewer may need unlocked sections between paragraphs or tables so that the user can insert a page break. The Review Document is generated as a .pdf document so no editing will be allowed by the reviewer if text is read only or locked.
Generating a Review Document
The Review Document Template allows user types with permission to create and modify Review Documents used by the Online Review Document Template tool.
To access the Review Document Template on a review Task, click Review Documents V2 to open the Online Review Document Templates for the associated Job Type. Valuation Job type will also see a button on the appraisal summary/review page for View Document V2.
Construction Job Type on Task Review Documents V2:

Environmental Job Type on Task Review Documents V2:

Valuation Job Type on Task Review Documents V2:

Valuation Job Type on Appraisal Summary/Review View Document V2:

The Review Documents page will open in a new tab.
The list of available templates will be displayed.
Click the name of the appropriate template to open the review document.

The review document will open with the smart fields populated.

Other than the header area, the other information was built using separate tables.
Smart fields appearing in yellow are locked from editing.
Smart fields appearing in green are unlocked and can be edited.

Valuation scenarios will be locked from editing unless they were set to be unlocked in the template.

The rows with the radio buttons are built in a table.
Unlocked sections are indicated by an unlock icon.

Drop-down lists are indicated with a drop-down arrow.

The signatory and certification information can be built within a table.

The footer information was built in two tables to align the text as needed.

Header and footer information will appear on the review document. They will not appear in the appropriate pages until the document is generated as a .pdf.


Click in an unlocked section to display toolbar. User can add image(s) to unlocked sections.

Before generating a draft document, clicking Cancel will remove any changes that have been made prior to the last save.
Refresh Data will refresh smart field information.
When user has completed making all their changes, they will click Create to generate a draft document.

User will enter or complete the draft document name. Optionally, the user can add a Description.

Clicking Create will save a draft document to the Drafts category of the Review Documents tab.
Draft will appear after the document name. An auto-generated Version number will appear. The Modified By information indicates logged in username, date and timestamp.

User can continue to make changes to the draft document.
Before publishing the document, user should select Print button to have the document generate as a .pdf. The document should be reviewed to see if any changes are needed.

When user is satisfied with their review document, they can click Publish. The document will move to the Published section with the original name that you used when creating the draft document and show Complete after the document name.

If the published document needs to be amended or deleted, user clicks the Amend button.

The published document will move back to Drafts category and show as Amend.

The user will now have all the options associated with the Draft document.
Any documents that do not need to go to the Published category, can be deleted from the Drafts category or left there. This is up to the customer’s workflow process that they establish.


The final .pdf review document can be added to the Review Task attachments by selecting the file from Downloads and selecting the Document Type.
.png)
