- Print
- DarkLight
- PDF
Creating an RFP Template
- Print
- DarkLight
- PDF
To create a new RFP Template, click on Add Record..png)
The Add Record screen opens.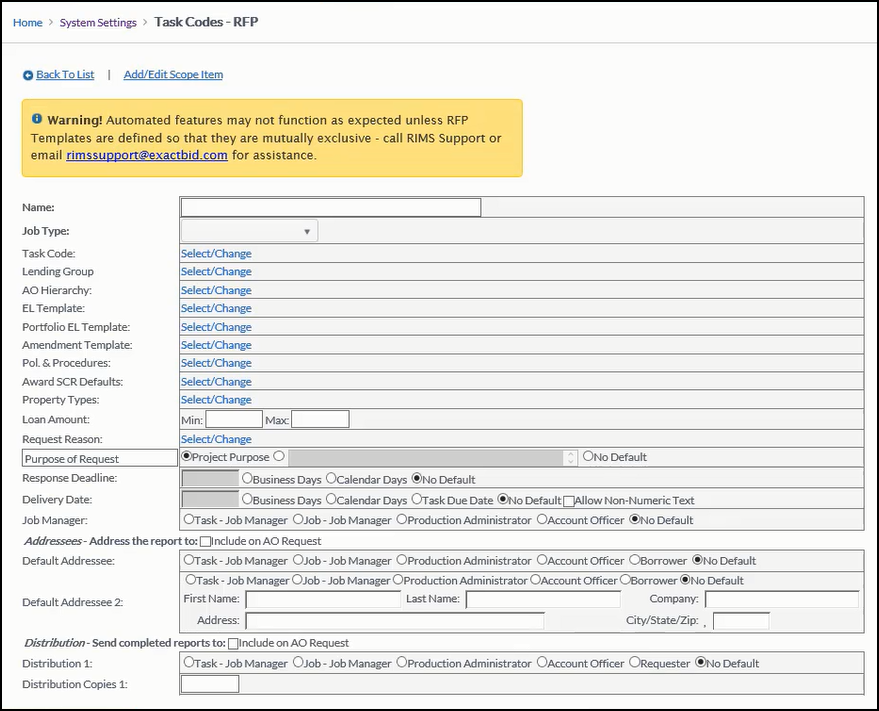
Give the Template a Name and choose a Job Type. Only one Job Type can be selected, as the Job Type will affect what kind of Templates and Vendors are available, etc. The selection made here will also determine what Task Codes are available for selection, so it's important to select Job Type first.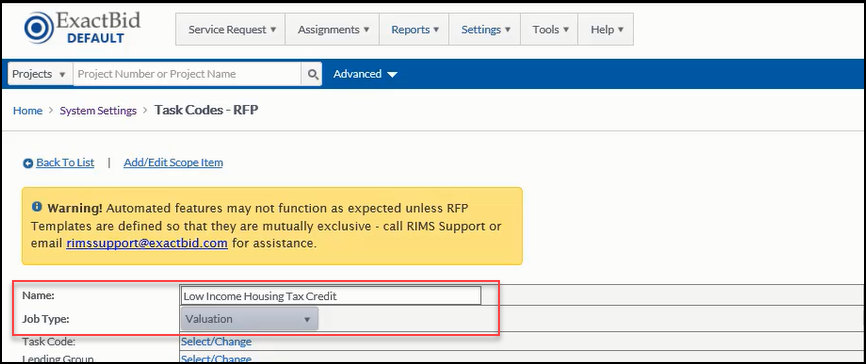
The rest of the fields on this screen fall into two categories:
- Filters: Filters determine when the Template is available for use.
- Pre-population: These determine what data will get populated on the RFP.
Filters
The fields highlighted below are all Filters.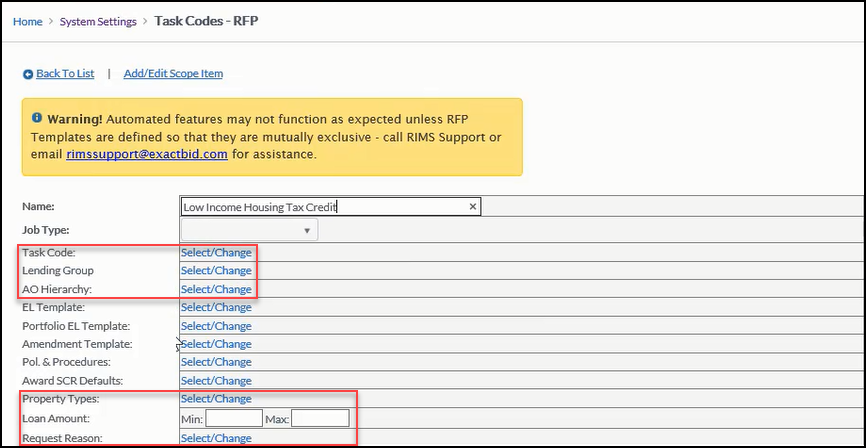
Filter fields include:
The Filters are AND statements; in order for the RFP Template to be available, the Job must meet all of the Filter requirements. So the more Filters are defined, the more narrowly defined the Template is.
Pre-population Fields
The fields highlighted below all prepopulate information in the RFP.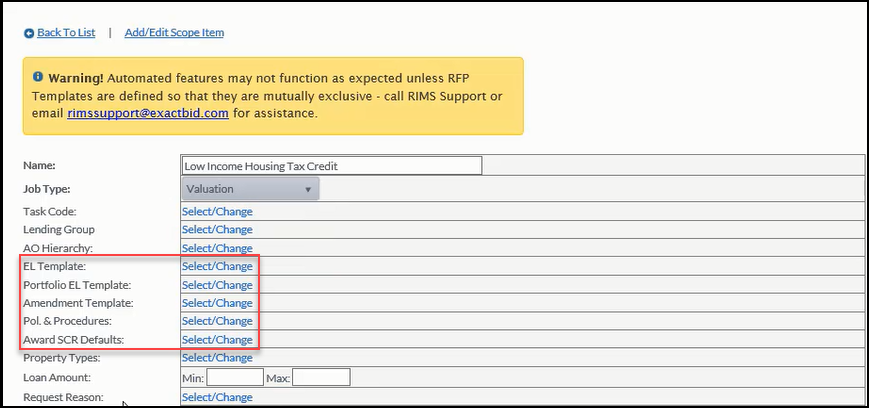
Additionally, everything from Purpose of Request down determines what information is prepopulated.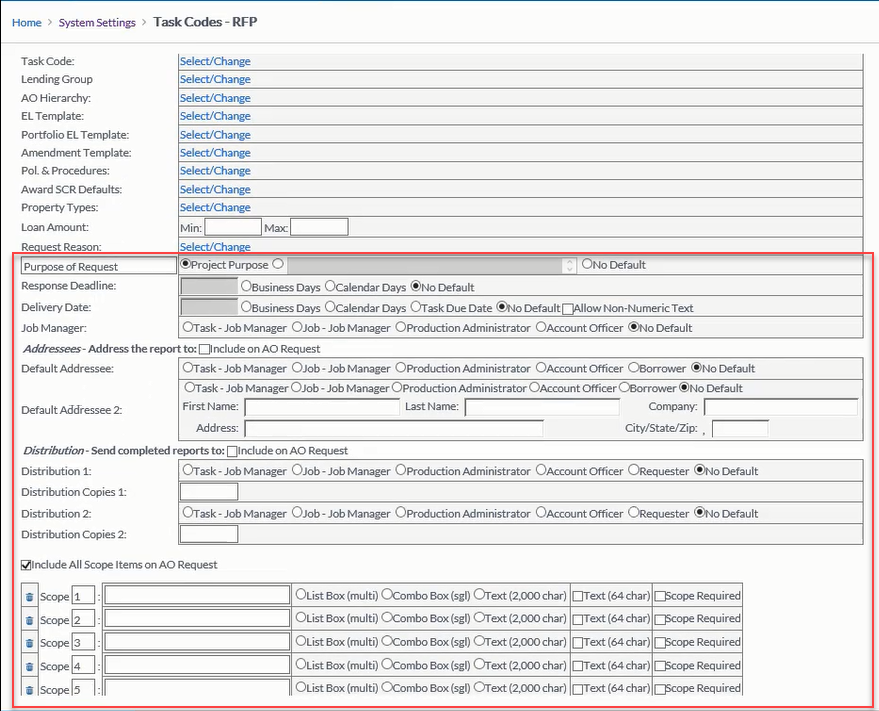
The fields that determine what information is prepopulated are:
- EL Template
- Portfolio EL Template
- Amendment Templates
- Policy & Procedures
- Award SCR (Specific Contractual Requirements) Defaults
- Purpose of Request
- Response Deadline
- Delivery Date
- Job Manager
- Addresses
- Distribution
- Scope Items
- Report Types
- Report Format
- Valuation Scenarios
- RFP Comments
- Award Comments
Creating an RFP Template
The following instructions walk through the steps of creating an example RFP Template for the Low Income Housing Tax Credit, which can be defined narrowly, by working top to bottom through all of the fields.
Task Code
Click Select/Change next to Task Code (Filter).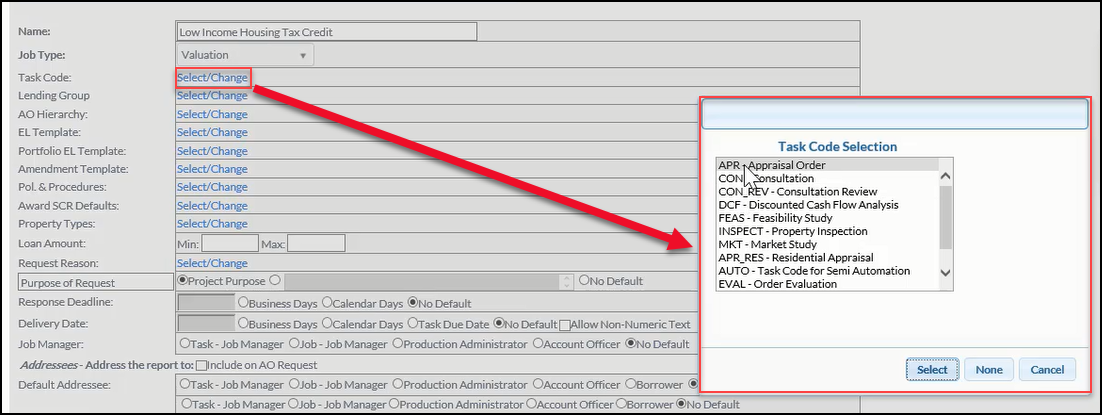
Multiple items can be selected by holding down Ctrl while clicking.
Lending Group
Click Select/Change next to Lending Group (Filter).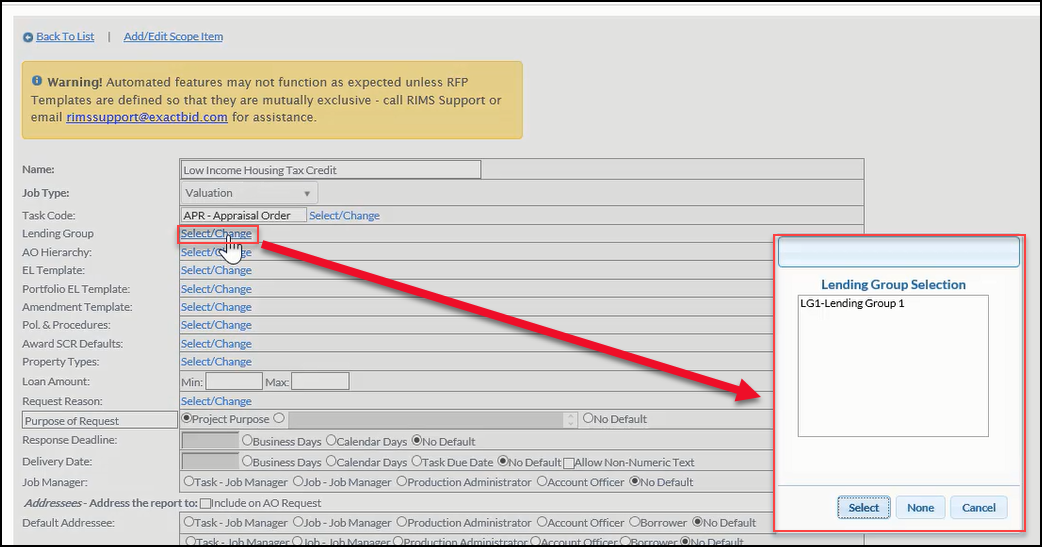
The Lending Group is a Filter. For example, if the institution has a Lending Group that specifically works with low income tax credits, that Lending Group could be selected and the Template would only appear for that LG.
AO Hierarchy
Click Select/Change next to AO Hierarchy (Filter).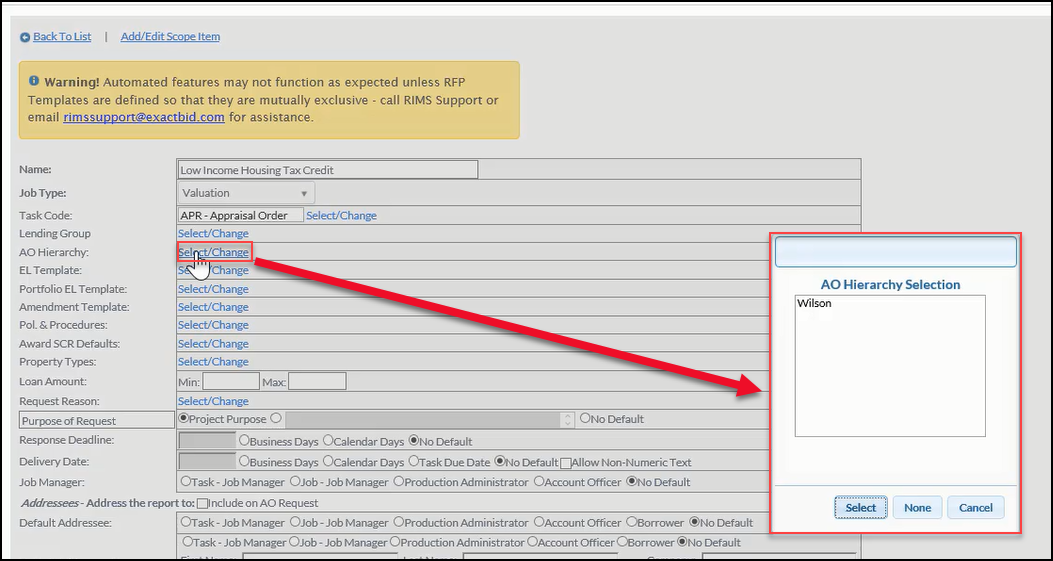
There's a field in the Account Officer's User Profile called Hierarchy Code. If there's anything in that field on the User Profile, it's going to be available for selection here. If the AO Hierarchy is selected, the RFP Template will only be available when that specific AO with that specific Hierarchy is associated with it. This feature is not used often.
EL Template
Click Select/Change next to EL Template. 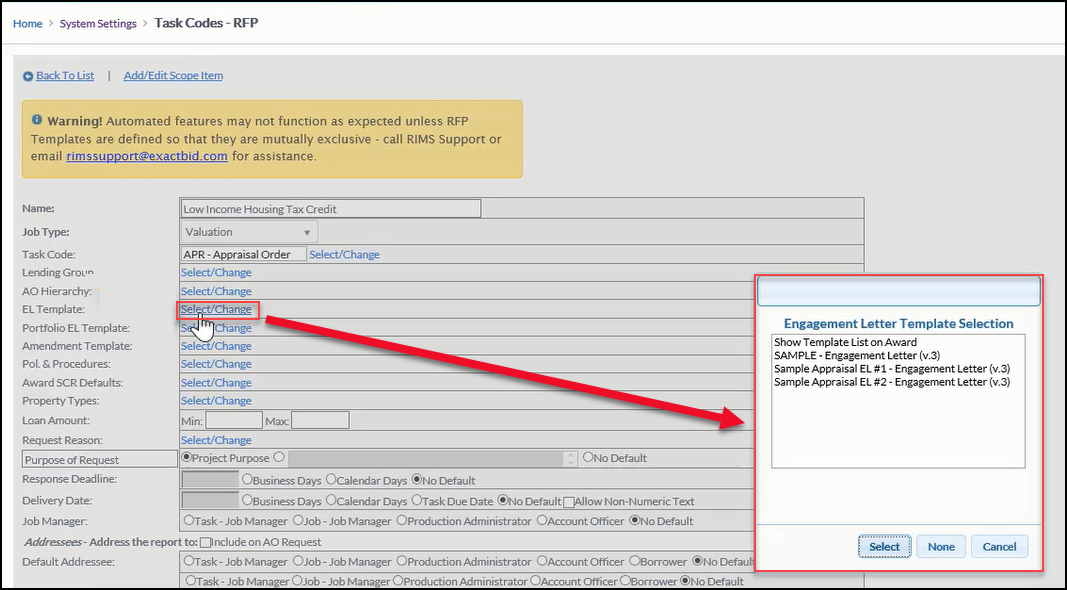
A list of all the Engagement Letters appropriate for the Task Code selected (Valuation, in this example) will appear in a pop-up window. One can be selected here, and then that EL will appear by default for the Job Manager. To allow the Job Manager to select the Engagement Letter, click Show Template List on Award; the Job Manager will be presented with a list of the relevant EL Templates to choose from.
Portfolio EL Template
Click Select/Change next to Portfolio EL Template.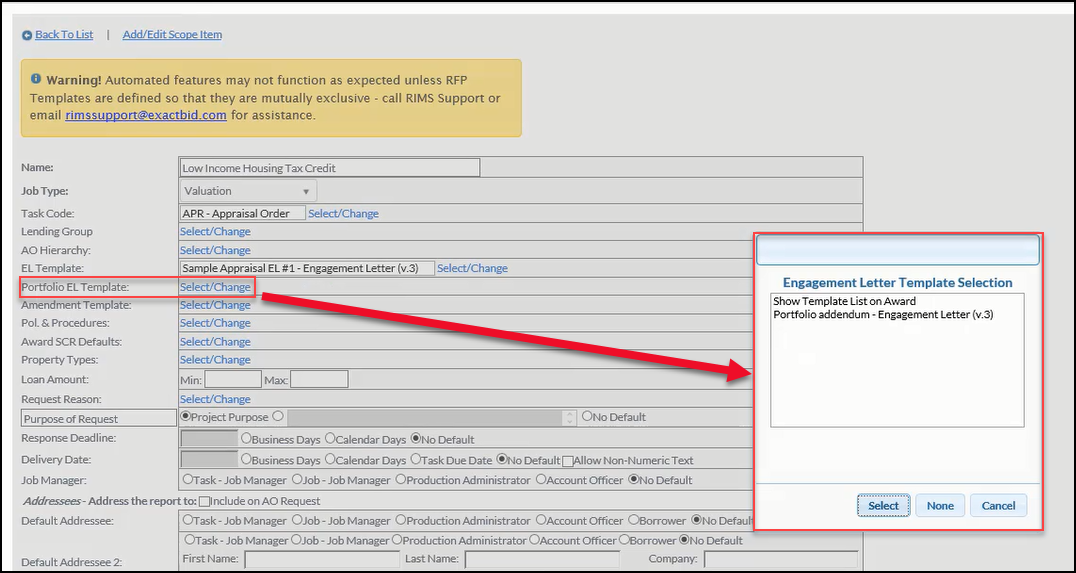
Like the EL Template, you will be able to either select a specific Portfolio Template or present the JM with a list of all the Portfolio EL Templates.
Amendment Template
Click Select/Change next to Amendment Template..png)
Select the Amendment Document that gets used in the event there's an Amendment.
Policy and Procedure/Specific Contractual Requirements
The Policy and Procedure and Specific Contractual Requirements items will be covered in more detail in other documentation. These items have prerequisites that are beyond the scope of this documentation.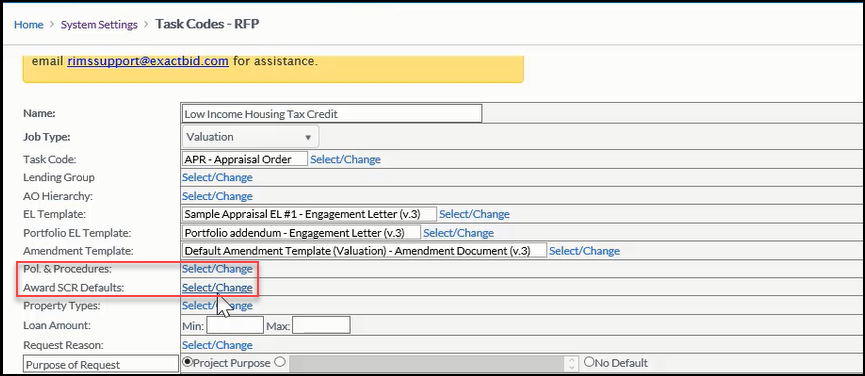
Property Type
Click Select/Change next to Property Type (Filter).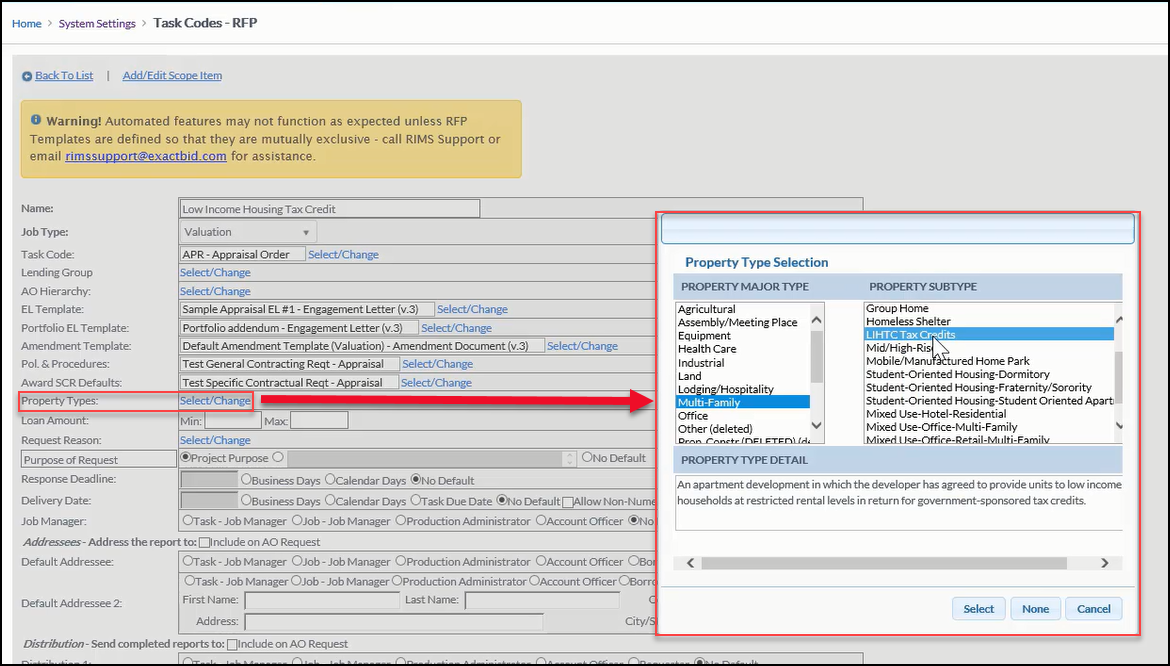 This item is a Filter. Select a Property Major Type, then select Property Subtypes.
Loan Amount
Enter a value into the Loan Amount Min and/or Max fields if desired (Filter).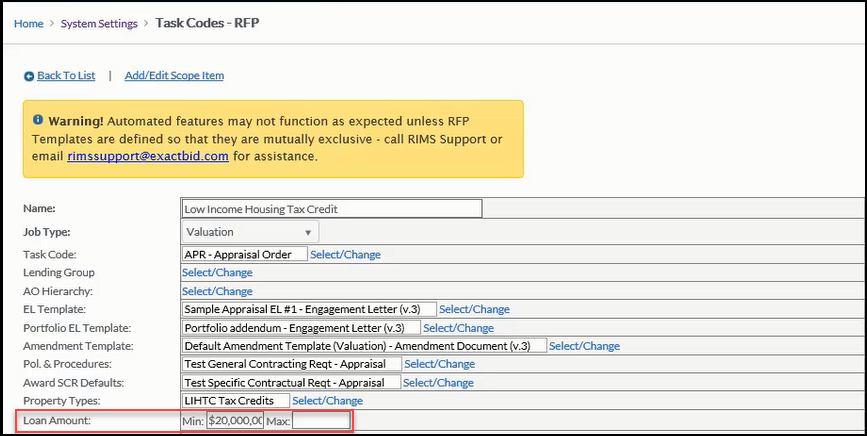
Loan Amount is a Filter; the RFP Template will only appear if the Loan Amount (and other) Filter conditions are met.
Request Reason
Click on Select/Change next to Request Reason (Filter). This is a Filter used to define whether the Template appears for different Request Reasons.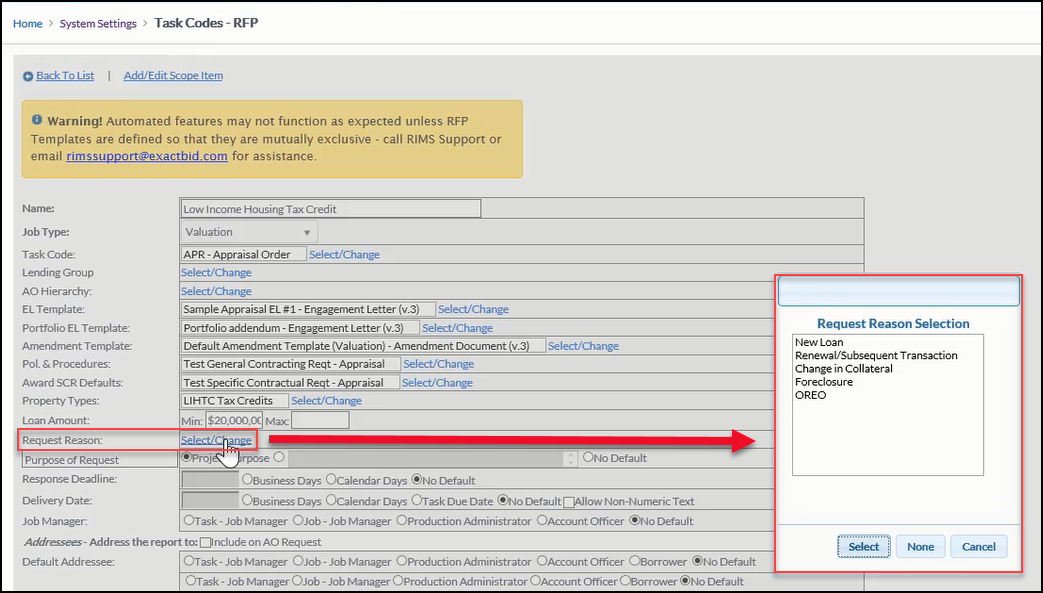
Everything below Request Reason defines what we will be prepopulated on the RFP. Though the selections made here will prepopulate data, the Job Manager will be able to change everything except Purpose of Request.
Purpose of Request
Purpose of Request: In some cases, it might be desirable to use what the Account Officer states and give the Vendor something specific. To do so, select Project Purpose. In other situations, it's not necessary for the Vendor to know the Purpose of Request.
Response Deadline
Response Deadline: Tells the Vendor they need to provide a Bid within a certain number of business or calendar days. Select No Default to give the Job Manager the ability to select anything they choose. In the example below, the Response Deadline is 2 business days.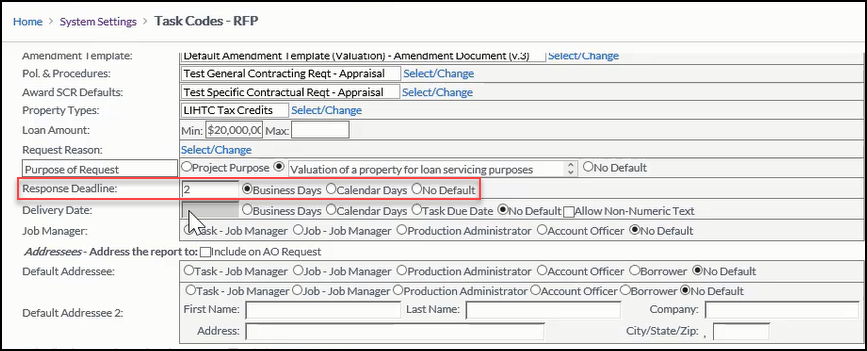
Delivery Date
Delivery Date: This tells the Vendor in what timeframe they need to deliver the Appraisal Report. This can be done based on Business Days, Calendar Days, Task Due Date (which gets pushed in from the Service Request's Desired Delivery Date), or No Default, which lets the JM decide. If No Default is selected along with Allow Non-Numeric Text, the JM is allowed to type a message, such as "Bid your earliest."
Job Manager
Job Manager: This tells the Vendor who to contact if they have questions before placing the Bid. Options include the Task Job Manager, Job Job Manager, Production Administrator, and Account Officer. If No Default is selected, the JM will be required to enter that information on the RFP.
Addresses
Addressees: This is who the Report is addressed to. Options include Task Job Manager, Job Job Manager, Production Administrator, Account Officer, and Borrower. A Default Addressee 2 can be also be entered. When the Job Manager is creating the RFP, they will have the ability to add additional Addressees that were not prepopulated.
Distribution
Distribution: This determines who should receive physical copies of the Report, as well as how many copies they should receive. Two selections can be made, with options including Task Job Manager, Job Job Manager, Production Administrator, Account Officer, Requester, No Default. If no hard copies are desired, the Distribution Copies 1 and Distribution Copies 2 fields can be left blank.
Scope Items
Scope Items: Add items that should regularly be included for the Vendor. Select the input type:
- List Box: the JM can select multiple items
- Combo Box: there's a list, but the JM can only select one item
- Text: enter up to 2000 characters of text
- Text: a smaller text box with 64 character limit
These can be made required or optional for the Job Manager.
When a Scope Item is added, a blue Default link will appear. Click on the Default link to view a list of items to choose from.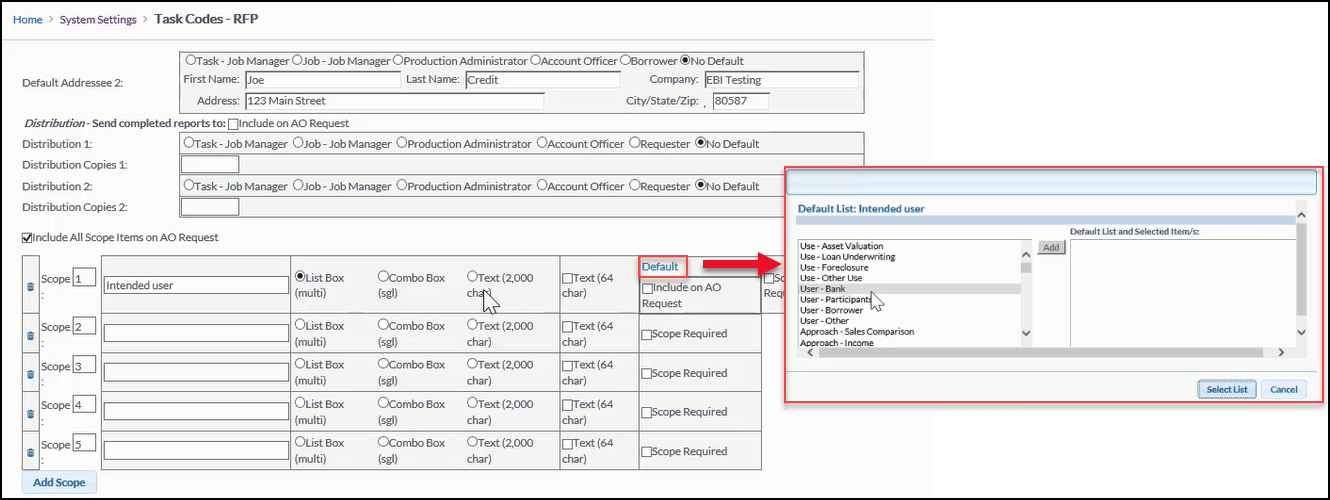
Select items from left-hand column, then click Add to move them to the right column. Once the items have been added, click Select List without anything highlighted to close the window and select the entire list. Or, highlight one of the items in the right-hand column and then click Select List - this item will appear as the default selection for the Job Manager.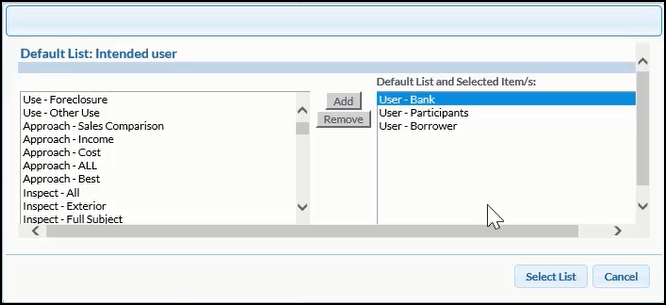
Here's how that will look to the Job Manager. In the example, User - Bank is the default selection.
In this example, three Scope Items have been added, one of each input type.
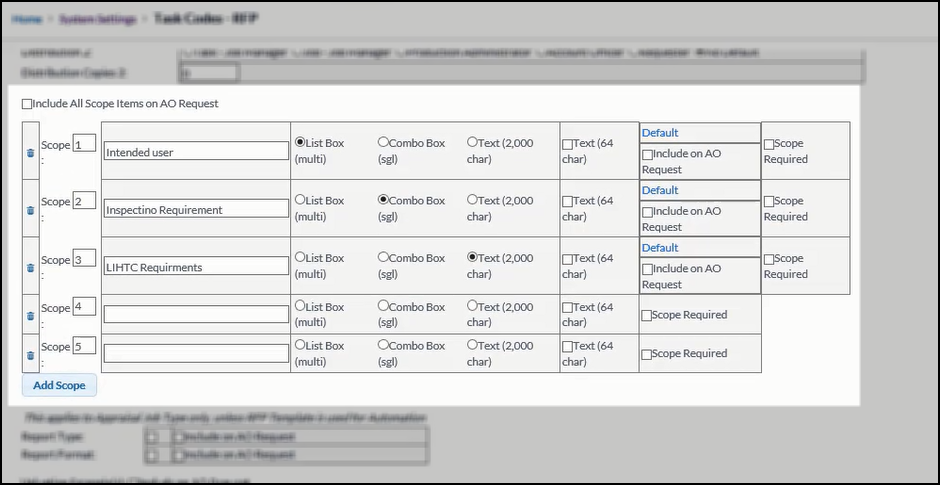
For more information about creating new Scope Items for the Content Administrator to select from, refer to Adding Scope Items.
The next two items are Report Types and Report Format.
Report Types
If the Report Type box is checked, a drop-down menu will appear. That menu is populated by the lookup table of Report Types. Select an item from the drop-down menu to create a default Report Type for the Job Manager, or leave it blank and the JM will choose it at the time of the RFP.
Report Format
Check the box to determine the format the Appraisal Report is presented in.
Valuation Scenarios
If specific Scenarios are always going to be required for this Template, add those Scenarios as defaults.
Click Add Row to add more Valuation Scenarios. The JM will still be able to add/remove Scenarios.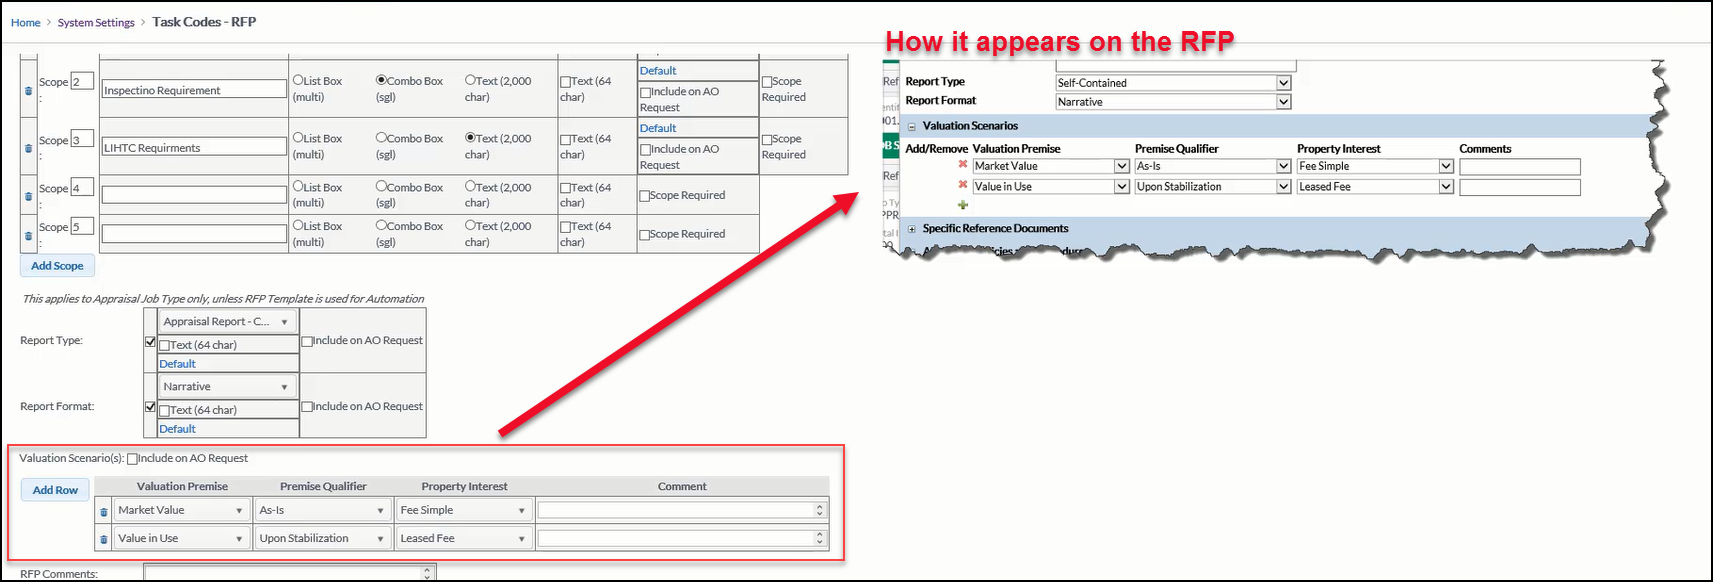
RFP Comments
To prepopulate an RFP Comment, enter text in the RFP Comments box. Note: If the text is something that should appear in the RFP every time, it's preferable to use a Scope Item rather than the RFP Comments field. It's better to leave the RFP Comments field available for the JM to use that for each individual RFP.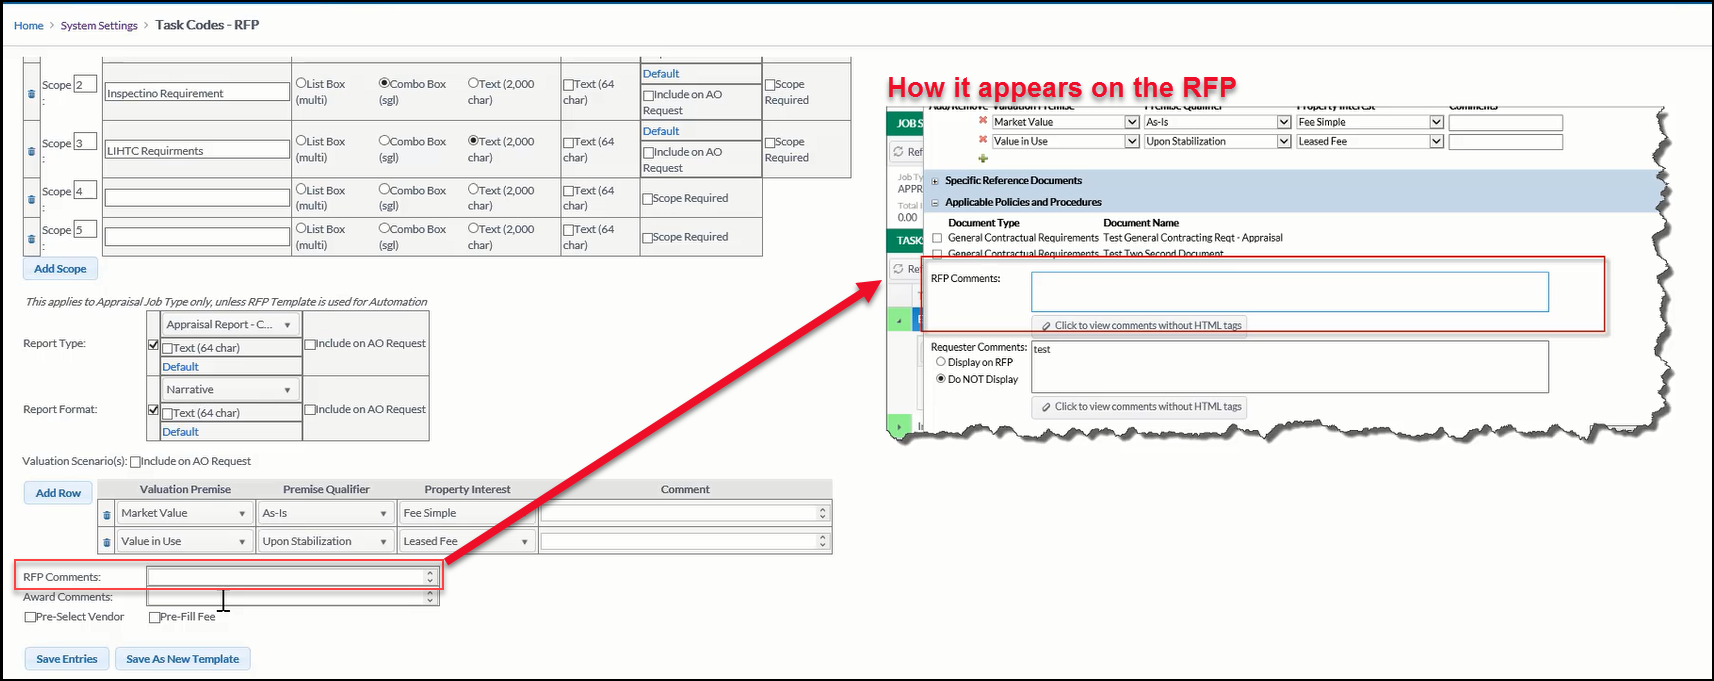
Award Comments
This doesn't appear for the Vendor when the Job is being Bid on, but it will show up at the time of the Award.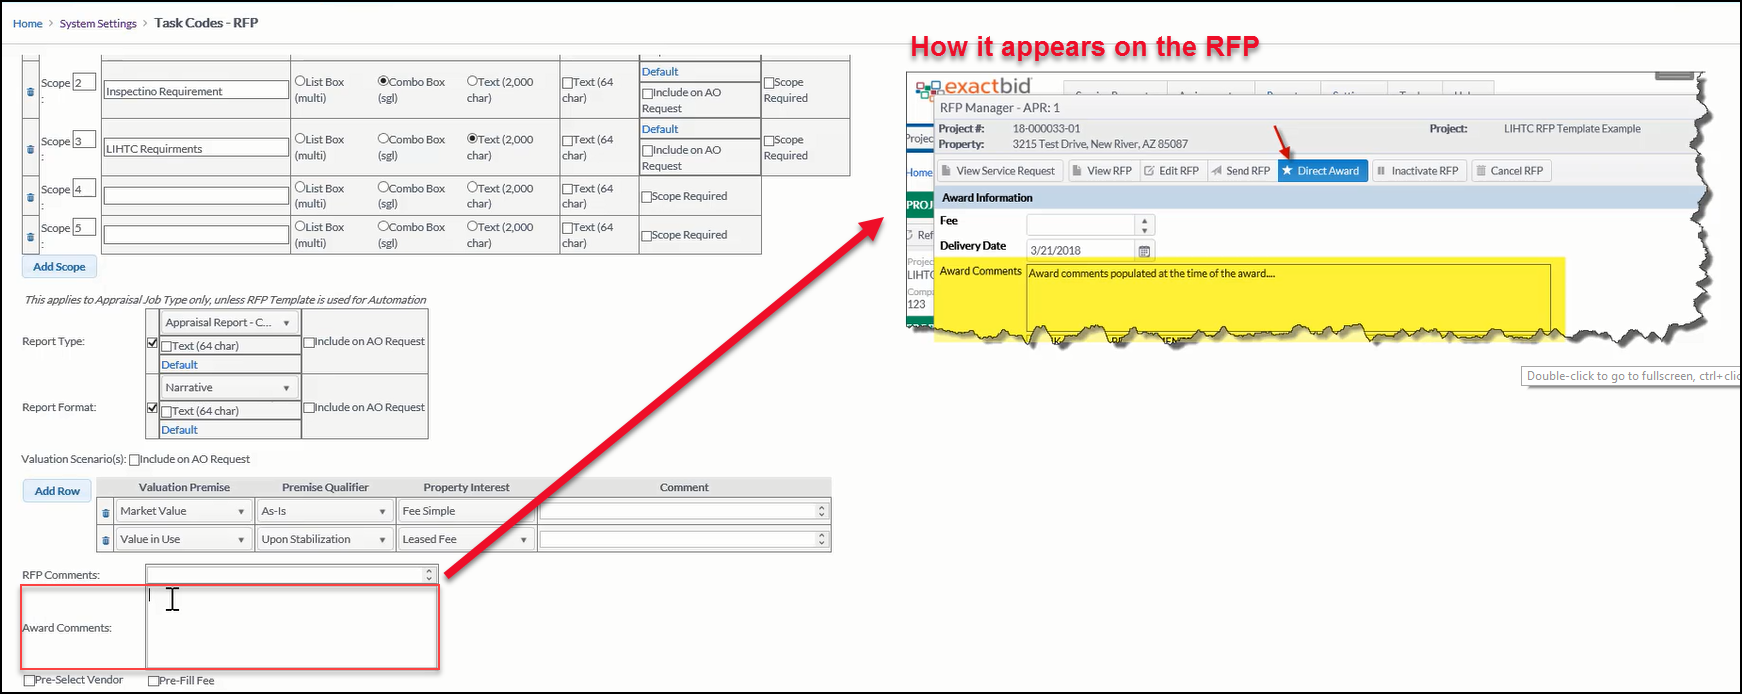
Include on AO Request, Pre-Select Vendor, Pre-Fill Fee will be covered in separate Semi-Automation documentation.
.png)
