- Print
- DarkLight
- PDF
Creating a Phase I ESA
- Print
- DarkLight
- PDF
Logging into the PARCEL Platform
Start by navigating to parcelplatform.com. Enter your username and password. You’ll also be prompted to enter a six-digit verification code emailed to you. This occurs once every 90 days.
If you’ve forgotten your login credentials, click “Forgot Your Password?” and enter your email address. PARCEL will send you an email with your username and a reset link valid for one hour.
Updating Your Account Information
Once logged in, click on your name in the top-right corner and select “Account Settings.” Then click Edit to update your name, contact information, and upload your credentials.
Resume: Must be a PDF under 1 MB
Signature: JPEG under 50 KB
Creating a New Phase I ESA Report
From the PARCEL homepage, click New Single Site Project to begin a new PCA report. The Create Project page opens.
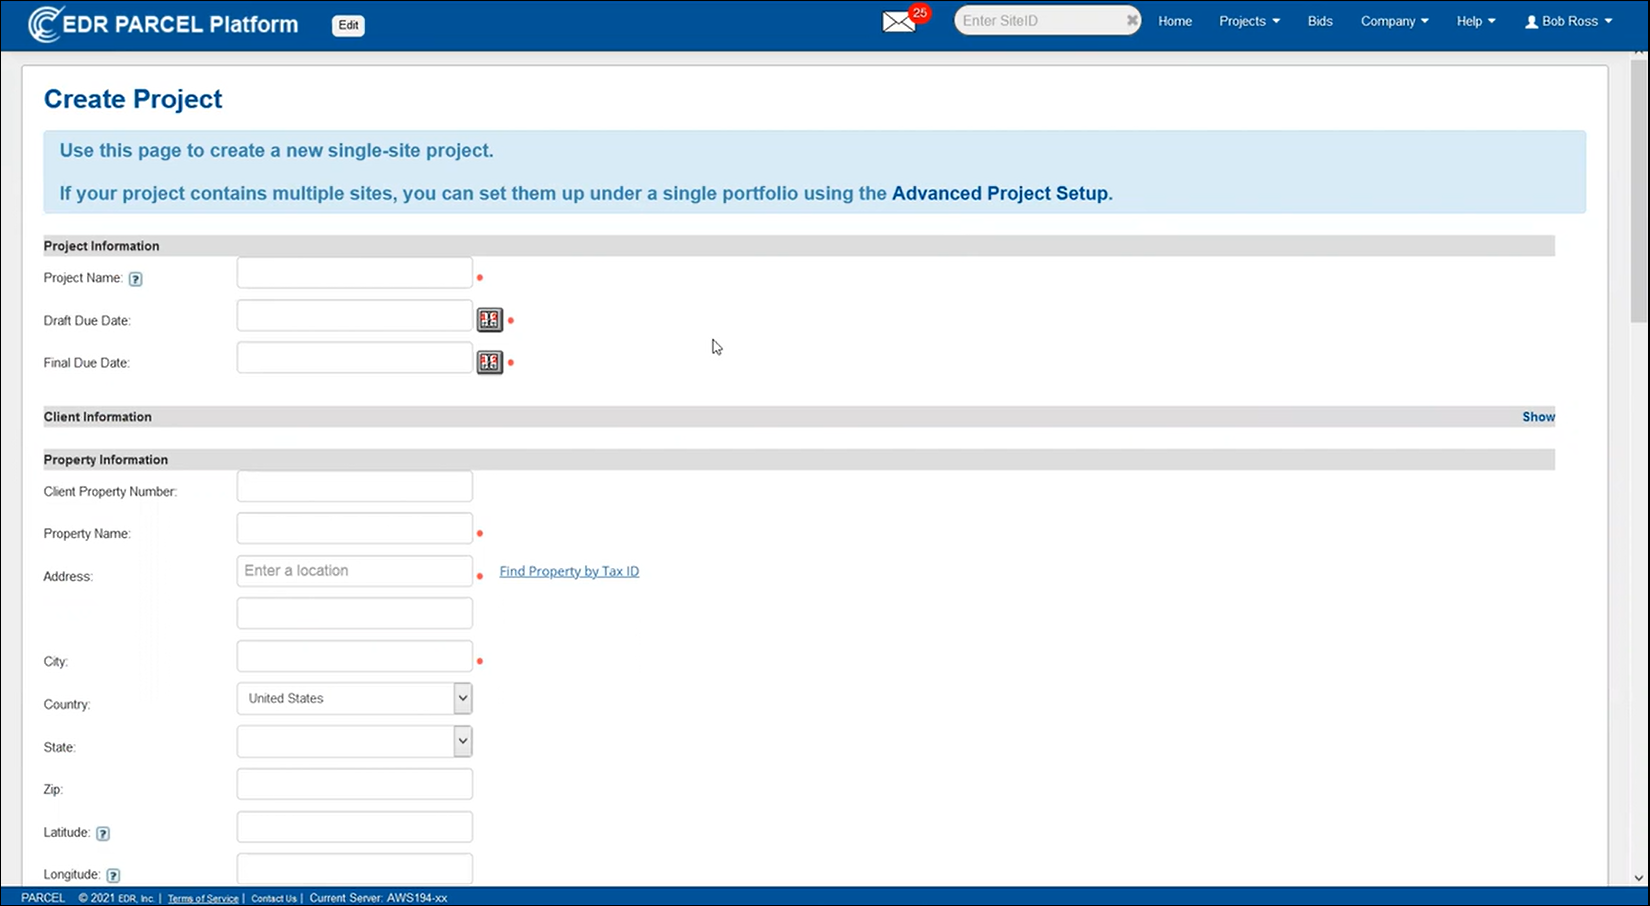
If your project involves multiple sites, you may also create a portfolio using the New Portfolio option. For the purpose of this training, we’ll focus on single-site Phase I ESA workflows.
Required Fields
Fields marked with a red bullet are required. These include:
Project Name
Draft Due Date
Final Due Date
Property Name
Property Address
City, State, Zip Code
Scope of Work
Auto-Geocoding
When you input the address, the system may auto-geocode the latitude and longitude fields. These can be manually edited if needed.
Scope of Work Templates
Select the appropriate PCA scope template (e.g., Optimized PCA, Fannie Mae, or Freddie Mac). The scope selected determines the structure and required content of the report.

Additional Property Information
While optional during setup, be sure to enter the following to ensure accurate cost calculations later:
Property Type (required for cost table calculations)
County
Acreage
Number of Buildings
Transaction Type

Assigning Site Assessors and Senior Reviewers
Under the Grant Access and Assign Roles section, you can assign users to the PCA report. Choose from your organization, a client, or a third party.

Assign Site Assessor: Choose a user responsible for site inspection and field data collection.
Assign Senior Reviewer: Choose a user to oversee and sign off on the report.
Senior Reviewer and Site Assessor can only be added upon report creation.
Uploading Attachments
Attach any relevant documents using the Browse button under the Attachments section. After selecting a file, click Add File.

Email Notifications
To notify collaborators that a report has been created or updated, scroll to the Email Notification section. Check the box to enable, then fill out:

To: The recipient's email address
CC: Optional
Message: Include project context or instructions
When ready, click Create Project to generate the report, or use Create Project And Order EDR Products to simultaneously initiate a database order.
Navigating the Dashboard & Opening Reports
After logging in, your dashboard will display a list of recently viewed reports. You can adjust the search filters using:
Date Range (e.g., 30, 90 days, All Time)
Status (Final, Non-Final, All)
Project Name Search
To open a report, click on the orange icon in the “R” column or click the report name in the recently viewed list.
Using the Write and Setup Tabs
When you enter a report, you’ll land on the Write tab by default. This is where most of your editing and writing happens. Available tools at the top include:
ToC (Table of Contents)
Library
Comments
History
Spellcheck
Find & Replace
.png)
Using the Setup Tab
The Setup tab shows all EDR products ordered for the site. Hovering over each entry reveals whether it’s still processing or has been delivered. This tab also shows which template and library are in use for the report.
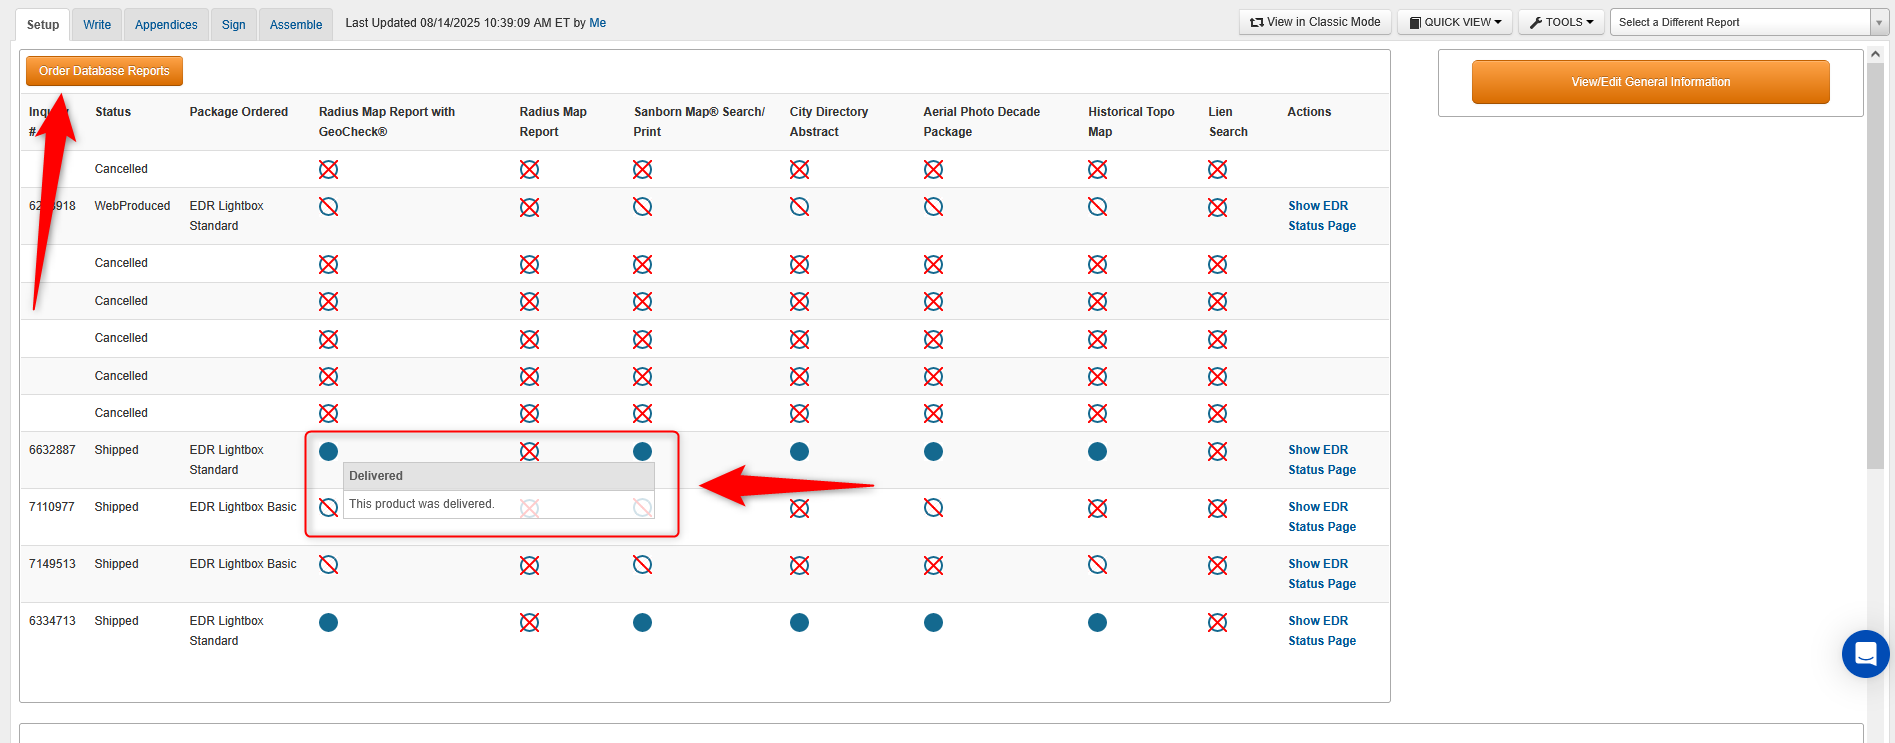
Editing General Information
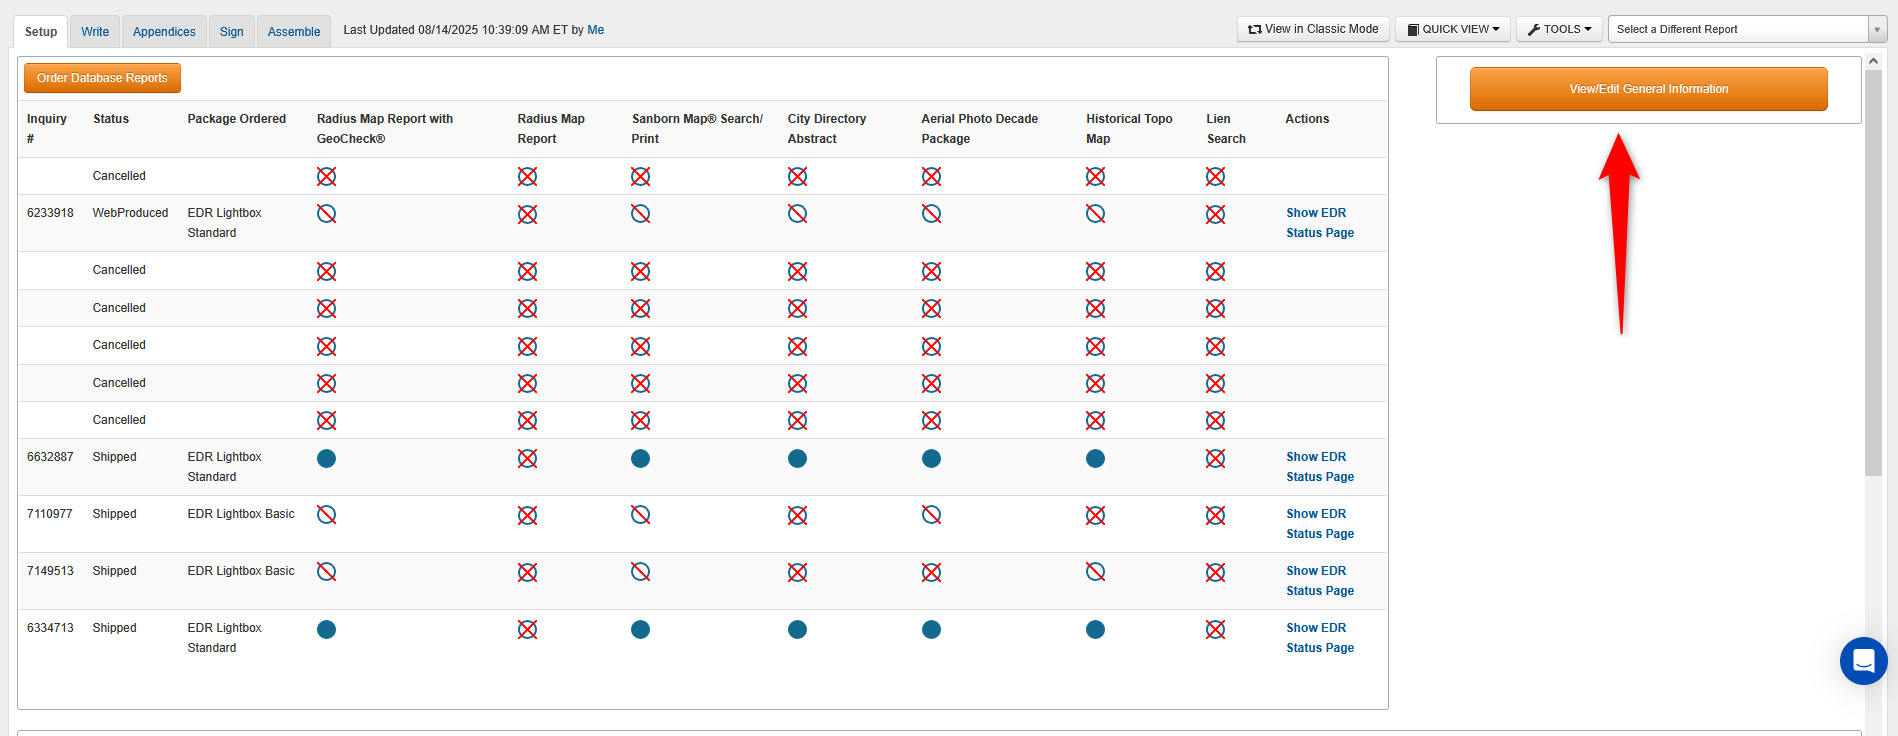
Click View/Edit General Information in the top toolbar.
This opens a new window containing project number, client name, assessment date, and other essential data.
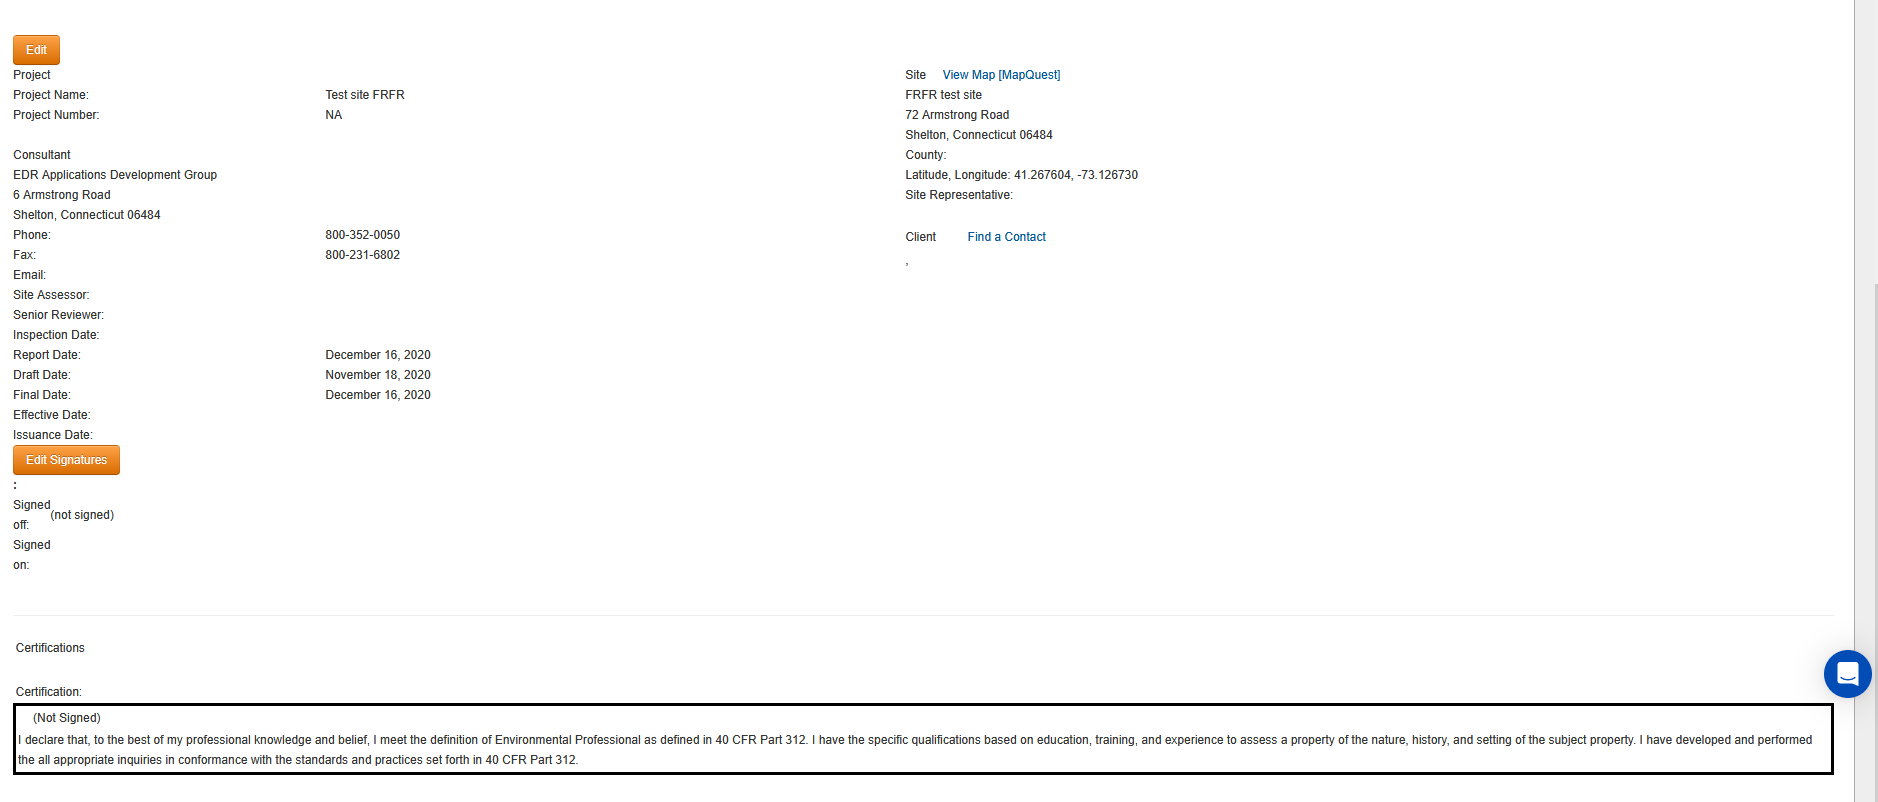
Make sure all your information is filled in, and then click Submit Changes.
Writing in Narrative Sections
Each section of the report includes editable narrative blocks. When you click into a section, the formatting toolbar activates, allowing you to:
Bold, underline, or color text
Use undo/redo, date stamp, or insert variables
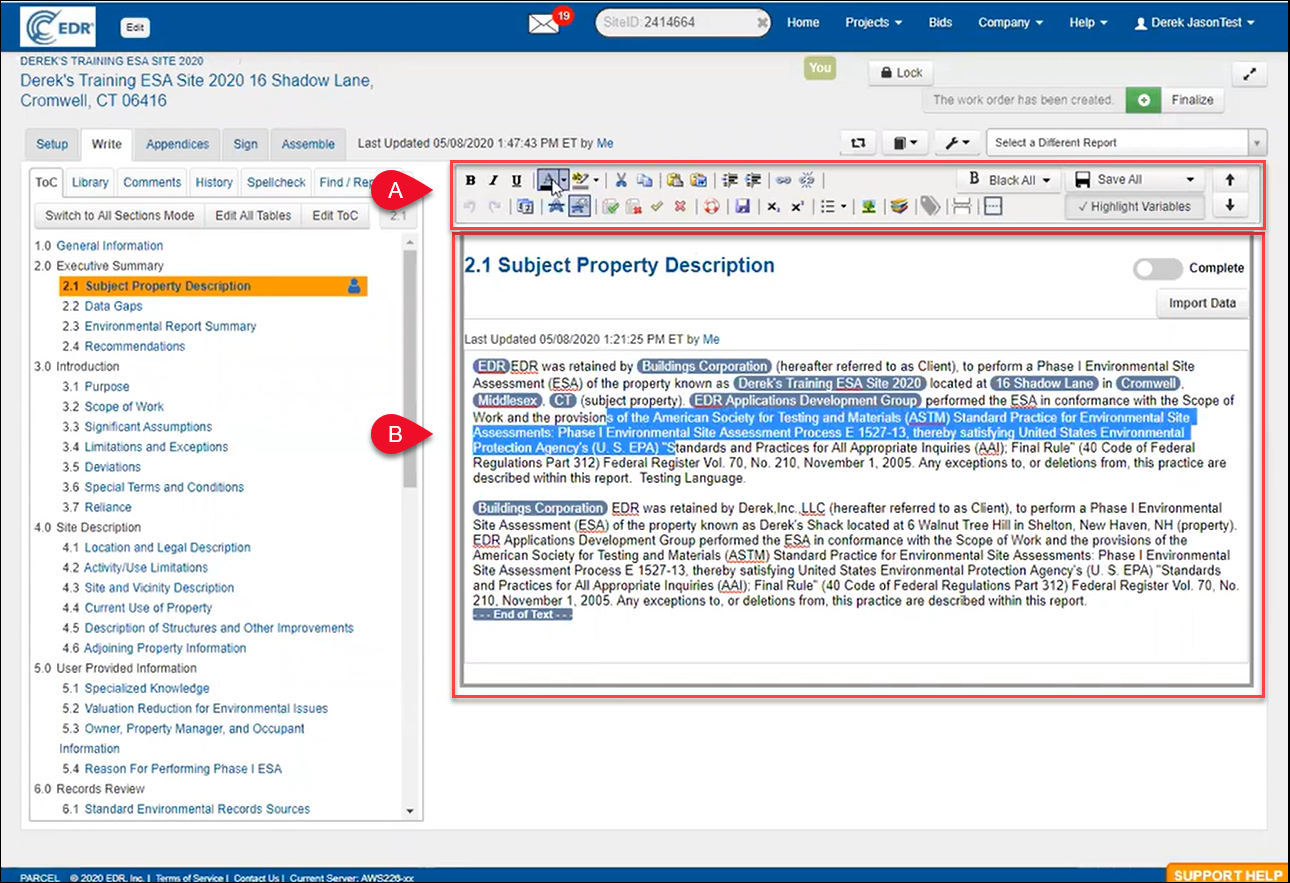
A. The Write Tab also includes a text formatting ribbon. From the ribbon, you can:
Change text style
Add indents
Insert hyperlinks
Add pictures
Create bullet lists
Insert variables
And more
For more information about variables, refer to Working with Report Variables below.
B. Add, delete, and modify the content in the editable narrative panel.
You can click the Save All at any time, but PARCEL also autosaves: every five minutes and whenever you navigate between sections.
Using the Library Tool
Click the Library tab to view available language content for the current section.
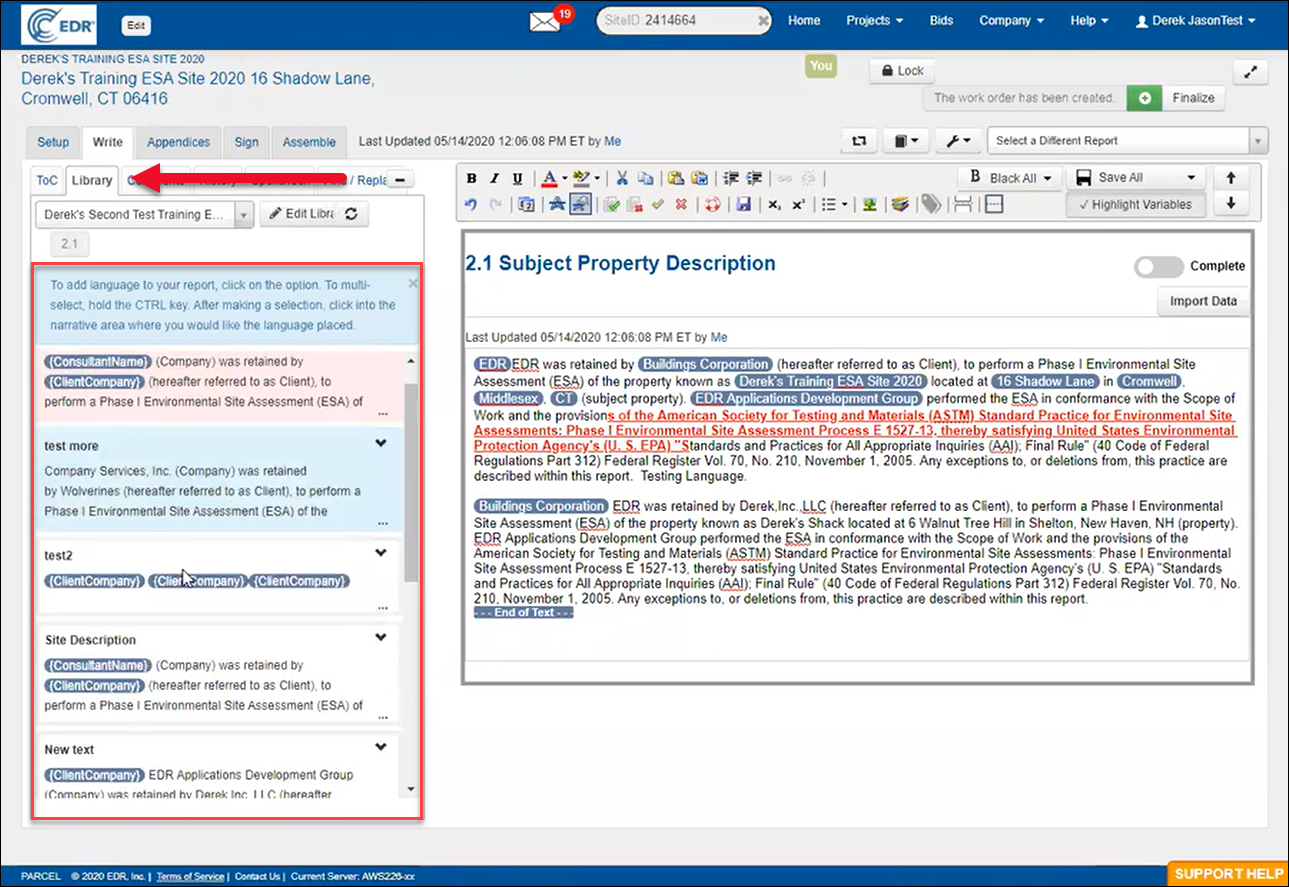
Content types include:
Pink text: Preloaded into the section by default
Blue text: Guidance and writing suggestions
White text: Approved language blocks you can insert
To insert a library block:
Click the arrow to expand the text preview
Click the Insert arrow to add it to the narrative
Using the Comment Tool
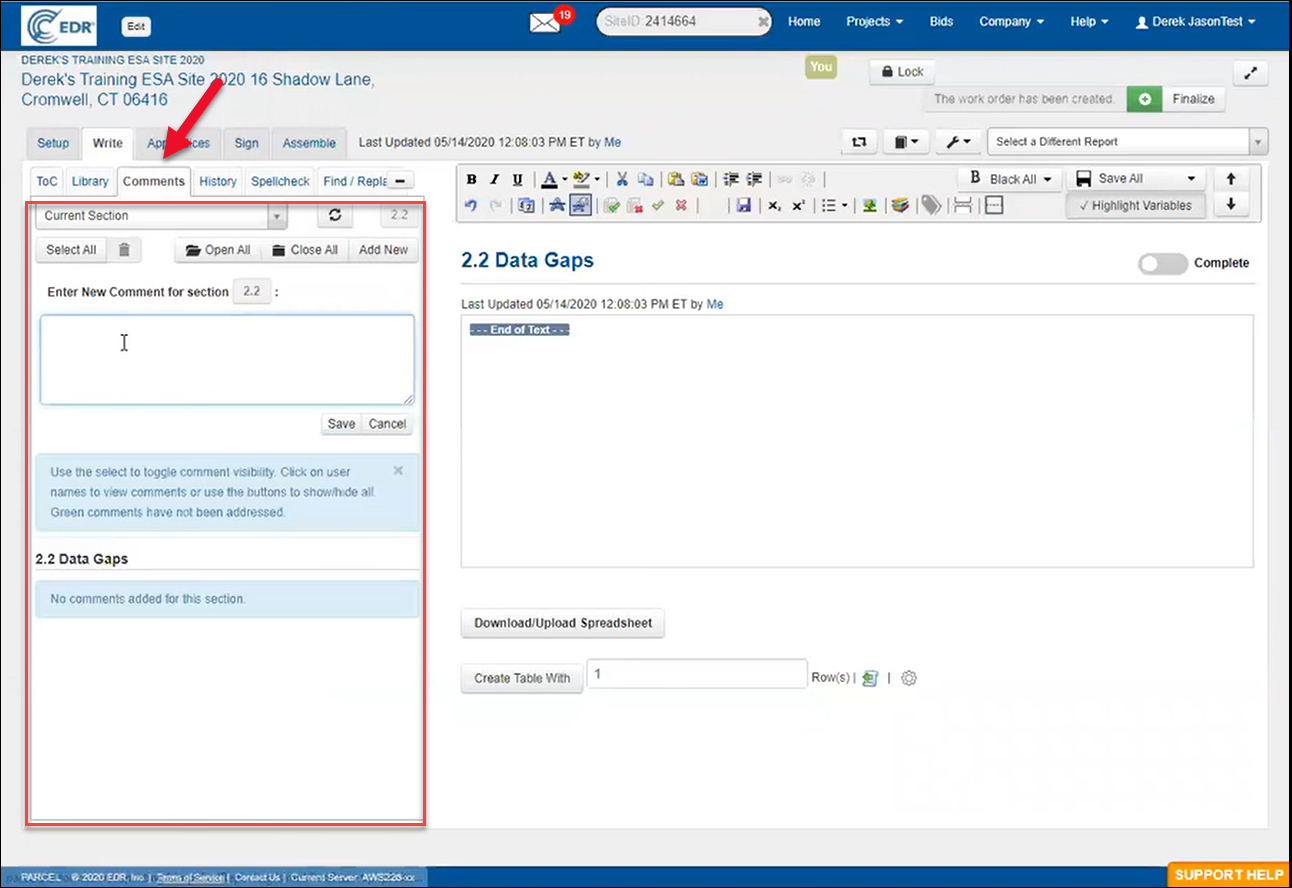
To leave a comment in a section (e.g., Data Gaps), click the Comments tab, then click Add New. Write your comment and click Save.
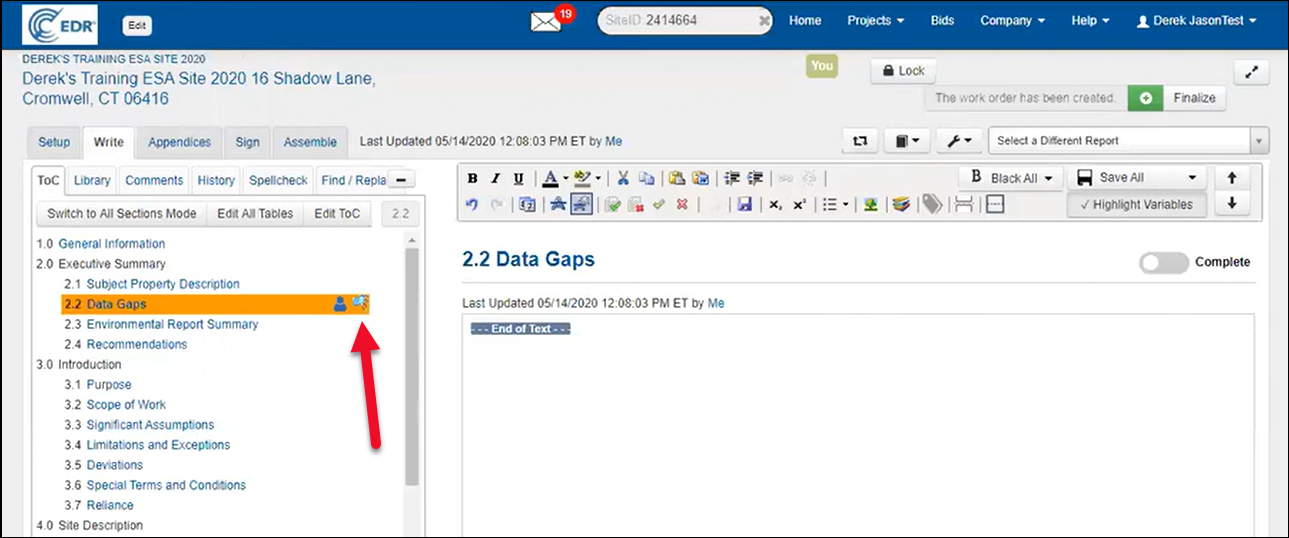
Within the TOC of the write tab, PARCEL will show a blue flag next to the section title, alerting reviewers.
When a reviewer addresses a comment, a green checkmark will replace the flag, and the original comment plus the response will be logged with timestamps and usernames.
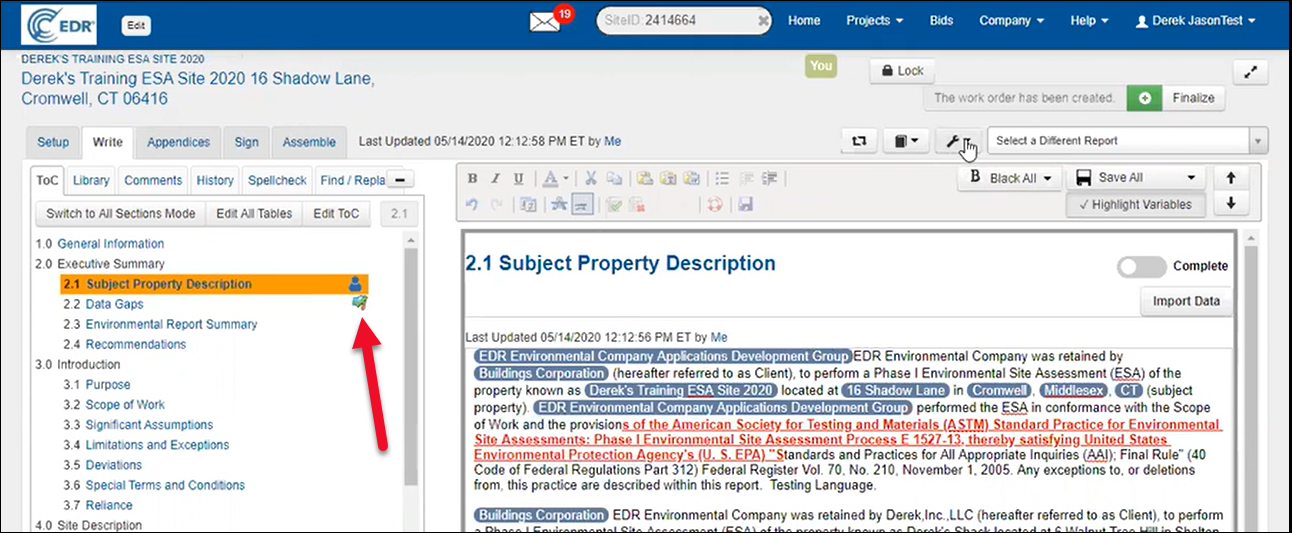
Comment flags can also be seen on the project dashboard

Using the History Tool
If text is deleted or changed unintentionally, click the History tab in any narrative section.
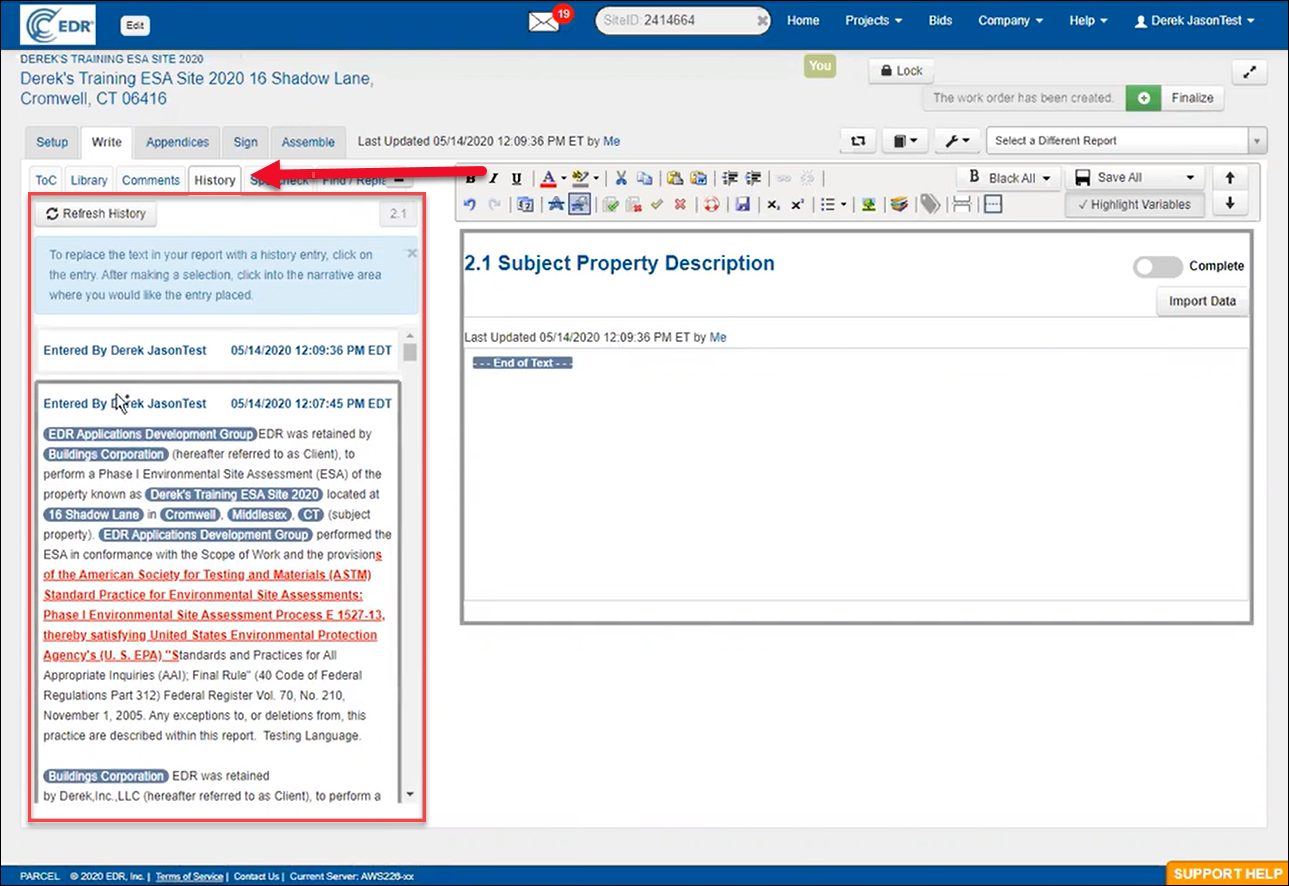
You’ll see a list of all saved versions, including:
Who saved it
Date and time
Snapshot of the previous content
Click on a saved instance, and then click into the narrative to restore the highlighted version. This tool stores saves indefinitely.
NOTE: Comment flags can also be seen on the project dashboard
Spellcheck
To run spellcheck, go to the Spellcheck tab.
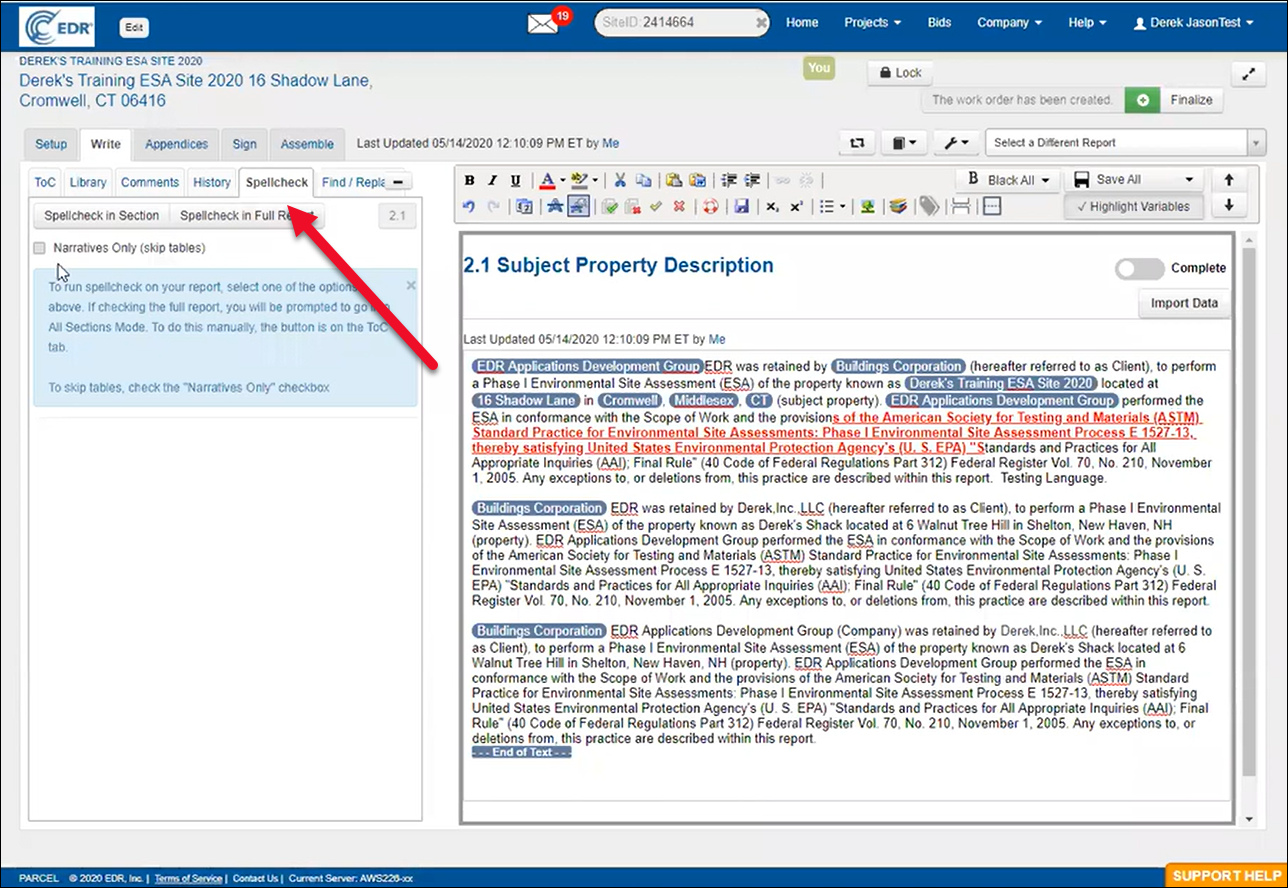
You can:

Spellcheck the current section
Spellcheck the full report (requires switching to All Sections Mode)
Check narrative-only (skipping tables)
Suggestions and corrections will appear in the left panel.
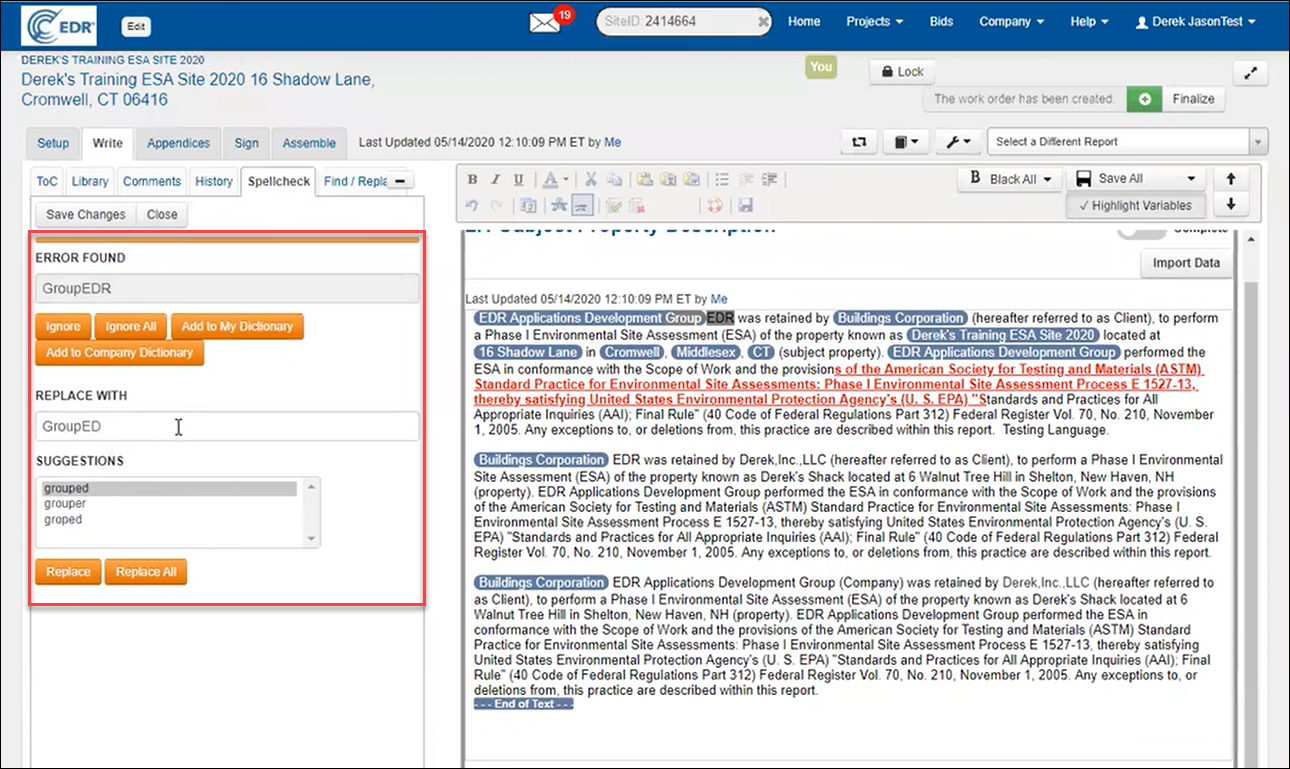
You can choose to:
Ignore or Ignore All
Add to My Dictionary (personal)
Add to Company Dictionary (shared)
Click Save Changes and Close when complete.
Find and Replace
Click the Find & Replace tab to search and replace text within a section (or in All Sections Mode).
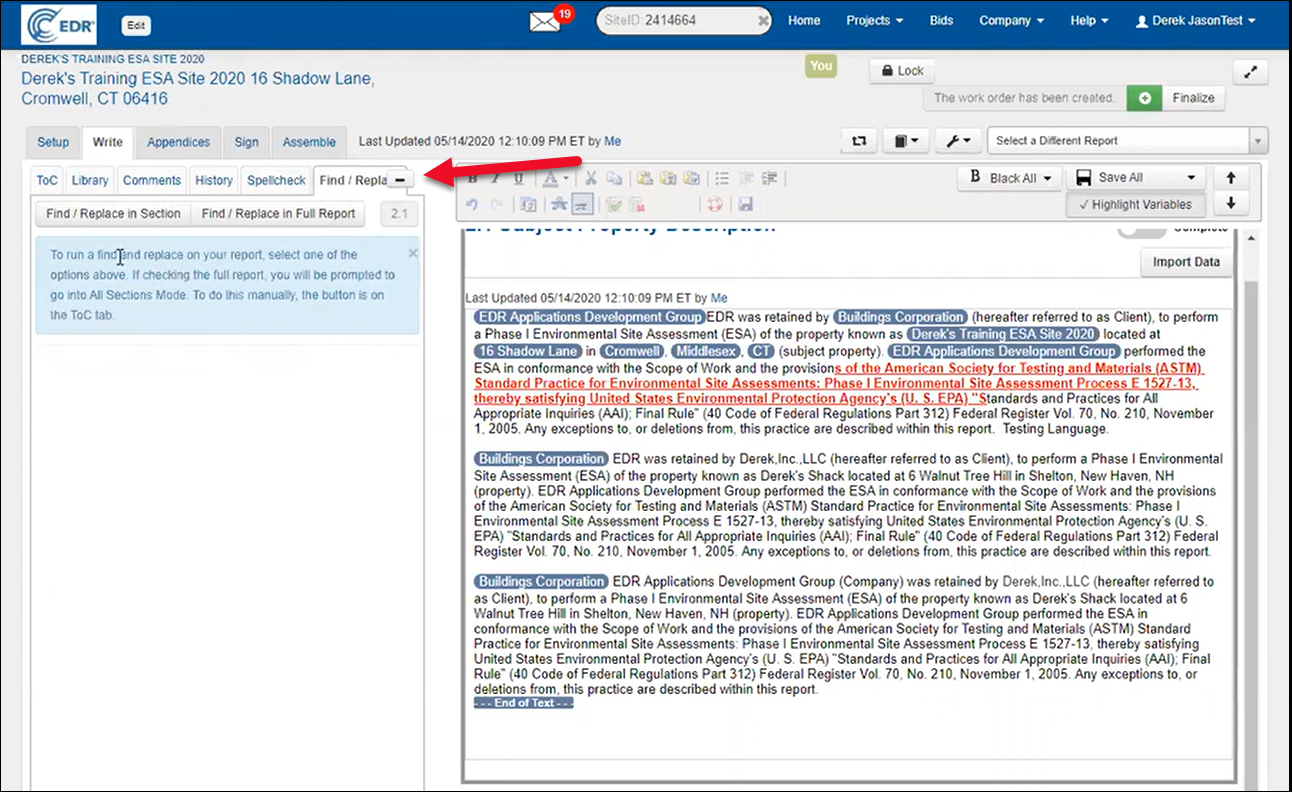
Useful for:
Changing a name or company throughout a section
Fixing terminology
Enter the term(s) in the “Find What” and “Replace With” fields. Then choose:
Replace
Replace All
The change will apply instantly, and you can save and close.
Working with Report Variables
Variables (like property address or client name) are used throughout PARCEL to auto-populate consistent data. These variables are pulled from the General Information section and highlighted within the report. Variables can be present in multiple areas throughout the report, including the cover page, the body content, and the transmittal letter.
To toggle the variable highlights on or off, use the Highlight Variables checkbox in the toolbar.
Using the Variable Replacer
To update variable content, click the Tools (wrench icon) menu and select Variable Replacer.
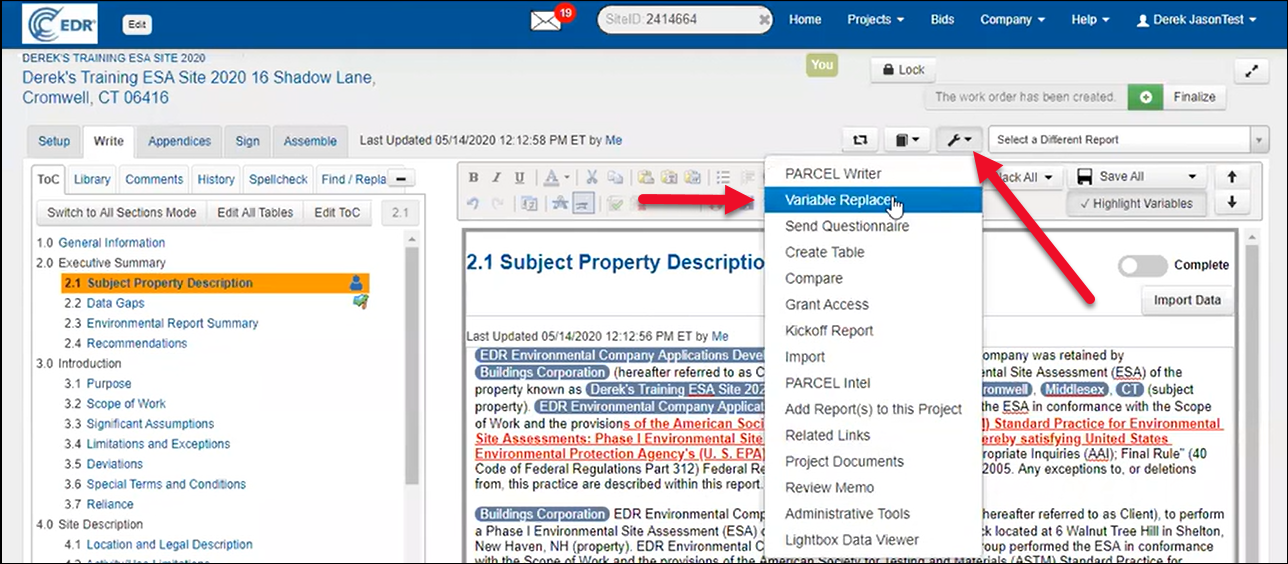
This will open a list of all variables in your report.
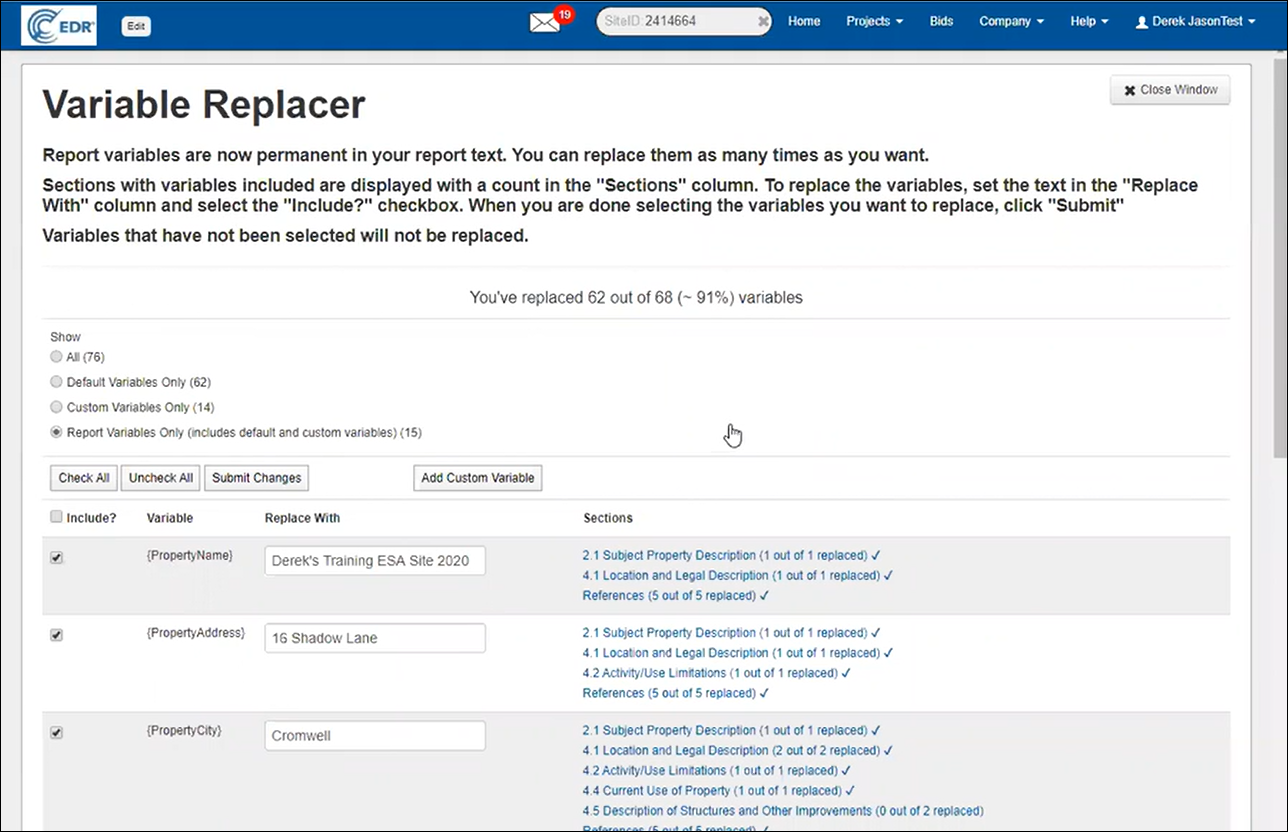
The tool displays:
Each variable's current value
Where it appears in the report
Editable fields to update content
Most values (e.g., address, property name, city) are pulled from General Information. Others like Zoning or Site Assessor Title must be entered manually.
To make a change:
Update the value(s) in the “Replace With” field
Check the box next to each variable you want to update
Click Submit Changes
Changes apply across the entire report automatically. If needed, refresh the page to verify updates.
Working with Tables
To manage tables, scroll to the desired section (e.g., Section 6.1). In this example, environmental records are imported from an EDR Radius Map report.
Importing Listings from EDR
If a Radius Map report was uploaded for the project, a table import button will appear and make it easy to import records from the report. Click Import EDR Map Findings Summary to display a list of results.
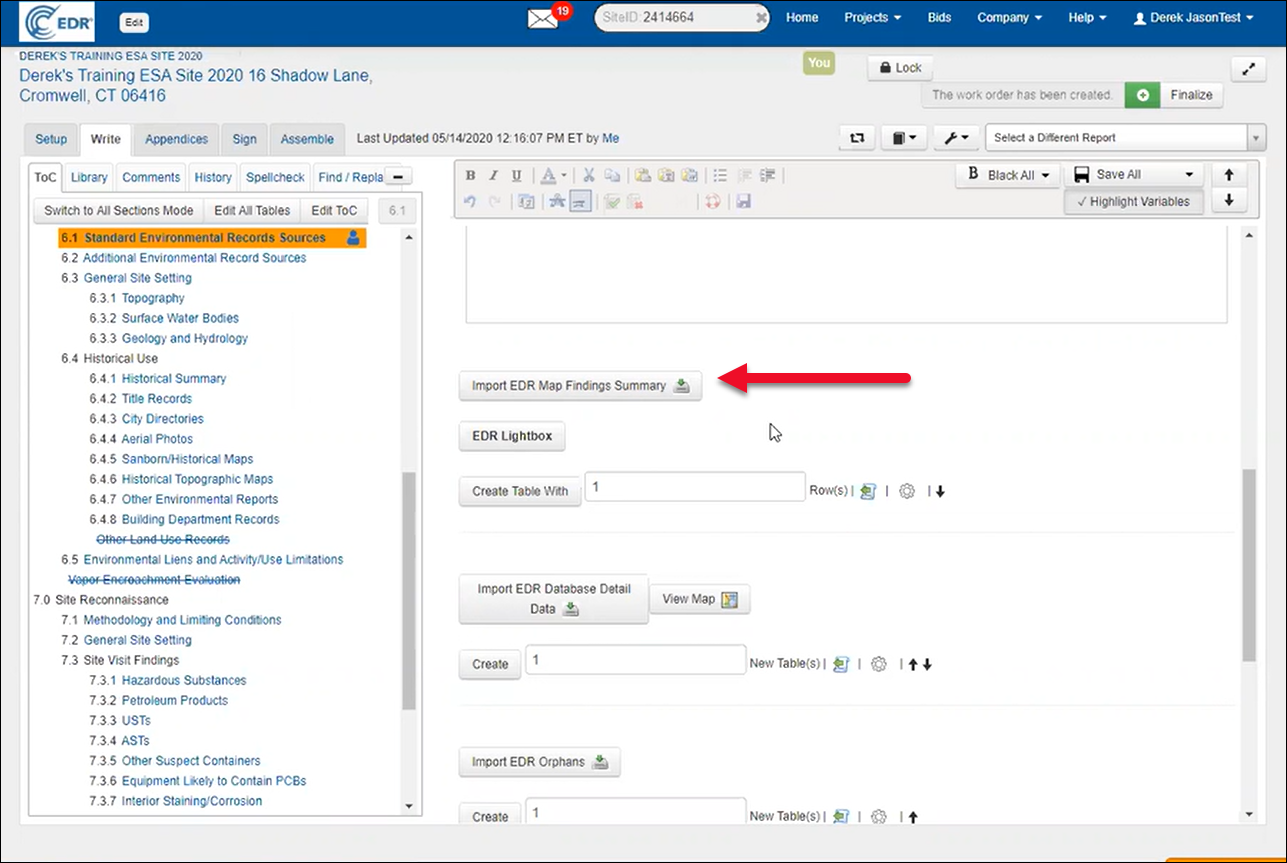
A new popup opens containing:
Listing name
Search Distance
Database
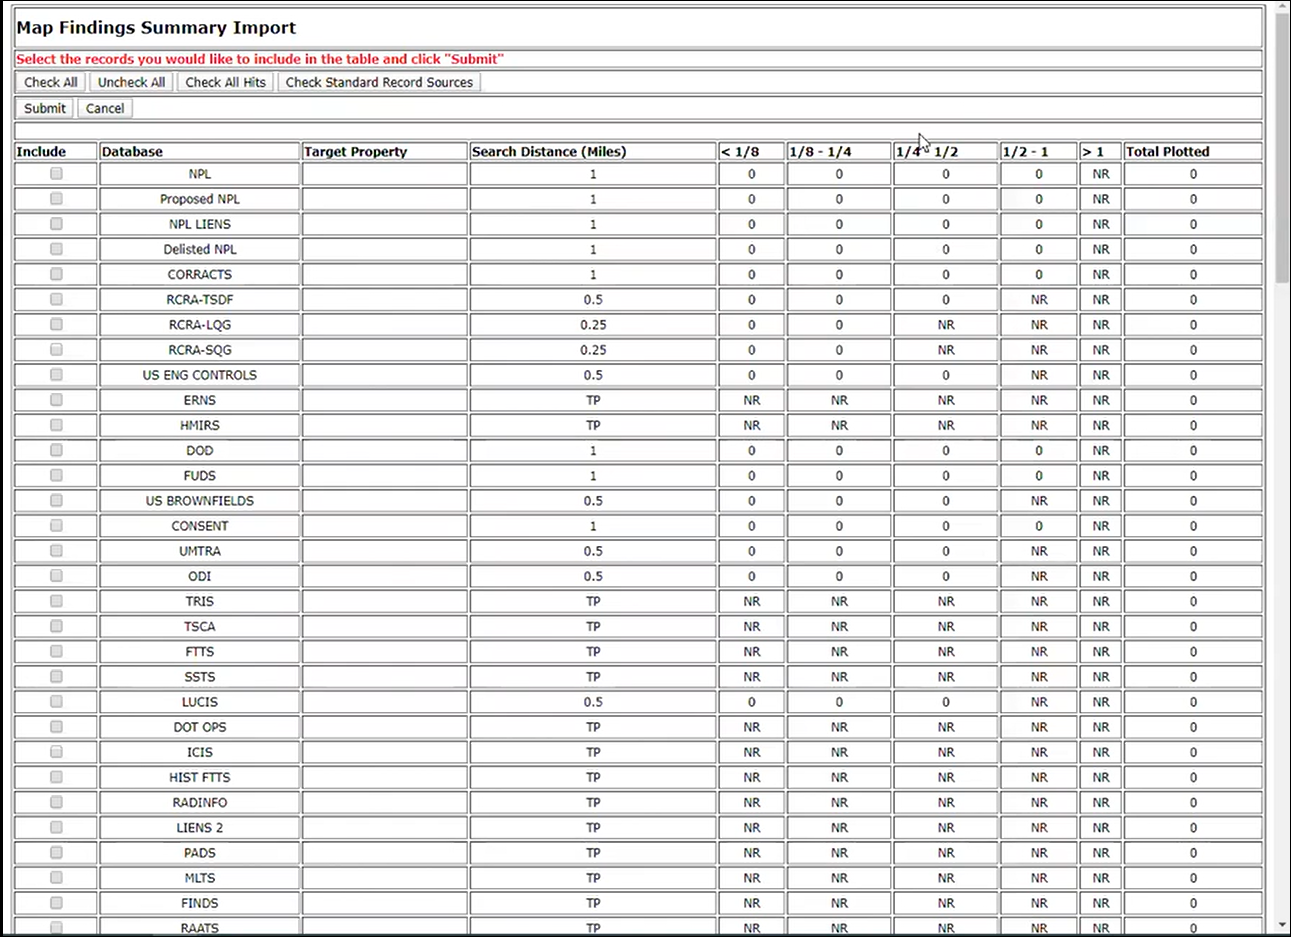
Select the listings to include and click Submit to auto-generate the table.
Editing Table Content
Each row has icon controls:
🗑️ Delete
📄 Duplicate
⬆️⬇️ Move row
To edit the table:
Click Edit Table
Make changes to active fields
Click Save All
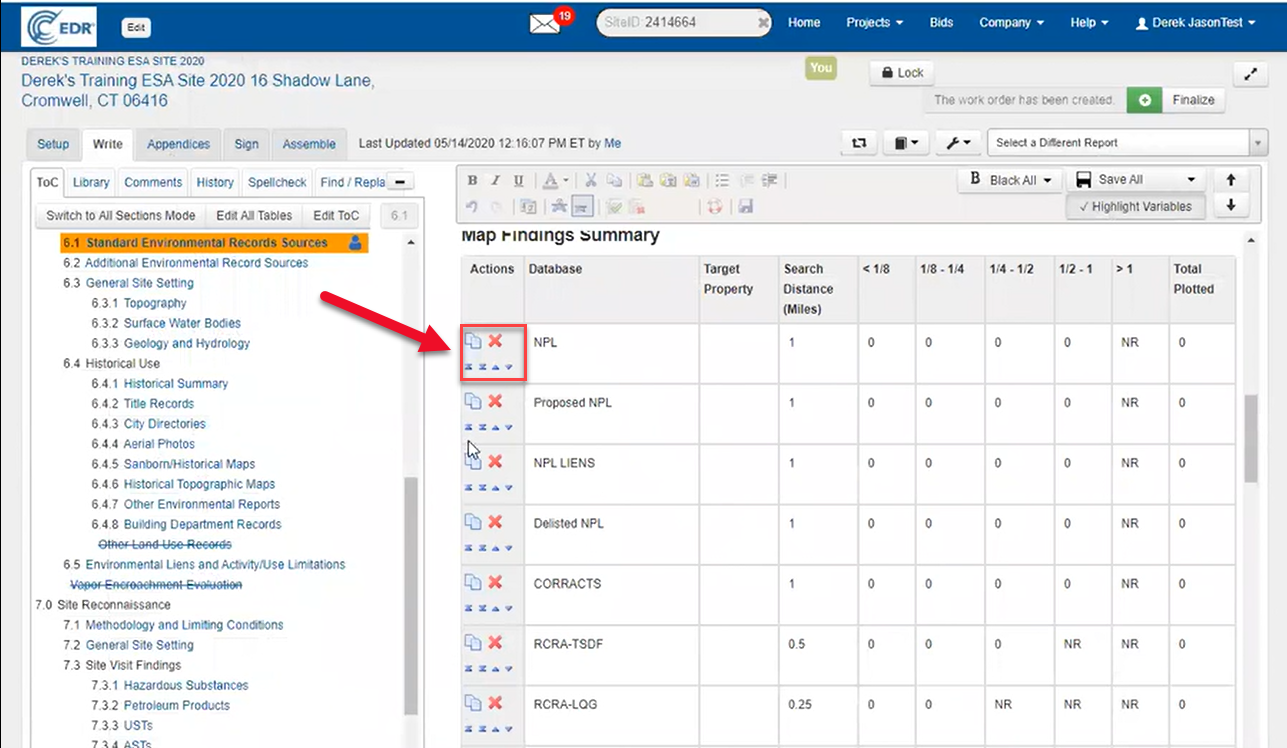
Adding a New Row
To insert additional rows:

Enter the number of rows you wish to add to the table
Click Add
A new, blank row will be added to the bottom of the table
Input data
Click Save Changes to save your changes

You can also use the Move to Top control to reorder the row.
Restoring a Deleted Table
Tables have their own history tool. If a table is deleted:
Click Create Table
Click Edit Table
Click the Undo/View History button
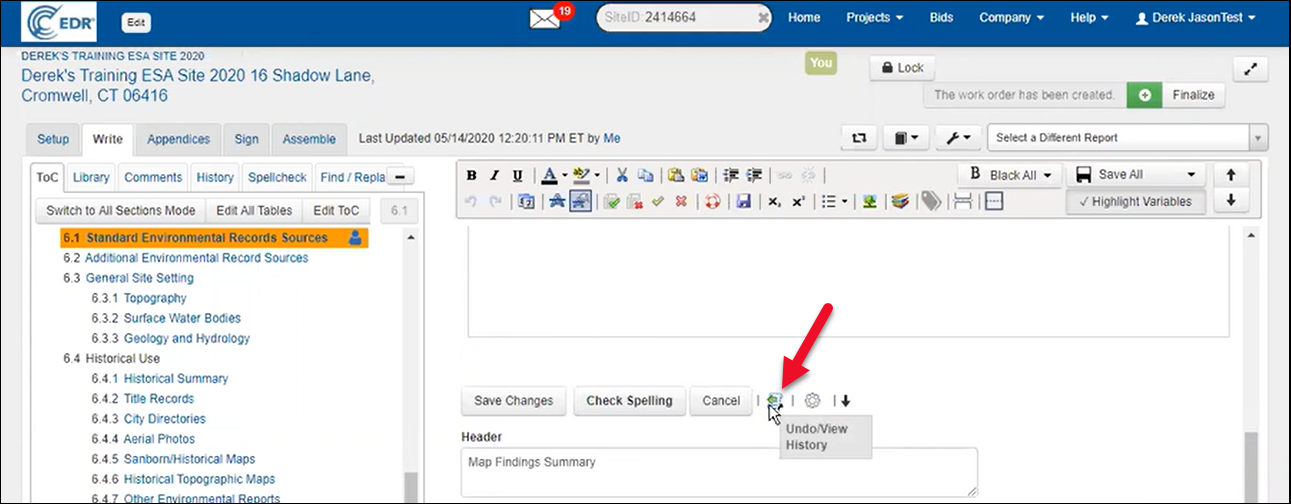
Select a saved version using the radio button. Choose to:
Append to Current Table — Adds to existing data
Overwrite Current Table — Replaces current data
Click Close Window and your table will be restored.
Previewing the Report (Detail View)
At any time, you can preview the report using the Quick View (book icon) tool.

Select Detail Report to generate a PDF for internal review.
If you notice any red or placeholder text (e.g., instructions or variables), use the Black All button to finalize styling:
Black This Section – for current section only
Black All Sections – to apply universally
Managing Appendices
Click the Appendices tab to view supporting documents.
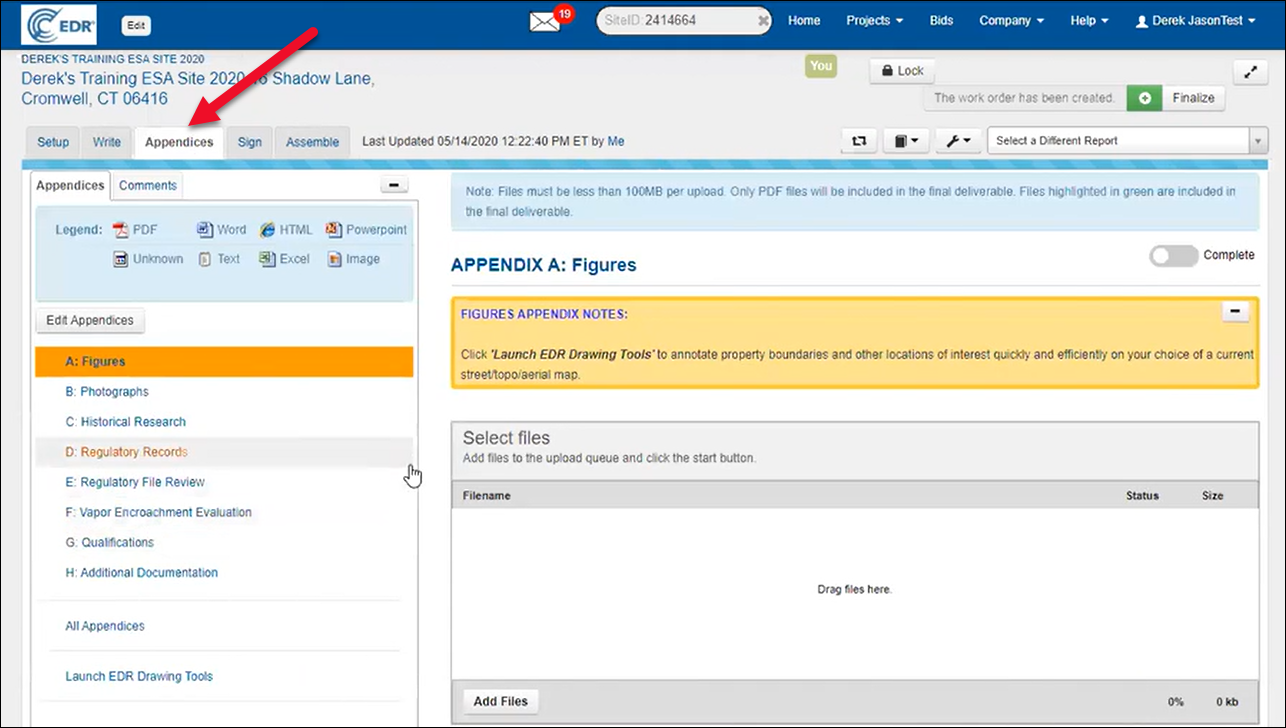
EDR-provided files are automatically uploaded and categorized by type:
PDFs (green highlight): Included in final deliverable
JPGs (white background): Not included in the final deliverable

Each file row includes options to:

❌ Delete
(truck icon) Move a file between appendices
🔖 Include/Exclude from final deliverable
⬆️⬇️ Reorder
Working with Photographs
The Photographs appendix works slightly differently.
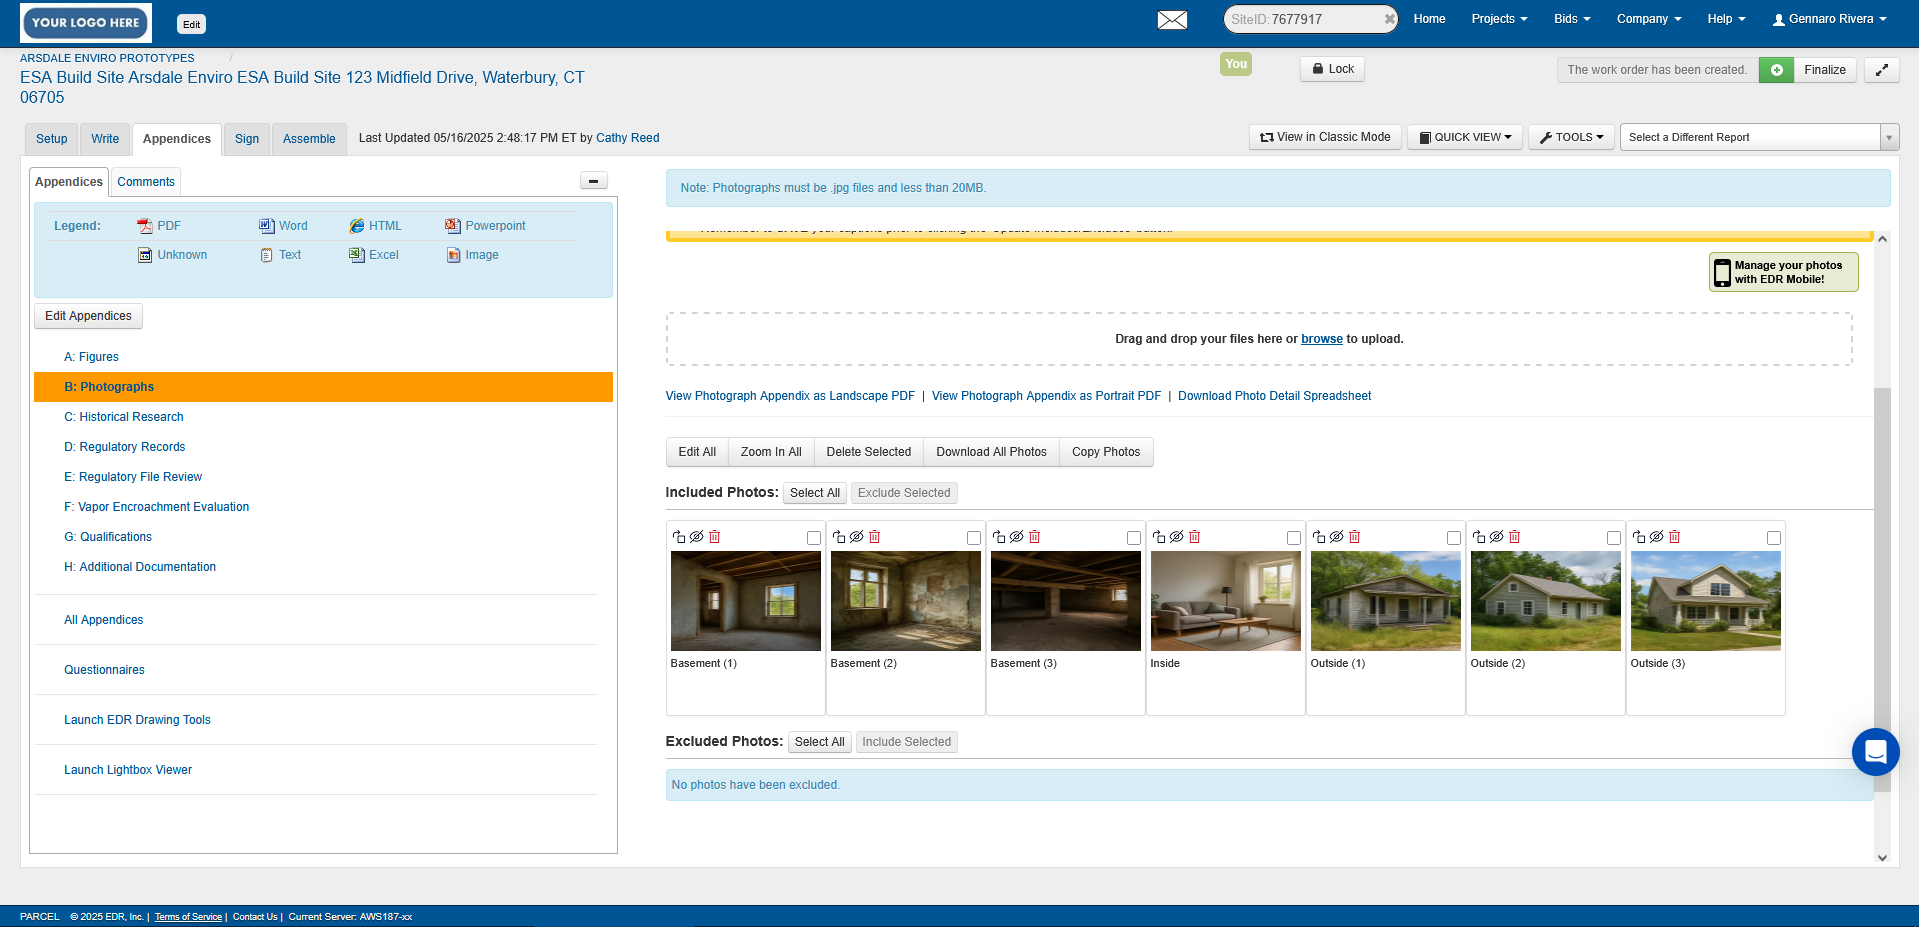
JPEGs show as thumbnails, and you can:
 Delete
 Rotate
 Include/Exclude
 Caption images by clicking Edit then typing below
Click on the photo to zoom in on the photo and edit the caption.
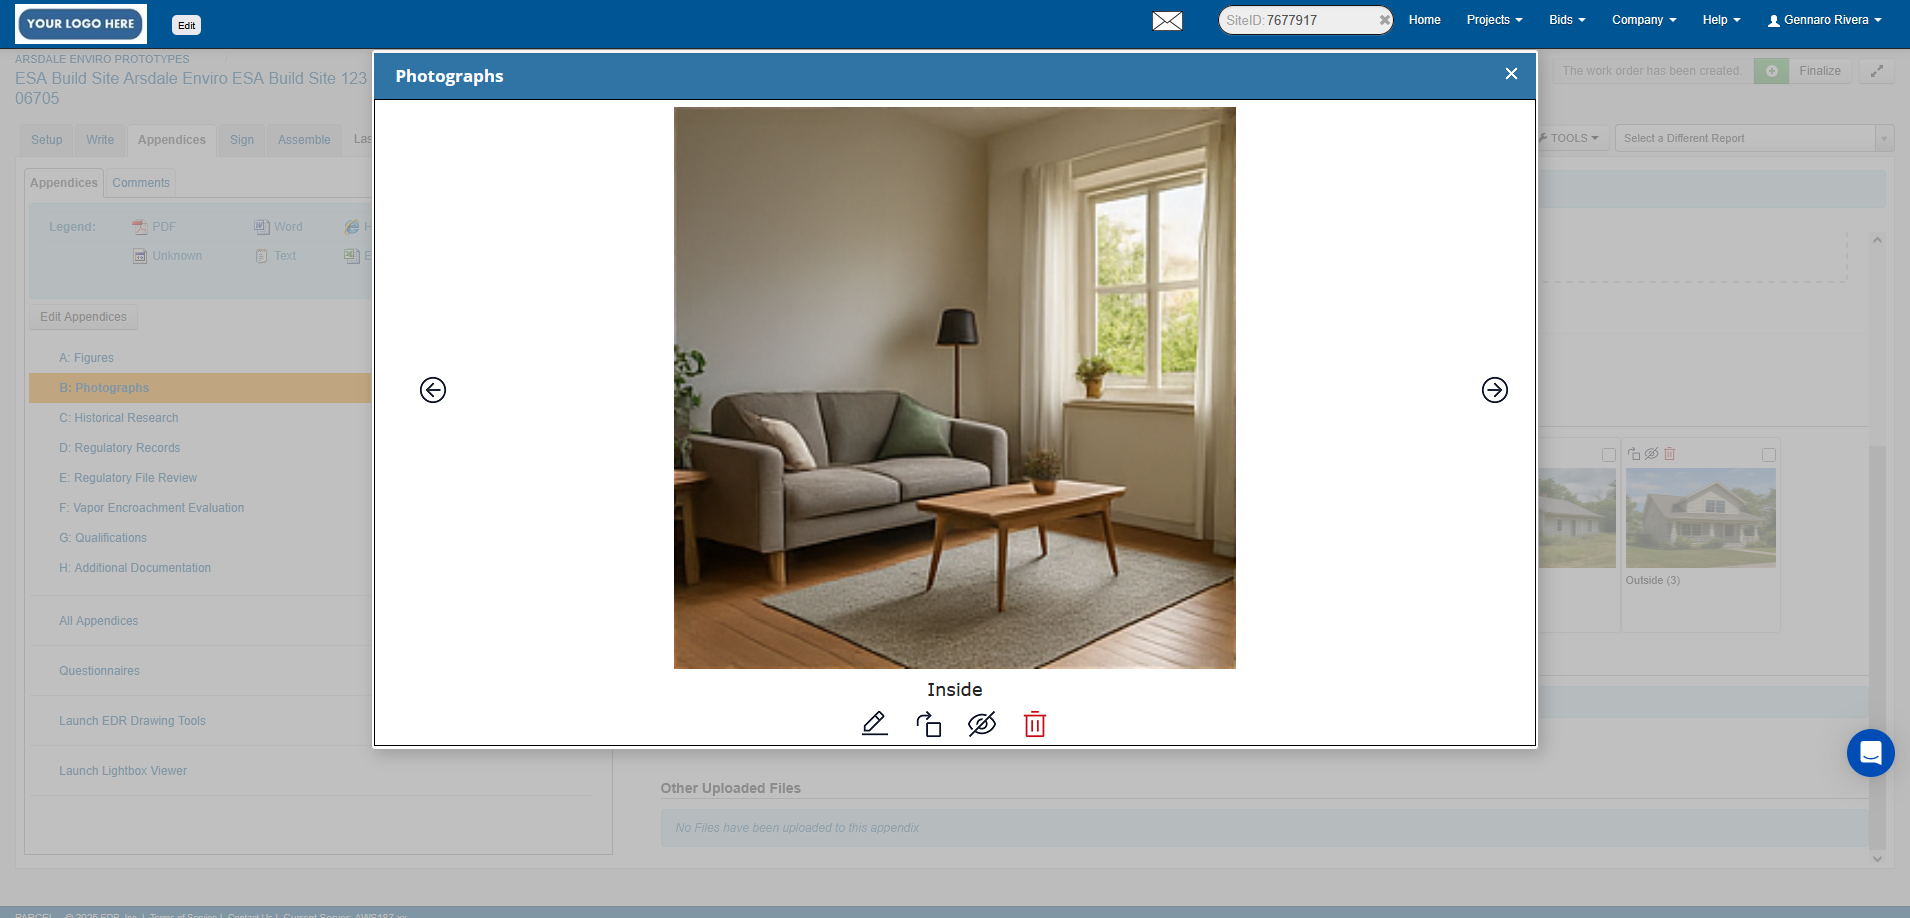
Use drag-and-drop to reorder or move photos. You can also bulk-select photos to delete or exclude. All changes are saved automatically.
Using EDR Drawing Tools
To annotate maps such as aerials, topos, or Sanborns, scroll to the bottom of the Appendices and click Launch EDR Drawing Tools.
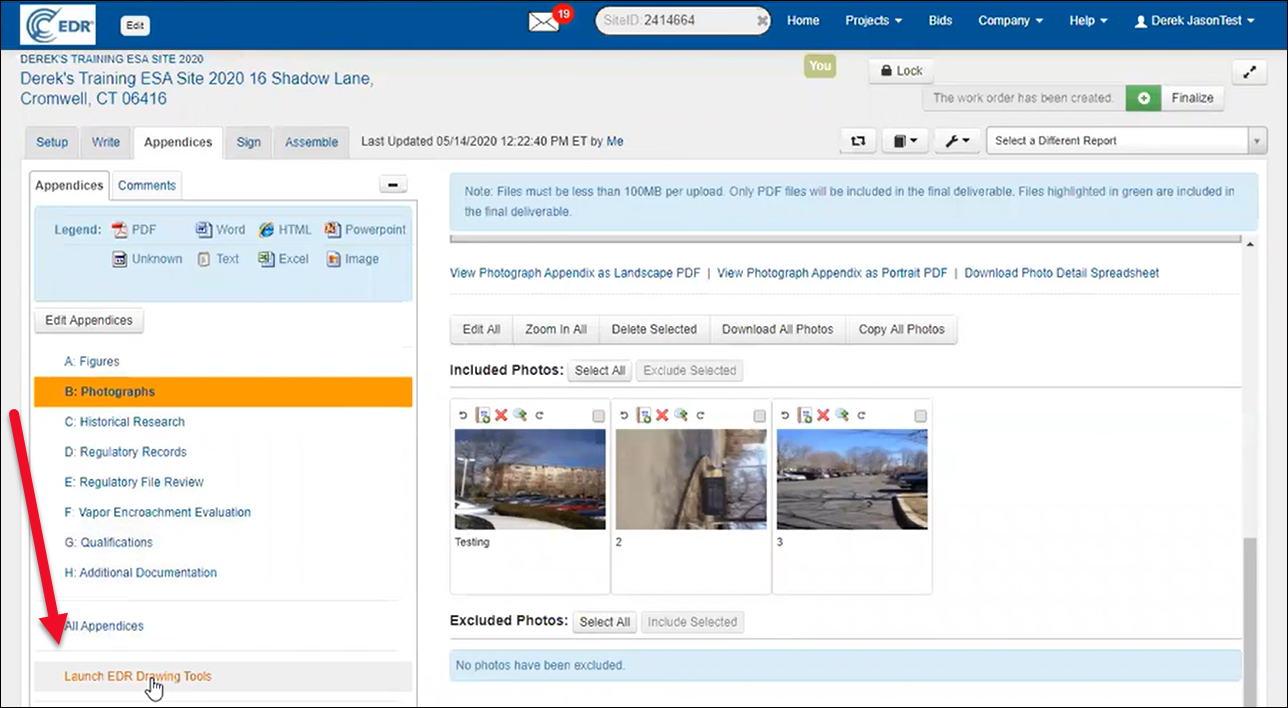
The tools open in a new window with your map images displayed. If a property boundary was defined when the EDR order was placed, it will appear automatically.
Drawing a Property Boundary
Select a tool in the menu on the right.
.png)
For example, the polygon tool:
Click the polygon icon (Draw Polygon)
Click to draw corners, then double-click to complete
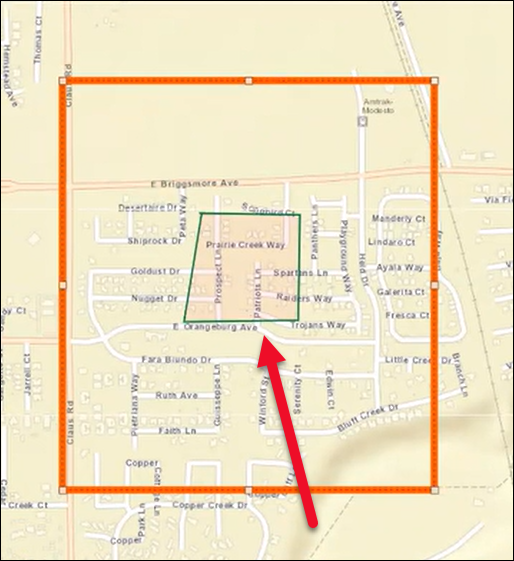
Adjust width, transparency, and color of the boundary
You can add a variety of markup to the map.
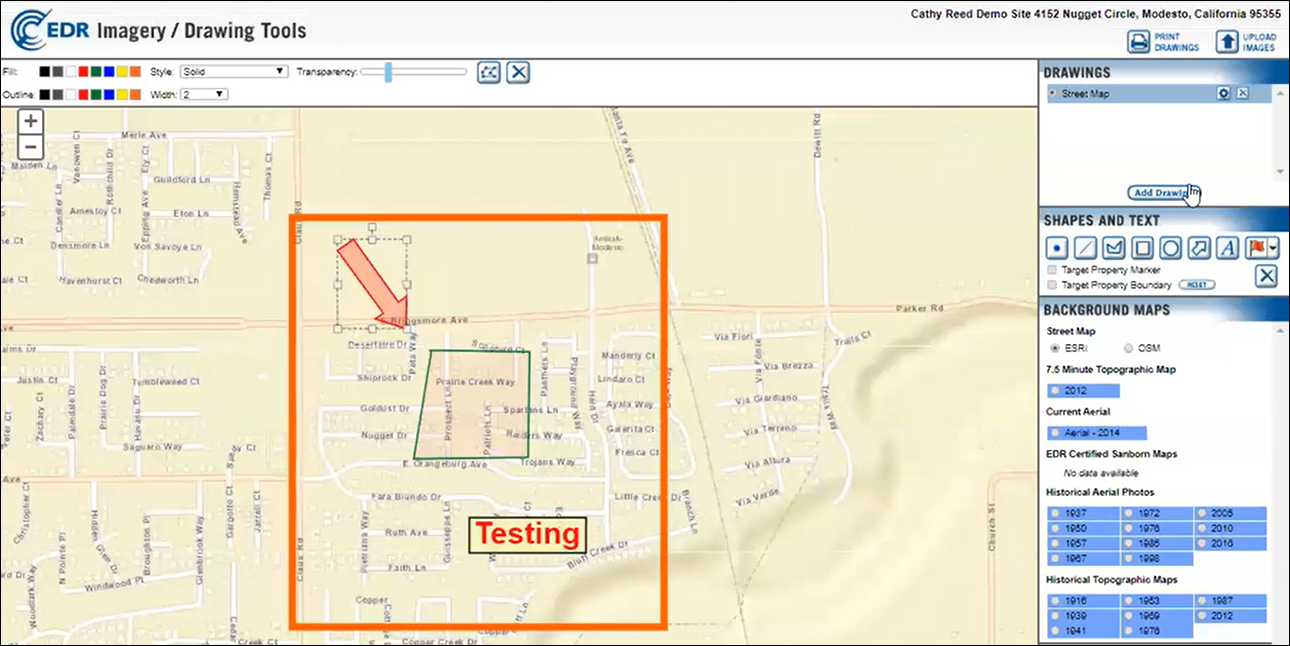
The visible orange frame defines the print area. You can reposition or resize it to change how the drawing appears in the final PDF.
Adding Drawings to Maps
Click Add Drawing

Select a map (e.g., “Aerial 2014”)
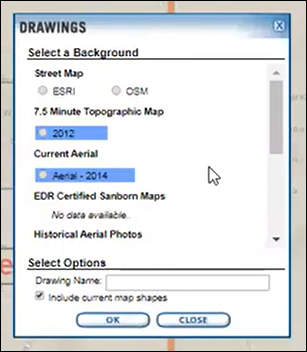
Optionally rename it (e.g., “Figure 1”)
Click OK
Once added, click the Printer icon to generate a printable PDF. Select which appendices to send it to (e.g., Appendix H) and click Print.
If needed, refresh the page to view the printed file in your appendix. To edit the map title block, click the gear icon in the Drawings list, update the fields, and reprint.
Signing the Report
Click the Sign tab, then click Edit Signatures.
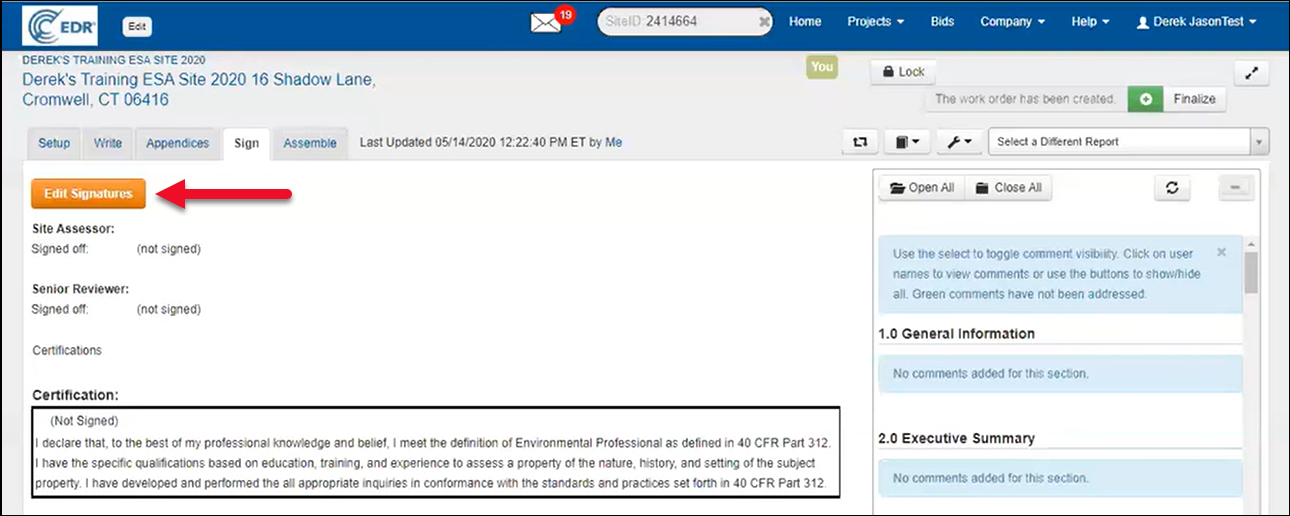
Your uploaded signature (from Account Settings) will appear automatically.
Click Sign to digitally sign the report.
Your signature and resume (PDF) will now be included in the deliverable package.
Assembling and Delivering the Report
Go to the Assemble tab to prepare the report for delivery:
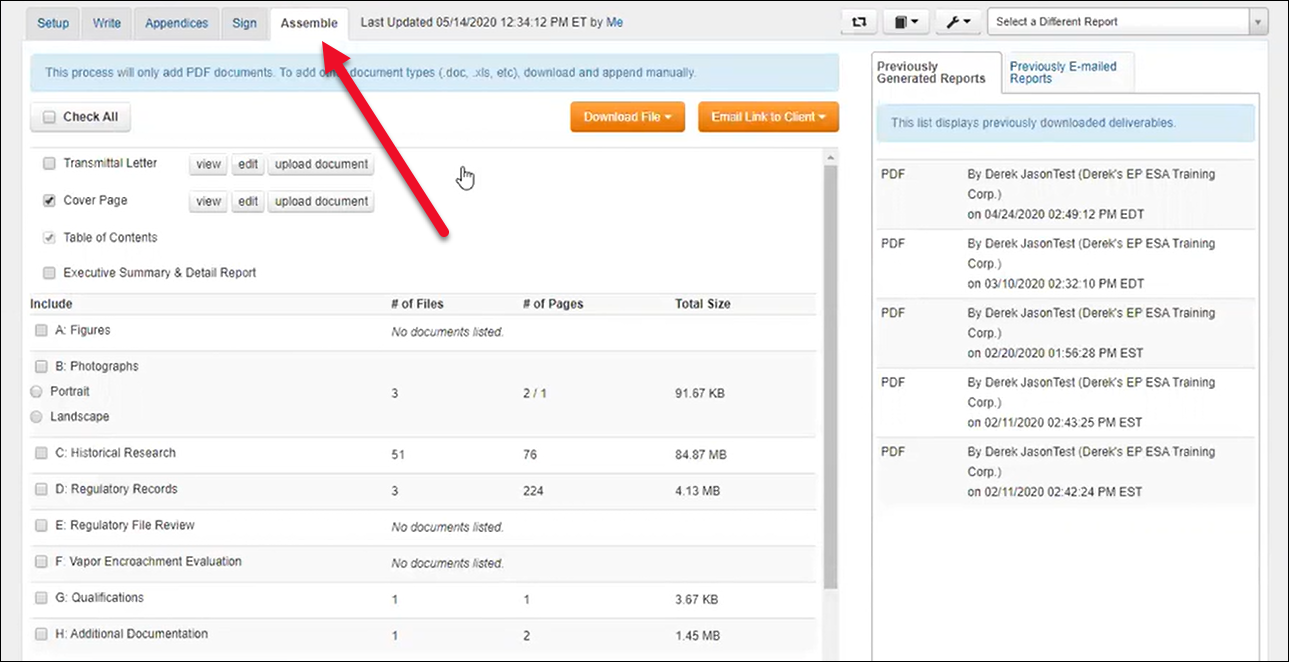
Select which sections and appendices to include
Click Reorder Lettering if needed
Click Download File (PDF format)
A record of who downloaded the report and when will be saved.
Emailing to Client
Click Email Link to Client → choose PDF → a popup form will open.

Fill out the form:
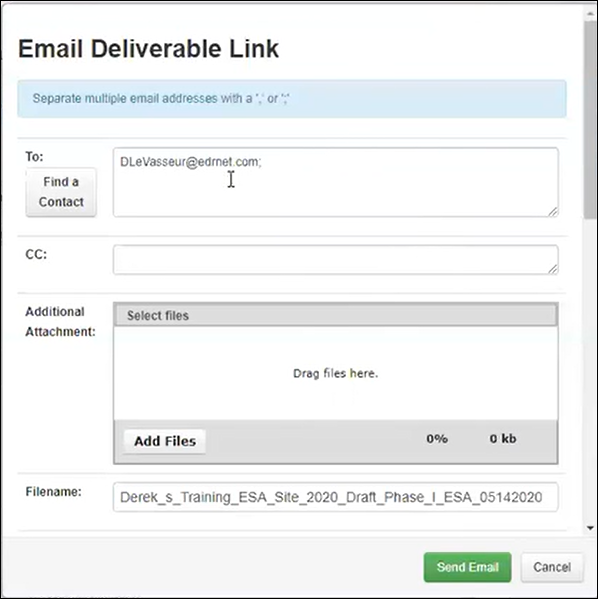
Add recipient contact(s)
Edit client-facing instructions
Optionally send a copy to yourself
Click Send Email to send
After sending, you can track when the report was accessed or expired, by viewing the Previously Generated Reports and Previously E-mailed Reports.

Use the Disable button to invalidate the link and resend a corrected version if needed.

.png)

.png)