Time View
- Print
- DarkLight
- PDF
Time View
- Print
- DarkLight
- PDF
Article summary
Did you find this summary helpful?
Thank you for your feedback!
The Time View tool in LightBox Vision enables you to view the most up-to-date satellite imagery available in your area. This feature also allows you to access historical satellite imagery that appears right on your map with the click of a mouse.
Note:
Time View is available as an add-on to any LightBox Vision account on Enterprise, Commercial or Builder versions. For pricing and more information, please contact your account manager.
Using Time View in LightBox Vision
1. The Time View icon can be found on the Main Toolbar at the top of the application
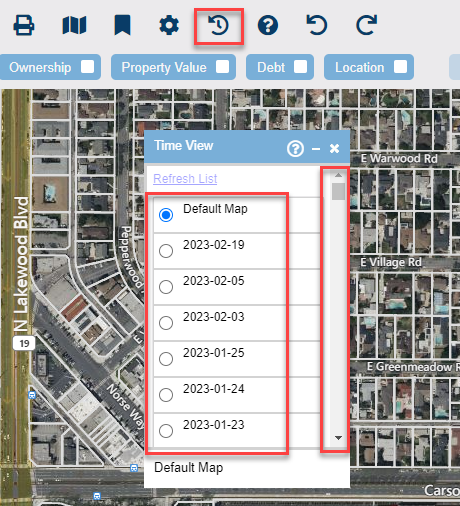
2. After selecting the icon, this will open a panel with a list of dates that you can select imagery from. These dates are the capture dates for the corresponding satellite imagery.
Note:
For performance and scalability reasons, Time View automatically turns off when you've zoomed out too far. Zoom in to enable the imagery
3. Click on the radio button next to the date to view the corresponding satellite imagery on your map and scroll down to see additional dates if applicaple.
Tip:
Satellite photography captures a limited area at a time so the imagery available will vary based on your viewing level. Moving the map may cause different dates to become available
Note:
Only one date at a time can be selected for Time View display.
Imagery may show various intervals at the selected date as we provide a combination of vivid (high resolution) and mosaic (low resolution) options.
4. To view a different date simply click another one from the list to have the corresponding satellite imagery appear.
Time View Considerations
Time View imagery is satellite imagery from a third party provider which is different from the Microsoft Bing aerial imagery that comes with the map by default. The resolution will generally be less granular than the base map aerial imagery and will look less refined due to fewer post-processing procedures. Its primary benefits are its currency and frequency.
Time View also differs from aerial imagery in that it is not contiguous for a given area. It is captured in strips. As you turn on a given satellite image, you may run into the edge of the image. This is normal and expected. If you encounter an edge of an image, simply refresh your Time View available list and select another image set from a similar timeframe.
Was this article helpful?