Printing
- Print
- DarkLight
- PDF
Printing
- Print
- DarkLight
- PDF
Article summary
Did you find this summary helpful?
Thank you for your feedback!
LightBox Vision™ enables you to print your map screen using a variety of options. The Advanced Print feature allows you to enhance your printable maps with headers and footers, set a custom map scale, and display your active layers in a legend for additional reference.
Printing Map Screens
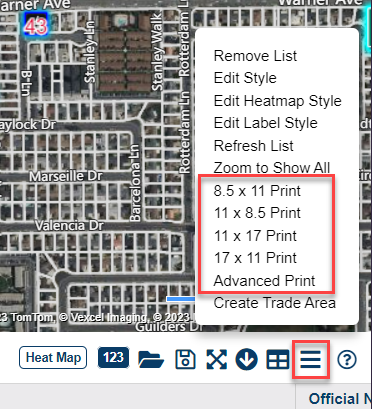
This section describes how to print you map screen at these pre-defined sizes:
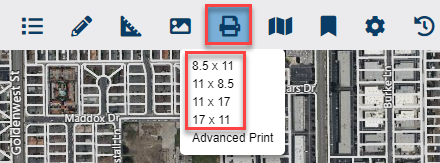
8.5 x 11
11 x 8.5
11 x 17
17 x 11
Note:
If you'd like to print the map screen at a custom size, use the Advanced Option on the Print menu. (See the section below for instructions).
1. Click the Print icon on the Main menu. The Print options appear.
2. Click the size on the menu at which you'd like to print your current map screen. This will open a new tab to preview your map.
3. On the new window, you can adjust the level of your viewing in the preview window by using the zoom slider in the top right corner (this does not affect the printed viewing level).

4. Click the Print button in the top left corner to print your map as desired.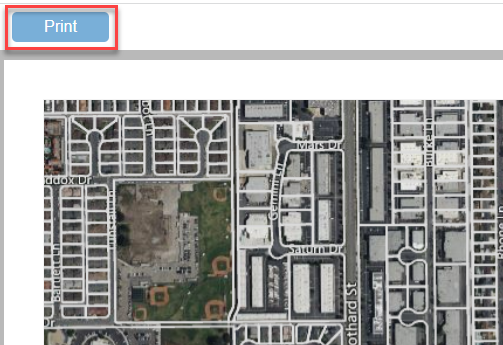
Note:
You may need to modify your browser settings for print setup in order to achieve your desired print layout.
Printing Maps with Advanced Print Options
Advanced Print allows you to customize your map with a title, footer, legend, and more. Read below to learn how to use the Advanced Print functionality.
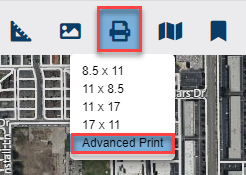
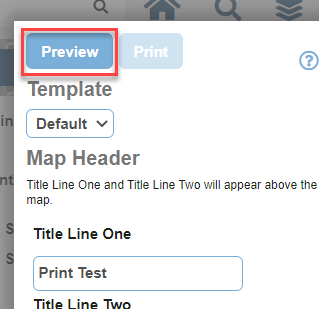
1. Click the Print icon on the Main Toolbar. Choose Advanced Print.
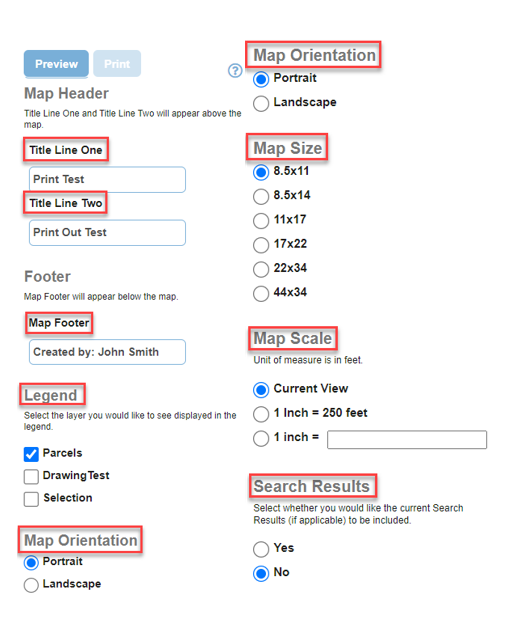
2. At the new window, select your desired options from the options on the left:
Map Header: Insert Title Line One text as a primary title, and insert a Title Line Two text as a secondary title. These titles will appear above the map.
Footer: Insert Map Footer text to appear at the bottom of the map.
Legend: Select your desired layers to be displayed alongside the map
Note:
In order for the layers to display and therefore be selectable under the Legend section, the layers must be turned on in the Legend from the map screen.
Tip:
The legend is limited in size to the vertical height of your print. If your legend is larger than the space available, remove some layers from your legend print selections.
Map Orientation: Choose from a portrait or landscape orientation.
Map Size: Choose from the following sizes: 8.5x11, 8.5x14, 11x17, 17x22, 22x34 or 44x34.
Note:
The larger the map size, the higher the possibility of small details (like parcel lines) being more difficult to view
Map Scale: Choose a unit of measure in feet: current view or 1 inch = 250 feet. Or, define a custom unit of measure.
Search Results: Select whether you would like the current Search Results List (if applicable) to be included on your print out
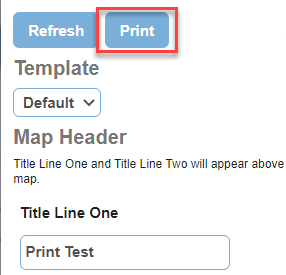
3. Click the Preview/Refresh button in the top left corner of the print options to preview changes made
4. Click the Print button at the top left of the print options to open a new tab to preview your map.
5. At the next window, you can adjust the level of zoom in the preview window by using the zoom slider in the top right corner (this does not affect the printed viewing level)
6. Click the Print icon Print Button in the top left corner to print your map as desired.
Printing Maps with Search Results
1. Run a search using your desired criteria (see related document on Search if needed)
2. The number of search results will appear on the upper right of the screen in the Search Results box.
3. Click Add to List from the Search Results box. The results will be added to the Results List.
4. Your search results will appear in the search results list at the bottom of the screen.
5. Click on Options from the Search Results List. From the drop-down menu, select either a standard print size or Advanced Print.
6. Follow the steps further above on this page for printing pre-defined simple maps or printing custom maps with the Advanced Print window.
Note:
The option to include the search results will be selected by default when printing from the results list.
Was this article helpful?