Map Views
- Print
- DarkLight
- PDF
Map Views
- Print
- DarkLight
- PDF
Article summary
Did you find this summary helpful?
Thank you for your feedback!
LightBox Vision™ enables you to conveniently save multiple custom map views that you can return to at any time. Any attribute displayed in your map view, such as a filter, search results, styling and/or layer can be saved within your view. You will save time by quickly accessing a map view for presentation purposes or share them with your team members to collaborate on project information.
Tip:
You can create a different Map View for each of your clients and/or market areas of interest
Map Views Overview
You can edit Map Views, save Map Views from one folder to another folder, and share them with members of your team. There is no limit to the number of Map Views that you can create. When you close LightBox Vision™, your current Map View is auto-saved.
Each Map View includes these settings specific to it:
- Map Extent and Zoom Level
- Set of Layers in the Layers Panel, which include:
- Layer Styles
- Layers that are turned on
- Layers that are identifiable
- Target Layer
(See Using the Layers Menu in Related Documents for information about layers.)
When you log into LightBox Vision™, the map screen displays the HOME Map View. HOME is the Map View set up by your Administrator and is considered your default view. You can use the HOME Map View like a template, save a copy with a different name, and then modify it to meet your needs.
Opening Saved Map Views
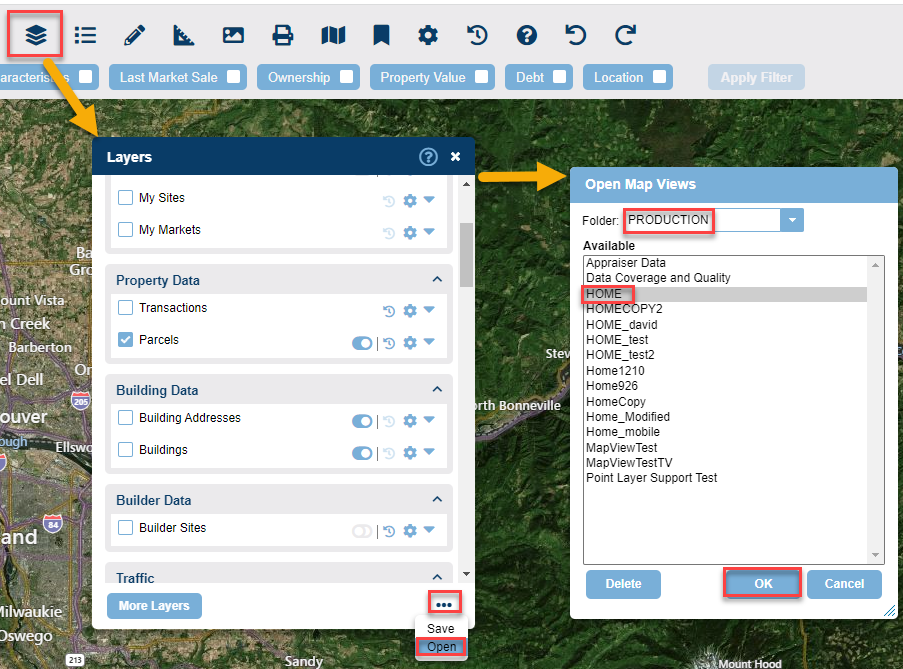
1. Click the Open button at the bottom of the Layers Menu. The Open Map Views window appears.
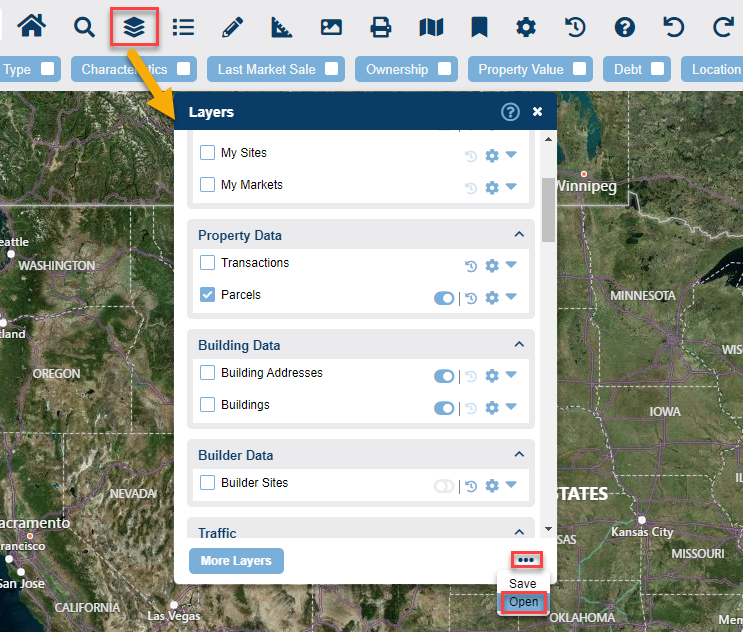
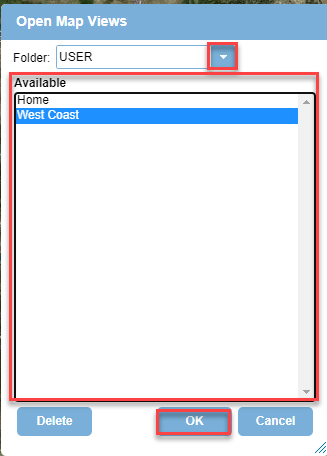
2. Select the Folder from the drop-down list which contains your desired Map View.
Note:
Folders that you don't have access to will be greyed out and inaccessible.
3. Select your desired Map View in the Available list.
4. Click OK. The Map View opens in LightBox Vision™.
Note:
To Delete a Map View, choose the Delete button at Step 4 after selecting the name of it
Saving Map View
Save a new Map View:
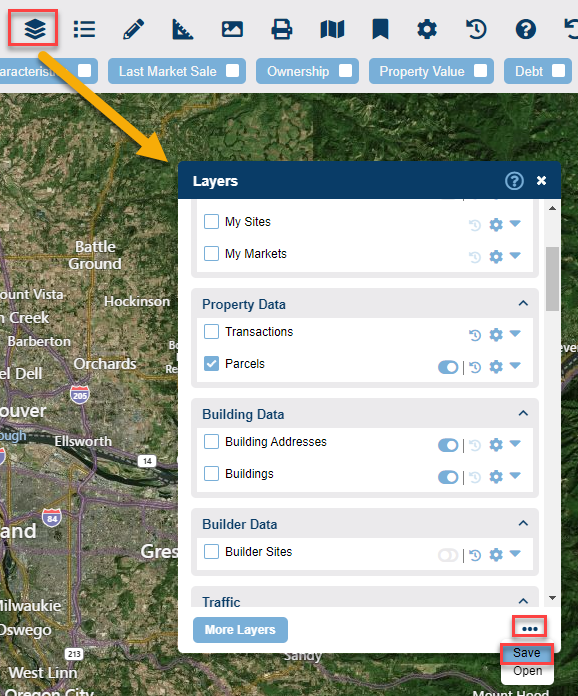
1. Position yourself on the map to an area of interest and enable layers you would like to have turned on upon getting to this view
2. Click the Save button at the bottom of the Layers Menu. The Save As... window appears.
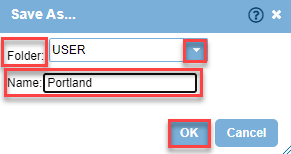
3. Perform the following in the Save As... window:
- Folder: Select the folder in which you'd like to save the Map View, such as the USER folder.
- Name: Enter your desired name for the Map View.
- Click OK to save the Map View.
4. Open your saved Map View to use it.
Your Map View does not automatically open in LightBox Vision™ after you save it. See the section above, Opening Map Views, for instructions.
Note:
Saving Map Views to your USER folder allows you to make adjustments to the Map View before copying it to the SHARE folder for members of your team to view it.
Save an Existing Map View from one folder to another folder:
1. Click the Open button at the bottom of the Layers Menu. The Open Map Views window appears.
2. Perform the following in the window:
- Folder: Select the folder which contains the Map View that you'd like to save to another folder (ex: USER).
- Available list: Select your desired Map View.
- Click OK. Your selected Map View opens in LightBox Vision™.
3. Click the Save button at the bottom of the Layers Menu. The Save As... window appears.
4. Perform the following in the Save As... window:
- Folder: Select the folder in which you'd like to save the Map View.
- Name: This field automatically displays the name of the Map View that you selected in the other folder. If desired, change the Map View name.
- Click OK.
5. Open your saved Map View to use it.
Your Map View does not automatically open in LightBox Vision™ after you save it. See the section above, Opening Map Views, for instructions.
Sharing Map Views
1. Save your desired Map View to the SHARE folder. See the section above, Saving Map Views, for instructions.
2. Instruct one or more LightBox Vision™ users to:
- Click the Open button at the bottom of the Layers Menu. The Open Map Views window appears.
- Select SHARE from the folder drop-down list in the window.
- Select your Map View in the Available list.
- Click OK. The Map View opens in LightBox Vision™.
Note:
The users that open your shared Map View can make additional changes to the Map View and either overwrite the changes or save them with a different name.
Restoring the HOME (Default) Map View
This section describes how to restore your HOME Map View saved in your USER folder with the default version of the HOME Map View in the PRODUCTION folder.
1. Click the Open button at the bottom of the Layers Menu. The Open Map Views window appears.
2. Perform the following in the window:
- Folder: Select the PRODUCTION folder from the drop-down list.
- Available list: Select HOME.
- Click OK.
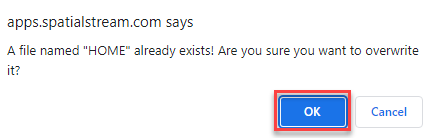
3. Click the Save button at the bottom of the Layers Menu. The Save As... window appears.
4. Ensure that the following entries are in the Save As... window:
- Folder: USER
- Name: HOME
5. Click OK

6. Click OK on the confirmation window.
- Your USER folder now includes the default version of the HOME Map View.
Was this article helpful?