Layers Menu
- Print
- DarkLight
- PDF
Layers Menu
- Print
- DarkLight
- PDF
Article summary
Did you find this summary helpful?
Thank you for your feedback!
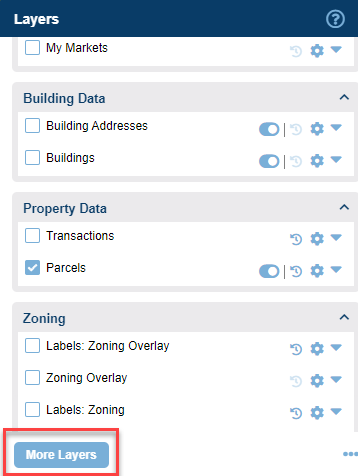
From the Layers Panel you can view and modify all your layers by accessing many of the powerful tools in LightBox Vision.
Layers Panel Overview
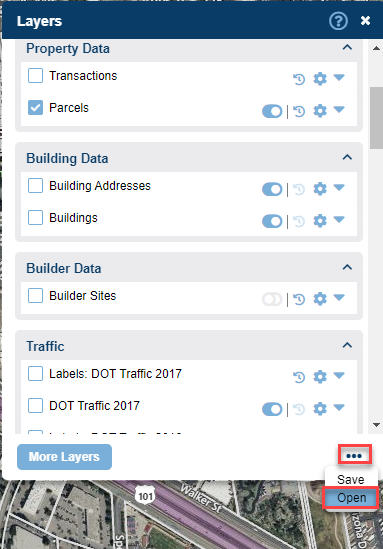
- To open the Layers Panel, click the Layers Panel icon Layers Panel Icon from the Main Toolbar.

- To make a layer visible, click the Checkbox icon to the left of the layer name.
- To style a layer, see the Map Styling documentation.
Groups Overview
|   |
Layer Tooltips
Tooltips enable information gathering at a glance by quickly hovering over a parcel or other active feature. If a specific layer's information needs to be viewed then enabling the tooltip button will assist with this. Layer tooltips can be activated on most layers by clicking the Tooltip toggle on the layer. You can also edit the information that appears in the tooltip.
- Read more about using and editing the Tooltips in the documentation.
Adding more Layers to the Layers Panel
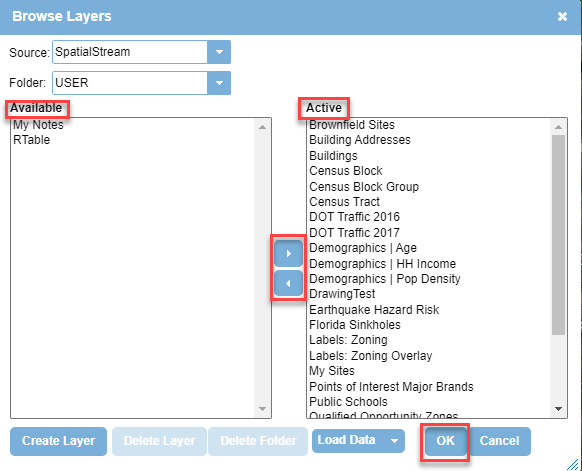
1. Click the More Layers button at the bottom of the Layers Panel. The Browse Layers window appears.
Note:
The Browse Layers window enables you to add, remove, and delete layers from the Layers Panel. This is also where you can load your data into LightBox Vision
2. In the Available list, click the layer you would like to add to the Layers Panel.
Tip:
You can add more than one Layer to the Layers Panel at once by holding down the Ctrl key on your keyboard and clicking on each of the desired layers.
3. Click the right arrow to move your selected layer(s) to the Active list.
Tip:
To remove any layer from the Active list select it and then click the left arrow to put it back to the Available section.
4. Click the OK button at the bottom of the Browse Layers window. LightBox Vision™ adds your layer(s) to the Layers Panel.
Removing and Deleting Layers
Removing a layer:
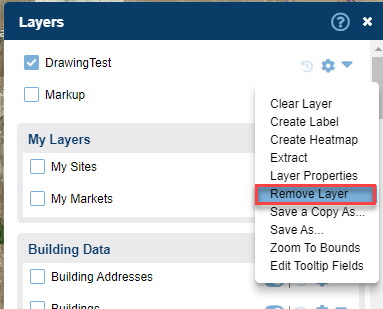
1. Click the Options icon on the layer you would like to remove. The Options menu appears.
2. Click Remove Layer on the menu. The layer is now removed from the Layers Panel.
Note:
After you remove a layer from the Layers Panel it is not deleted. See instructions below to delete a layer.
Deleting a layer:
1. Click the More Layers button at the bottom of the Layers Panel. The Browse Layers window appears.
2. In the Available list or the Active list click the layer you would like to delete.
3. Click the Delete Layer button . A confirmation box appears.
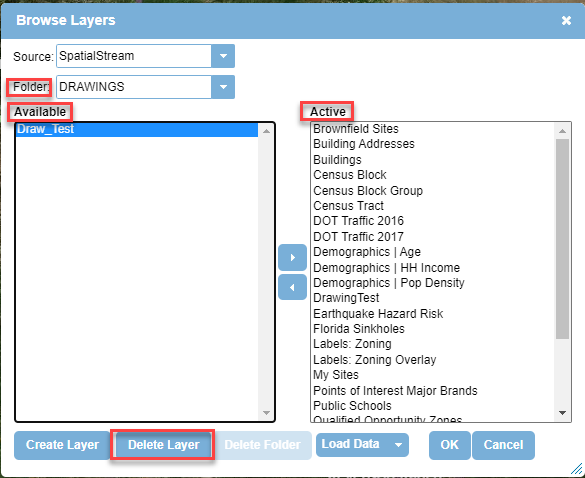
4. Click OK in the confirmation box to delete the layer.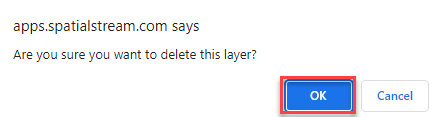
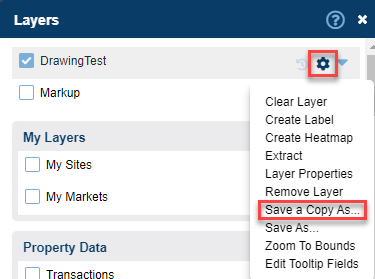
Layer Options Menu
This section describes these options on the Layer Options menu:
- Create Label
- Clear Layer
- Layer Properties
- Save As...
- Save a Copy As...
- Zoom to Bounds
Note:
For information about Remove Layer, see the section above: Removing and Deleting Layers.
See Related Documents for information about these options:
Create Label
The Create Label option creates a label layer. A label layer displays a label for every feature on the map associated with a selected field in your database.
Tip:
It is the best practice to review the values of the fields in your database before creating a label layer.
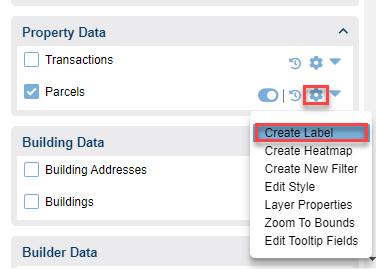
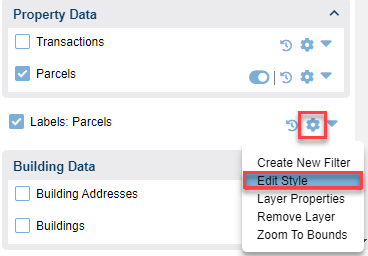
1. Click the Options icon on the layer you would like to label. The Options menu appears.
2. Click Create Label on the menu. In the example image below we chose the Parcels layer
3. Select a Field in your database from the drop-down list that contains the values you would like to appear as labels. In the example image below, we used the Parcels layer and selected a field of APN.
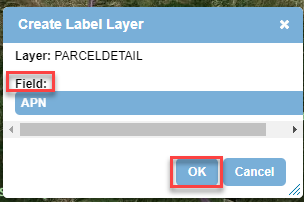
4. Click the OK button. The map displays the labels, and the Layers Panel displays the label layer with the name of your selected Field. In the below example, we now have the APN label over each parcel.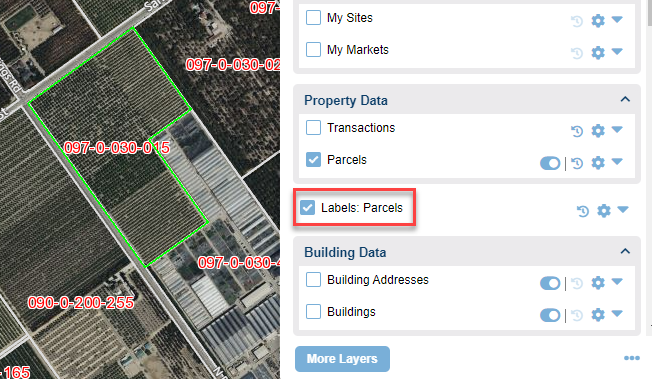
5. To edit the style of the labels on the map, such as changing the fill or line color, select Edit Style from the Options icon next to the label layer.
Note:
When choosing to Create Label as a layer, the labels themselves cannot be maneuvered to get placed in locations other than where it resides (automatically in the centroid of the layer the label was made from).
Clear Layer
The Clear Layer option permanently deletes all data from the layer.
Note:
Since all data will be permanently deleted, use this with caution. This is not limited to markup or drawings. If you clear layer the layer will be completely empty with no data.
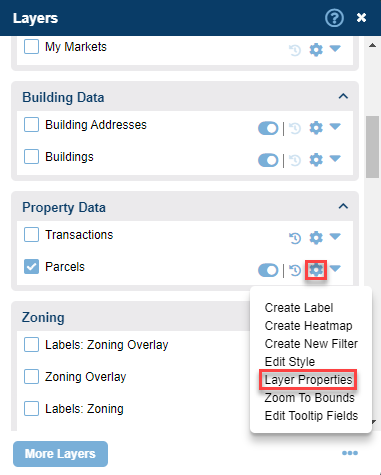
1. Click the Options icon on a layer to view, enter, or edit its properties. The Options menu appears.
2. Select Clear Layer.
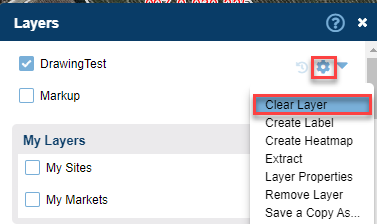
3. A dialogue appears stating that you are permanently deleting all data and content within that layer and it cannot be recovered.
4. Select yes to clear all data on that layer.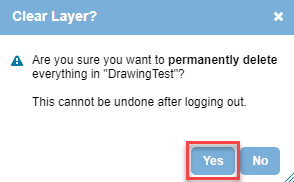
Layer Properties
1. Click the Options icon on a layer to view, enter, or edit its properties. The Options menu appears.
2. Click Layer Properties on the menu. The Layer Settings window appears.
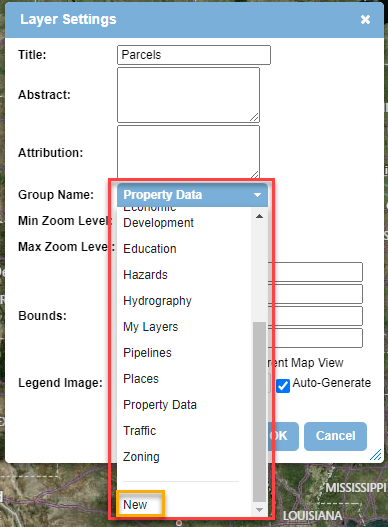
3. Select your desired options in the Layer Settings window. Your selections are not enabled until you click OK at the bottom of the window.
- Title: Edit the layer name here if desired.
- Abstract: The best practice is to enter a description of the layer data.
- Attribution: The best practice is to enter details such as who loaded the layer data, the date the data was loaded, and the source of the data.
- Group Name: Groups conveniently bring together related layers, such as the Property Data Group. There are three options for Group Name:
- Select an existing Group Name from the drop-down list. Your selected layer moves to the Group.
- Select New from the drop-down list to create a new Group for your selected layer. The Create New Group box appears. Enter a new Group Name and click OK.
- The Layers Panel displays a new blue group header with your new Group Name. Your selected layer is listed under the group header.
- Select None from the drop-down list to remove your selected layer from its Group. The Layers Panel displays the layer without a Group.
- Min / Max Zoom Level: The Zoom Level range is 1 to 21. The best practice is to set the Max Zoom Level to 21 (zoomed in all the way). It allows you to view the layer at the greatest detail (the parcel level). The MinZoom Level is 1 (zoomed out to the furthest extent from the map surface but viewing is not guaranteed at this level if too much data congests the map view).
- The Use Current option sets the current map extent as the zoom level. Select Use Current for the Min or Max Zoom Level by clicking the appropriate check box. The zoom level in the drop-down box is grayed out.
- The base map is in view, but the features of your layer are not in view.
- This would occur, for example, if the Min Zoom Level was set to 18, and you zoomed out to the County (level 10 or 11). To view the information, you would need to zoom in closer.
- Min / Max Longitude and Latitude: Instead of entering map coordinates, the best practice is to select Use Current Map View by clicking the check box. This option sets specific bounds in which your layer is visible.
- For example, you might use this option to set bounds for the display of a watersheds layer to your City instead of the whole state of California. It would aid in viewing the layer and speed up the display of the layer.
- Legend Image: Use this option to place an image on any layer listed in the Layers Panel. This enables quick understanding of the layer.
- For example, you might place an image of a bike on a bike path layer. The image is displayed only on the layer listed in the Layers Panel.
- Uncheck Auto-Generate to enable your image upload. Auto-Generate displays a default image for a layer if there is one.
- Click in the Legend Image field to enter the path to an image file.

Save As
Use this option to save a layer to a different folder. For example, you could save a layer in your User folder to the Shared folder. The people in your account would then be able to access your layer.
Note:
You must have the appropriate account permission to use this option.
Tip:
If this option is not enabled, contact your Account Administrator.
1. Click the Options icon on a layer that you would like to save to a different folder. The Options menu appears.
2. Click Save As... on the menu. The Save Layer As... window appears.
3. Select the folder to save your layer from the Folder drop-down list.
4. Click the Save button.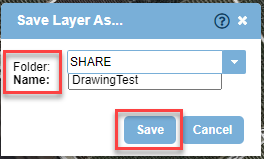
Save a Copy As
Choosing this allows you to save a copy of a layer
- For example, saving a copy of a layer to another Group or saving a copy of a layer and renaming it to have a backup of that layer
Zoom to Bounds
1. Click the Options icon on a layer to zoom to its bounds. The Options menu appears.
2. Click Zoom to Bounds on the menu. The map screen zooms to the bounds of the features on the layer.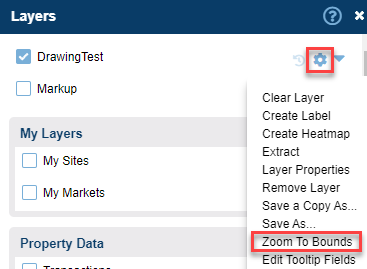
Note:
The Min / Max Zoom Level settings may affect the display of layer features. See Min / Max Zoom Level under Layer Properties documentation further above
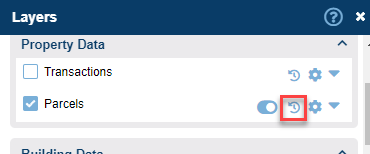
View in Time Icons
Use the View in Time option to view your selected layer at an earlier version. This is very useful to understand the changes that may have been made to the layer.
Note:
Not all layers will have earlier versions to display
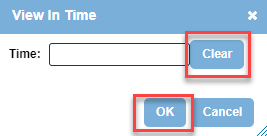
1. Click the View in Time icon on your desired layer. The View in Time box appears.
2. Click in the Time field. A drop-down box opens with a calendar and sliders to set the time.
3. Select your desired date and time to view your layer:
- To select a month/year, click the left or right arrows in the calendar heading.
- To select a day, click on it. Note: If you don't select a time, it is set to 12:00:00 AM by default.
- To select the Hour, Minute, or Second, use the appropriate slider.
- To reset the Time field to the current date and time, click the Now button.
- To clear the Time field, click the Clear button in the View in Time box.

4. Click the Done button when you have set your desired date and time. The drop-down box disappears.
5. Click OK in the View in Time box to view your layer at the selected date and time.
To return your layer view to the current date and time:
1. Click the View in Time icon on your layer. The View in Time box appears.
2. Click the Clear button. A drop-down box opens with a calendar and sliders to set the time.
3. Click OK in the View in Time box.
Setting up Map Views
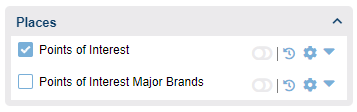
Creating Map Views enables you to consistently return to a map view with only the map layers, styles, and settings relevant to a specific project. For example, if you're working on a project concerning Points of Interest, you might create a Map View with Points of Interest turned on.
You have many options for editing the look and feel of the data that is displayed in each Map View. Each individual Map View can have its own unique set of layers, styles, order, controls, and features. When you save a Map View it includes all your current settings in LightBox Vision™. There is no limit on the number of Map Views that you can create.
The following example workflow is intended to increase your understanding of Map Views:
1. Click the Open button at the bottom of the Layers Panel. The Open Map Views window appears.
Note:
Home is the default Map View set up by your Administrator. It is the best practice not to overwrite the Home Map View.
2. Select Production from the Folder drop-down list.
3. Select Home in the Available list.
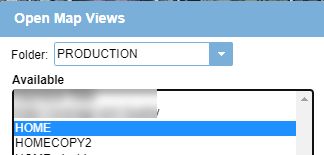
4. Click OK. This enables access to the list of layers that are currently displayed in the Home Map View. You access these layers later in this workflow.
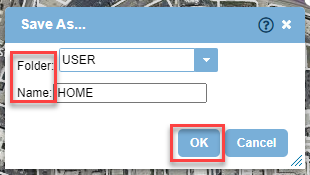
5. Click the Save button at the bottom of the Layers Panel. The Save As... box appears.
6. Perform the following in the Save As... box:
- Folder: Select the User folder.
- Name: Enter Parks as the name to save this Map View. (Let's assume for this example we are working on creating a Points of Interest Map View).
Tip:
Saving the Map View to your USER folder allows you to make edits and changes to the Map View and get any final approvals before sharing this information to all users in the Production folder.
7. Click the More Layers button at the bottom of the Layers Panel to add any desired layers now in the Production folder to the Layers Panel. The Browse Layers window appears. See the section above on Adding more Layers to the Layers Panel for instructions.
8. With all layers now added to the Points of Interest Map View, you can begin grouping the layers and setting the view status. See Layer Properties above for instructions.
Note:
LightBox Vision™ allows you to define whether a layer is automatically On or Off when the Map View is loaded, as well as whether the layer is identified.
Tip:
LightBox Vision™ utilizes Autosave functionality. When you exit, and then log back into the application, it zooms to the last map view, including the same Map View.
9. At this point in the workflow:
- You could share this Map View by saving to another folder (ex: SHARE)
Share the Map View
1. Save the Map View to the Share folder.
2. Instruct the other user to click the Open button at the bottom of the Layers Panel and then navigate to the Share folder where the file you saved is located.
3. The other user can make additional changes to the Map View and either overwrite the changes or save them with a different name.
Save Map View Directly to Production
1. Click the Save button at the bottom of the Layers Menu and select the Production folder.
2. Name the Map View and click Save.
Now anyone in the account has access to this new Map View.
Note:
There are two significant differences between the Share and Production folder:
- Only Administrators can add Map Views and Layers to the Production folder
- The Share folder allows all users to change and delete data. The production folder only allows users the ability to access and read the data.
Was this article helpful?