Integrating Esri Data
- Print
- DarkLight
- PDF
Integrating Esri Data
- Print
- DarkLight
- PDF
Article summary
Did you find this summary helpful?
Thank you for your feedback!
For LightBox Vision™ clients that would like to access layers that are located on Esri servers into your LightBox Vision subscription, then this is the answer for you! Now layers housed on an Esri server, whether it is on premise or in the cloud, can be integrated into LightBox Vision subscription accounts.
Esri Requirements for LightBox Vision
- Map Server is the supported source (Feature Server is not supported)
- If an ArcGIS layer is created via its desktop application, then the layer needs to be published to the ArcGIS portal as a WMS (Web Map Server) so that it can get loaded in LightBox Vision
- Please contact Esri's ArcGIS Support for assistance on their process for this
- Https connections are supported (Http connections are not supported)
- Avoid special characters when naming a connection in LightBox Vision
Note:
Only Support can remove a failed connection upon request.
Integrating Esri Data
With this functionality, Esri data is served directly into your LightBox Vision™ account with any updates made on the server experienced by users in real time. This includes both private and public Esri servers that leverage MapServices for the layers.
Should your data be private, it will continue to be maintained privately and confidentially on your servers with this model.
Contact us to see how the Integrated ESRI Data can be leveraged alongside LightBox's data all within one application.
Note:
The Integrated ESRI Data is an add-on for LightBox Vision™ products. Please contact your account manager for more information if you are interested in this new capability.
Adding an ArcGIS Connection and Layers
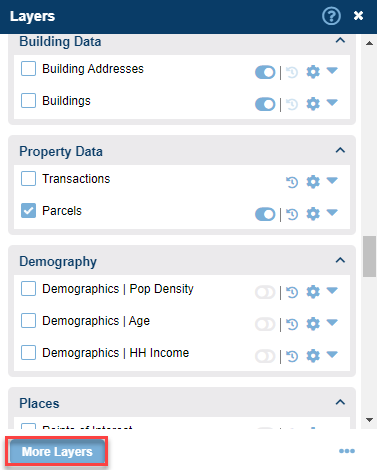
1. Click the Layers icon from the Main Toolbar.

2. Click the More Layers button in the layers panel.
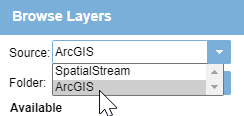
3. From the Source options, select ArcGIS.
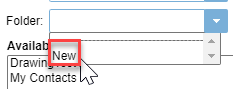
4. From the Folder options, select New.
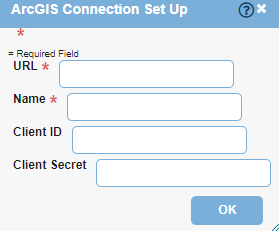
5. Enter the Host and Connection ID to your ArcGIS service. The Client ID and Client Secret are optional.
- URL: The full URL that directly points to the service directory on the host ArcGIS server. This will add all layers within this service directory to LightBox Vision™. These layers will be accessible when choosing the alias from the folder dropdown when choosing layers.
- Name: A unique name or alias that will represent the connection to the ArcGIS service directory. This can be used in LightBox Vision™ to retrieve additional layers from this ArcGIS source at a later date. This supports alphanumeric characters but avoid special characters.
- Client ID: The "Client ID" used to access an ArcGIS server that requires authentication (this is assuming the ArcGIS server requires it. If not, then leave blank)
- Client Secret: The "Client Secret" used to access an ArcGIS server that requires authentication (this is assuming ArcGIS server requires it and if not, then leave blank)
- Most ArcGIS servers are shared and do not require authentication, however certain internal and Esri servers may require authentication to gain access.
- Connection ID & Client Secret are similar to a "User Name & Password" required for login and authentication.
- Click OK to finalize the process. This will populate the available layers window with all layers that exist in the server directory you used, that can now be added to the active layers in LightBox Vision™.
Add Esri Layers to the Map in the Layers Panel
1. Select ArcGIS in the Source field.
- Source field = The online source that LightBox Vision™ is accessing to show available layers.
- SpatialStream = Data hosted by LightBox
- ArcGIS = GIS data provided and hosted by a third party and made available to others
Note:
Lightbox is not responsible if a third party source has made changes to source links which have the potential to disrupt the connection to that resource. Users will have to find the new source to apply
2. Select the Connection ID name you created for your new layer in the Folder field. Alternatively, if you know the Connection ID, you can type it directly into this field.
- The 20 most recently used connections will be shown.
- If you are trying to access a connection another user in your LightBox Vision™ account shared, you will need to type the Connection ID manually.
3. In the Available section you will see all of the data layers available in the ArcGIS rest directory.
4. Select the layer you wish to use and click the green arrow button (facing to the right) to add it to your Active layers. Then click OK
Using the Layer
After the connection is established and the layer is added to the Layers Panel, you have many different options to work with the data (just like any other layer) including:
- Creating a Custom Search Filter
- You can now create custom searches utilizing your new Esri feature layer.
- Viewing the Data in the Results List
- Take your search results and put them into an organized, easy to read list that can be saved, exported into spreadsheets, used to create mailing lists, or more.
- Printing Maps
- After you have found and displayed all of the data you need on the map, take it with you or share with others by printing the map or saving as a PDF
LightBox Vision is replicating what exists within the Esri servers so the creation of labels, editing existing labels, changing the layer name or style of Esri streamed layers will not be possible.
Note:
- Not all resources for Esri layers will allow the above functionality as it depends on how the source is structured and the compatibility of its build within our system.
Was this article helpful?