Account Administration
- Print
- DarkLight
- PDF
Account Administration
- Print
- DarkLight
- PDF
Article summary
Did you find this summary helpful?
Thank you for your feedback!
Account User Overview
The Account Administrator home page has four links:
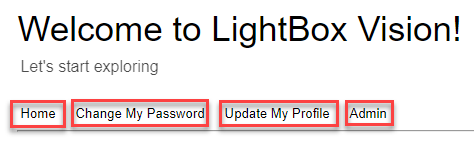
Home: Provides access to LightBox Vision
Change Password: For the logged-in user to change their password.
The Password must be at least 6 characters. There are no character restrictions.
The Security Question is not case sensitive.
Update My Profile: For the logged-in user to update their profile.
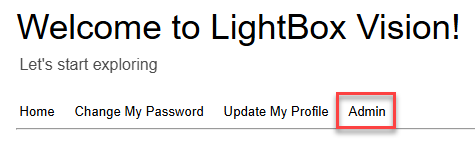
Admin: Click this link to administer groups and users.
Users will not see this option if their organization has not made them an admin
To become an admin, please contact your current account admin find out
User Types
There are three types of Account users, with the following Account privileges, listed in order from least to most privileges:
User:
No Admin privileges.
Can change their password and security question
Can update their profile by selecting "Update My Profile" on the home page (before reaching the map page)
Admin:
Cannot grant/revoke Admin Privilege to a user
Cannot grant/revoke Account Liaison Access to an Admin
Cannot add/remove an Admin to be a Point of Contact
Can add/delete users and groups
Member of Admin Group with full Admin Group privileges (see below)
Account Liaison:
Can grant/revoke Admin Privilege to a user
Can grant/revoke Account Liaison Access to an Admin
Can add/remove an Admin to be a Point of Contact
Can add/delete users and groups
Member of Admin Group with full Admin Group privileges (see below)
Admin Privileges
Read/Write capability in the account folder
View and Manage Users and Groups
Add New and Delete Users
Manage existing User Login Credentials
Reset User Passwords
Unlock Users
Create New Groups and Remove Groups without Users
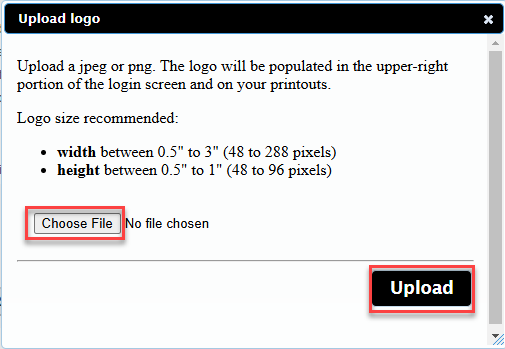
Update Logo:
Click the Update Logo button to add a logo to the top right corner of the page. The Upload logo box appears.
Click the Browse button to select a Logo.
Allowed File Types: .jpeg, .jpg, .gif, .png
Recommended Logo Width: Between 0.5" to 3" (48 to 288 pixels)
Recommended Logo Height: Between 0.5" to 1" (48 to 96 pixels)
Alert: If the user loads a logo larger than the recommended size, it is reduced in size, which may affect the quality of the logo.
Click the Upload button
Update My Profile
Anyone can change the details of their user profile at any time. This allows edits to name, title, email, phone, extension, organization, and work address info.
1. Log in to the username that needs the profile update
2. At this next page, select "Update My Profile" from the top options
3. Select "Update Profile" and now the changes will be saved. Select "Home" near the top to get back to the home page
Adding/Deleting Groups and Users
Account admins have the ability to add or delete groups and users. Only admins will see the Admin link on their LightBox Vision home page to open the Admin page and administer groups and users:
Groups (Management)
Groups are set up to allow certain users to share and collaborate with each other. Each user can only be in one group. The Current Groups list includes all the current Account groups.
Click on a Group in the Current Groups list to see all the users associated with that Group in the Active Users table.
See the section below for restrictions on creating new Group Names and removing Groups.
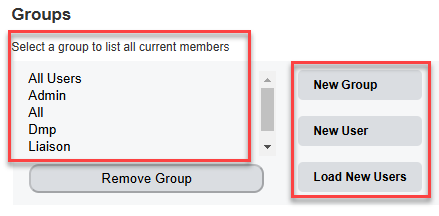
Add a New Group to the Account:
1. Click the New Group link. A field appears below the link.
2. Enter the New Group Name in the field.
Restricted Group Names: Admin, Liaison, All, and existing Group Names
3. Click the Add button. The New Group appears in the Current Groups list.
Remove a Group:
Highlight a Group in the Current Groups list by clicking on it.
Click the Remove Group button.
Note:
A Group cannot be removed if it contains a user, and if you do not have privileges to remove the selected Group. In that case, the Remove Group button is grayed out.
Add New User:
1. Click the New User link. A form appears below the link.
2. Enter information about the New User in the fields, and select a Group from the drop-down list. All fields are required.
User Name Requirements: You may use alpha numeric characters and underscores. No spaces, @, or dots are allowed.
Disclaimer: If a previously used username is added back later on, it has the potential to cause issues with data restoration. It is recommended to not re-use a username and instead provide an entirely new one (ex: jsmith1 instead of jsmith).
3. Click the Add button. The New User:
Appears in the Active Users table.
Is sent an email with login instructions.
After logging in, the user must change their password, and select and answer a security question within 24 hours of being added or else they will need a password reset by the admin
Note:
If the request to add a user is denied with the message that "no licenses are available", please contact your account manager
Tip:
If you need to add more than one user at the same time, see the instructions below to Batch Load New Users
Expire Users:
Expiring usernames may be necessary if you'll want to keep the user from accessing the account in situations where they have become prohibited from signing in, yet you want to keep their username in case they get added back later. To expire accounts, take the following steps:
1. While in the Admin section, find the user by their username/email/first/last name
2. Click on "Select" next to their username
3. In the Expiration Date field, pick the date of expiration
4. Select "Save"
5. To undo the expiration, just remove the date and select "Save"
To make an expired user active again, the admin of the account must go back to the Admin console, select the username, and then remove the date from the "Expire Date" field.
Note:
It is recommended to expire usernames if access to that user's data will be needed in the future. Expiring usernames will not be used against your license count.
Batch Load New Users:
1. Create a CSV file, with multiple New Users, containing the following field names per column:
USERNAME
EMAIL
GROUP
FIRSTNAME
LASTNAME
2. Click the Load New Users link. A field appears below the link.
3. Select your CSV file by clicking the Browse button.
4. Click the Load button.
A message appears with the number of users loaded, and an email is sent to you with load details. In the example message to the right, 0 of 3 users were added. A user may not be added to the account for these reasons:
The Group doesn't exist
The user already exists
No more licenses are available
All of the New Users that loaded appear in the Active Users table.
An email is sent to each New User that loaded with login instructions. After logging in, the user must change their password, and select and answer a security question.
To delete a user, see the section below, Managing Active Users.
Managing Active Users
This section describes the various parts of the Admin page that pertain to managing Active Users.
The following information is displayed at the top of the Admin page:
Current Licensed Users: Number of users currently having account logins
Available Licensed Users: Number of user logins available in the account
Account Expiration Date: Expiration date of the account. This is not the same as the contract renewal date (please reach out to your Account Manager for this).
Note: User login times are set to GMT (Greenwich Mean Time) which is the system default and can not be adjusted.
Active Users Table:
The Active Users table is at the bottom of the Admin page. There are various ways to view users:
To view all the Active Users associated with a Group, click on the Group in the Current Groups list.
To view all the Active Users in the account, click on All Users in the Current Groups list.
Filter by: Search for particular user(s) in the Group displayed in the Active Users table. You can filter your search by User Name, Email, First Name, or Last Name, and use Wildcard characters * and ?. For example, enter ts* to search for all users whose User Name starts with ts.
To sort the Active Users table off of a column, such as User Name, click on the column header.
To export the Active Users table to a spreadsheet, click the Microsoft Excel® icon in the header of the last column.
The Select link is in the last column of the Active Users table below the Excel® icon. It provides access to the Edit User form. The Edit User form contains a variety of functions to manage Active Users, which are described below
Grant Admin Privileges to a User:
1. Click the Select link for an Active User. The Edit User form appears.
2. Select Admin from the Group drop-down list
3. Click the Savebutton.
To Revoke Admin Privilege:
1. Click the Select link for the Active User. The Edit User form appears. In the Group drop-down list, the user is listed as being in the Admin Group.
2. Change the user's group from Admin to another Group in the Group drop-down list.
3. Click the Save button.
Note:
Only Account Liaisons have permission to grant or revoke this privilege.
Edit User Form Description
Delete User: Delete a user from the account
Unlock User If the user types in the wrong password 10 consecutive times, they are locked out of their account. You can use this button to unlock the user.
Reset User Password: Sends an email to the selected user indicating that the administrator has allowed them to reset their password
Add/Remove Admin to Point of Contact: When a user has login problems, they can click the Contact Login Administrator link on the login page. The Point of Contact receives the email.
Only Account Liaisons can add or remove an Admin to Point of Contact. If there are no Points of Contact, all Admins will be contacted when a user clicks the Contact Login Administrator link.
Grant/Revoke Liaison Access: Grants Liaison Access to the selected Admin. Only Account Liaisons can grant or revoke Liaison Access.
Note:
A button is grayed out if you do not have permission to use it or its function is not applicable.
Was this article helpful?