- Print
- DarkLight
- PDF
Vendor Alert Queue
- Print
- DarkLight
- PDF
Purpose
This documentation describes how to manage the vendor alert queue.
Audience
Job Managers and Content Administrators.
Vendor Alert Queue Overview
The vendor alert queue feature notifies the lender when a vendor has made a change to their user profile in PARCEL. This provides the lender with the opportunity to review the change.
Content Administrators can view and dismiss alerts
Job Managers can only view alerts
In its default state, the vendor alert queue feature creates an alert and highlights the vendor change(s) in yellow when there is a change to the vendor’s profile. An optional setting will also set the vendor’s status to “Inactive.”
Manage the Vendor Alert Queue
Manage Settings
Manage the Vendor Alert Queue
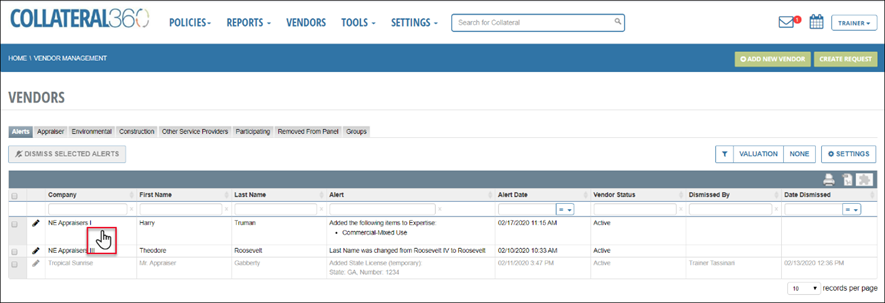
To access the vendor alert queue, click Vendors.

The Vendor Management page will open on the Alerts tab.

Note:
Job Managers will see a View (Eye) icon instead of an Edit (Pencil) icon. Additionally, the Dismiss Selected Alerts button will not be present. This is to indicate that Job Manager users can view, but not dismiss, alerts.
A. Alerts: Individual alerts are listed in the table. An alert is created when a Vendor makes one or more changes to their account in PARCEL and then saves those changes or if the Vendor’s account is moved or deleted in Collateral360. If the Vendor makes multiple changes and saves after each change, multiple alerts will appear in the Alerts tab.
Click an alert row to open that alert.
The vendor profile will open with a message listing the changes at the top of the page.

The change(s) will be highlighted in yellow.

To dismiss the alert, click Dismiss Alert. (Content Administrators only)

A pop-up will warn you that dismissing the alert will remove the highlighting on the vendor’s profile. It will request confirmation. Click Yes, Dismiss Alert to confirm.

Note:
Alerts can also be dismissed individually or in multiples on the Alerts table. Instructions are listed in item “D” below.
B. Column Filters: There are two types of column filters: text fields and date.
Text Field: Enter text and/or numbers to filter the alerts table by those characters.
Date: Click the menu button to show three commands:
On this date
Before this date
After this date
Click a command and enter a date in the field to the left to apply the filter.

C. Service Group Filters: Click one or more filters, such as Valuation or Environmental, to filter the alerts table by the service group(s) selected. Click None to clear the filter(s).
D. Dismiss Button: Select the checkboxes next to one or more alerts, then click Dismiss Selected Alerts. (Content Administrators only)

A pop-up will warn you that dismissing the alert will remove the highlighting on the vendor’s profile. It will request confirmation. Click Yes, Dismiss Alert to confirm.

In the above example, the bottom three alerts have been dismissed.
Note:
Alerts that have not been addressed after 30 days will be automatically dismissed.
Manage Settings
Click Settings to open the Vendor Alert Settings modal.

The Vendor Alert Settings modal allows you to control when dismissed alerts will be cleared from the dashboard. It also allows you to control if email notifications are sent when new alerts are received.
Note:
When email notifications are enabled, an email is sent once a day. The email will include a summary of all alerts received in a 24-hour period.

A. Auto-clear Dismissed Alerts: Click to expose a menu. Select the number of days that must elapse before a dismissed alert is cleared.

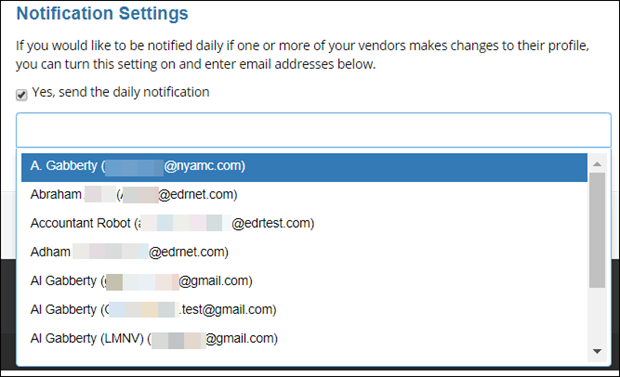
B. Notification Settings: Click the checkbox to expose a textbox that allows you to search for names and email addresses.

Select an address or search by name or email to find a user. Repeat the process to add multiple users.

In the example above, two email addresses have been added.
Click Save Changes to apply all settings.

.png)

.png)