- Print
- DarkLight
- PDF
Task Pipeline
- Print
- DarkLight
- PDF
Purpose
This documentation describes how to navigate the Task Pipeline, add Services, create Invoices, and more.
Audience
Job Managers, Lender Managers, Lender Executives and Content Administrators.
Task Pipeline Overview
The Task Pipeline is an optional feature that lists the Services associated with a loan file. The Task Pipeline is on the Collateral Overview page, immediately below the satellite-view image.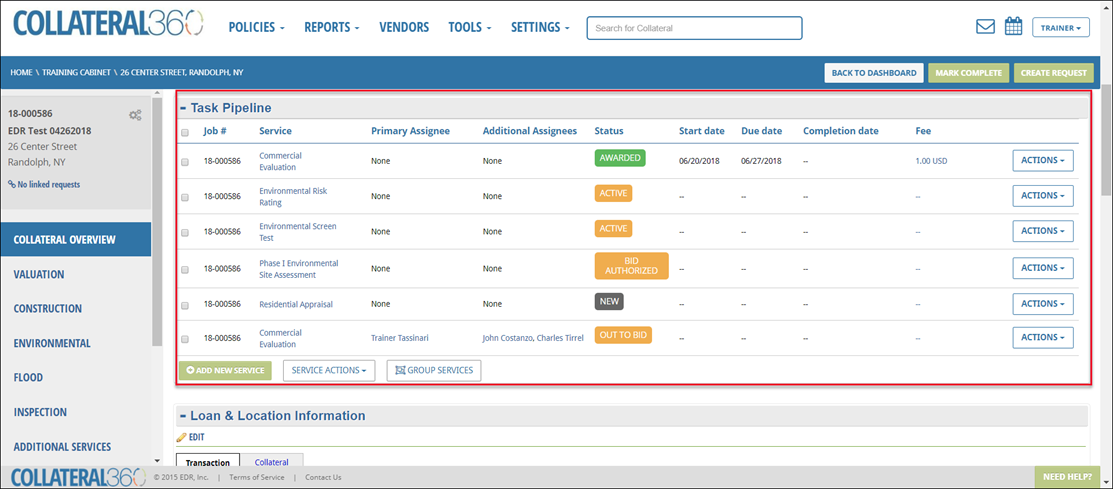
You can use the Task Pipeline to:
Add a Service
Create Invoice
Group Services
You can also use the Actions drop-down menu to modify and delete Services:
Edit Service Details
Edit Service Fees
Change Status
Log Time
Create Invoice
Remove Service
The Services on the Task Pipeline cannot be sorted.
The Task Pipeline contains several fields.
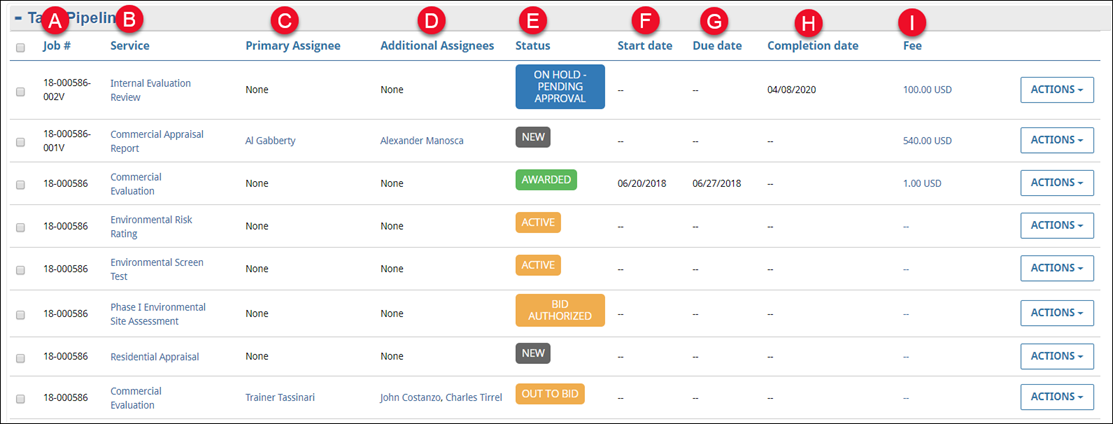
A. Job #: A bank-defined loan-identifier number. This unique identifier helps users easily find a Job in the Dashboard, Global Search, etc.
B. Service: A specific type of product or service that must be procured, or an internal review process that must be completed.
C. Primary Assignee: The individual responsible for completing the requirements of the Service, such as procuring an Appraisal Report or completing a review.
D. Additional Assignees: One or more individuals who play a supporting role in completing the Service.
E. Status: Describes the current state of the Service, such as Awarded or On Hold.
F. Start date: The date on which work was started for the Service. Note that this field is auto-populated with the date that the lender awards the Service to the vendor.
G. Due date: The date by which work must be completed. Note that this field is auto-populated with the date that the lender awards the Service to the vendor.
H. Completion date: The date on which work was completed. Note that this field is auto-populated when the user marks the Service as complete.
I. Fee: The sum of all fees associated with the Service.
Add a Service
Click Add New Service to add a new Service to the loan file.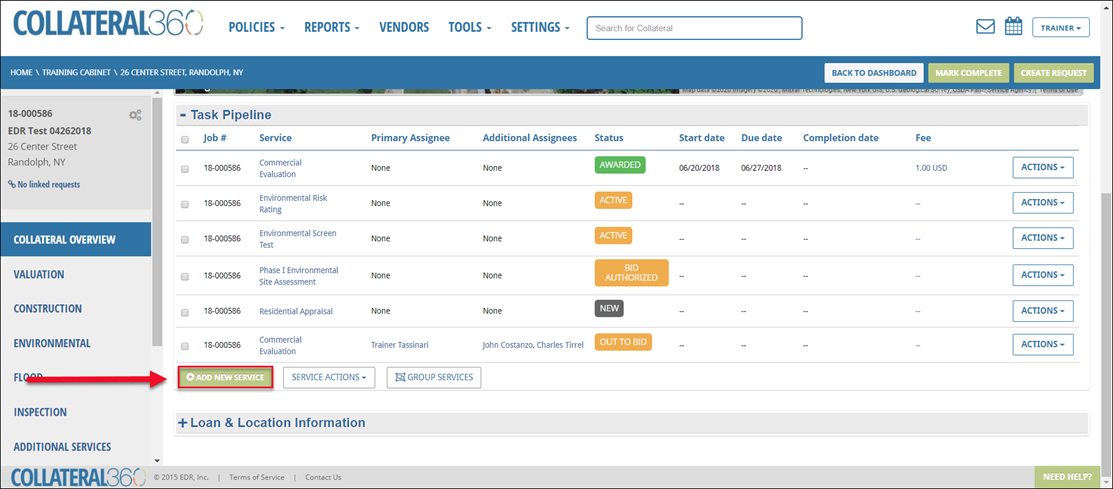
The Add New Service modal will open. 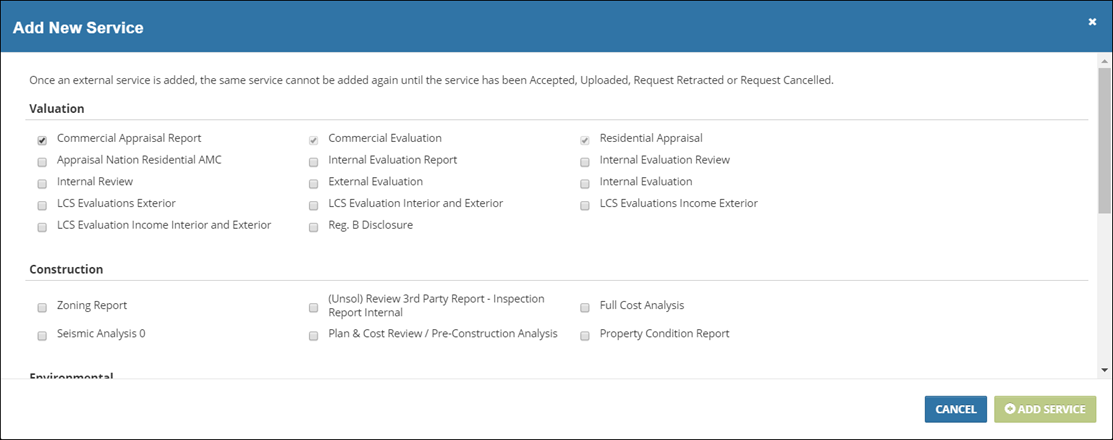
In the example above, the Commercial Appraisal Report box is checked
Services are divided by Service Group. Click the checkbox next any Services you wish to add to the loan file. Then click Add Service.
Note: You cannot add the same Service a second time until the prior Service request has been Accepted by the vendor, Uploaded, Retracted or Cancelled.
The Add New Service modal will close. The Collateral Overview page will refresh and the new Service(s) will be listed in the Task Pipeline.
Create Invoice
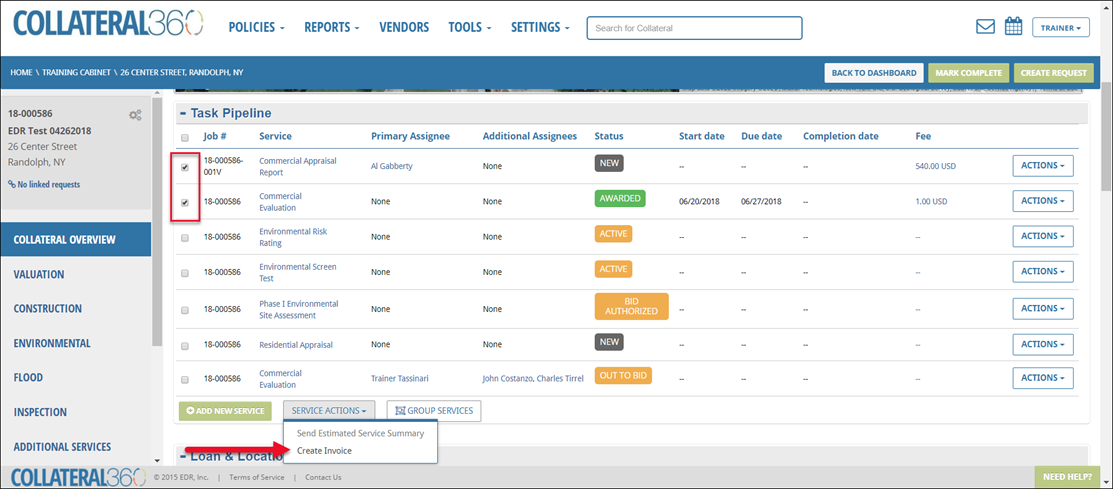
To create an Invoice, select one or more Services by clicking the checkmark (s) next to those Services. Next, click Service Actions, then click Create Invoice.
The Create New Invoice modal opens.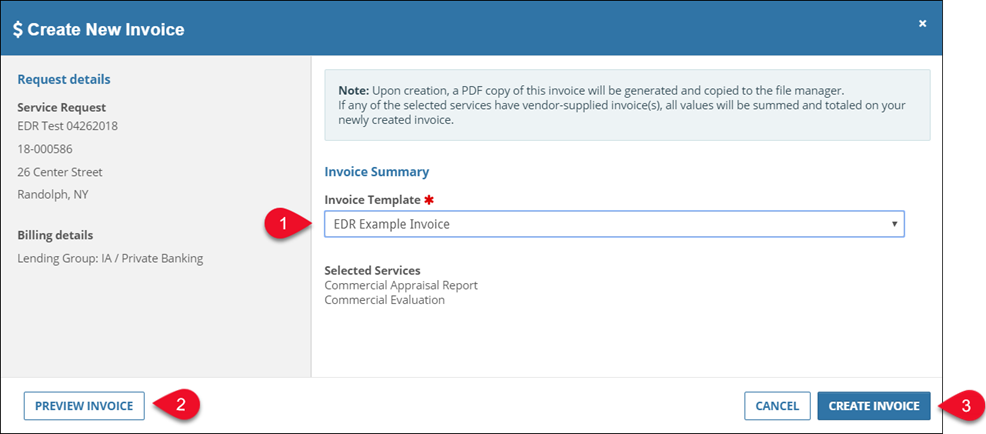
Select an Invoice Template.
Optionally, click Preview Invoice. A copy of the PDF invoice will open in a separate browser tab. The preview document is displayed with a “DRAFT” watermark to distinguish it from the actual Invoice.
Click Create Invoice to generate the Invoice file.
The Invoice is accessible on the File Manager page, in the Invoices section.
Note:
You can also create an Invoice for a single Service. Click the Actions button for that Service, then click Create Invoice.
Group Services
The Group Services feature allows the user to link Services. Services can be grouped automatically by the Collateral360 Trigger on Status feature. They can also be grouped manually with the Group Services feature. When Services are within the same group, the Primary Assignee of any of the Services in the group can sign any Review Memo on any of those Services.
Services can be grouped in the Task Pipeline section of the Collateral Overview and in the Service Review section of the Services pages (Valuation, Environmental, Construction). For information about grouping Services on the Services pages, refer to the ORM – Grouping Services Job Aid.
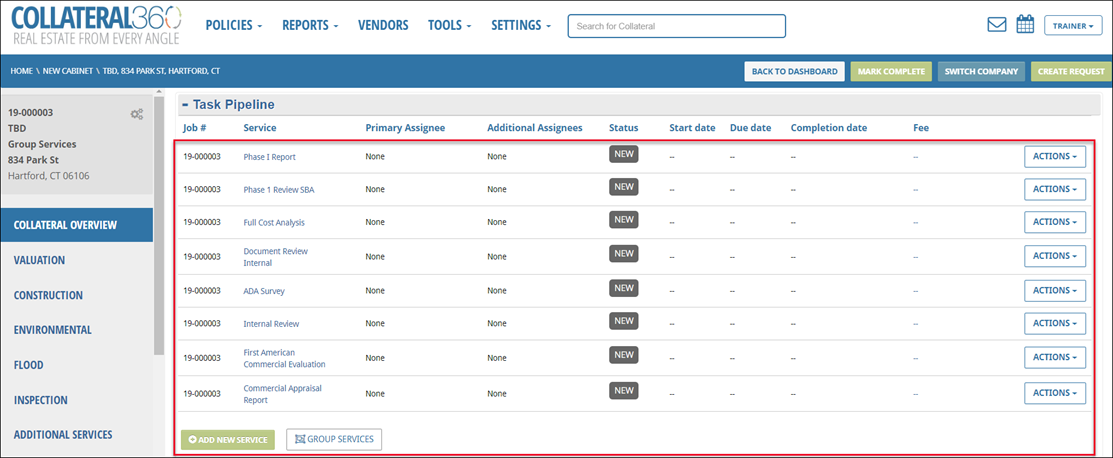
In the example above, no Services have been grouped yet.
To manually group two or more Services, click Group Services at the bottom of the Task Pipeline.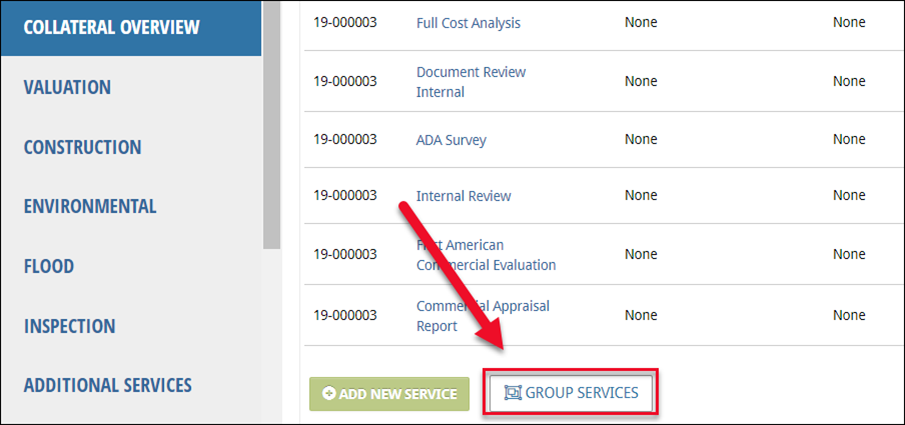
The Group Services modal will open.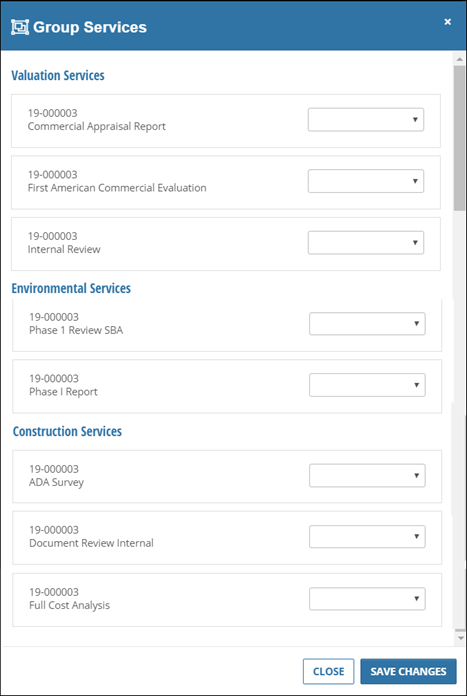
The Services on the Group Services modal are displayed by Service Group. In the example above, there are Services for all three Service Groups: Valuation, Environmental, and Construction.
To create a group, click on the drop-down menu to the right of one of the Services you would like to be in that group.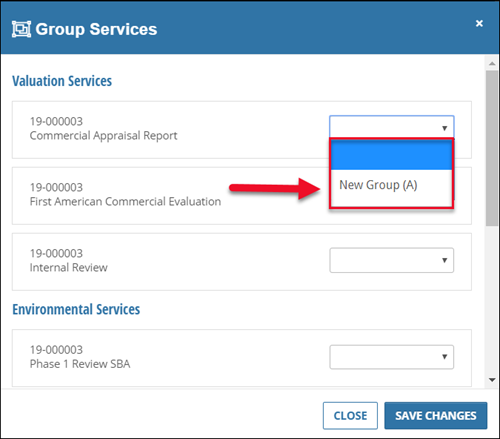
When creating the first group, there will be a single option in the drop-down menu: New Group (A). Click New Group A to create a new group that contains the selected Service.
The group will not be created until you click Save Changes in the bottom right-hand corner of the modal. If the modal is closed by clicking Close or the X in the upper right-hand corner, the group will not be created.
To add a second Service to the group, click on the drop-down menu for that Service.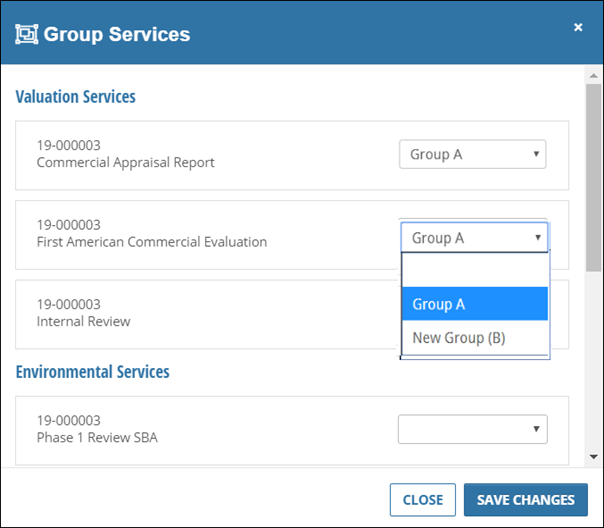
This time, two options will be available: Group (A) and New Group (B).
To add the selected item to the same group as the first (01V Evaluation Report in this example), click Group A. To create a new group, click New Group B.
Note that you can only group Services from the same Service Group. You cannot, for example, group an Appraisal Report with a Phase II Environmental Report.
Click Save Changes to create the group and close the modal. The new Group A will now appear in the Task Pipeline.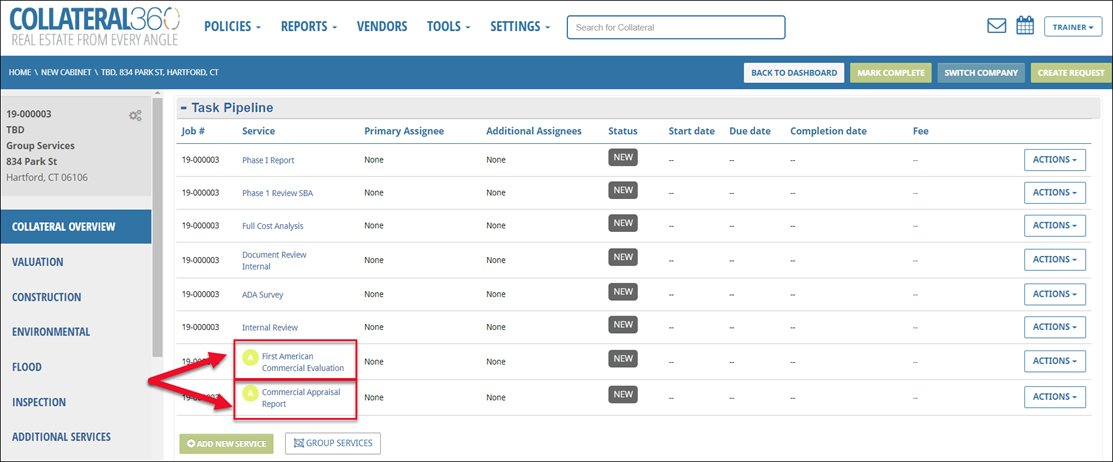
Additional Services can be added to the group by clicking Group Services, selecting another Service, and clicking Group A in the drop-down menu. Upon clicking Save Changes, that Service will be added to Group A.
To create another group, click Group Services. The group services modal will open. Clicking on another Valuation Service will present two options:
Group A: Click to add the Service to Group A.
New Group (B): Click to create a new group, called Group B, and add the Service to it.
If you click on a Service in one of the other Service Groups – Environmental or Construction – you will only be presented with the New Group (B) option, as groups can only contain Services from the same Service Group.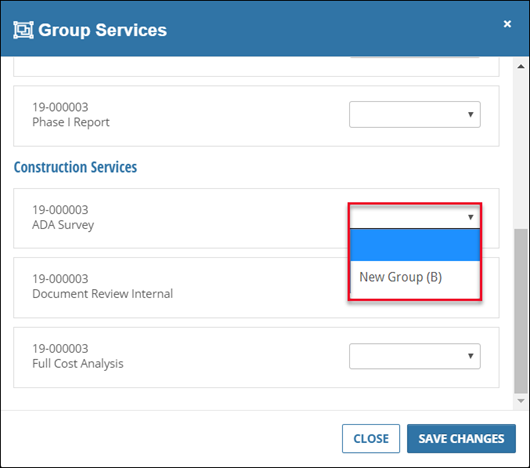
To remove a Service from a group, click on the drop-down menu and select the top (blank) option.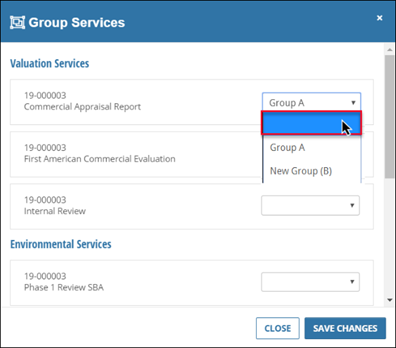
Click Save Changes to apply the change.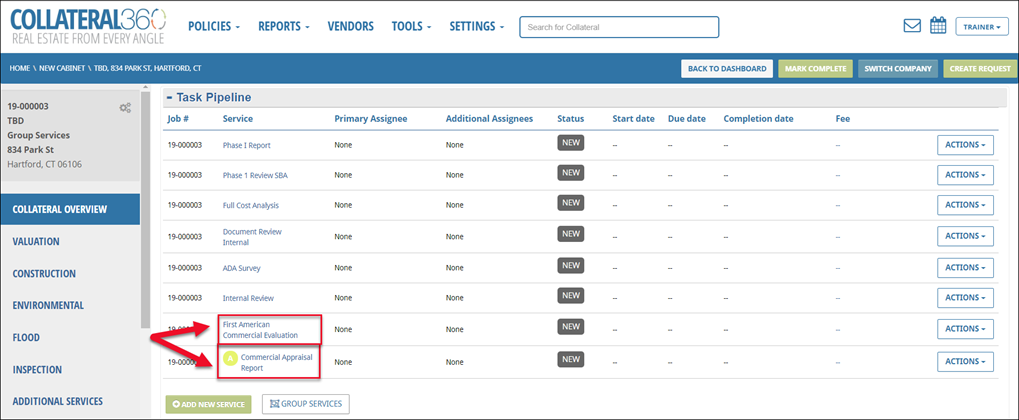
Removing all Services from a group will destroy that group. When a group is destroyed, the letter is released and becomes available for use by a new group. Other groups and their letter designations will not be impacted by the destruction of a group.
Actions Menu
Every Service in the Task Pipeline has an associated Actions button.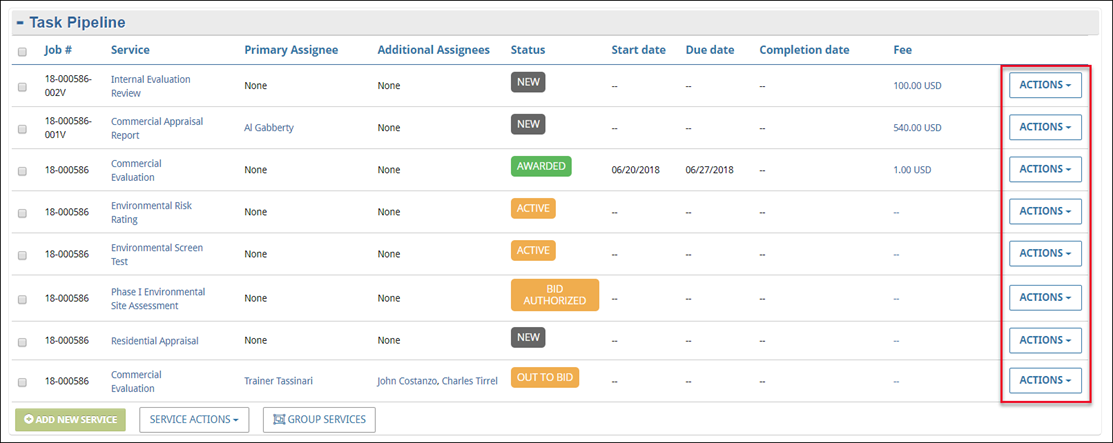
Services with a Status of New have the following menu items in their Actions menu:
Request Data Updates
Edit service details
Edit service fees
Change Status
Log time
Create Invoice
Remove Service
Services with any other Status have the same menu items, except for Request Data Updates. Click on Actions to expose the menu items for that Service.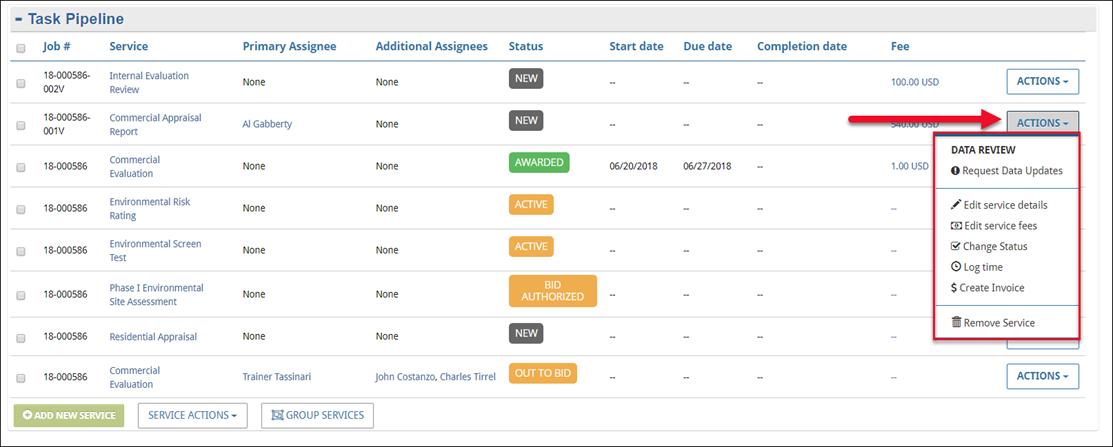
Request Data Updates: Click to open the Request Data Updates modal and communicate to the requester that the Service Request was incomplete.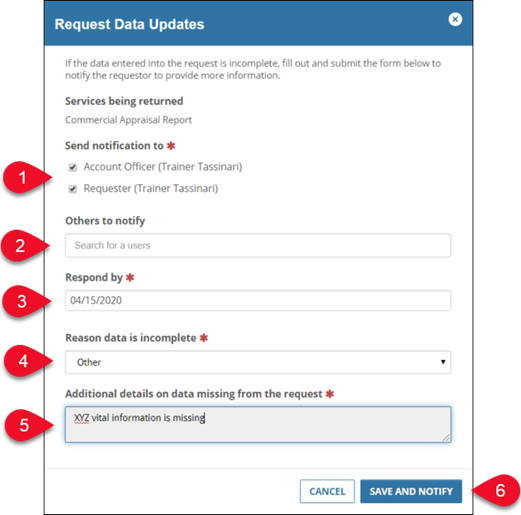
Send notification to: Deselect users that you do not wish to send the data update request to. Note: At least one user must remain checked to send the request.
Others to notify: Add additional users that you would like to send the data update request to. Type two or more characters to be presented with users you can add.
Respond by: Select a date by which the requester must respond.
Reason data is incomplete: Select a reason from the drop-down menu.
If you select Missing document, the Missing Document drop-down menu will appear. Select a document from the drop-down menu.
If you select Other, the Additional details on data missing from the request field becomes required.
Additional details on data missing from the request: Describe the specific information missing from the Service Request.
Save and Notify: Click to submit the form.
The Task Pipeline will reload and the Status will change to Incomplete Data.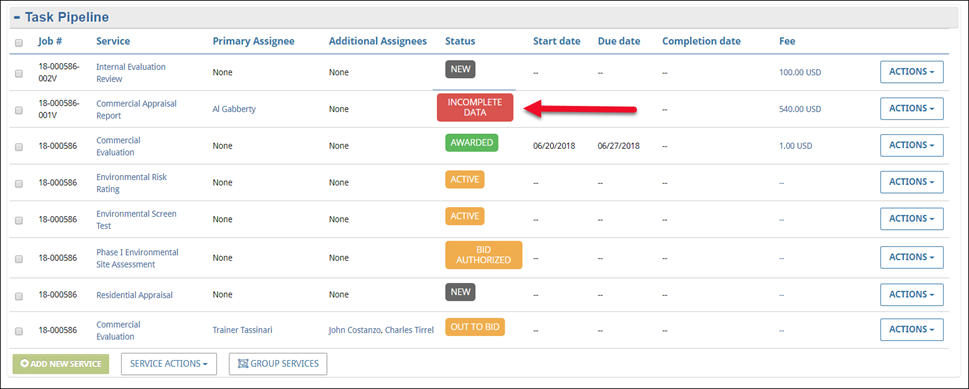
The Service will remain in that Status until the requester responds to the Incomplete Data Request.
Edit Service Details: Click to open the row for editing.
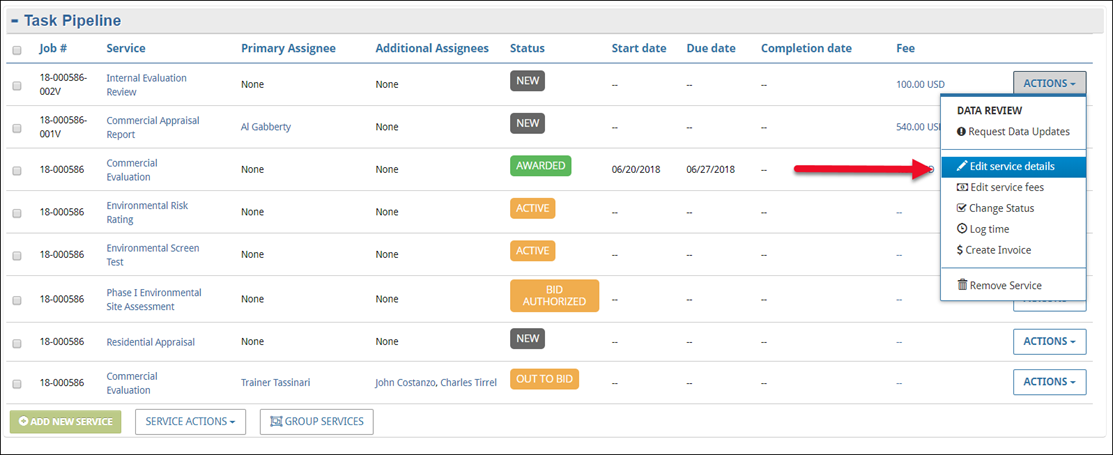
The fields in the row open for editing.
Note:
The Service field for external Service types can only be changed when the service has a status of New. The Service field for internal Service types can be changed when the Status is anything except Completed.

Make the desired changes then click Save to apply the changes.
Edit service fees: Click to edit the Service’s fees.
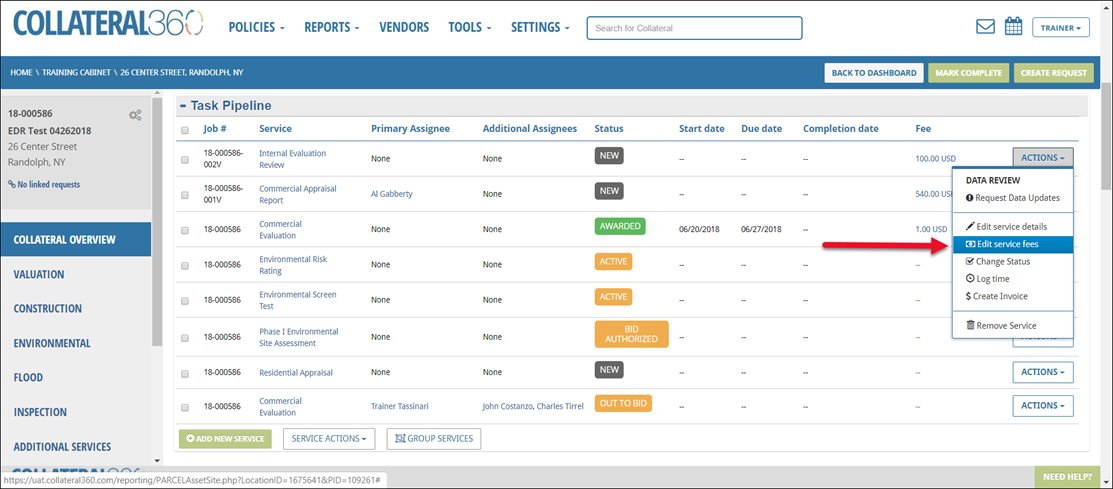
The Edit Service Fees modal opens.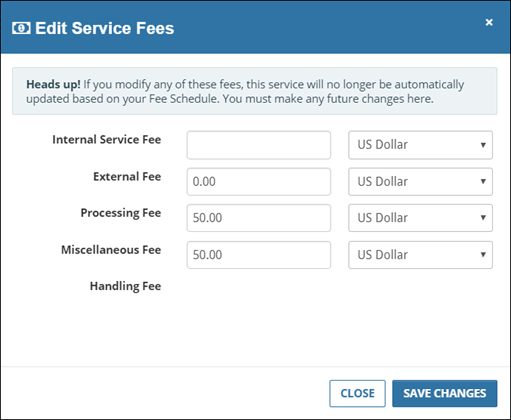
Note the warning at the top of the modal: “Heads up! If you modify any of these fees, this service will no longer be automatically updated based on your Fee Schedule. You must make any future changes here.”
Make the desired changes, then click Save Changes.
Change Status: Click to change the Service’s Status. Note: Status cannot be changed when the current Status is Active.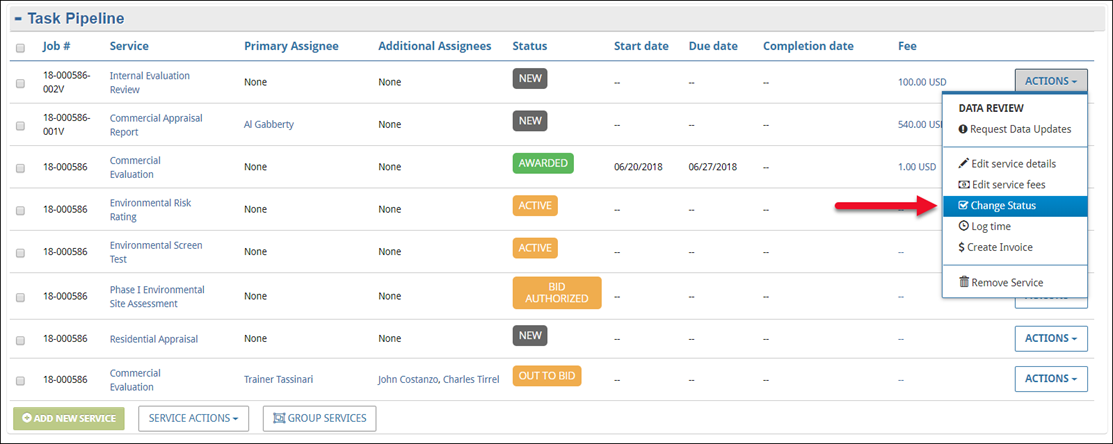
The Change Report Status modal opens.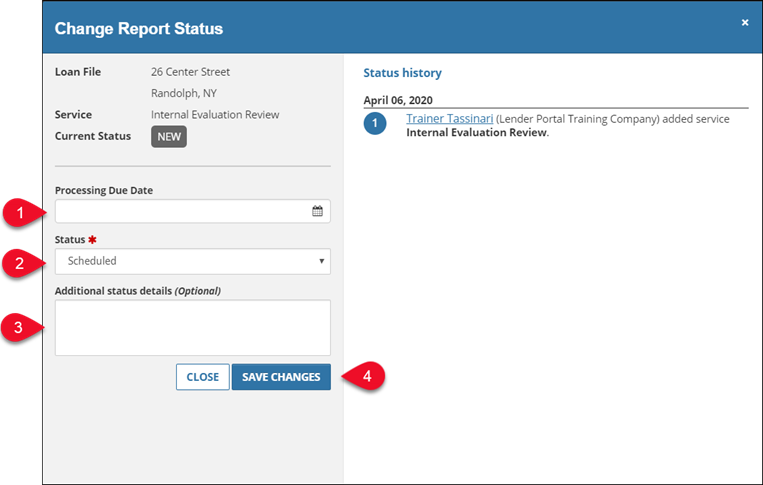
Processing Due Date: The processing due date is a user-defined date, best described as a reminder to the business that an action needs to occur. For example, a user may place a Service On Hold and set the reminder (Processing Due Date) for later in the week as a reminder to follow-up.
Status: Select the desired Status.
If you select On Hold or On Hold Pending Approval, the On Hold – Pending Approval reason menu appears. You are required to make a selection. Note that placing a Service On Hold using this method only pauses the Service internally, and does not notify or otherwise impact the Vendor. If you wish to place the Service On Hold with the Appraiser or other Vendor, please refer to the Cancel or Place a Service On Hold documentation.
Additional status details (Optional): Enter comments about the Status.
Save Changes: Click to apply the Status change.
Note:
If a Service has a status of Accepted, meaning the Vendor has accepted the awarded Job but not yet uploaded the Final Report, changing the status to Cancelled or Cancelled Rejected a message appears, notifying the user that this cancels the Service internally only and does NOT notify the Vendor: “You are about to cancel this service in the task pipeline. If you'd like to cancel with the vendor, please select Cancel in the Actions drop-down in the Report Status area.” Likewise, taking a Service off cancelled displays a message notifying the user that this will not notify or otherwise impact the Vendor. If a Service has a status of Accepted, changing the status to On Hold a message appears, notifying the user that this places the Service on hold internally only, and does not notify the Vendor. “You are about to place this service on-hold in the task pipeline. If you’d like to place it on-hold with the vendor, please select On-hold in the Actions drop-down in the Report Status area.” For information about cancelling and placing Services on hold on the Report Status page, refer to the Cancel or Place Service On Hold documentation. |
All user-initiated Status changes are logged in the Status history panel. Automatic Status changes made by Collateral360 are not logged here.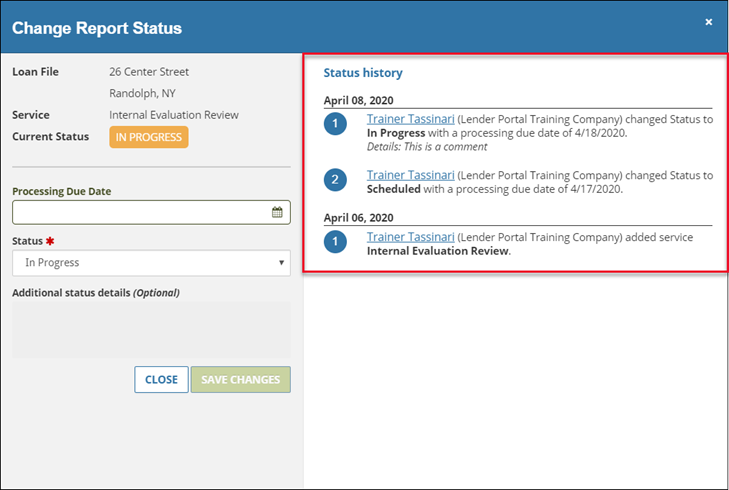
Log Time: Click to log time for the Service.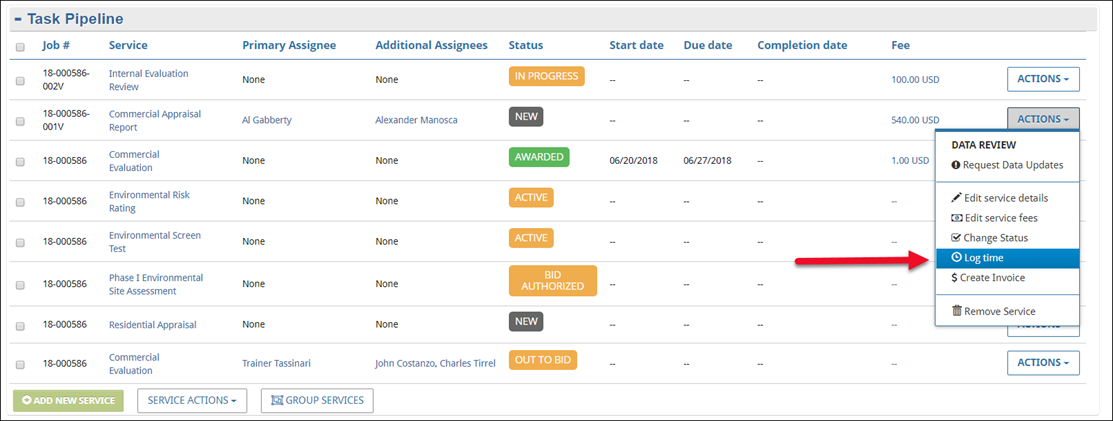
The Log Time modal opens.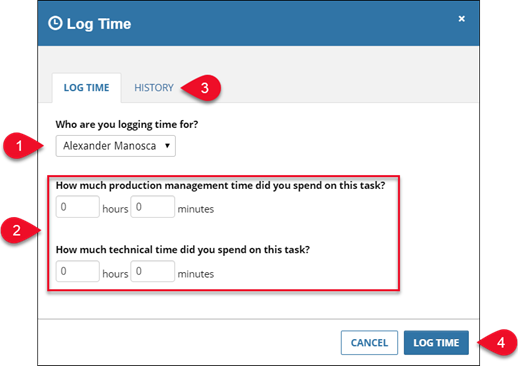
Who are you logging time for?: If there is at least one Additional Assignee on the Service, you will have the option to select the Primary Assignee or one of the Additional Assignees.
Enter hours and minutes for production management time. Enter hours and minutes for technical time.
History: Click to open the History tab and view all log entries.
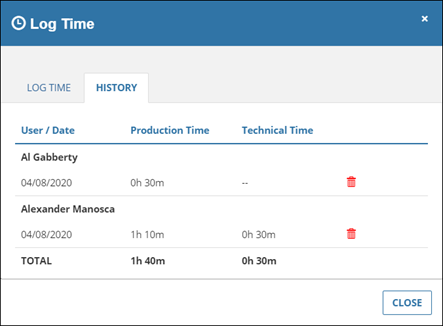
In the example above, there are time entries for two users: Al Gabberty (Primary Assignee) and Alexander Manosca (Additional Assignee).
If time is logged for the same user more than once in a day, that time will all be added to the existing entry for that user.
Click the trash can icon to delete a time-log entry.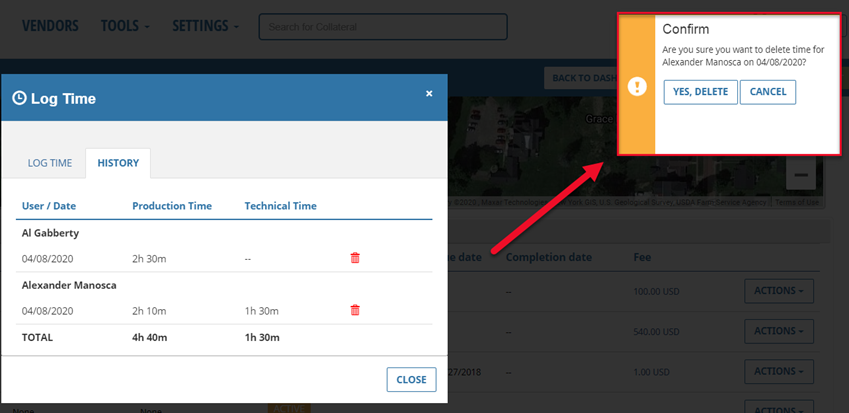
A pop-up will request confirmation. Click Yes, Delete to delete the log entry.
Create Invoice: Click to create an Invoice for a single Service.
The Create New Invoice modal will open.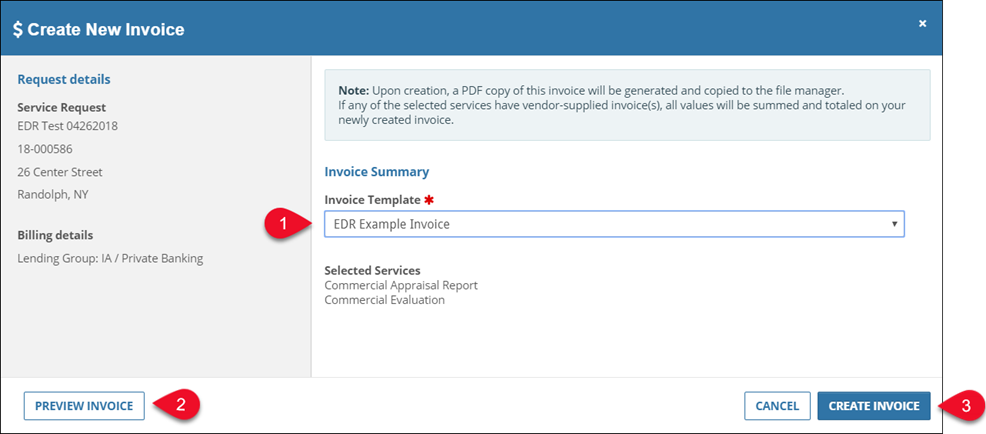
Select an Invoice Template.
Optionally, click Preview Invoice. A copy of the PDF Invoice will open in a separate browser tab. The preview document is displayed with a “DRAFT” watermark to distinguish it from the actual Invoice.
Click Create Invoice to generate the Invoice file.
The Invoice is accessible on the File Manager page, in the Invoices section.
For information about how to create an Invoice for multiple Services, refer to Create Invoice.
Remove Service: Click to remove the Service from the loan file.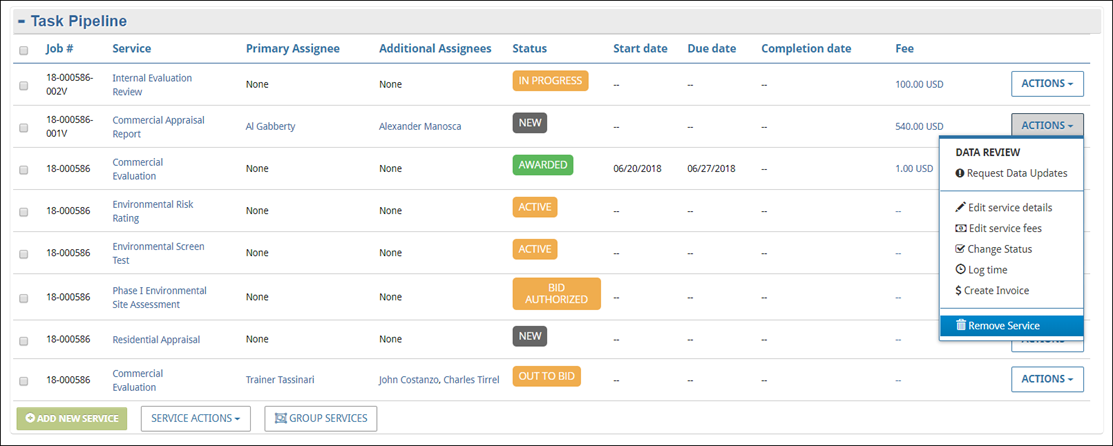
The Remove Service popup will request confirmation. Click Yes, Remove to delete the Service. Once deleted, a Service cannot be restored. However, you can add the same type of Service again.
Note:
Only Services with a Status of New can be removed.
.png)

.png)