- Print
- DarkLight
- PDF
Reference Document Library
- Print
- DarkLight
- PDF
Purpose
The purpose of this Job Aid is to describe how to create and manage Reference Document Libraries.
Audience
Content Administrators and Lender Executives
Overview
Reference Documents are attachments that can be added to RFPs. These are typically documents which an organization wants attached to every RFP, or every RFP within a specific Service Group, e.g, legal, instructional, or scope-definition documents. A Reference Document Library combines two or more Reference Documents, making it easier for the user to include all of the requisite documents.
The Reference Document Library tool allows users to create Libraries, add and remove documents from Libraries, and control the Service Groups those Libraries are available for, and define when those Libraries are automatically attached to RFPs.
To access Reference Document Libraries, click Settings, then click Form Settings in the dropdown menu.

On the Form Settings page, click View Libraries.

On the Libraries page, click View Libraries.

The Reference Document Libraries page has two tabs at the top.

Libraries: Libraries are collections of related documents that can be attached to an RFP as a group.
Documents: Documents are individual files that can be added to one or more libraries.
Documents
Click the Documents tab. The Documents tab lists all documents that have been uploaded to the Reference Document Libraries tool.

A. Column Headers: Click the Name column header or the sort icon to change the sort order. Click again to change it back.
B. Search: Enter a search phrase to search for a document. The Name, Library, Last Updated, and Created By fields are searchable.
C. File Name: Click the blue File name text to download a copy of the corresponding file.
D. Library Name: Lists the Library or Libraries in which the document is included. If blank, the document is not included in any Libraries.
E. Active Toggle: When a document is toggled ON, it is available to be added to Libraries. When a Library in which it is included is attached to an RFP, the file will appear as part of the Library.
When a document is toggled OFF, it will not be available to be added to Libraries. When a Library in which it is included is attached to an RFP, the file will NOT appear as part of the Library. However, any RFPs that are in-flight when the document is toggled OFF will still include the document if it was part of a Library that was attached to the RFP.
When switching a document OFF, a popup appears and requires confirmation. Click Yes to make the document inactive.

F. Actions: The Actions dropdown menu contains three commands:

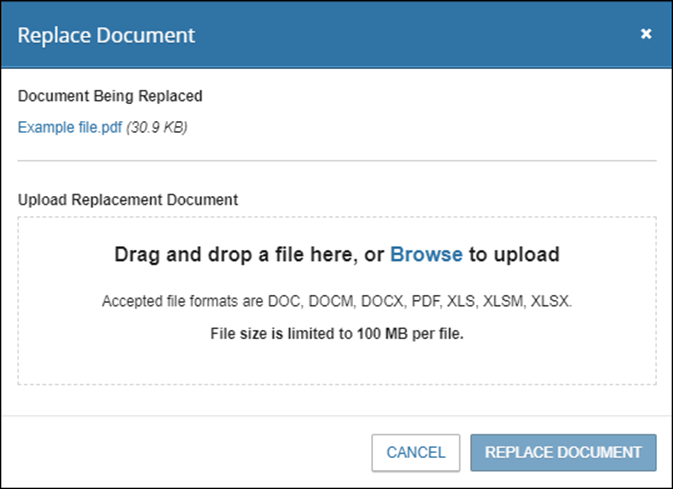
Replace Document: Click to open a file-upload modal.

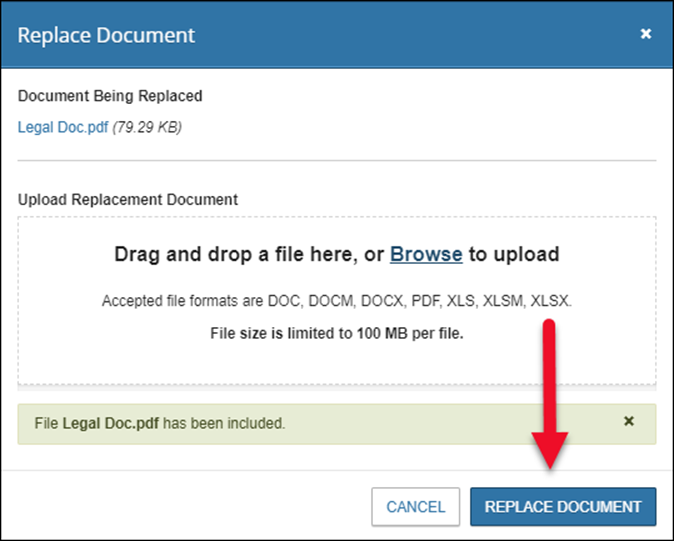
Drag and drop or use the Browse button to upload a document. The replacement document must have the same document name and type as the original; attempting to upload a document that does not conform to those requirements will produce an error message and prevent you from proceeding.
Once the document has been uploaded, click Replace Document to replace the existing file with the new file.
A popup will state the following:“Replacing a document will share the new version in any libraries it is in for all RFPs and Awards moving forward.”
Click Replace to proceed with the document replacement. The modal will close, and a success message will appear in the upper right corner of the page.

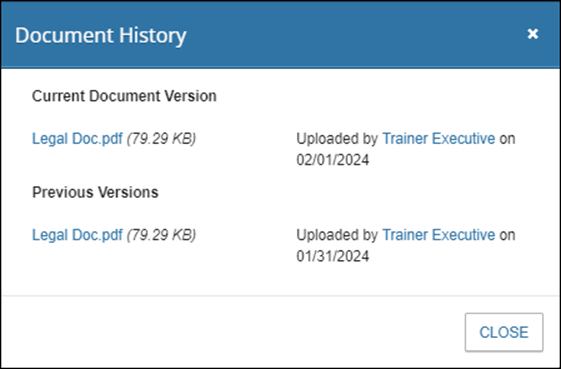
View Document History: Click to open a popup that lists the date on which the document file was uploaded, along with the dates any subsequent replacements were uploaded.

Delete Document: Click to delete the document. A popup will appear and provide the following warning:
“Deleting a file will remove it from any libraries it is in for all RFPs and Awards moving forward. Once files are deleted they cannot be restored. Files can be replaced with newer versions or marked inactive instead.”
Click Yes to delete the document.
Upload a Document
To upload a document, drag and drop it into the drag-and-drop area at the top of the Documents page. Or click Browse and use file explorer to find and upload the desired document.

Once the document has been successfully uploaded, a success message will be displayed, and the document will appear on the page. New documents default to Active.

Libraries
The Libraries page lists all existing Libraries, and provides the ability to create new Libraries.

A. Search: Enter a search phrase to search for a document. The Name, Description, Last Updated, and Created By fields are searchable.
B. Column Sort Icon: Click the icon to sort the Libraries in that Service Group alphabetically. Click the icon again to reverse the sort order.
C. Auto-Attach: By default, this box is not checked. When it is checked, the Library is automatically attached to the relevant RFPs. The documents in the Library will be visible on the RFP, but the Library will not be listed in the Reference Document Libraries dropdown menu for selection, preventing it from being added to the RFP a second time.
When this box is checked/unchecked a popup will request confirmation. Upon successfully checking/unchecking, a confirmation notification will appear in the upper right corner of the page.
D. Active Toggle: When a Library is toggled ON, it is available to be added to RFPs of the appropriate Service Group. If it is active and has Auto-Attach checked, the documents it contains will be automatically added to the appropriate RFP(s).
When it is toggled OFF, the RFP Library will not be available to attach. If Auto-Attach is checked, it will NOT be automatically added to the relevant RFPs; the Active toggle being set to OFF overrides the Auto-Attach setting.
E. Actions: The Actions menu contains four commands:

Edit Library

Click to open the Library for editing. The Library Name, Description, and the documents included are available to be edited.

a. Click to add additional documents to the Library. The table will refresh, displaying documents available to be added. Click Add to Library to add the corresponding document to the Library.

Once you have finished adding documents, click Finished Adding Files. The table will refresh, displaying all documents in the Library.

b. When a document is marked Non-Overwritable, if the Library it is a part of is attached to an RFP, that document cannot be removed from the RFP. When this box is checked/unchecked, it does not impact in-flight RFPs.
c. Click Remove From Library to remove a document from the Library. A popup will request confirmation.
Click Save Changes to apply all changes made on the editing page.

View Change History

Click View Change History to open modal that displays all changes made to the Library.
In the modal, click View Revision to view the specific change(s) made.

Duplicate Library

Click to create a duplicate of the Library. A copy of the existing Library will open in editable mode. Make the desired changes, such as changing the Library Name and adding/removing documents, then click Save Changes to create the new Library.

Delete Library

Click Delete Library. A popup will state that deletion is permanent and cannot be undone. Click Yes, Delete Library to proceed with the deletion.

Add New Library
Click Add New Library to create a new Library.

The Library creation page is identical to the page used to edit an existing Library, with two key differences:
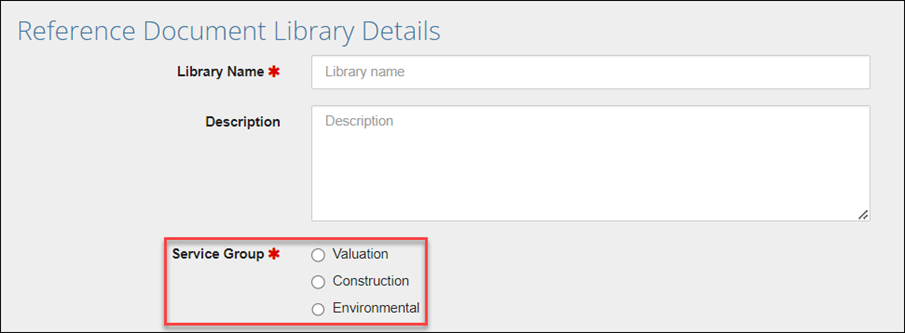
The Library Name and Description fields are blank. The Library Name field is required.
A Service Group must be selected. Click the radio button next to the appropriate Service Group.

Once the fields have been filled out, a Service Group selected, and the desired Documents added, click Save and Create Library to create the new Library.

The new Library will be created, with the Active switch toggled OFF by default.
.png)

.png)