- Print
- DarkLight
- PDF
Portfolio
- Print
- DarkLight
- PDF
Creating a Portfolio Project
There are two methods for creating a new Portfolio Project. The initial steps in each process are identical.
- Click the Collateral button in the upper right corner of the page.
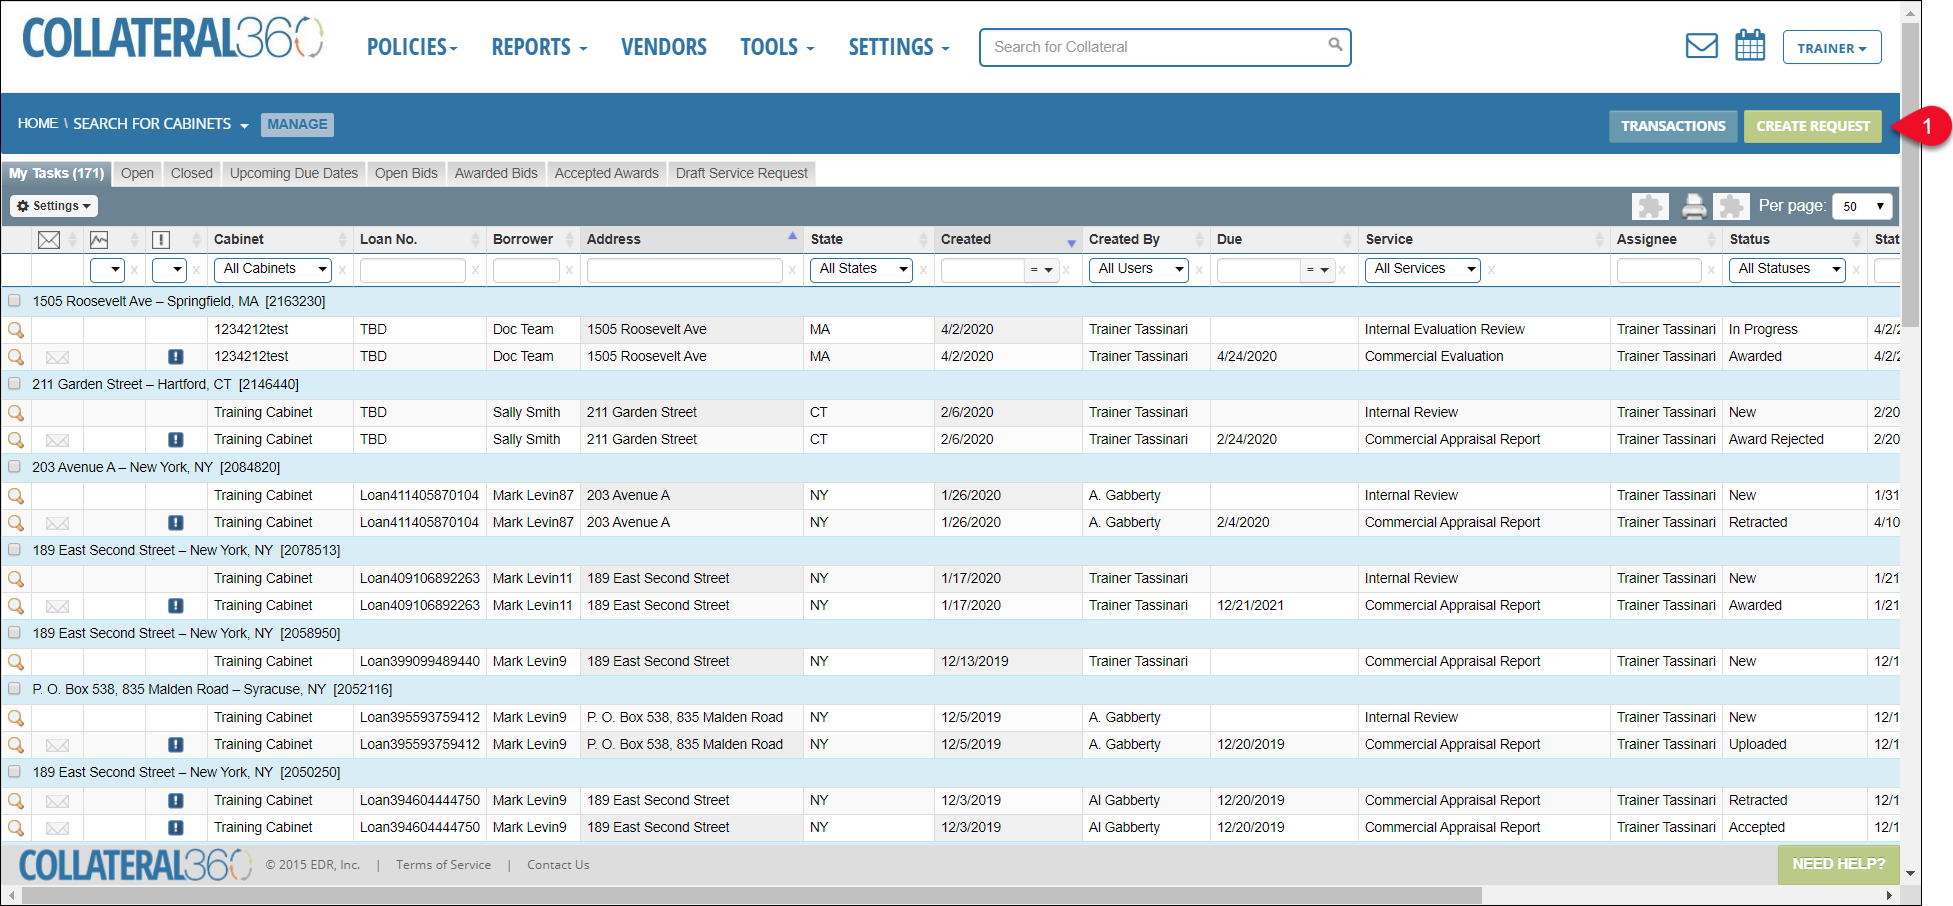
Note: The title of this button varies among companies, but it is always green and located in the upper right corner of the page.
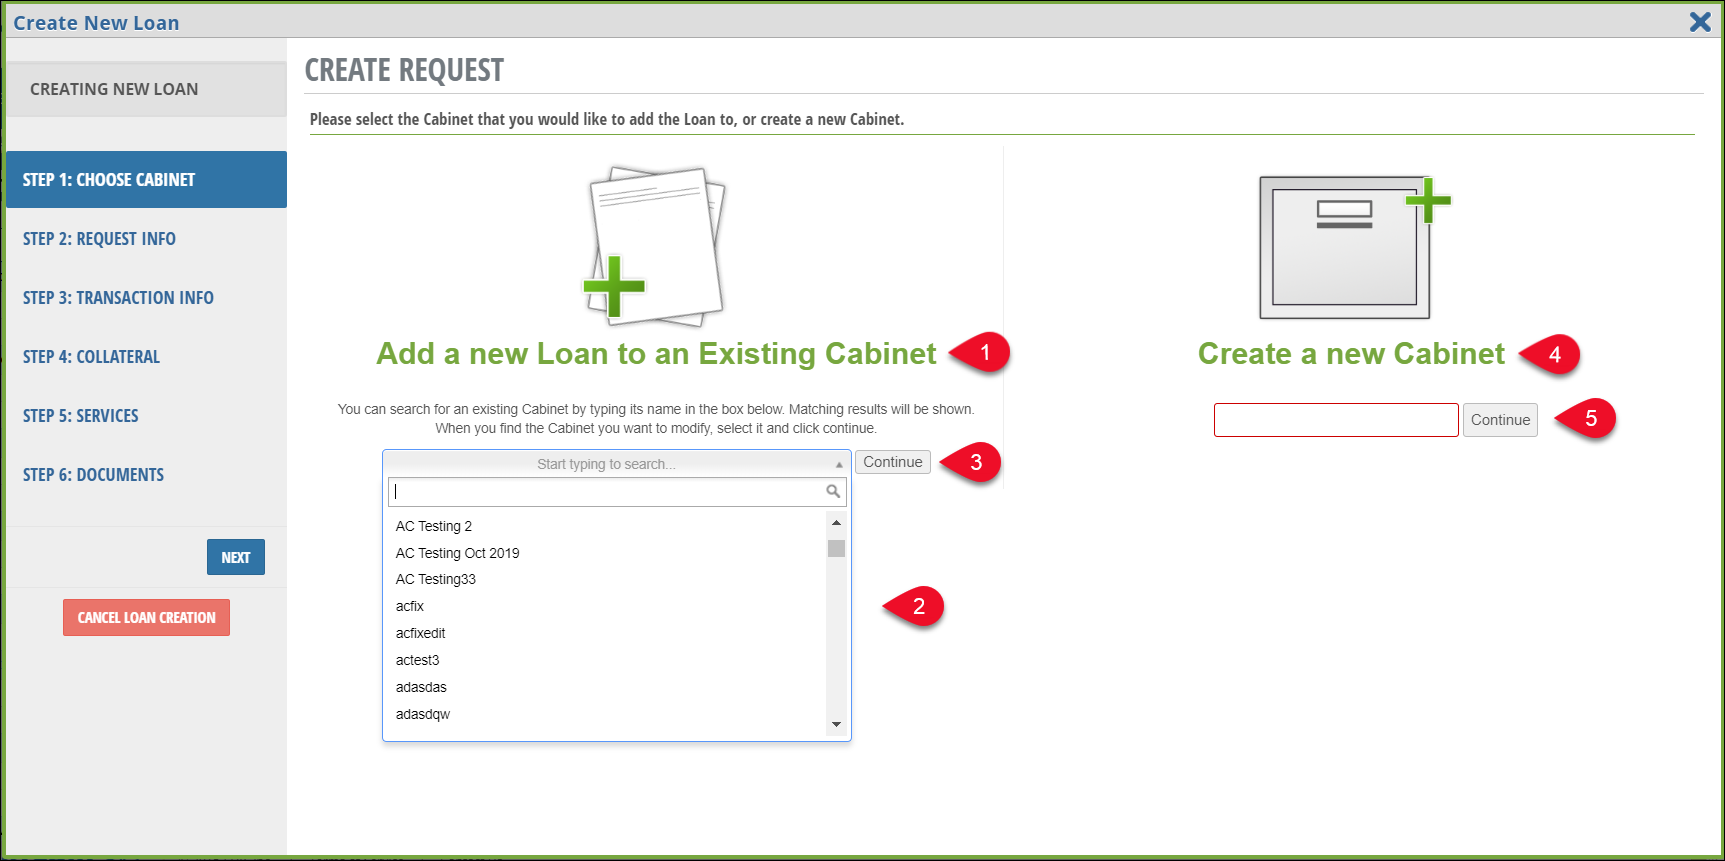
- Click Add a New Loan to an Existing Cabinet to save the loan file in an existing cabinet.
- Choose a cabinet from the list of those available.
- Click the Continue button.
OR - Click Create a New Cabinet to save the loan file in a new cabinet.
- Enter a new cabinet name in the available field and click the Continue button.
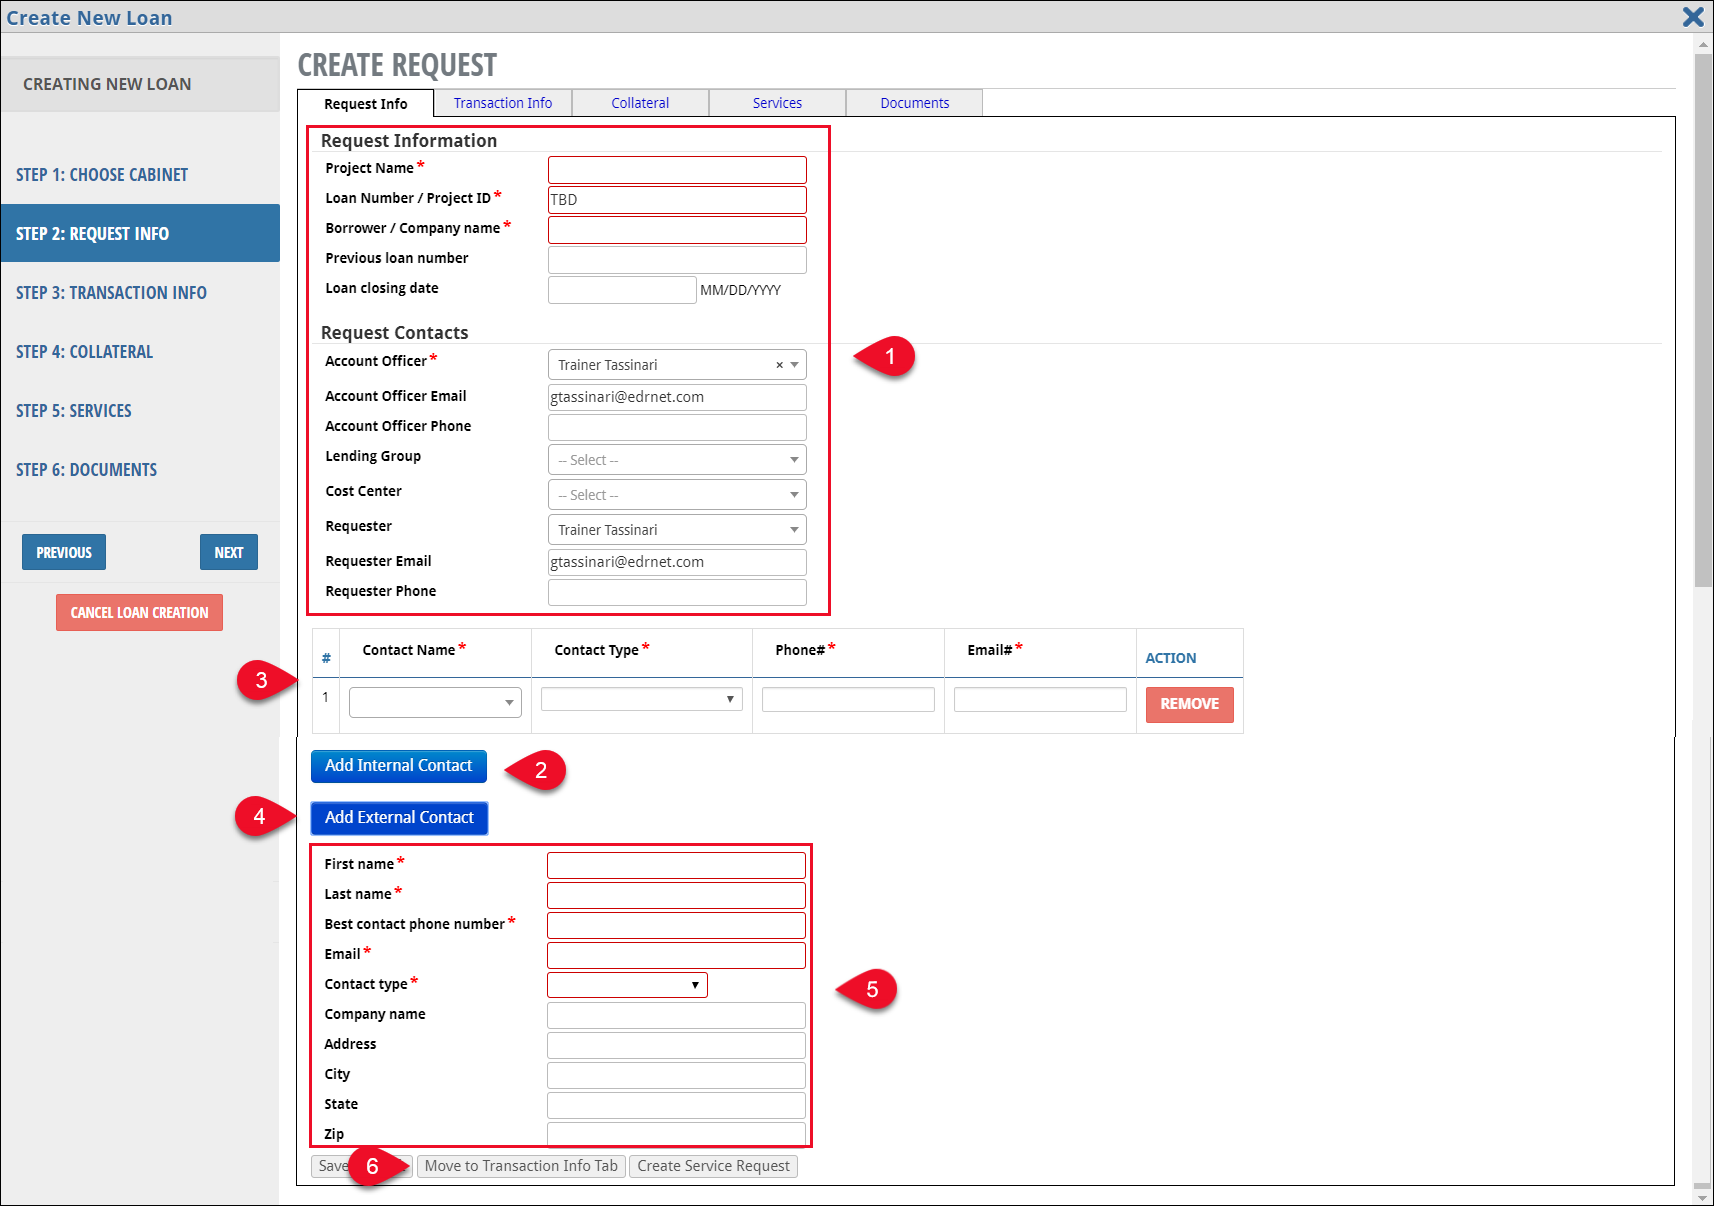
- Enter Request Information.
- Red-outlined fields are required.
- Click Add Internal Contact to associate another Collateral360 user with the Service Request.
- Enter Internal Contact information.
- Click Add External Contact to associate an individual without a Collateral360 user account with the SRF.
- Enter the External Contact information.
- Click Move to Transaction Info Tab.
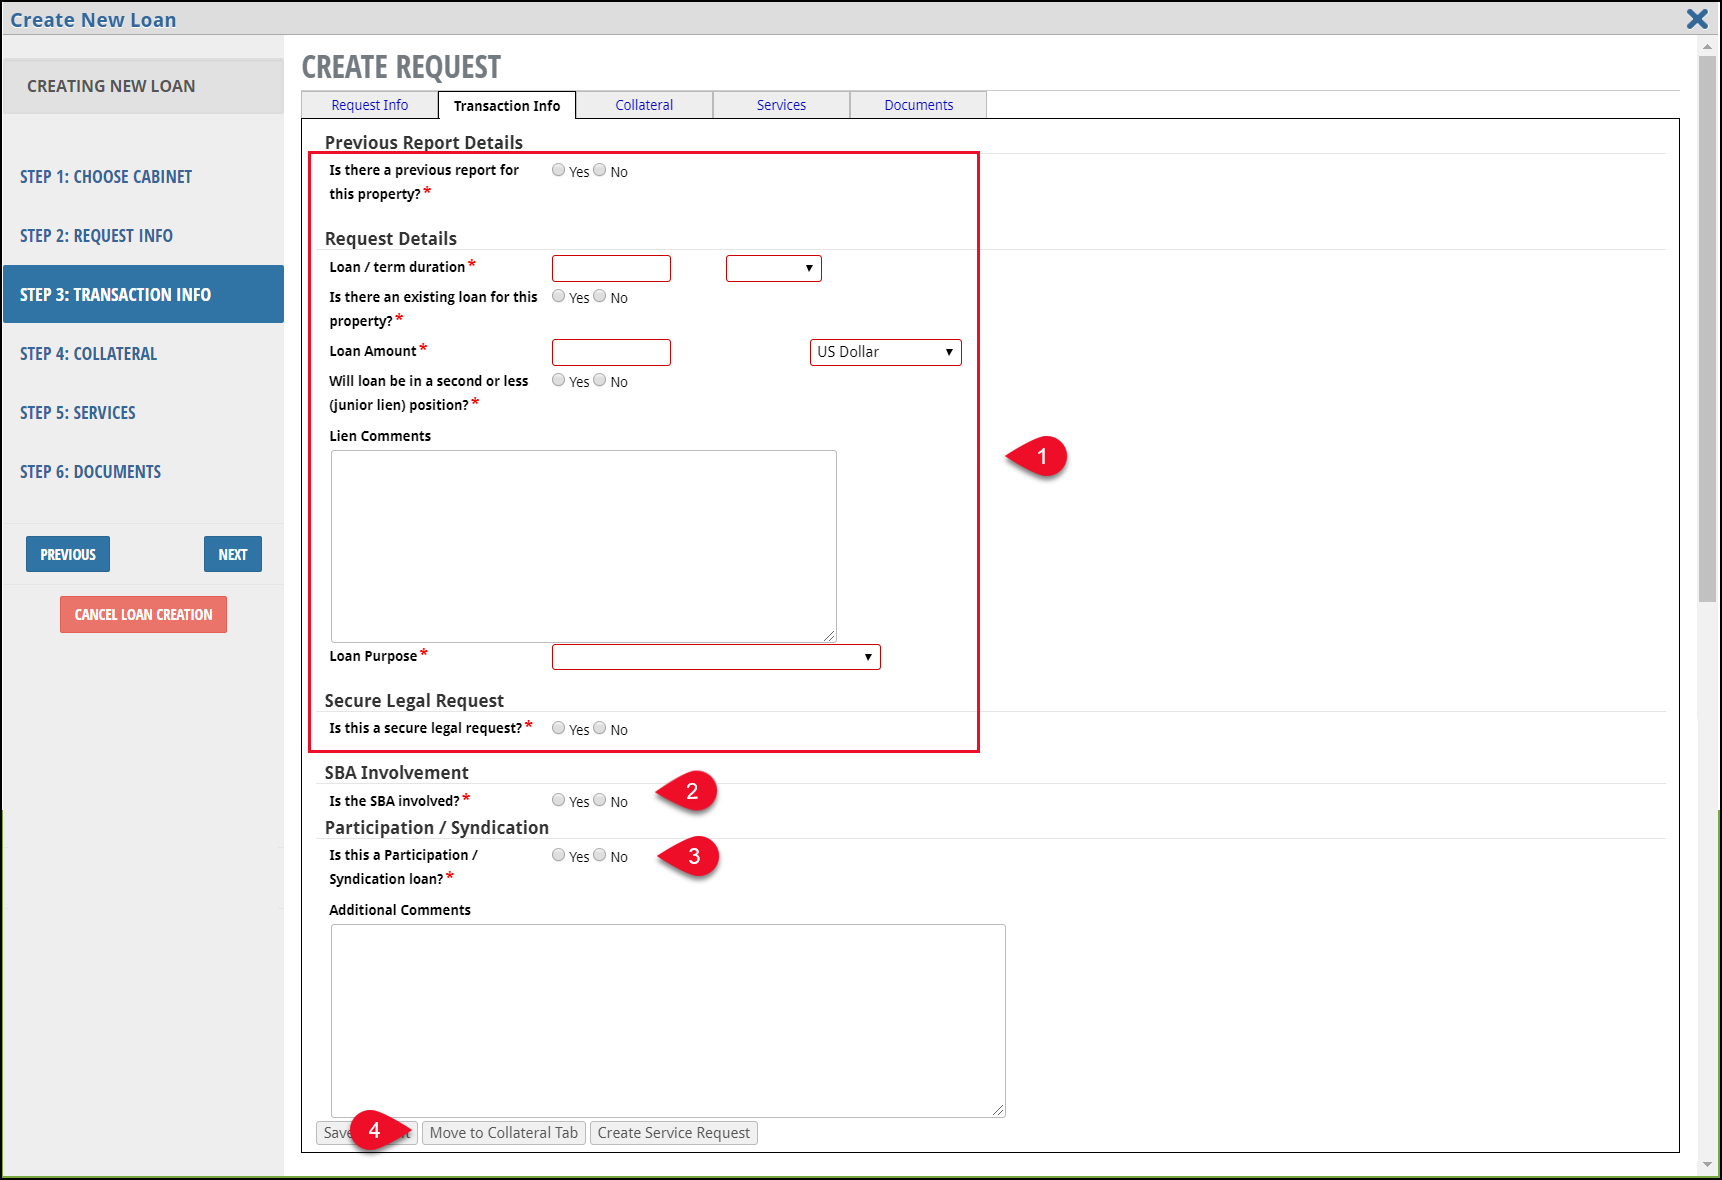
- Enter required information in the red-outlined fields of Transaction tab.
- Select Yes or No for SBA Involvement and enter required information.
- Select Yes or No for Participation/Syndication Loan and Administrative Agent.
- Click the Move to Collateral button.
The Collateral tab opens. This tab provides two methods for adding multiple Properties: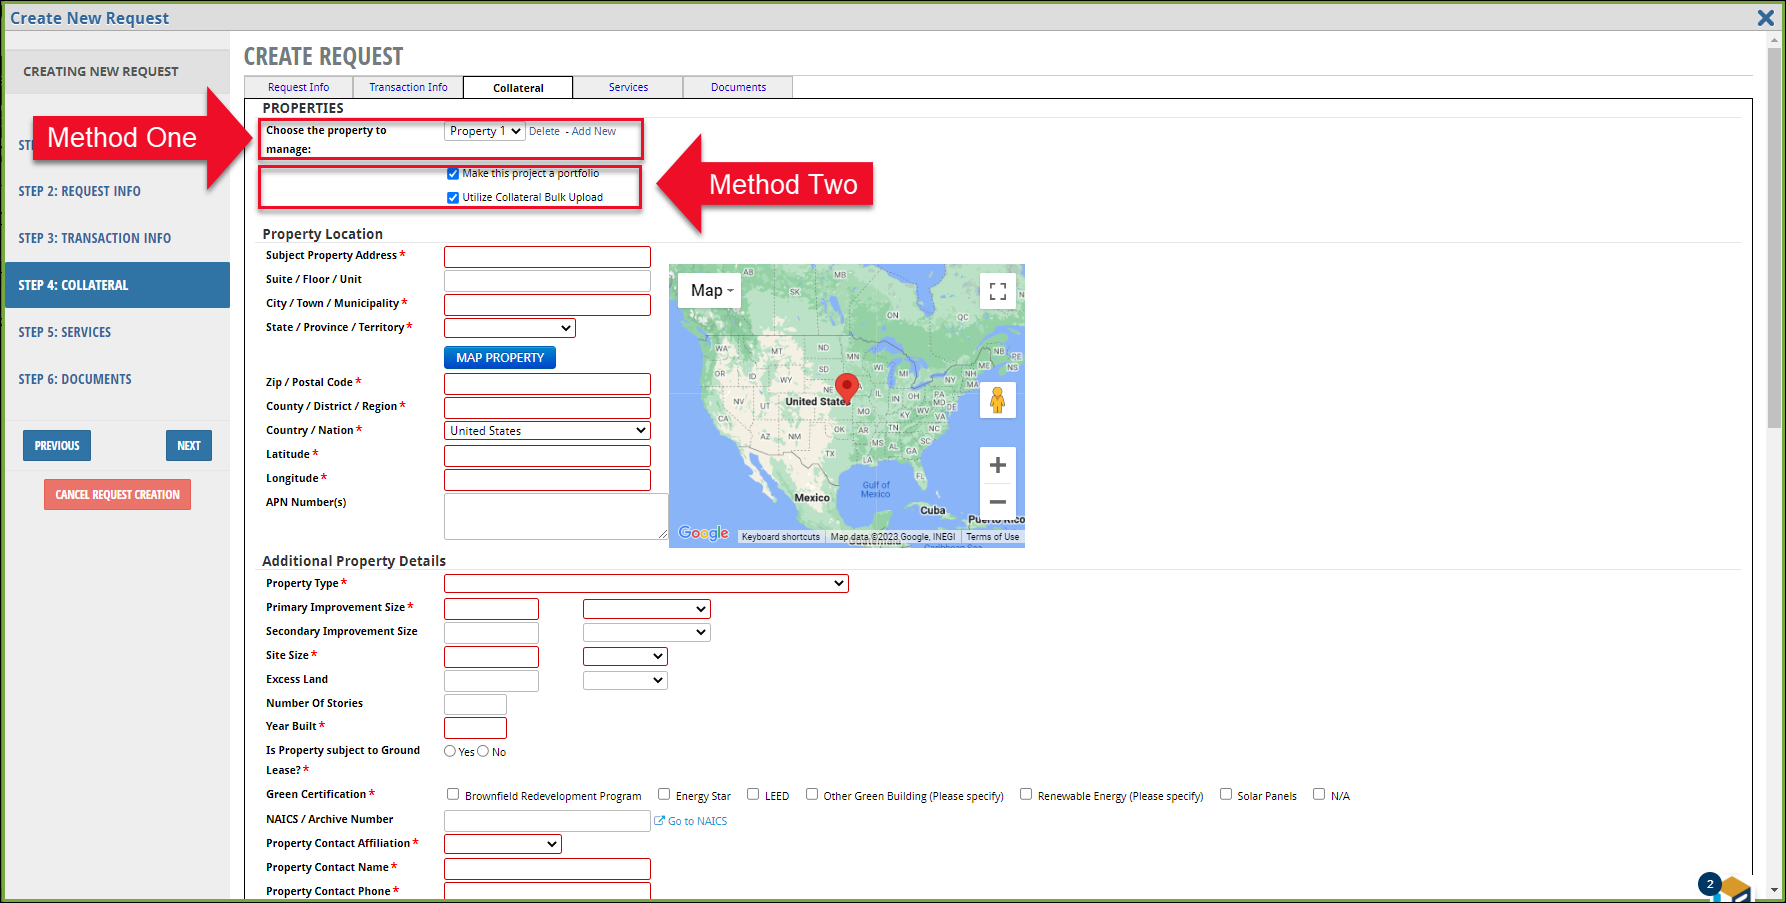
- Method One: Check the Make this Project a Portfolio box.
- Add Properties individually, on the Collateral tab.
- Method Two: Check the Make this Project a Portfolio box, then click Utilize Collateral Bulk Upload.
- Add a Primary Property on the Collateral tab.
- Upon submitting the SRF, upload a spreadsheet containing the Properties you wish to include in the Portfolio Project.
Method One
Enter information for the first Property. Fields with a red outline are required.
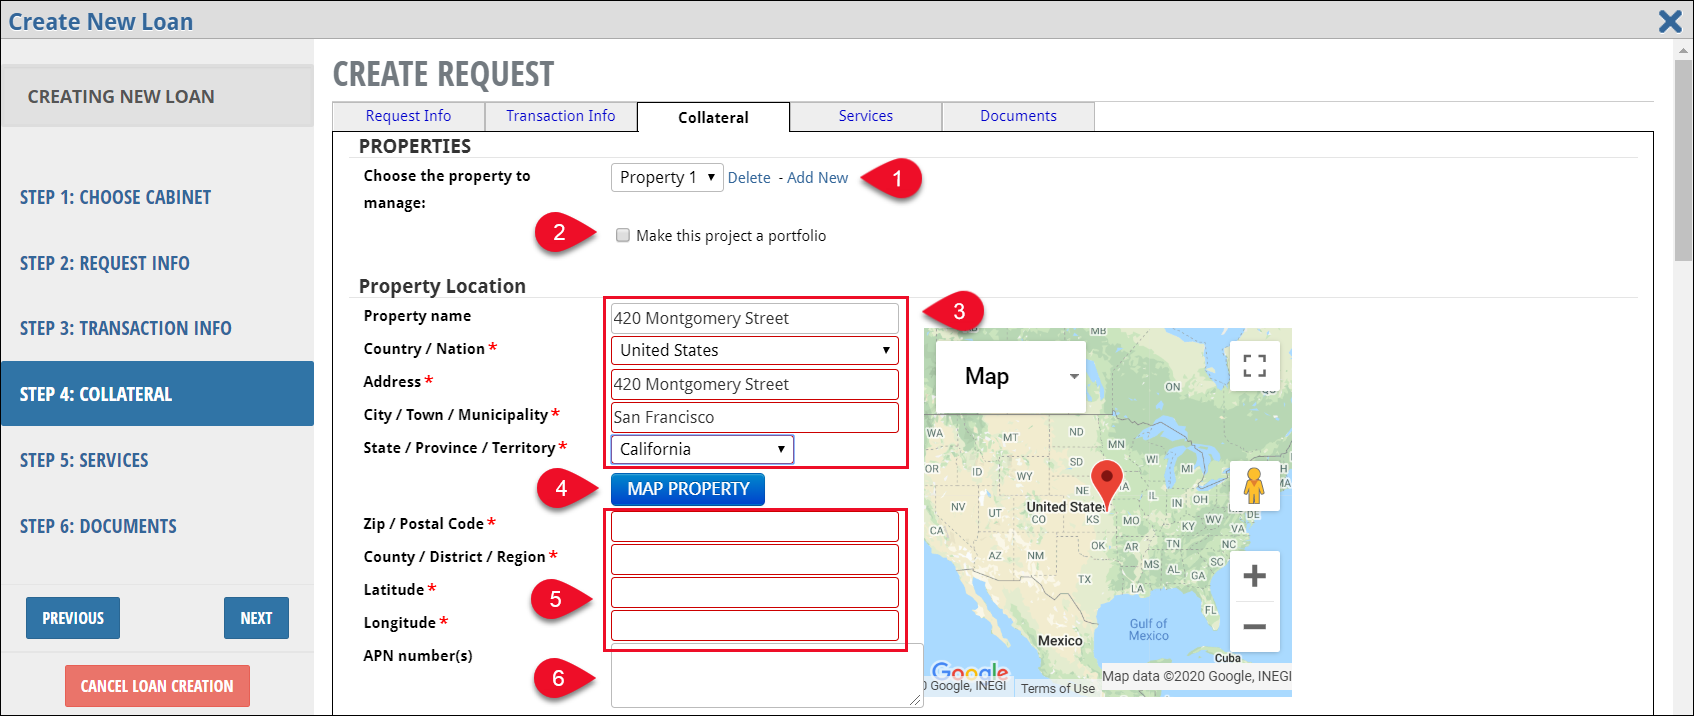
- After entering the first Property, click Add New to begin entering the subsequent Property information on the SRF.
- If the request will include 4 or more Properties (Portfolio), check mark the box Make this Project a Portfolio.
- Enter Property Location information.
- Click the blue Map Property button to populate Zip Code, County, Country, Latitude and Longitude fields.
- View or change auto-populated Zip Code, County, Country, Latitude and Longitude.
- Select Yes or No for Assessor’s Parcel Number (APN) availability.
- Enter APN(s).
OR - Choose an applicable reason APNs are not available.
- Red-outlined fields are required.
- Complete the remainder of the fields on the form, then click Move to Services Tab at the bottom of the page.
The Add Services page opens.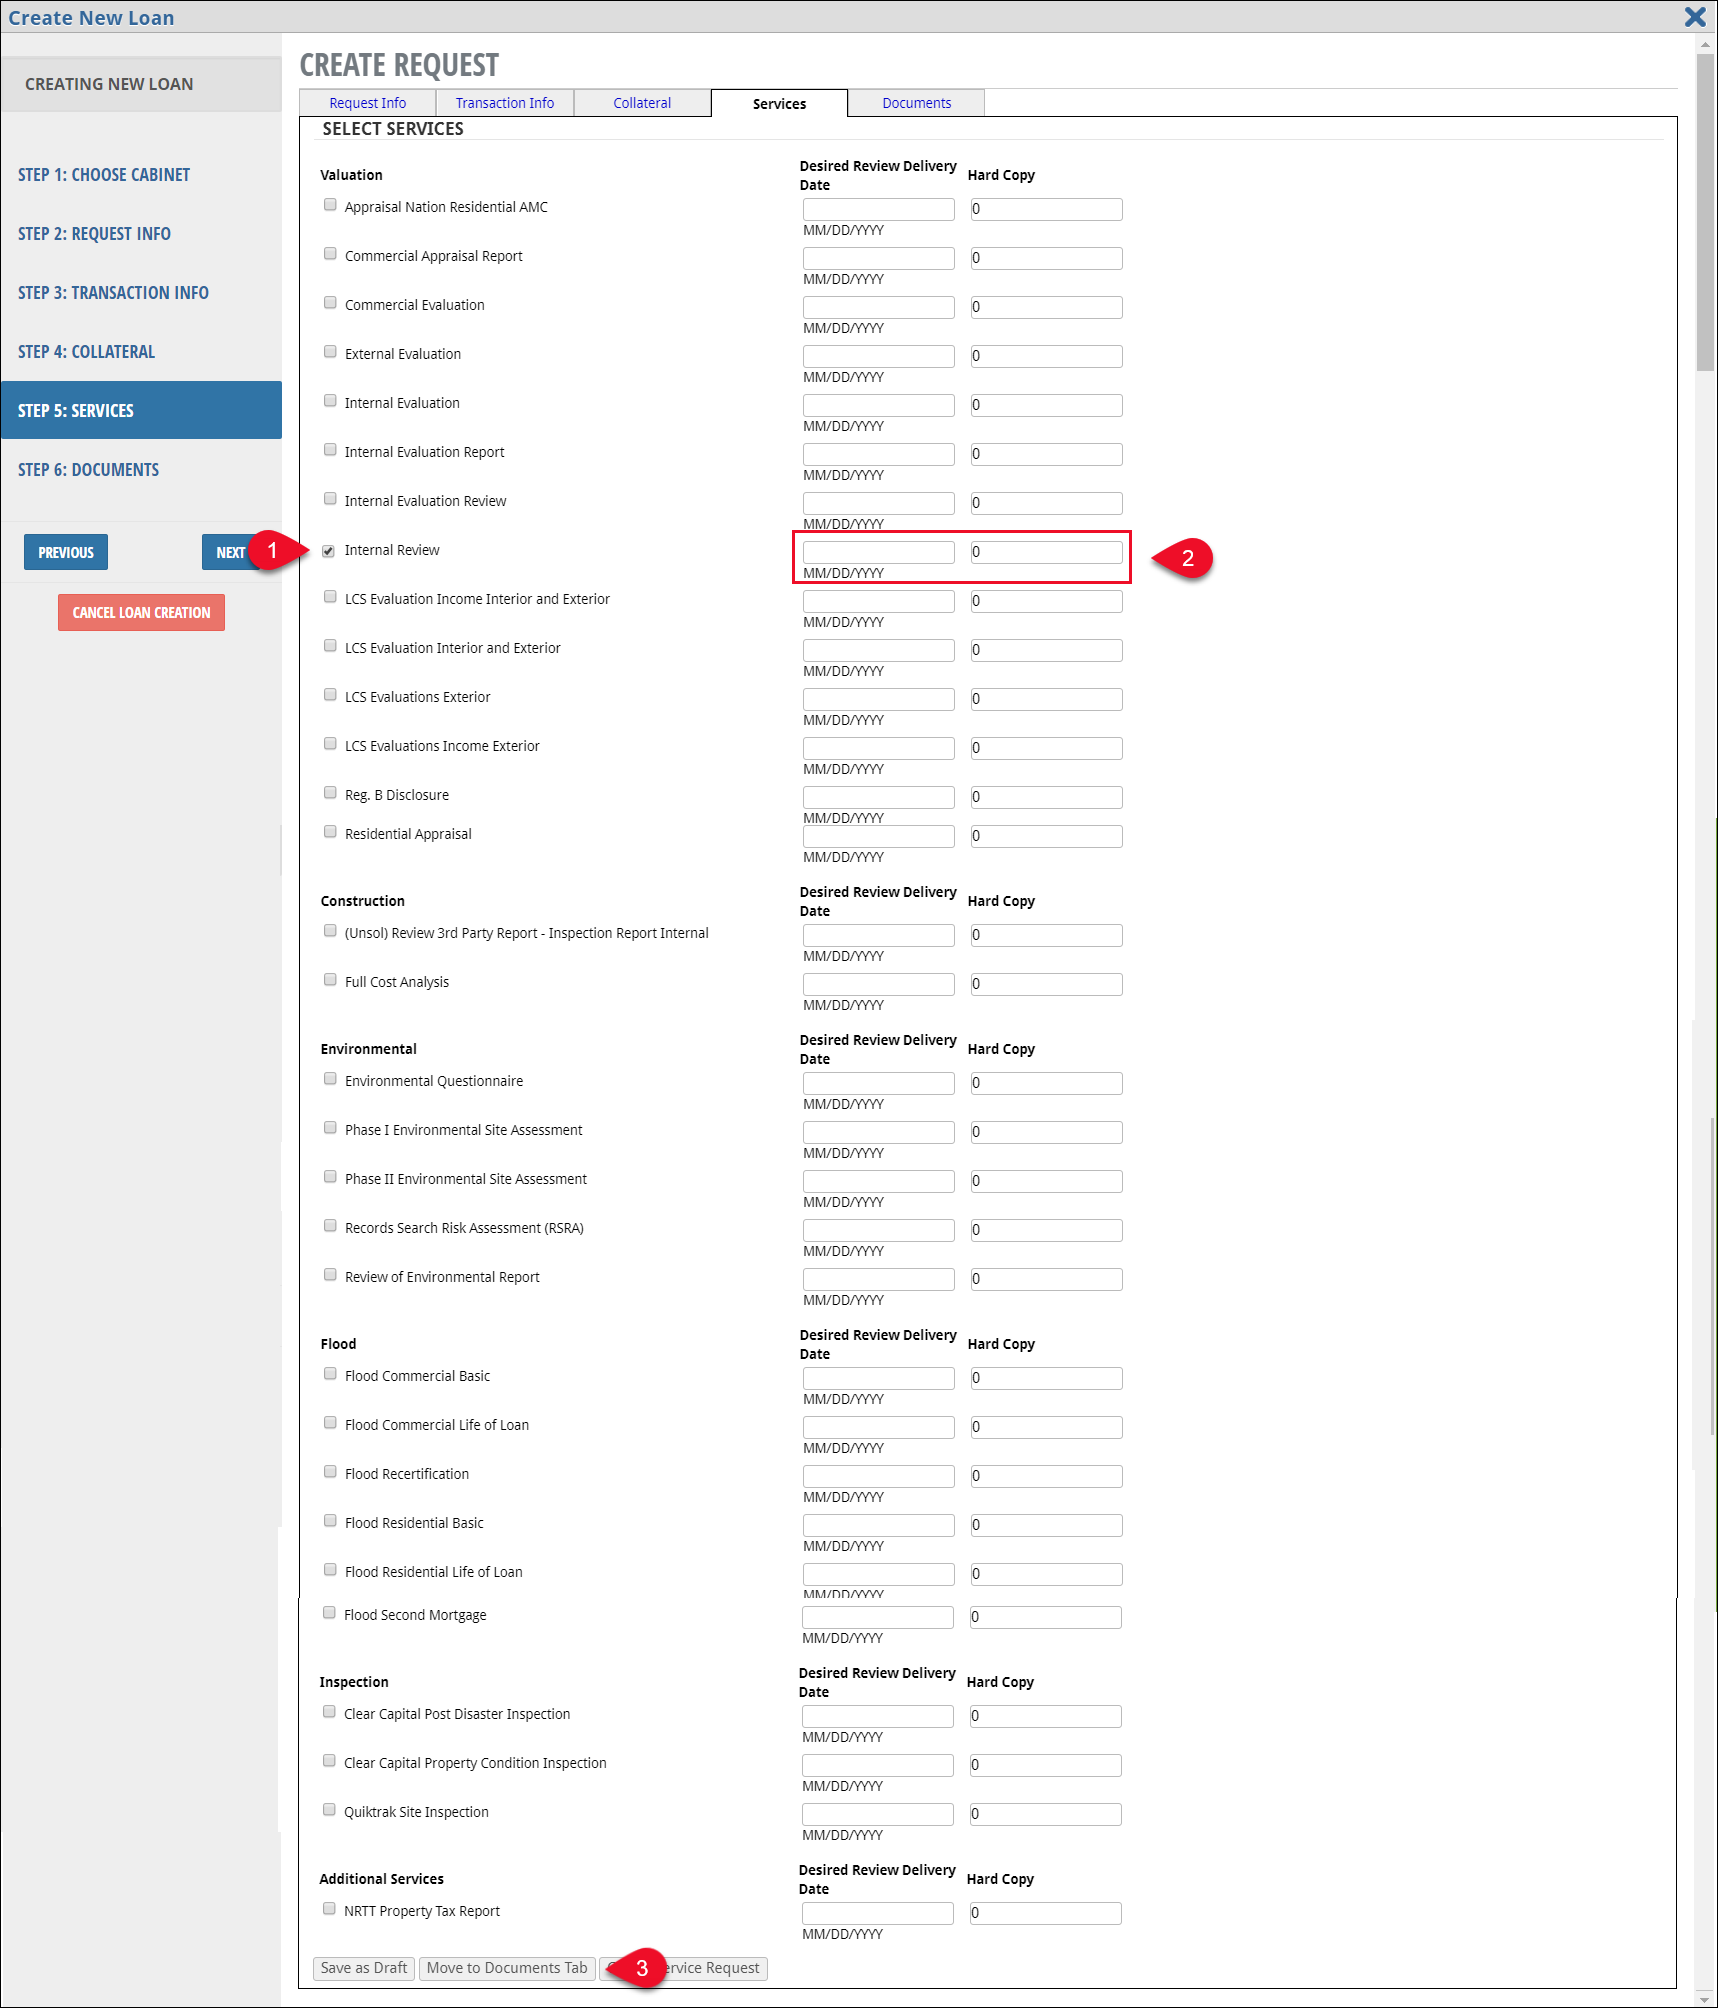
In the example above, the Internal Review Service from the Valuation Services group has been checked.
Services are divided by Service Group: Valuation, Environmental, etc.
- Check the box next to one or more Services to add those Services to the SRF.
- Enter the Desired Review Delivery Date and Hard Copy for each Service added, if applicable.
- Click the Move to Documents Tab button.
The Add Documents tab opens.
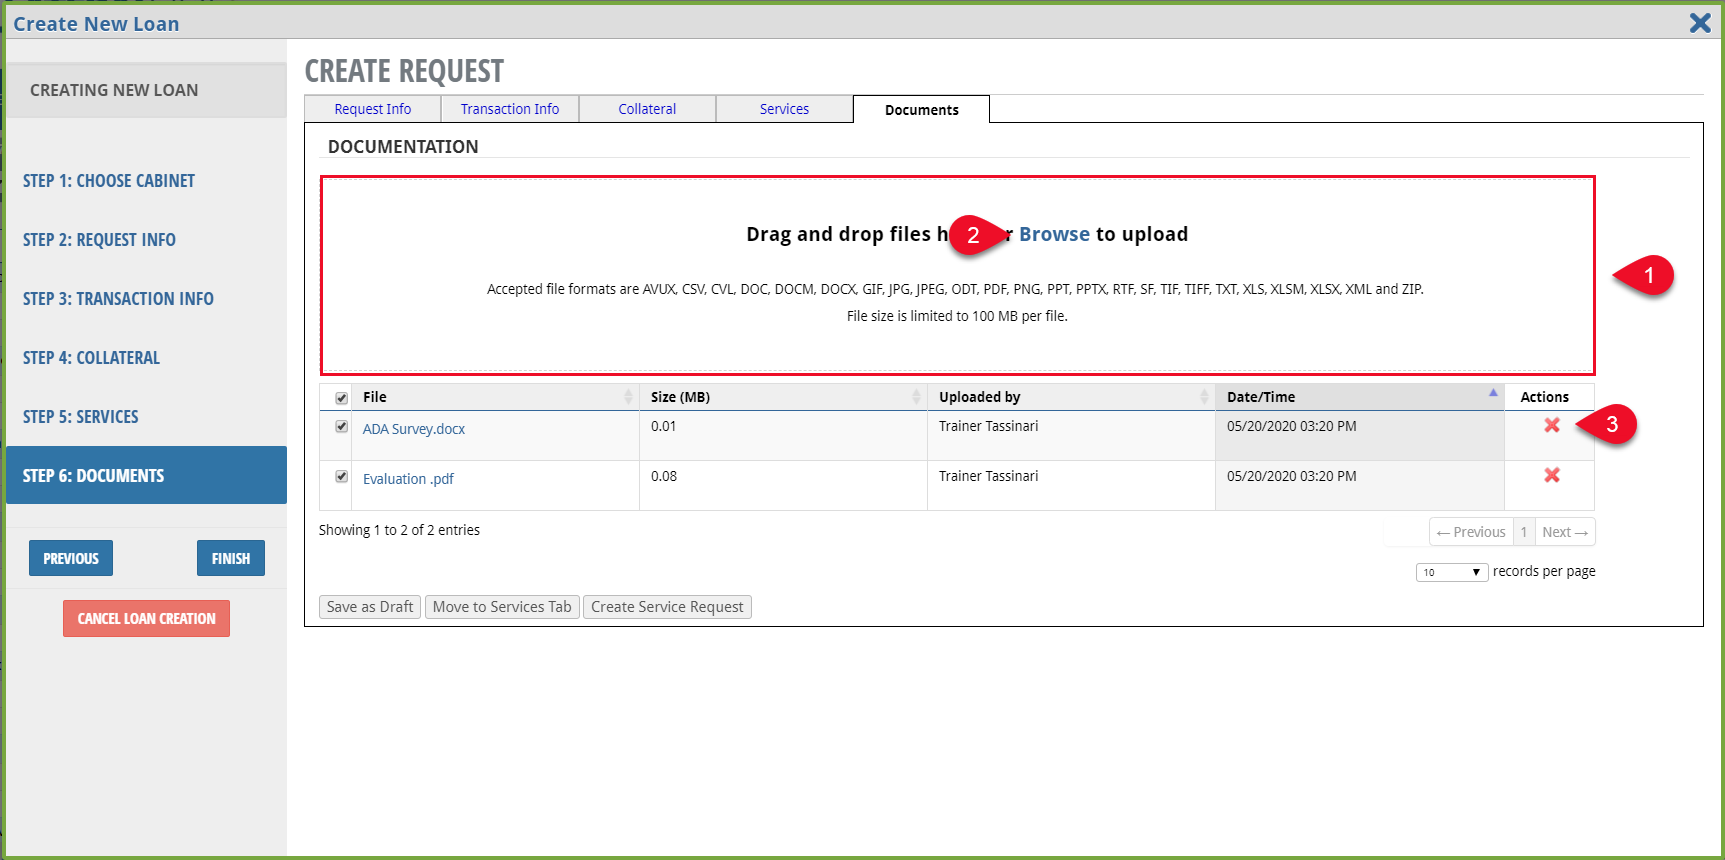
In the example above, two documents have been added to the Service Request: ADA Survey.docx and Evaluation.pdf
- Drag and drop files.
OR - Click Browse to navigate to your computer and select files to upload.
- Click the red X next to a file that has been uploaded to remove it.
Click Create Service Request to submit the request.
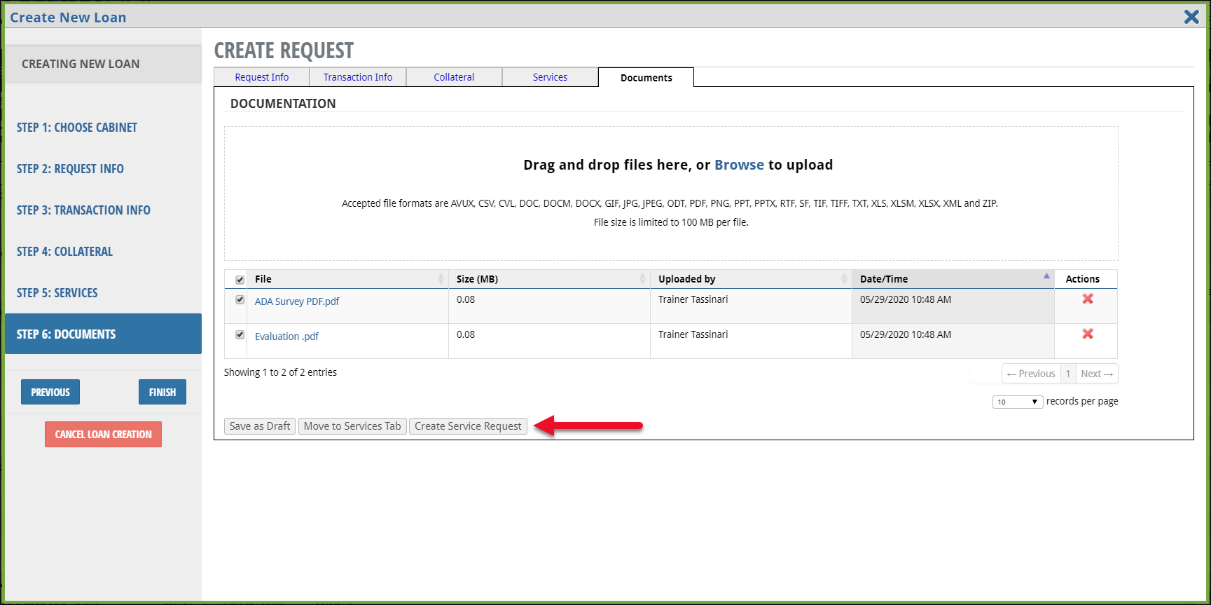
If all required fields have been filled out, the Create New Loan modal will close, and the Service Request will be created. If any required fields have not been completed, the modal screen will refresh and list those required fields in red.
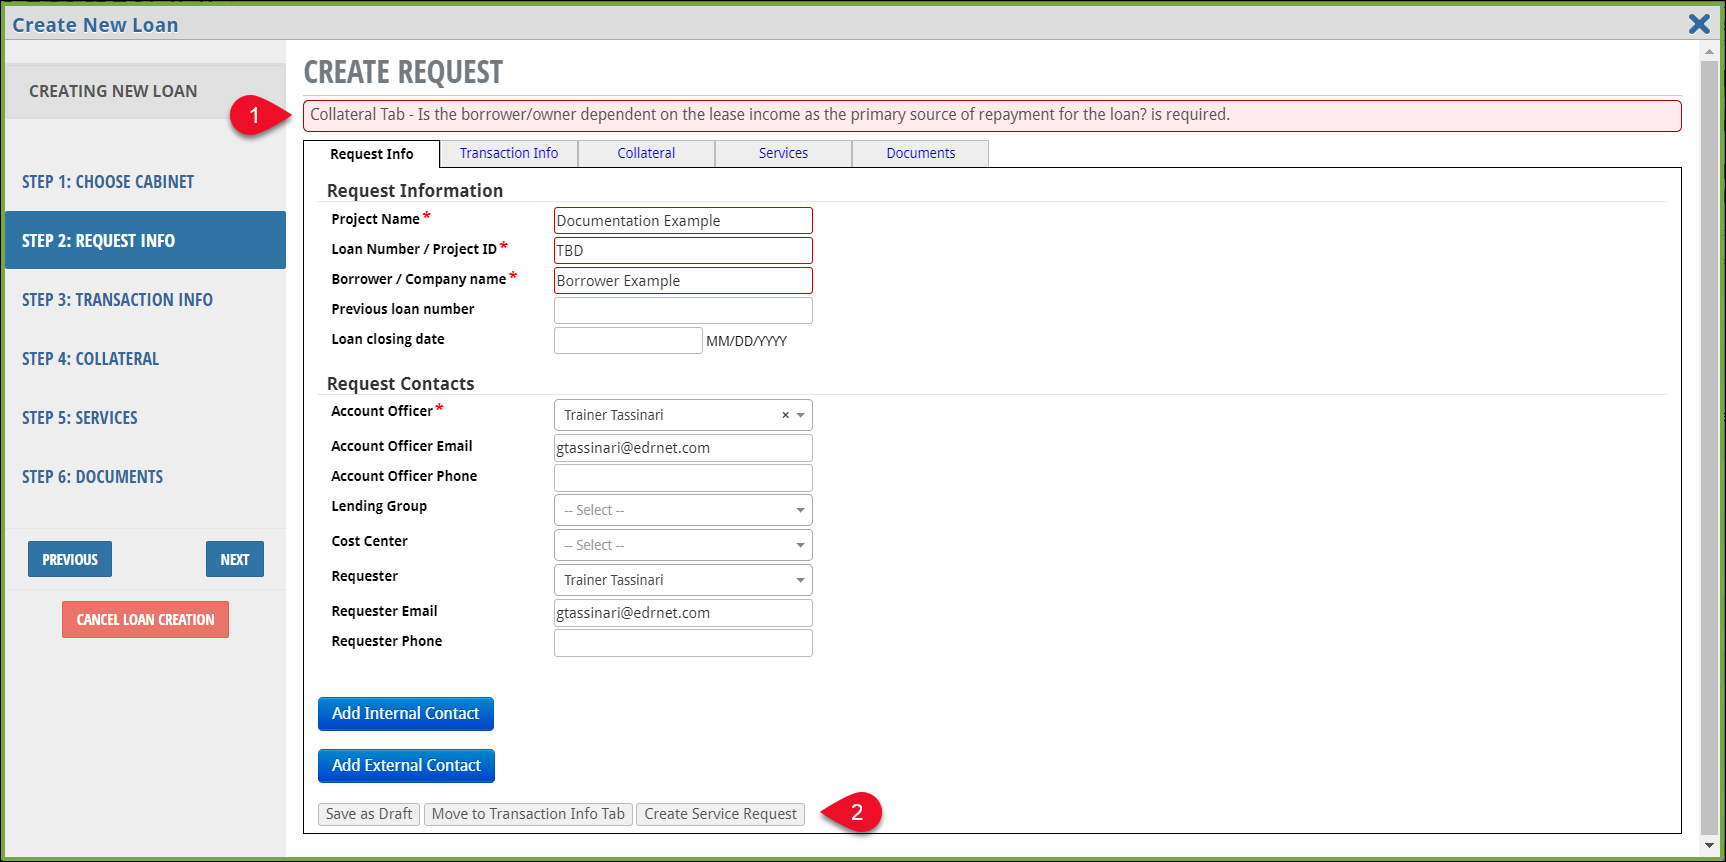
- View required fields that have not been filled out are listed at the top of the page. Add the missing information.
- Click Create Service Request.
If all required fields have been filled out, the Create New Loan modal will close, and the new Portfolio Project will be created.
Method Two
On the Transaction tab, check the Make this Project a Portfolio box, then click Utilize Collateral Bulk Upload.
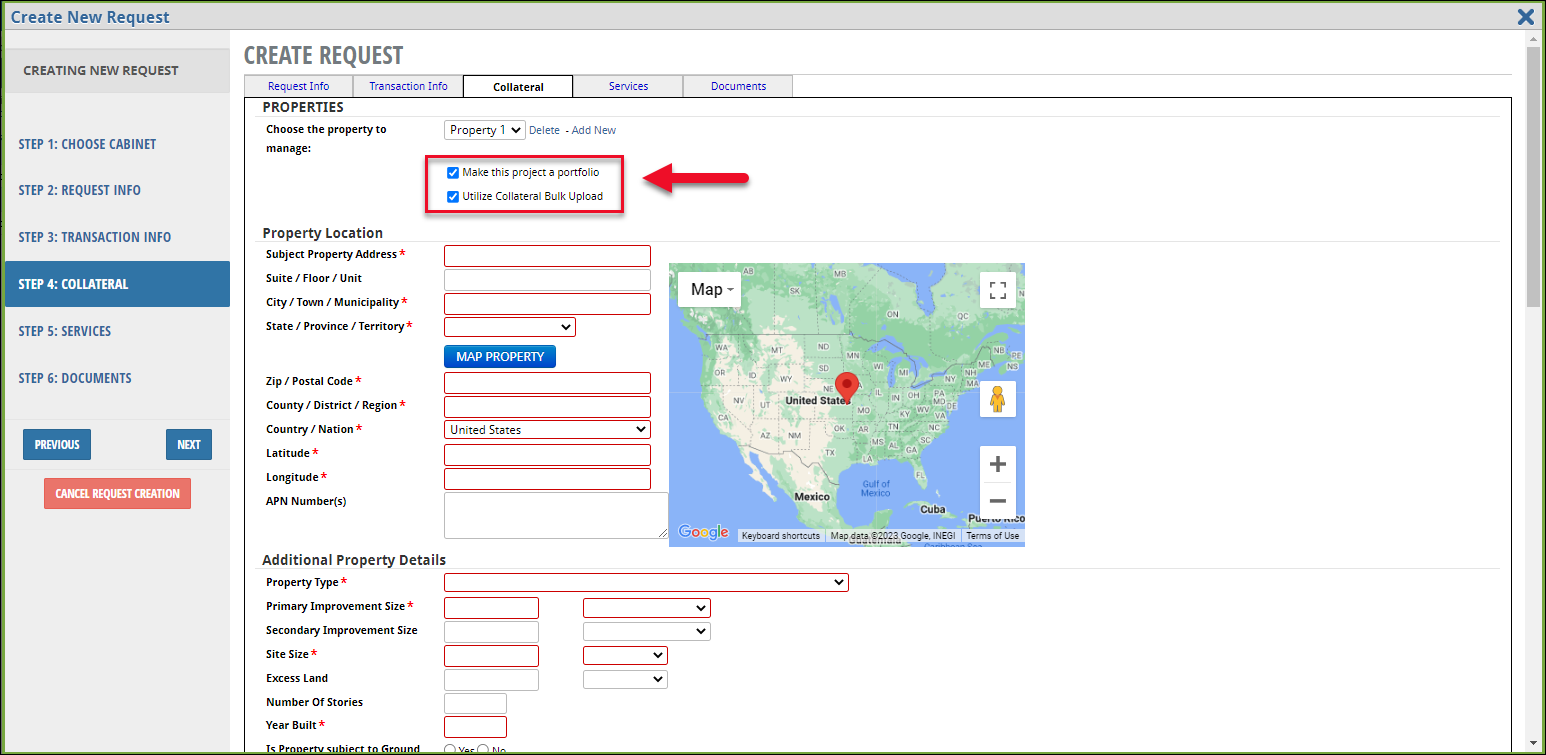
Enter the information for one of the Properties that will be in the Portfolio on the Collateral tab. This will become the primary Property.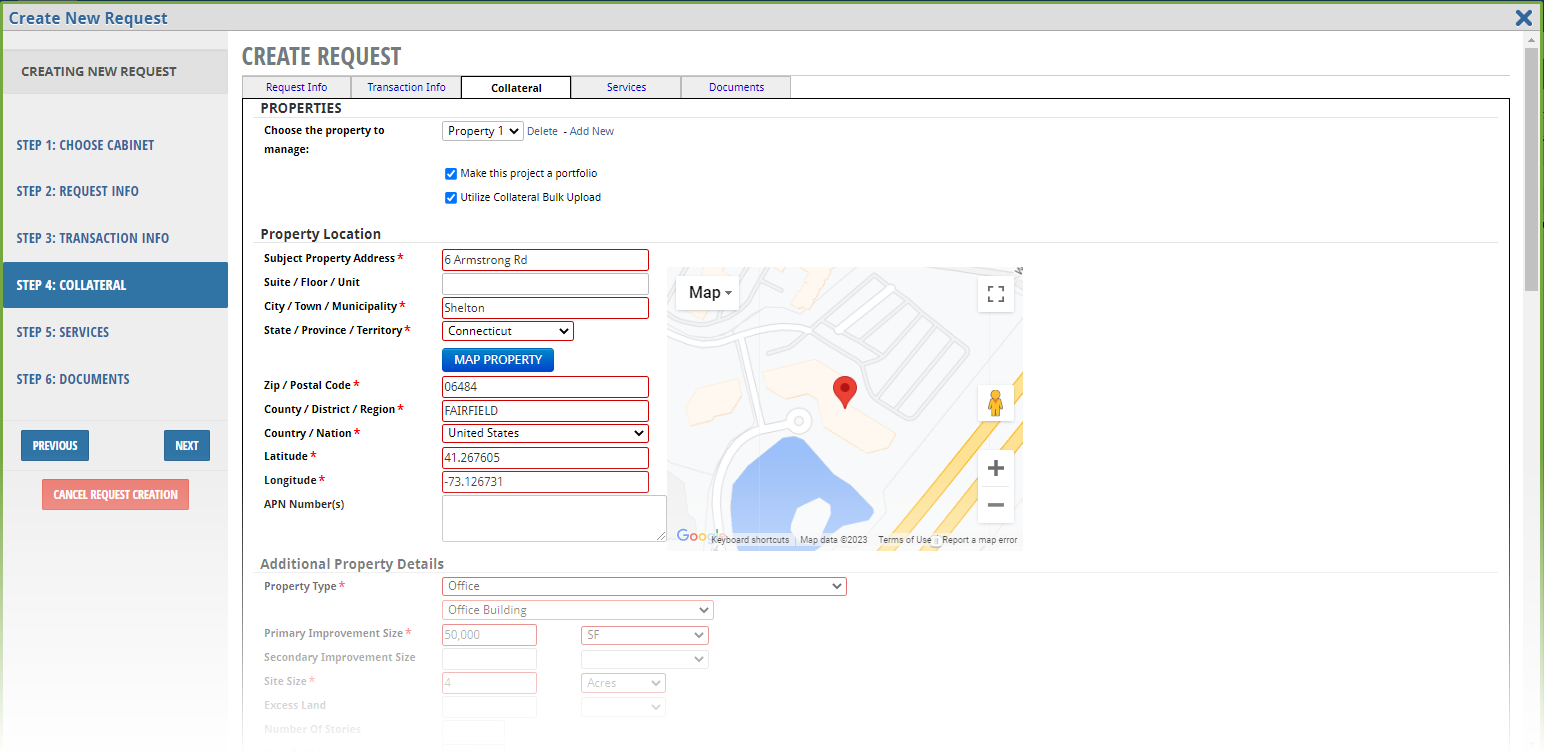
Complete the Services and Documents tabs (described in Method One).
Upon submitting the SRF, the Upload Collateral to Portfolio page loads. Click Download the Spreadsheet to download the template.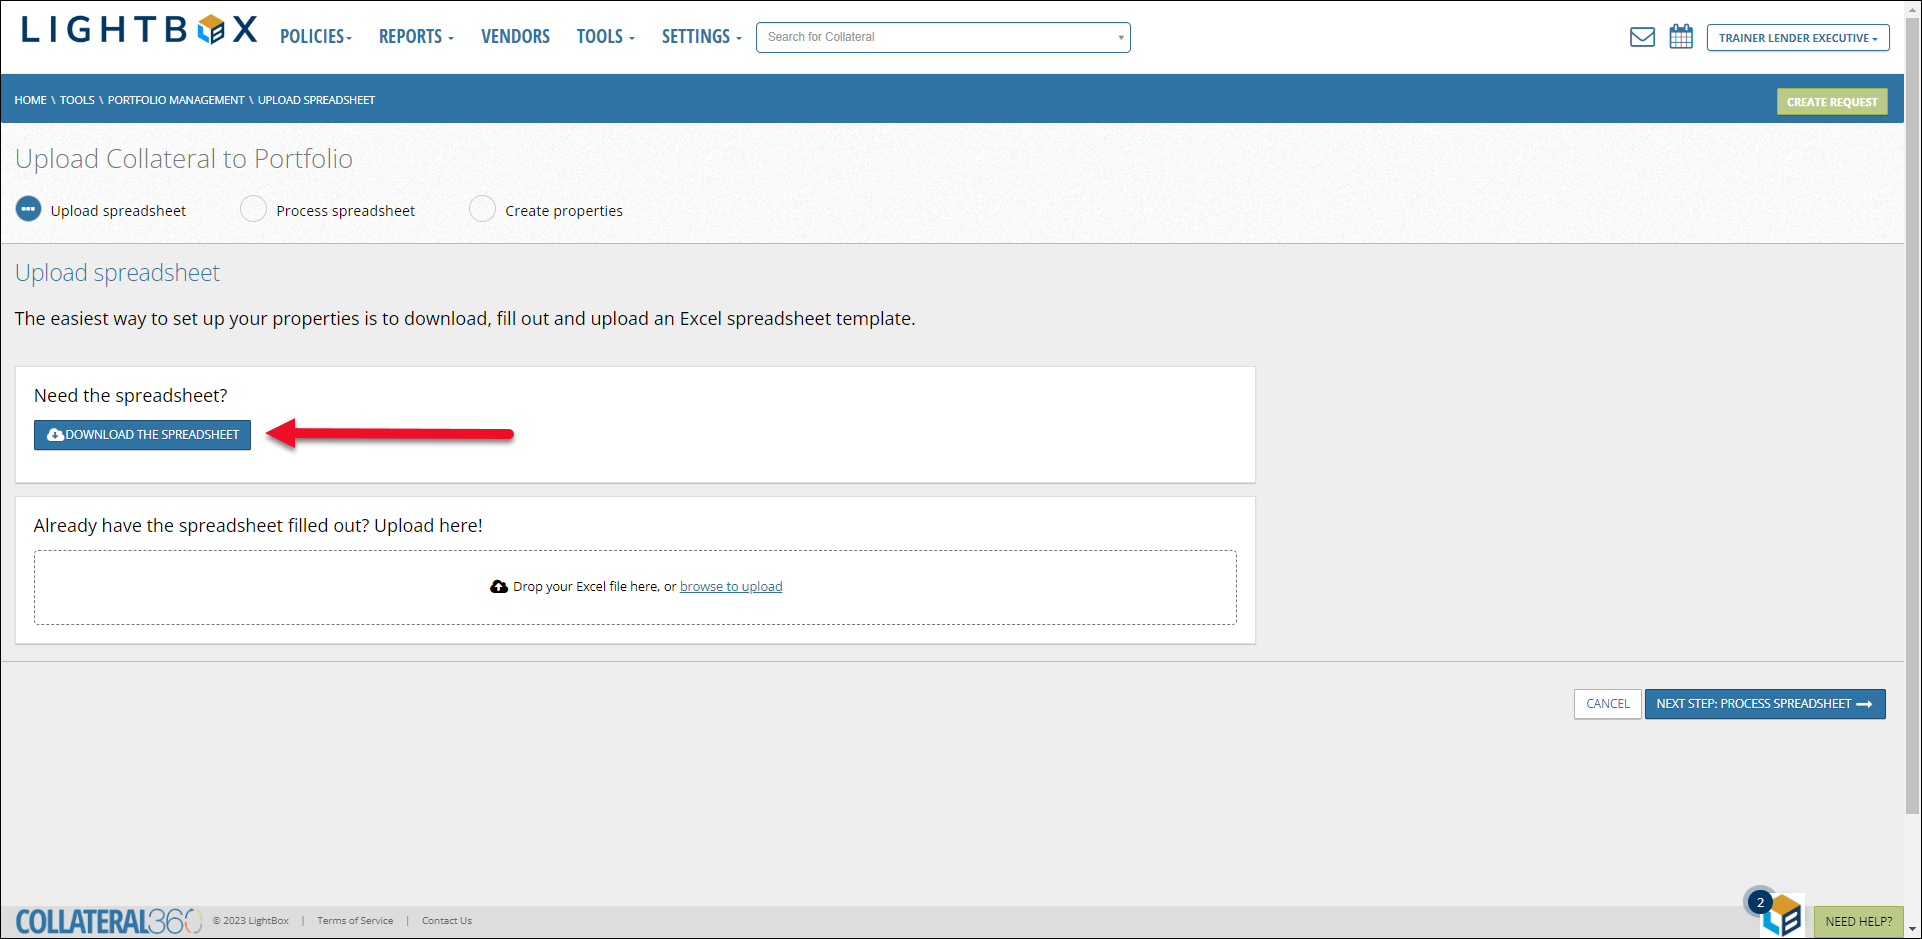
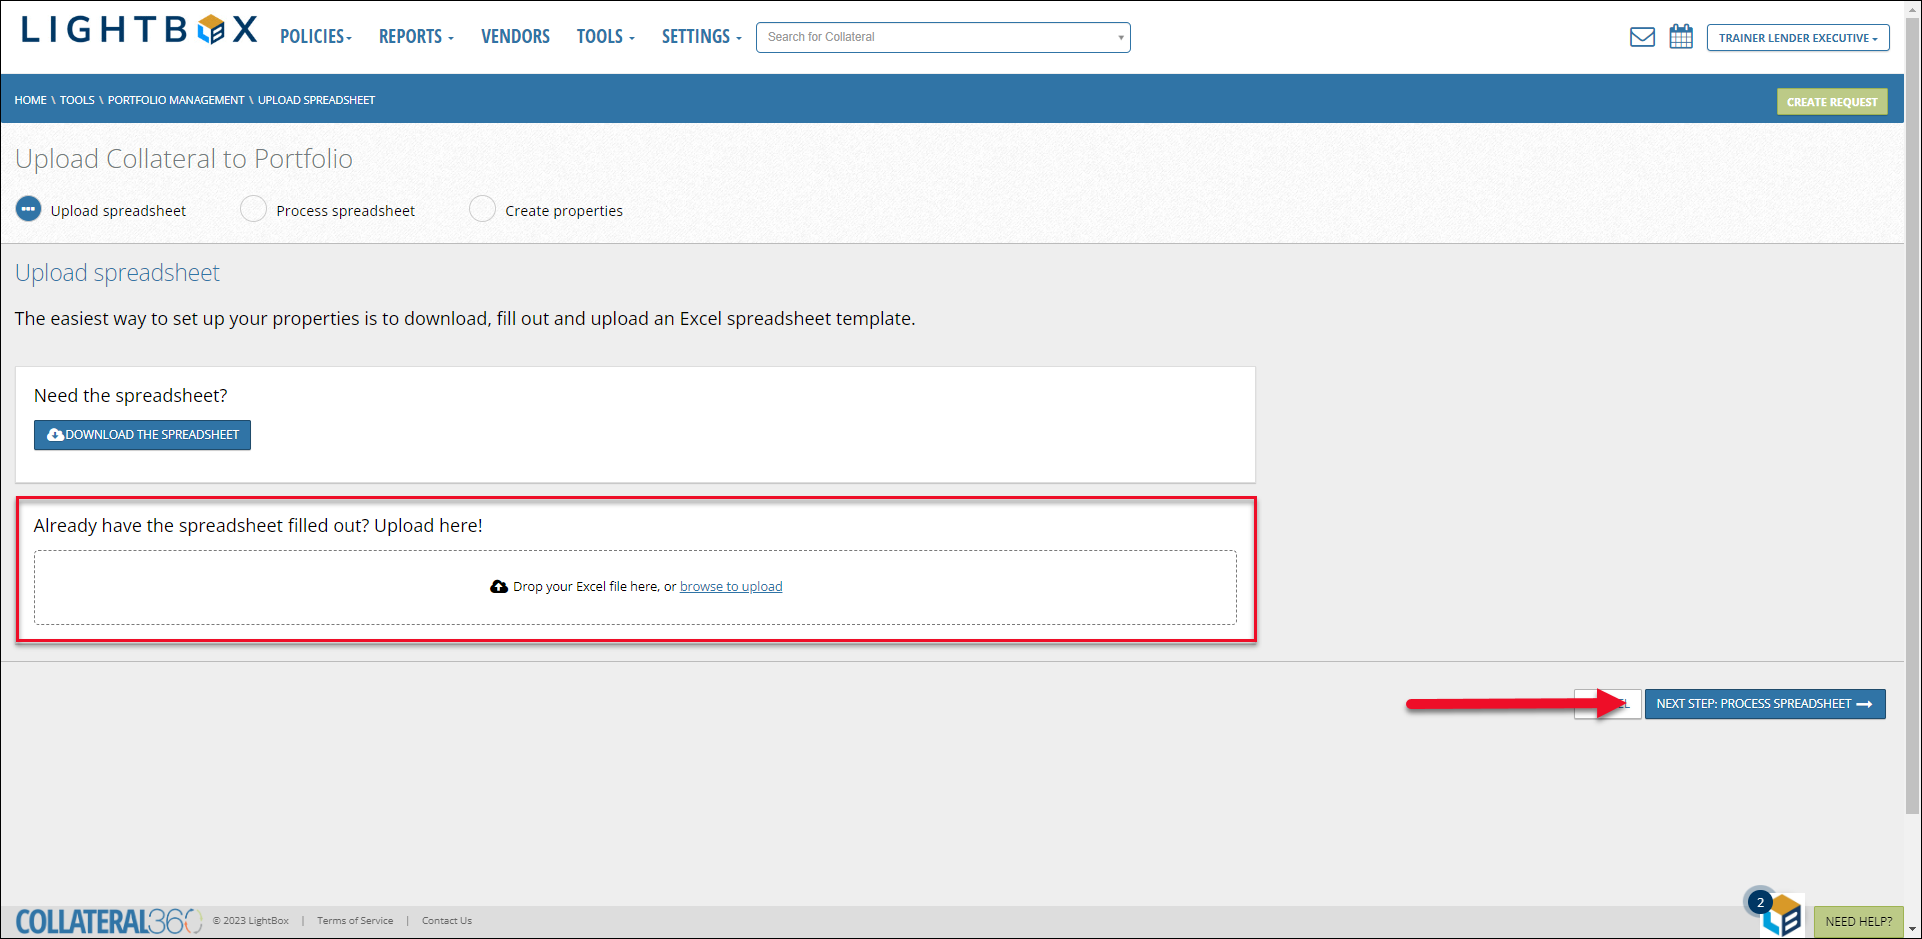
Enter the Portfolio Properties in the Excel template, then drag and drop the file onto the upload area or click browse to upload and upload the file. Click Next Step: Process Spreadsheet to proceed.
Verify that the data mapping is correct on the Process Spreadsheet page.
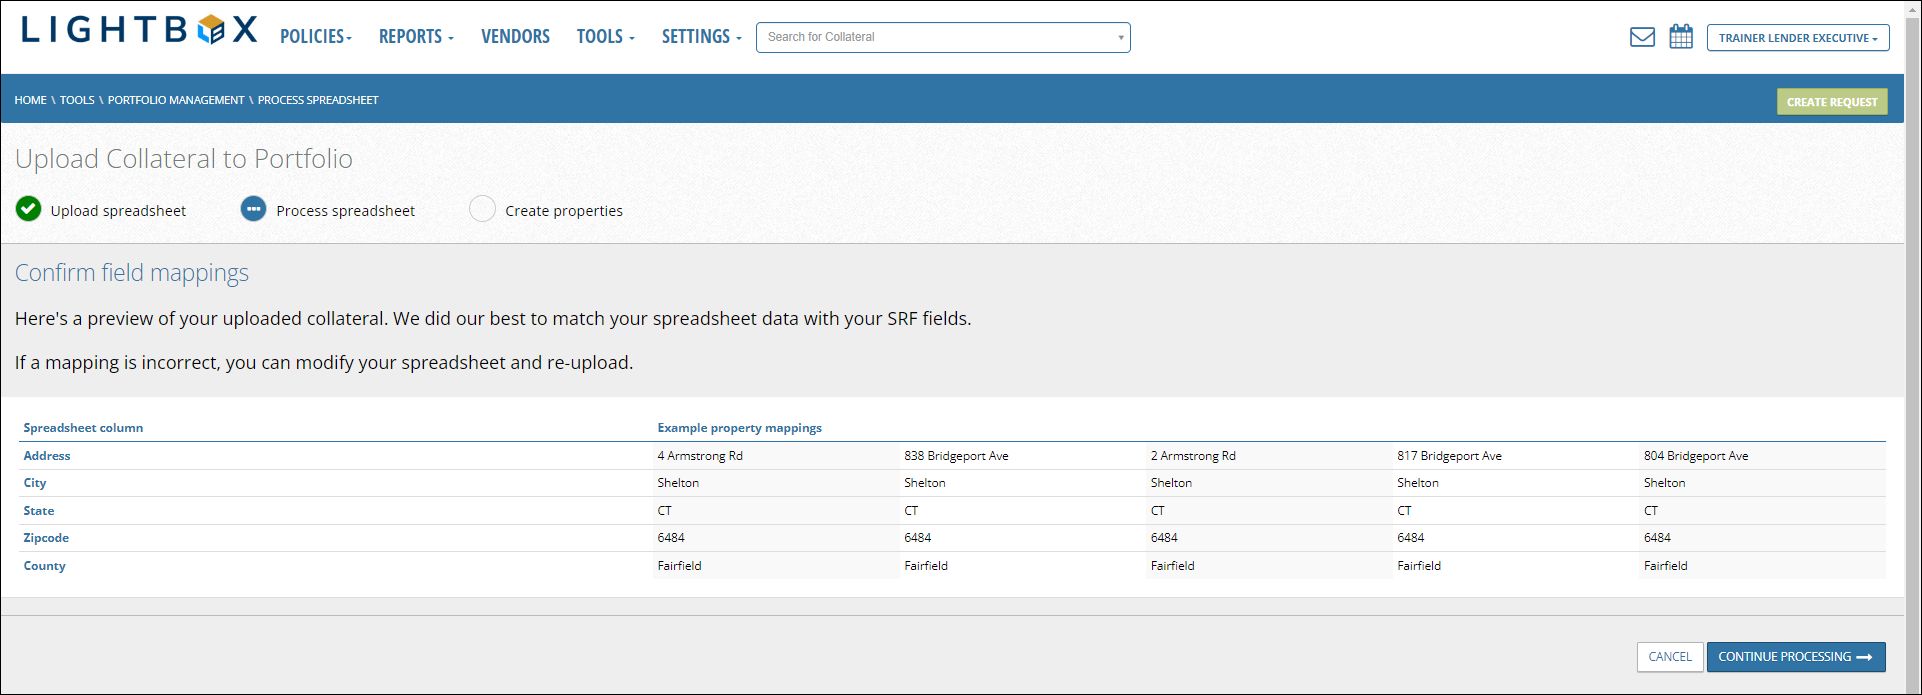
If the mapping is correct, click Continue Processing. The spreadsheet will process. The amount of time it takes to process is dependent on the number of Properties in the spreadsheet. You can navigate away from the page without disrupting the process. You will receive an email notification when processing is complete.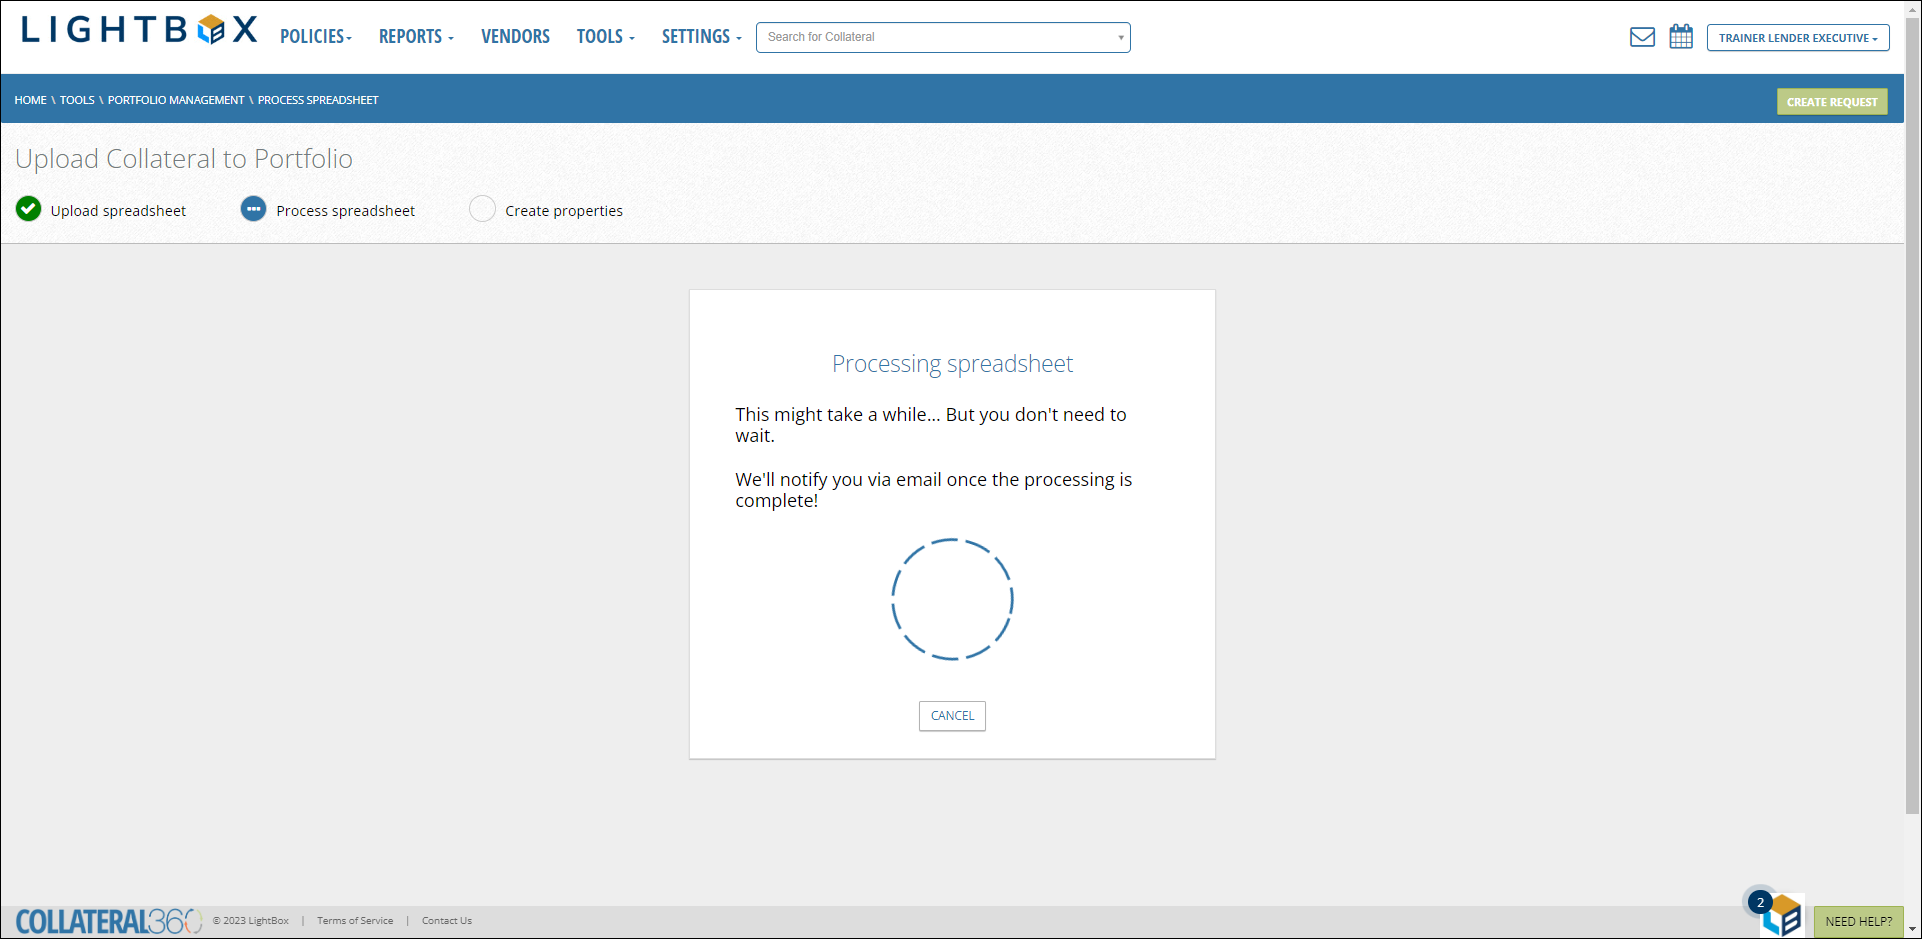
If the mapping is incorrect, click Cancel in the lower right corner. A popup will require confirmation: click Yes, Cancel to confirm.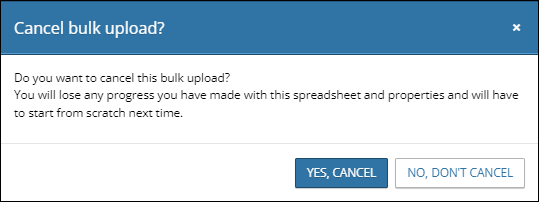
The Portfolio will be created and displayed, but only the primary Property (entered on the Collateral tab of the SRF) will be listed. Once you have corrected the issues with the spreadsheet, click Actions, then Bulk Upload.
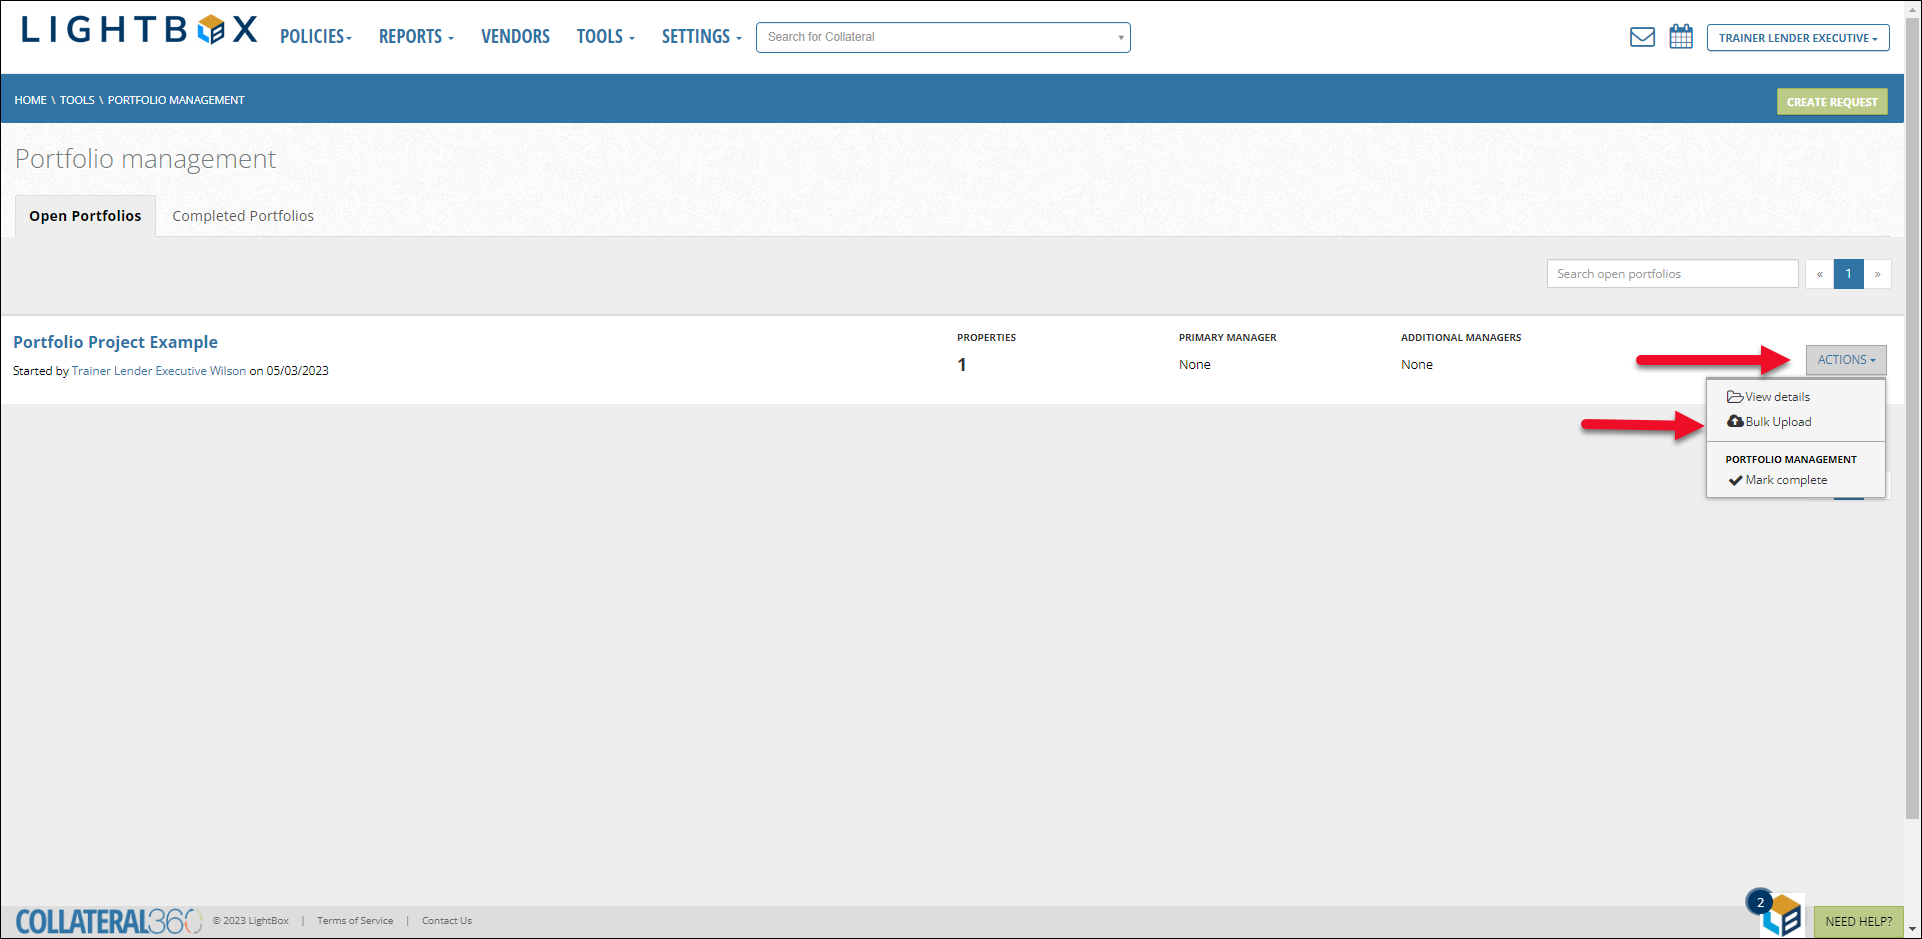
Repeat the steps above, uploading the spreadsheet and verifying the data. If the data mapping is correct, click Continue Processing.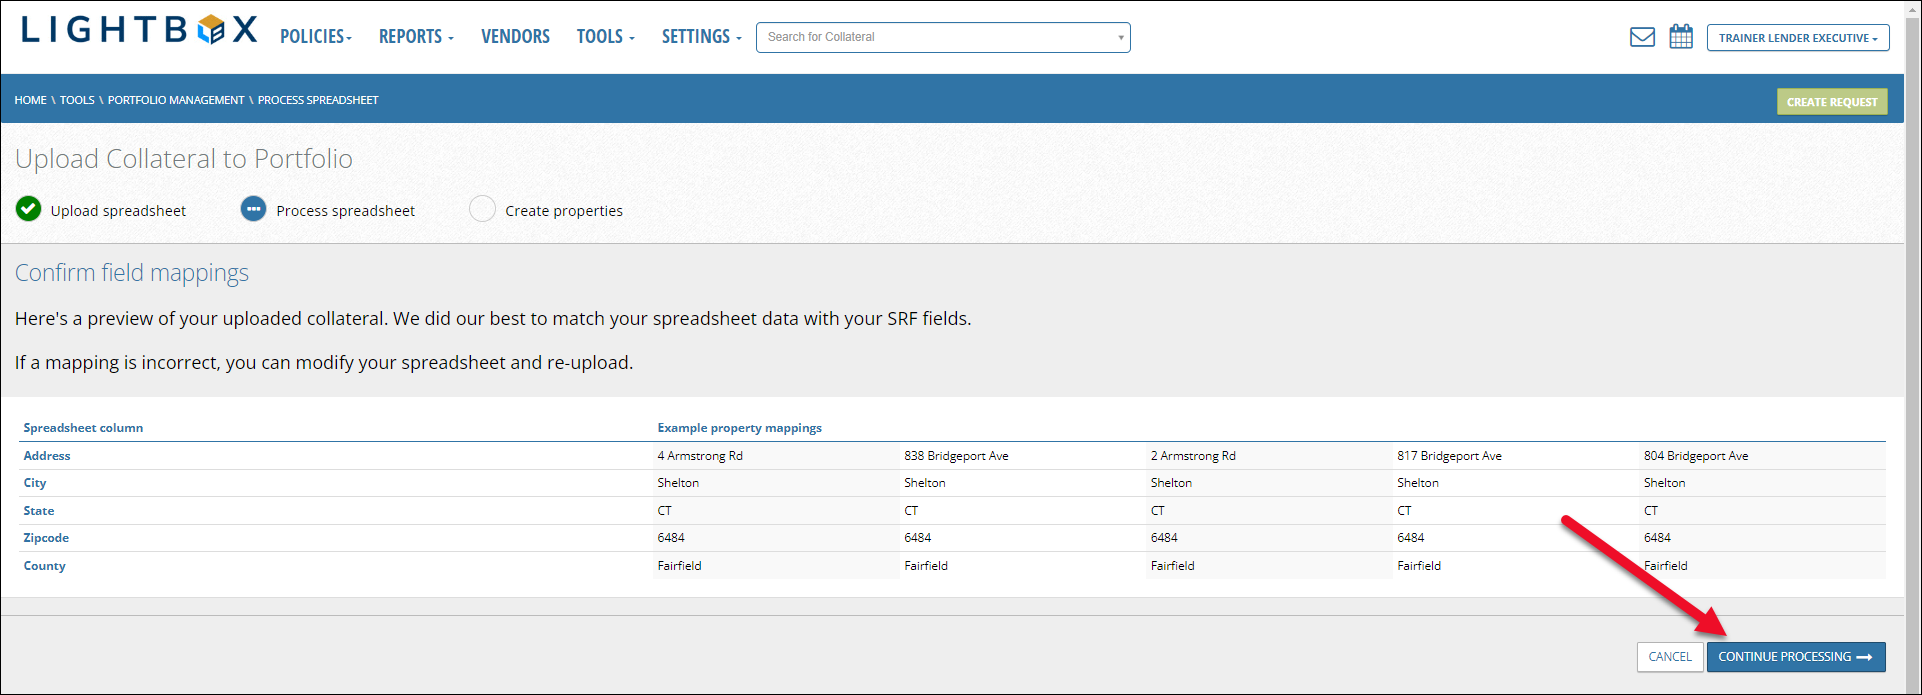
Once the processing has been completed, you will receive an email notification.
Managing Portfolios
To access a Portfolio, click Tools in the menu bar at the top of the screen, then click Portfolio Management.
The Portfolio management page will open.
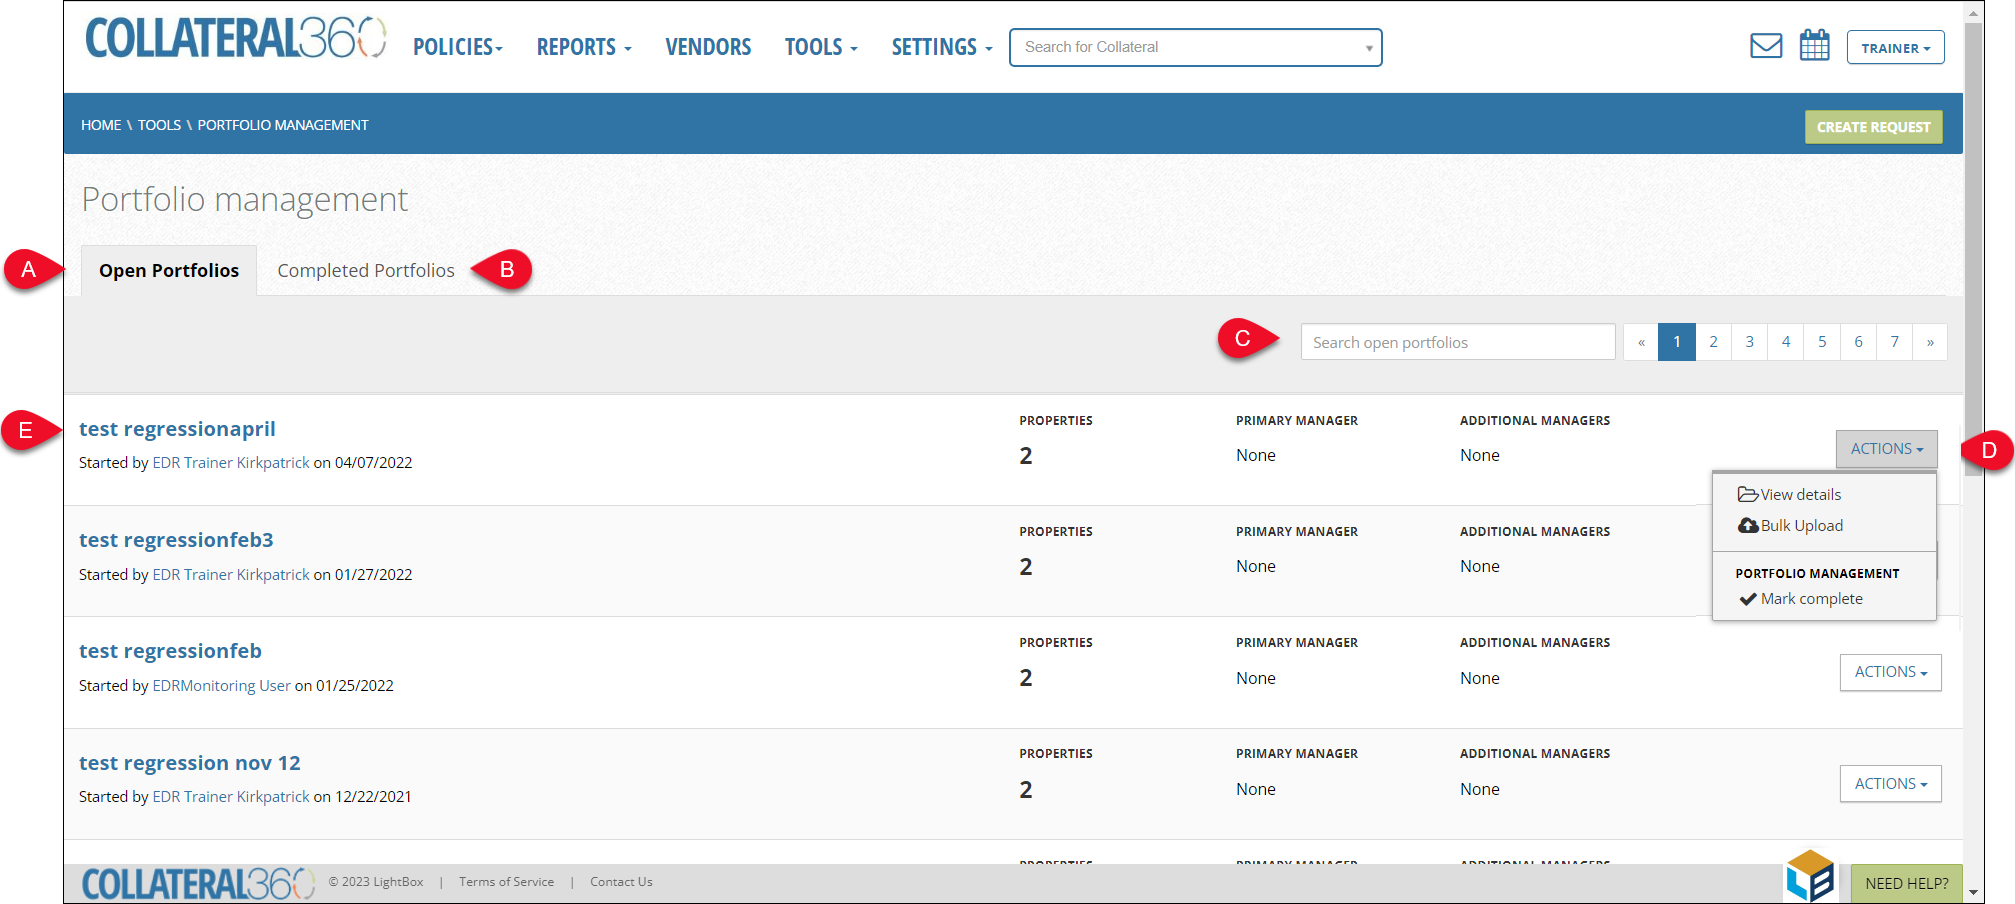
- Open Portfolios: The Open Portfolios tab, selected by default, contains all incomplete Portfolios.
- Completed Portfolios: The Completed Portfolios tab contains Portfolios in which all sites within the Portfolio are in a “completed” status and have been moved manually.
- Search: To locate a Portfolio within Portfolio Management, use the type ahead search field using:
- Portfolio Project Name
- Account Officer Name
- Primary and Additional Portfolio Managers - Actions: Click the Actions button for a Portfolio to expose a menu with three commands:
- View Details: Allows the user to navigate to the Portfolio Management Overview for that specific Portfolio.
- Bulk Upload: Navigates the user to the bulk upload screen if additional Portfolio Properties need to be added from a spreadsheet.
- Mark Complete: Mark the Portfolio “complete” and move it to the Completed Portfolios tab. - Portfolio link: Click the blue Portfolio name to open the corresponding Portfolio.
Managing a Single Portfolio
Click the blue Portfolio name to open the corresponding Portfolio.
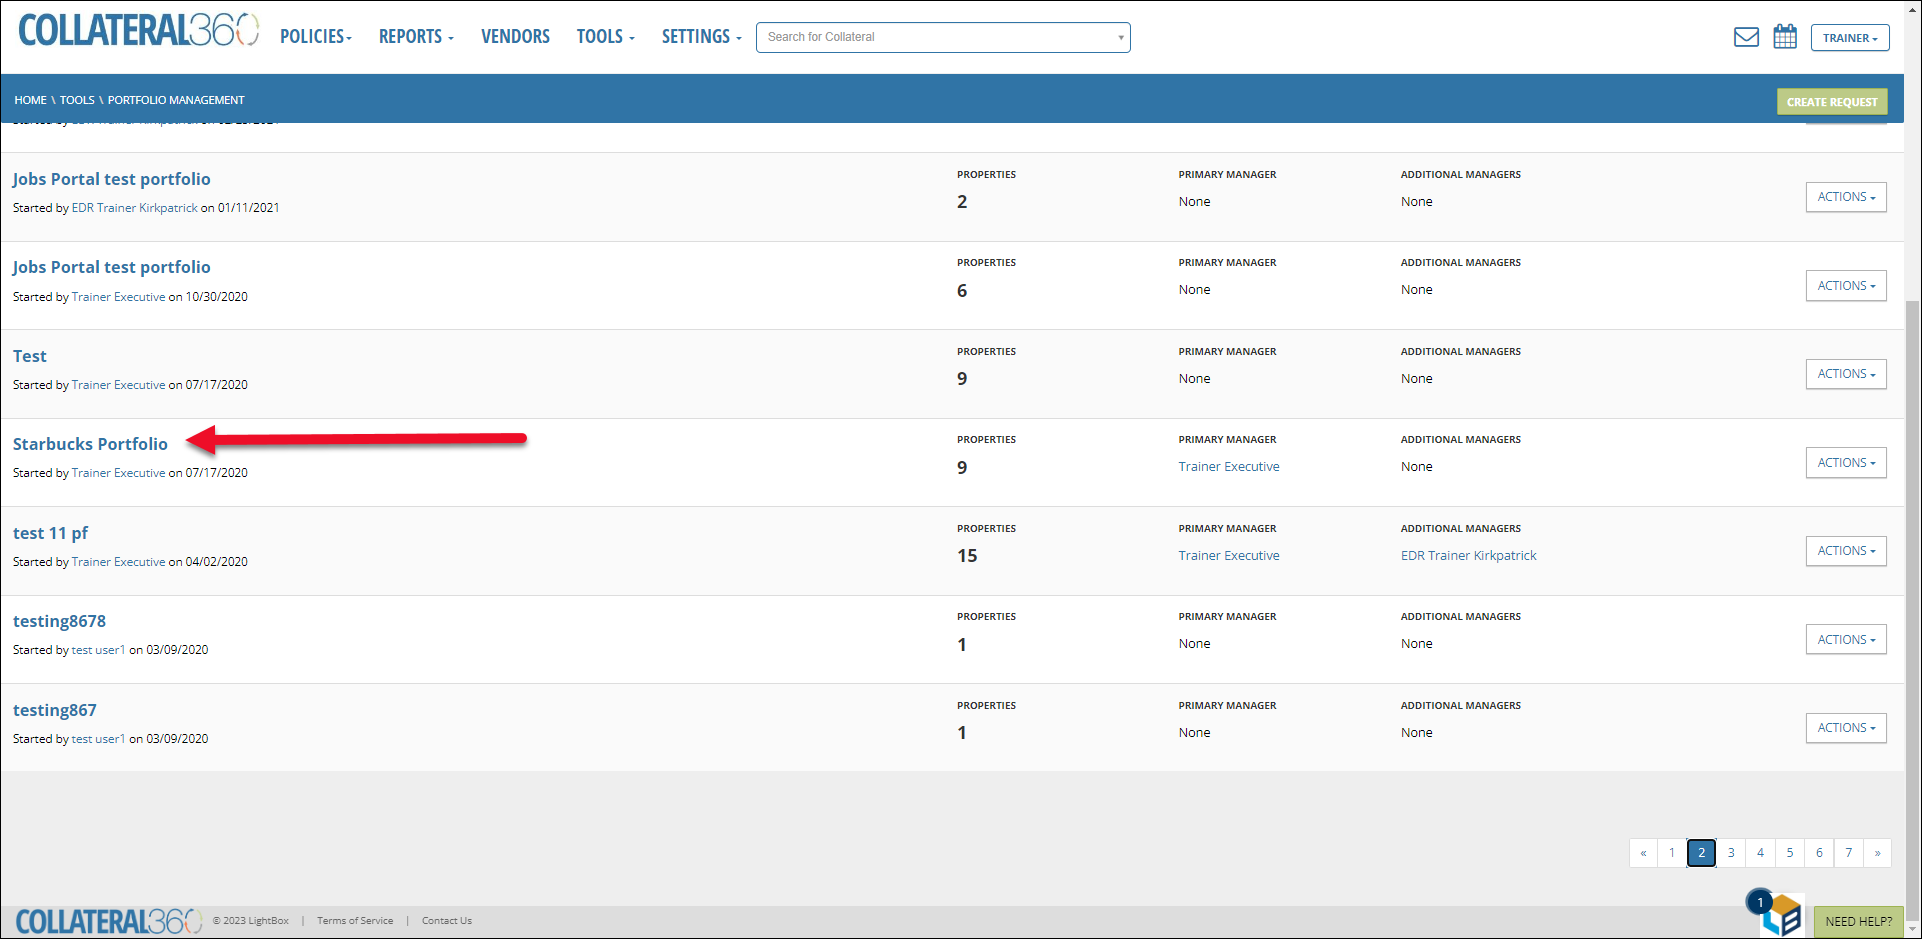
The Portfolio Overview page will open.
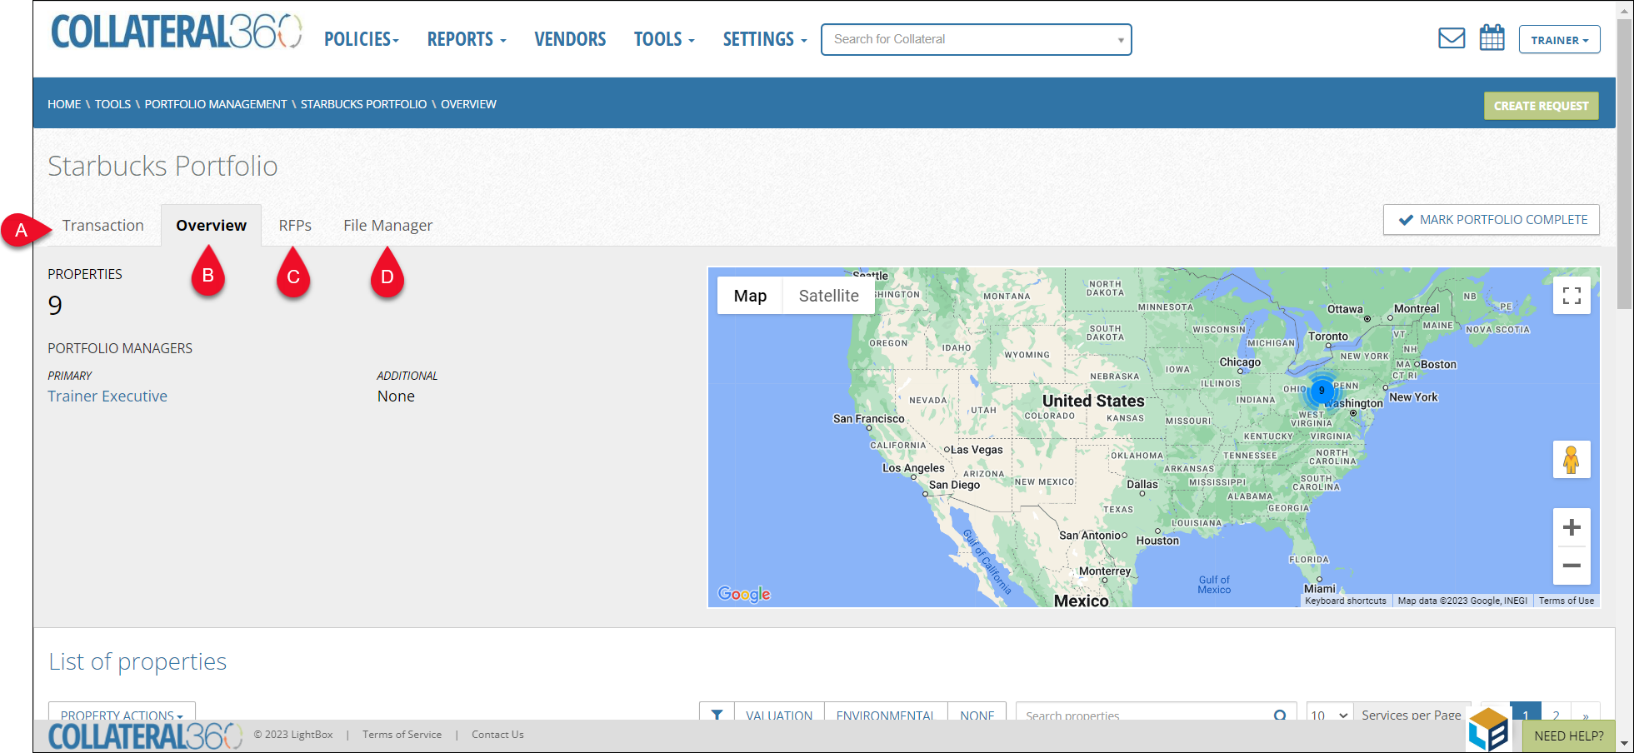
- Transaction: List the information from the Transaction tab of the SRF.
- Overview: Displays a map of the Properties contained in the Portfolio, and below that, a list of all Properties contained in the Portfolio.
- RFPs: Contains a Create RFP button and a list of all RFPs for the Portfolio Properties.
- File Manager: Contains a file upload utility and lists all files associated with the Portfolio and its Properties.
Transaction
The Transaction page lists the Transaction information listed in the SRF.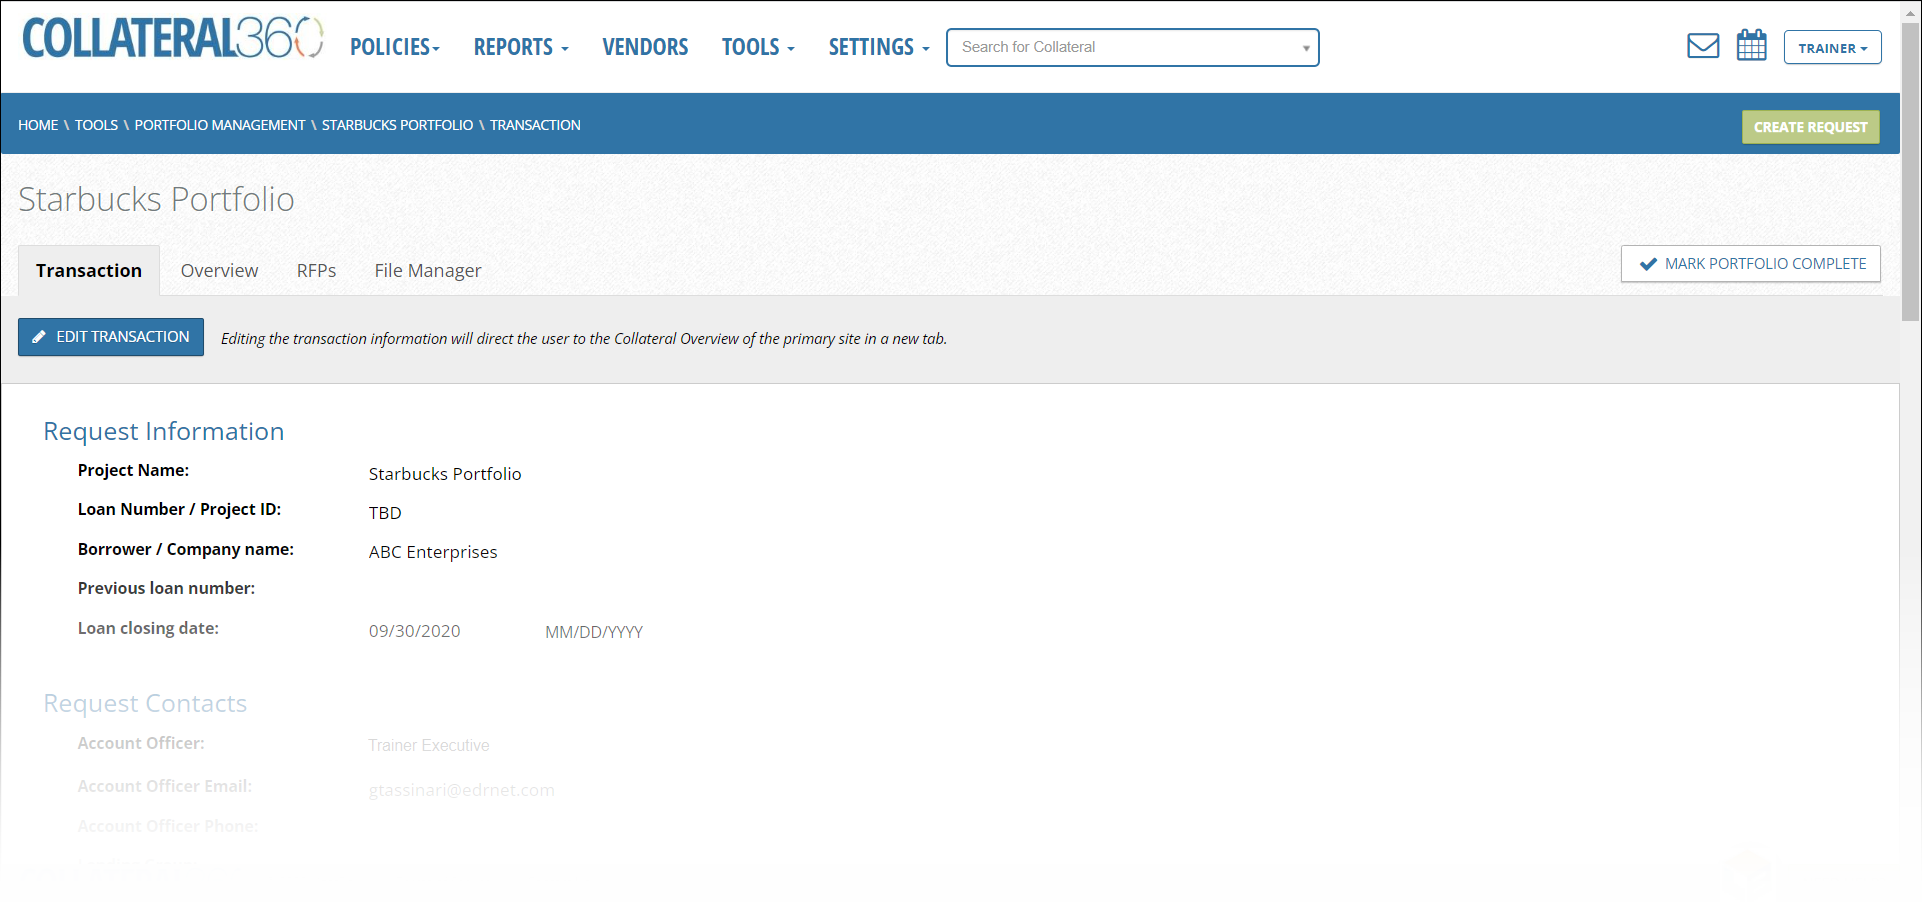
Click Edit Transaction at the top of the page to edit the Transaction information.
The Collateral Overview page of the Primary site will open in a new tab. Scroll down to the Loan & Location Information section and click the Edit button.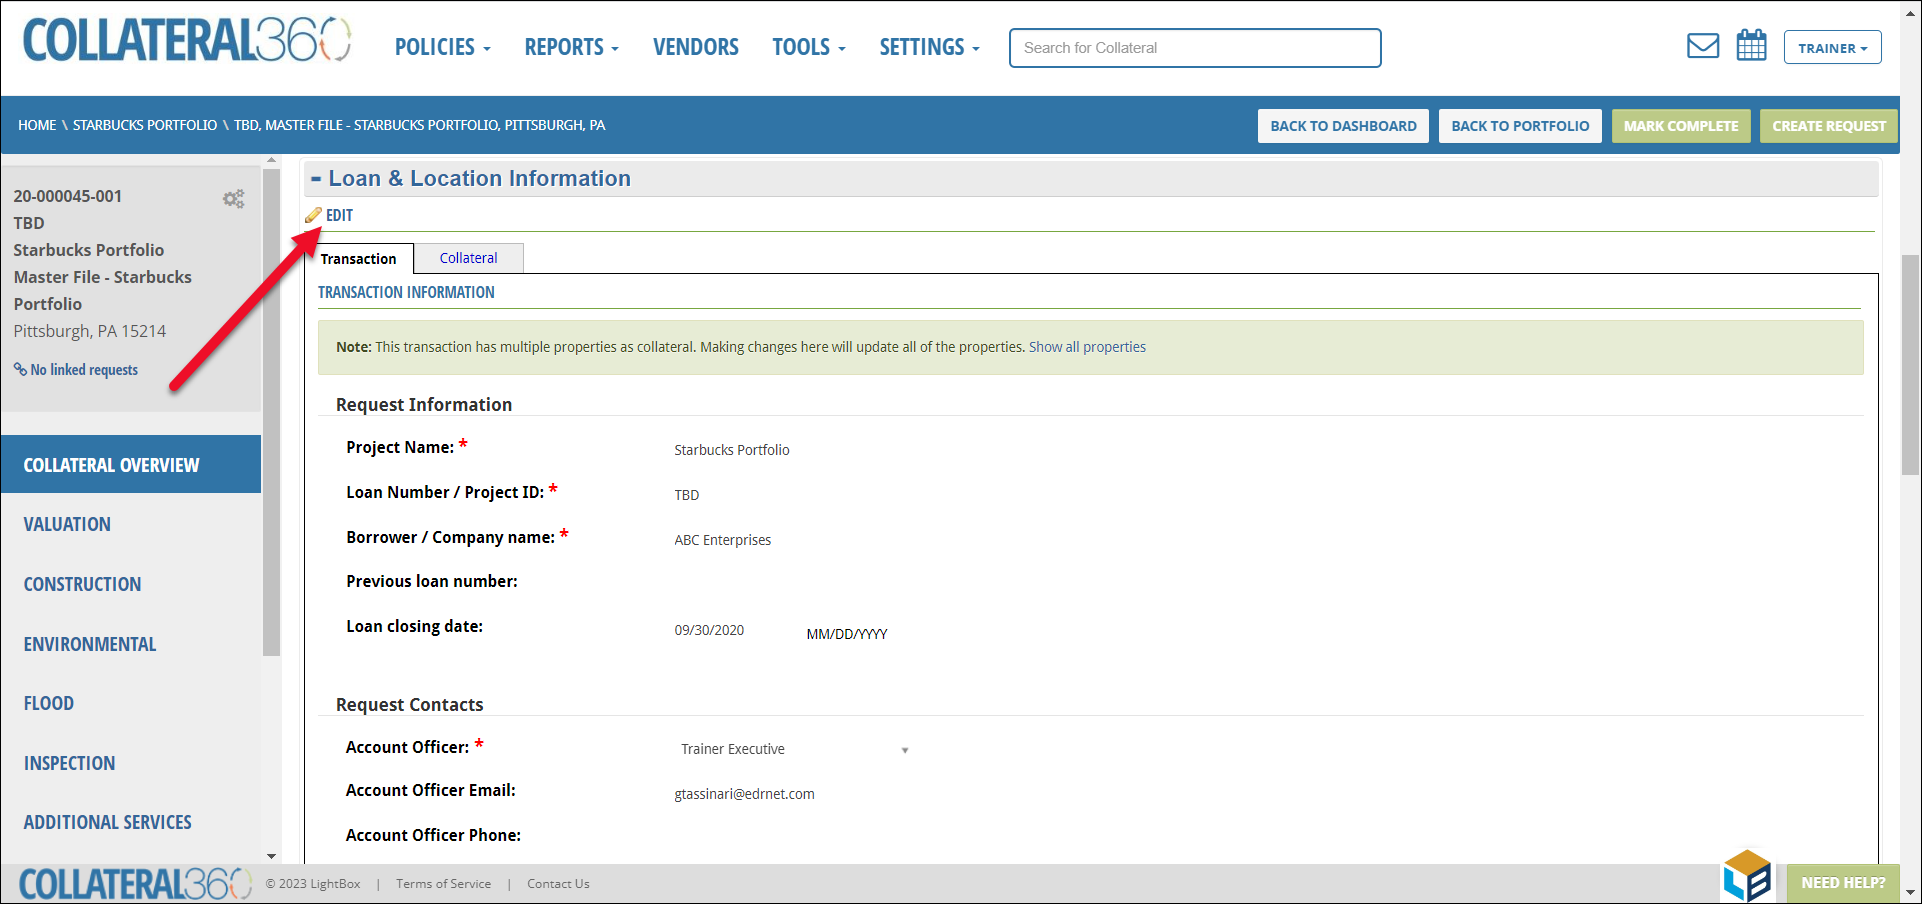
The fields will open for editing.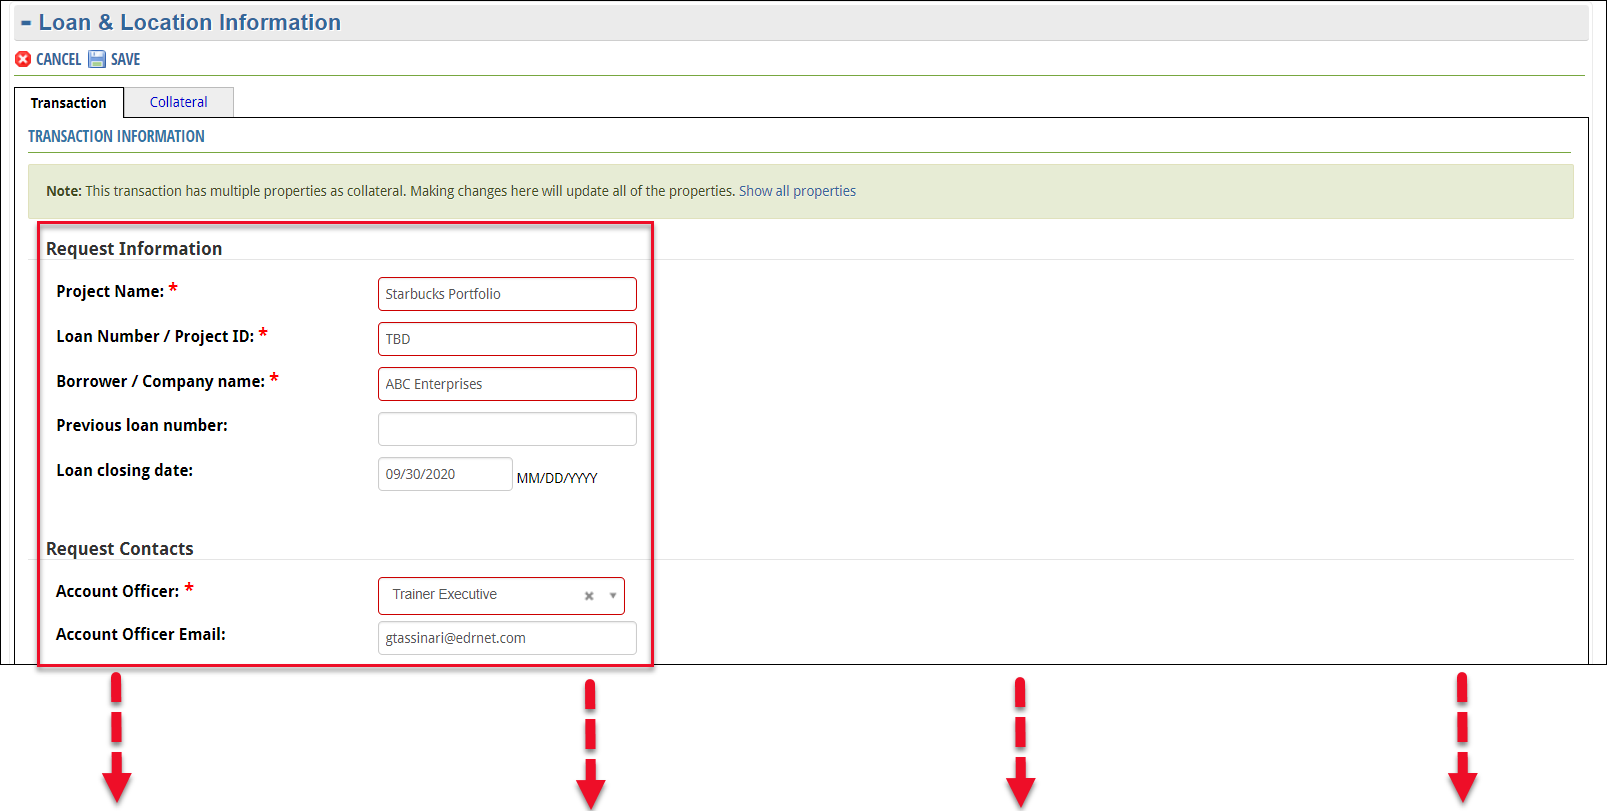
Note: The transaction information applies to all Properties in the Portfolio.
Click Save to apply the changes.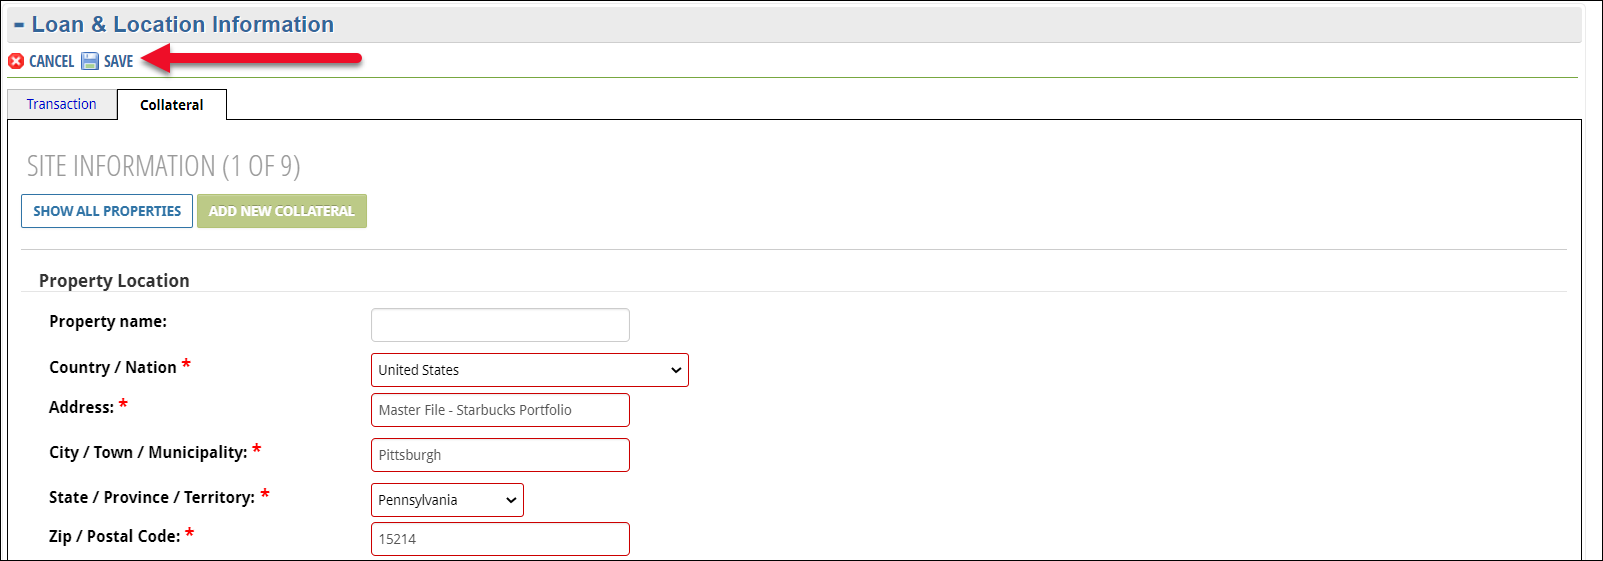
Overview
The Overview page displays a map of the Properties contained in the Portfolio, and below that, a list of all Properties and associated Services contained in the Portfolio.
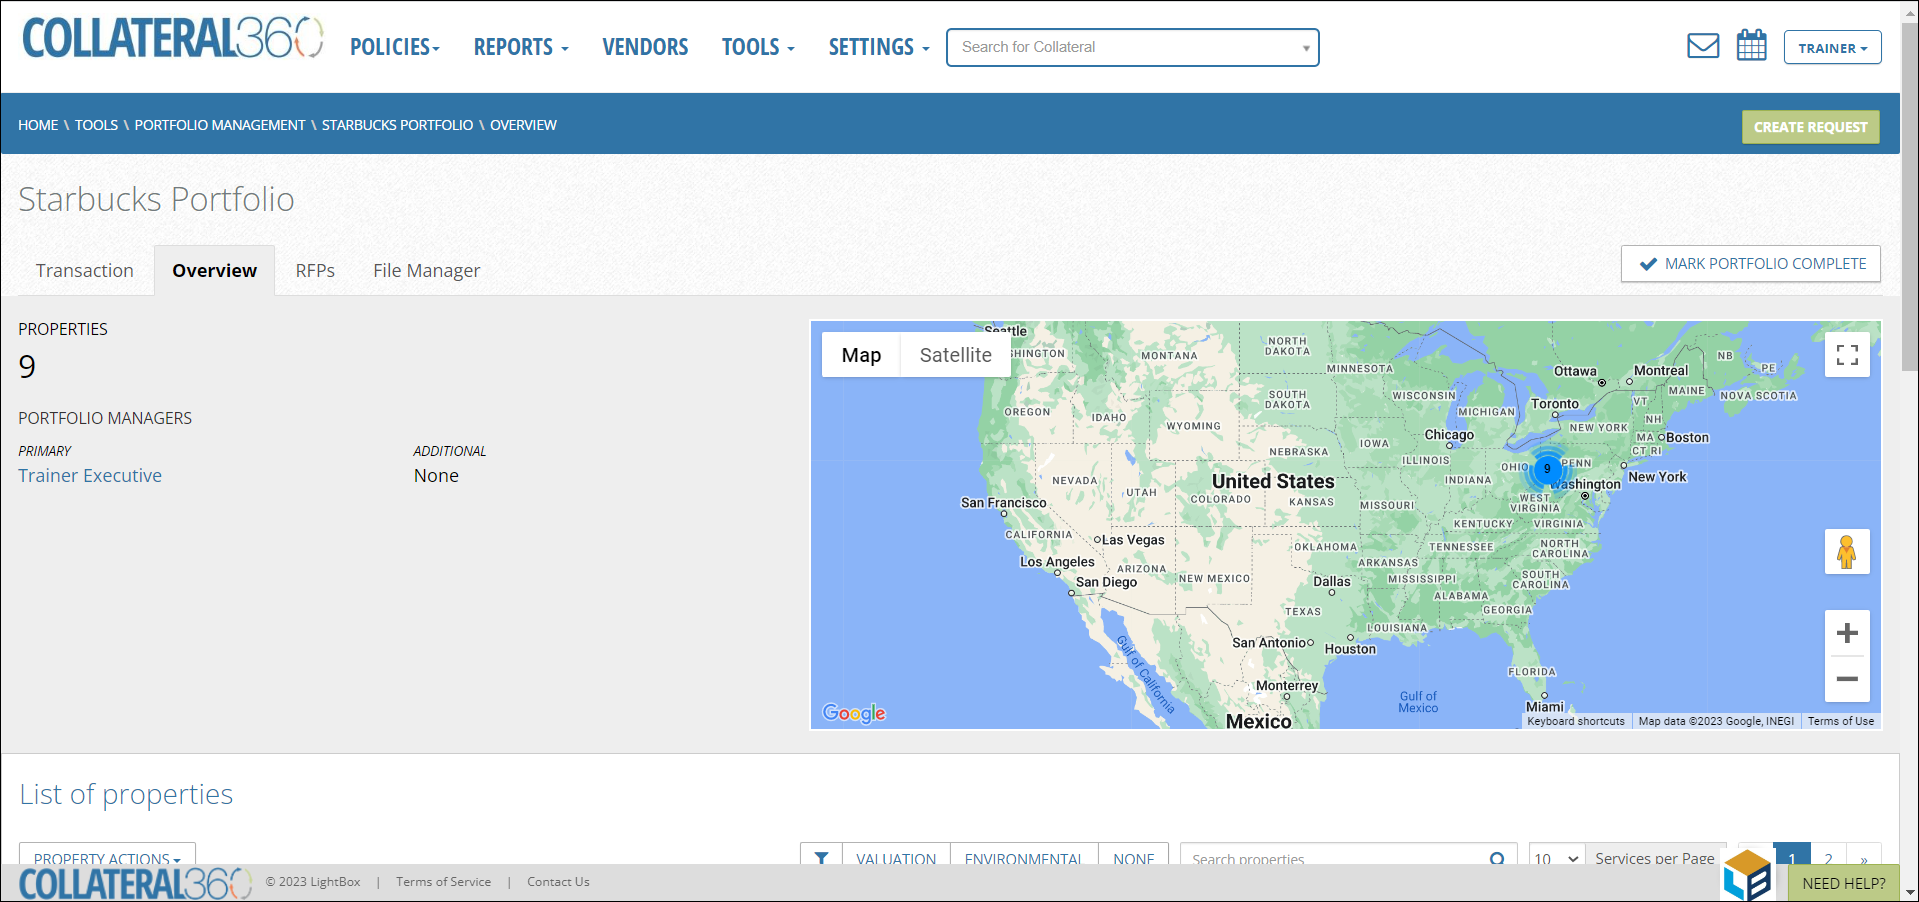
Scroll down to view the Properties and associated Services in the List of Properties section.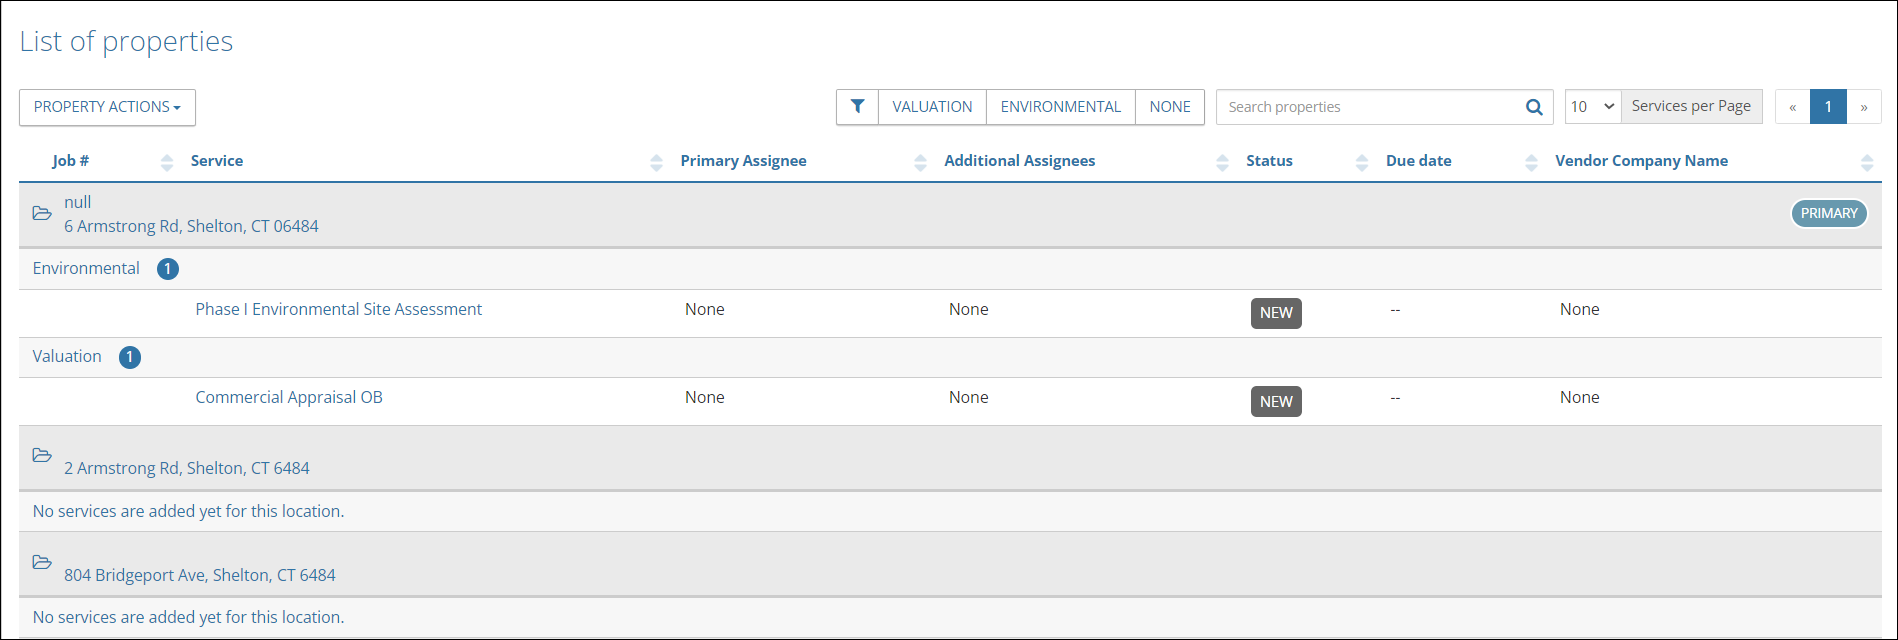
Note: When adding Properties using the Bulk Upload tool, only the Primary Property has Services assigned. The Properties on the spreadsheet are added to the Portfolio without Services assigned.
Click Property Actions to expose a menu containing five commands.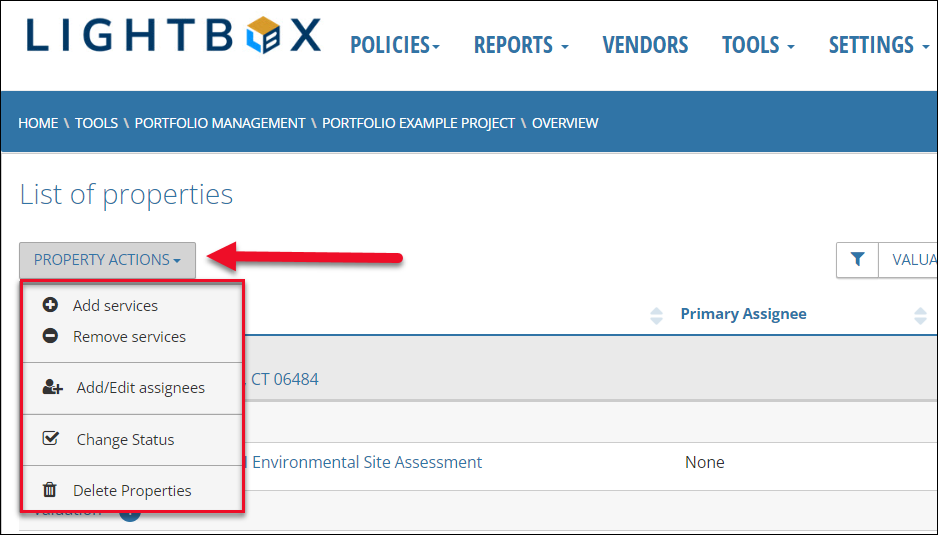
- Add Services
- Remove Services
- Add/Edit Assignees
- Change Status
- Delete Properties
Add Services
To add Services that the Lender User or Account Officer left off the SRF, click Add Services in the Property Actions dropdown menu. The Add Services modal will open.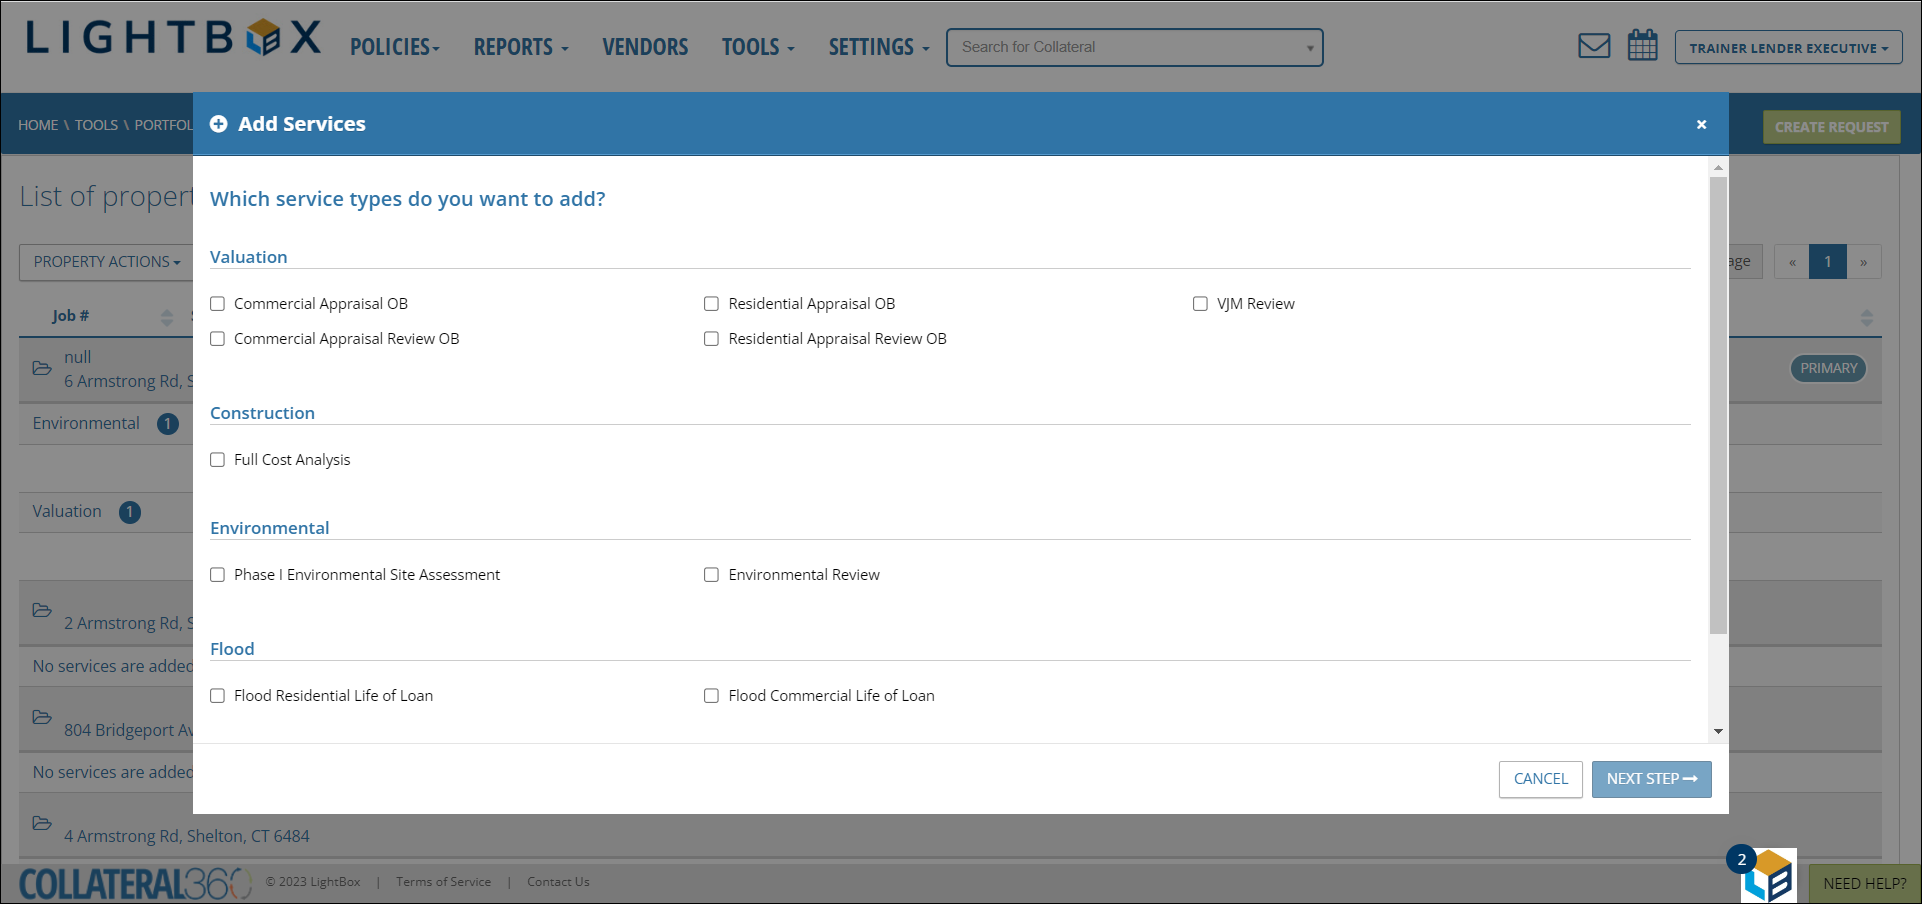
Check the desired Service(s), then click Next Step in the bottom right corner of the modal to proceed to the next step.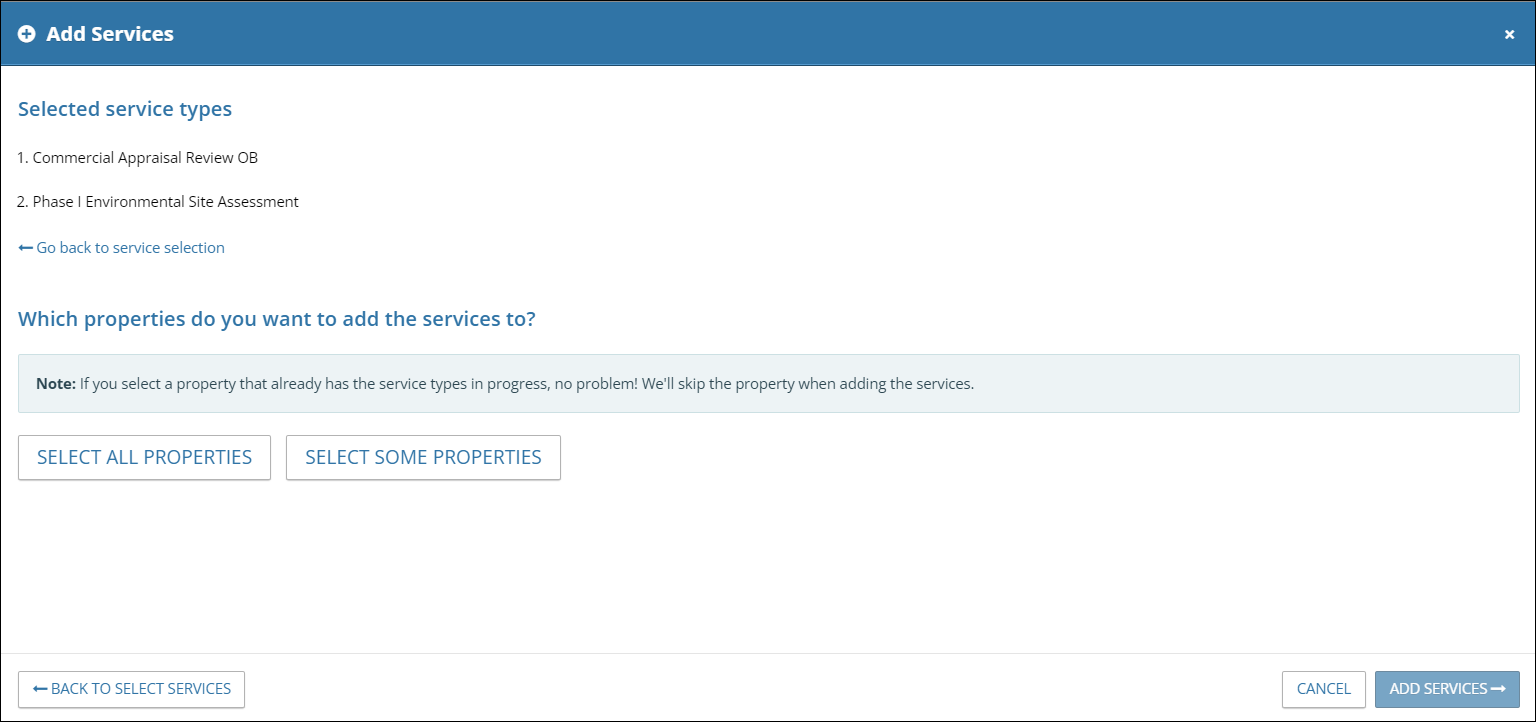
Click Select All Properties to apply the Services to all Properties in the Portfolio. A green check mark will indicate the selection.
OR
Click Select Some Properties, then check the desired Properties.
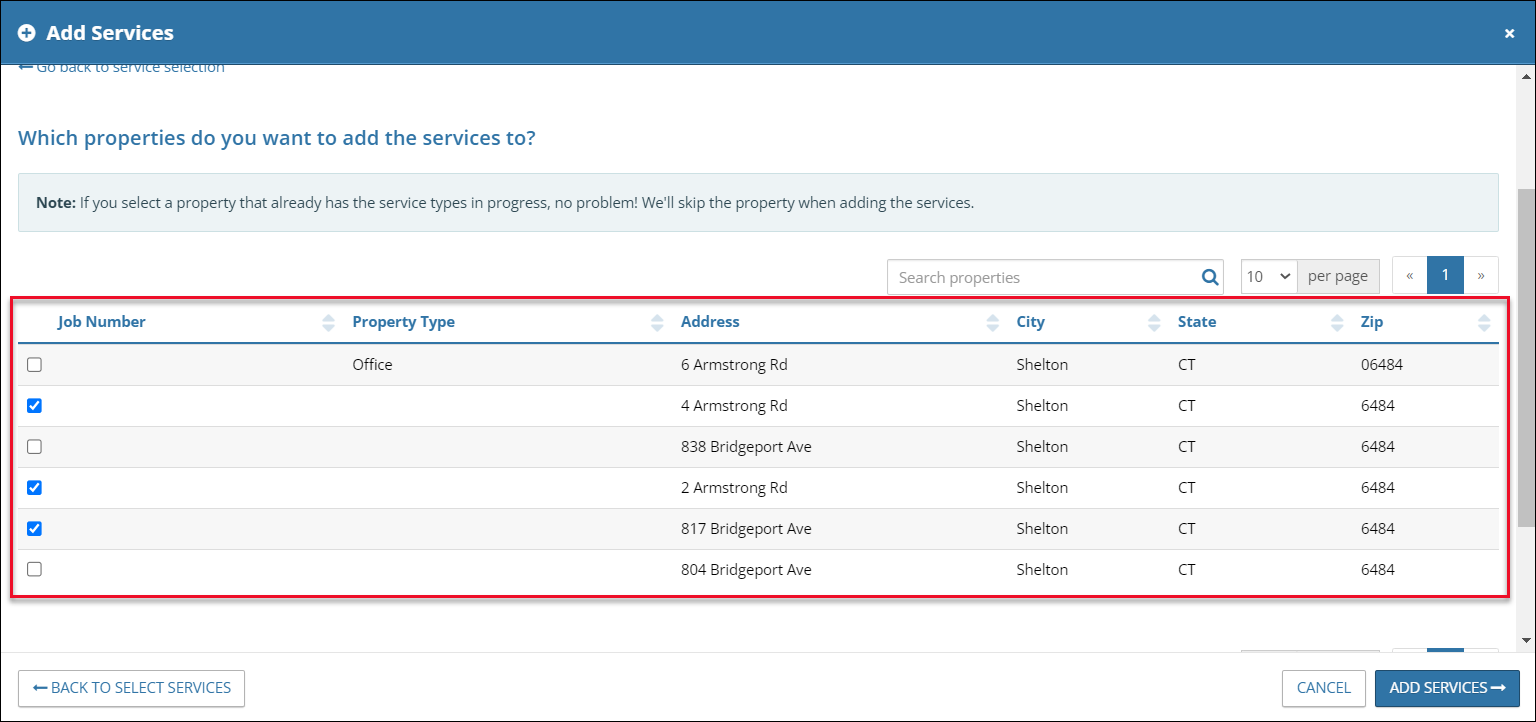
In the example above, the 4 Armstrong Rd., 2 Armstrong Rd., and 817 Bridgeport Ave Properties have been selected.
Click Add Services in the bottom right to apply the Services to the selected Property or Properties. A success message will appear. Click Close to close the modal and return to the Portfolio Overview page.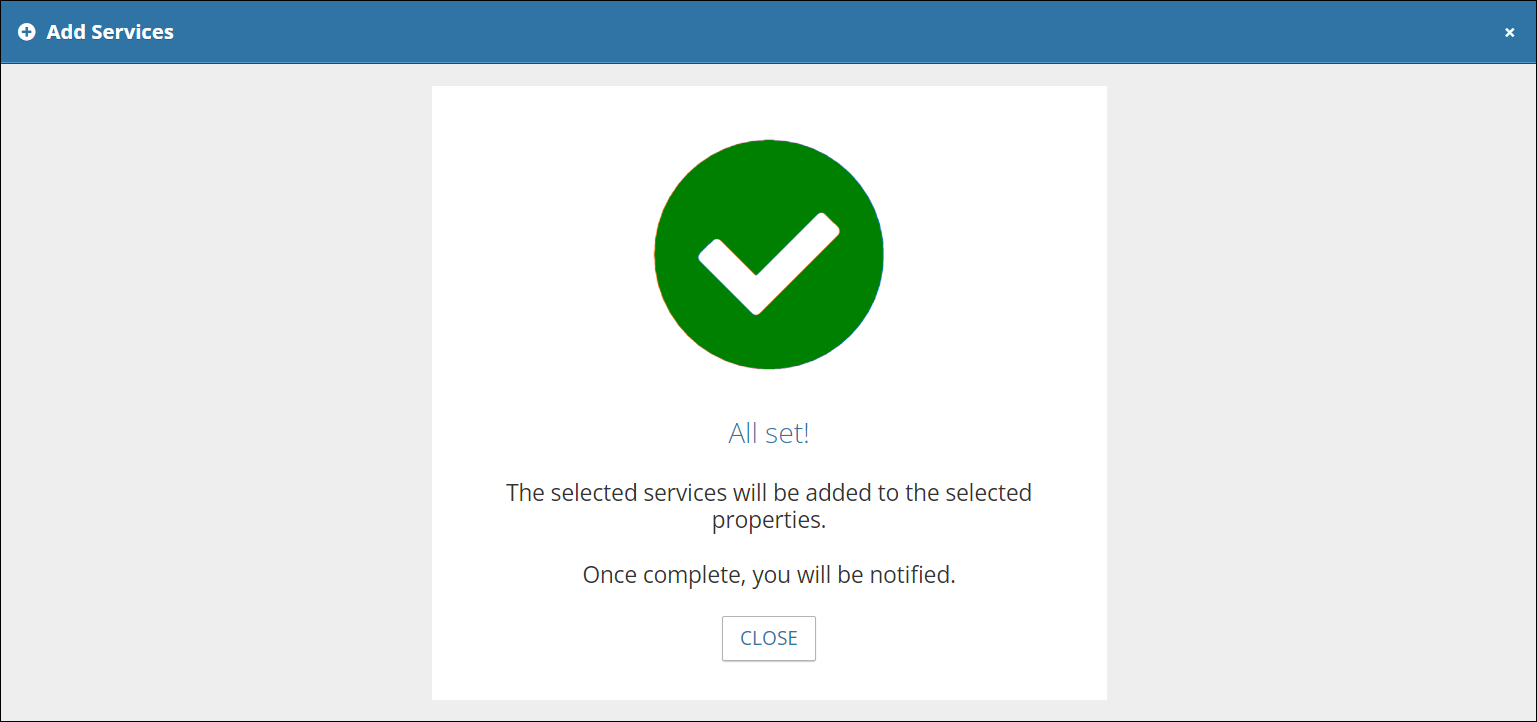
Note: The Overview page must be refreshed before the changes made will be reflected in the List of Properties table.
Remove Services
To remove Services, click Remove Services in the Property Actions dropdown menu. The Remove Services modal will open.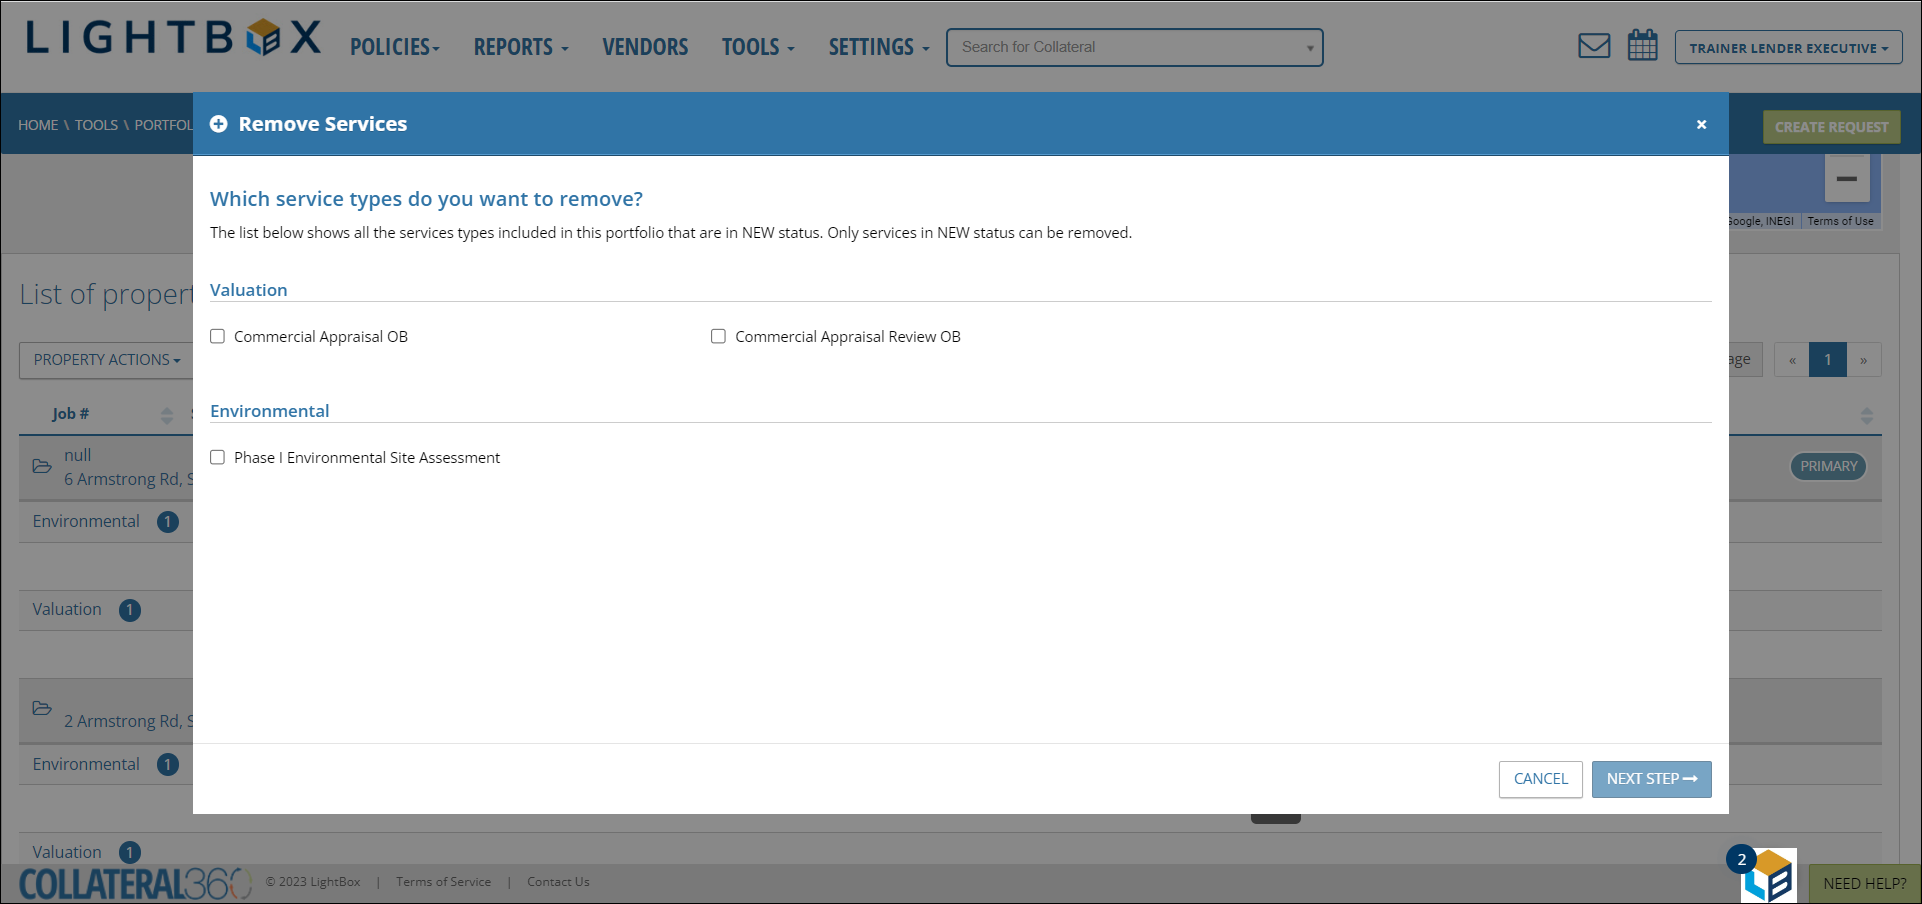
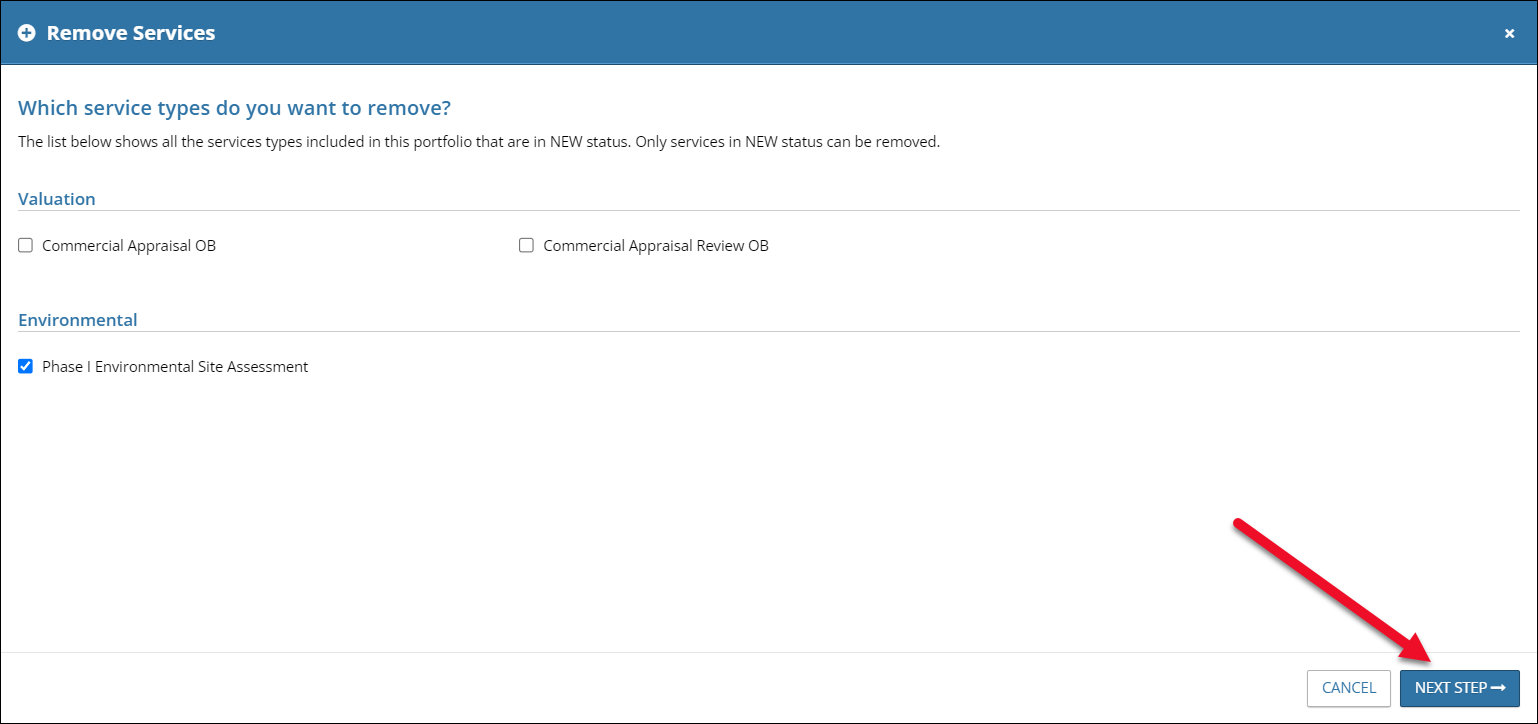
Check the desired Services. Note: Only Services with a status of “New” can be removed. The Remove Services modal will only display Services that are in a “New” status. If a Service has multiple statuses across different Properties and at least one of those statuses is New, it will be displayed in the modal.
Click Next Step to proceed.
Click Select All Properties to apply the Services to all Properties in the Portfolio. A green check mark will indicate the selection.
OR
Click Select Some Properties, then check the desired Properties. Click Remove Services.
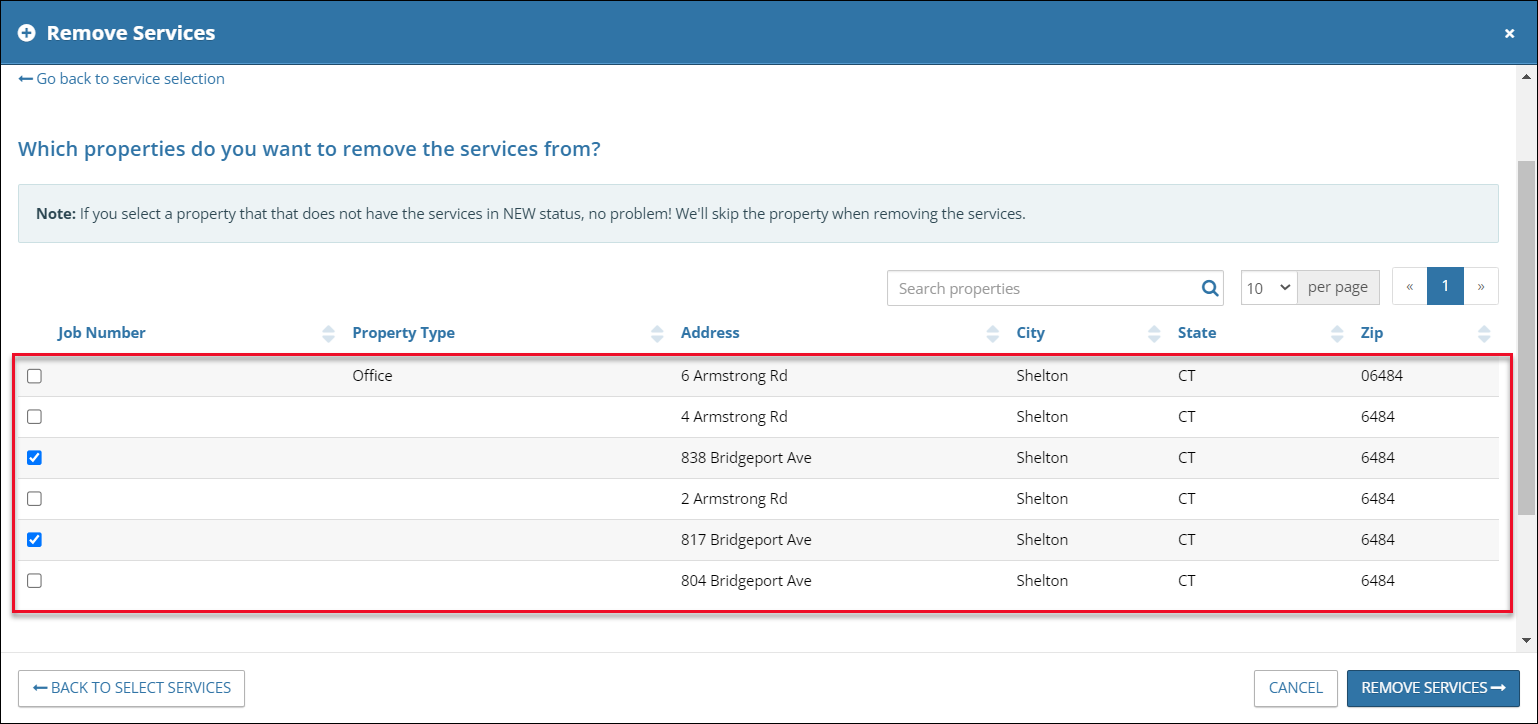
In the example above, the selected Service (Phase I Environmental Site Assessment) is being removed from the 838 Bridgeport Ave and the 817 Bridgeport Ave Properties.
A success message will appear. Click Close to close the modal and return to the Portfolio Overview page.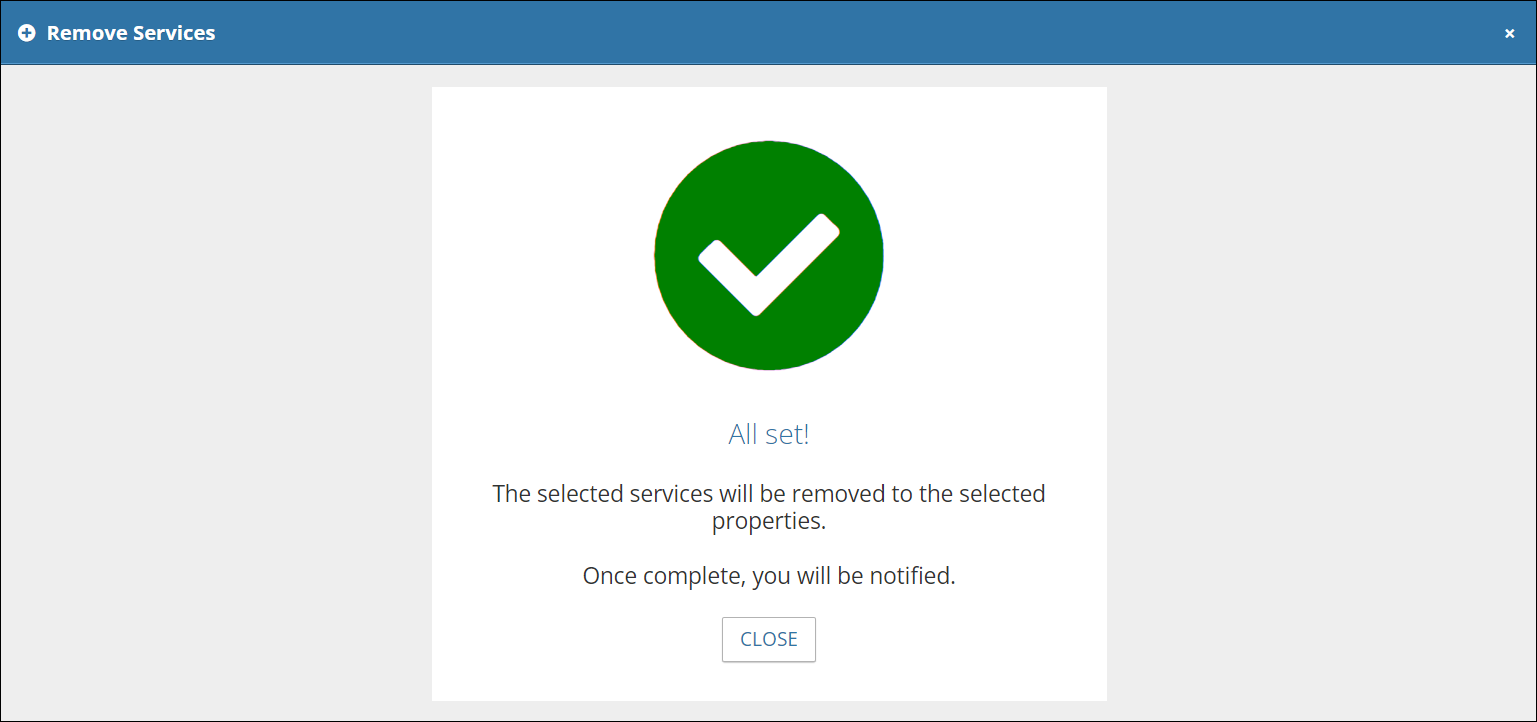
Note: The Overview page must be refreshed before the changes made will be reflected in the List of Properties table. If an attempt is made to remove a Service(s) that is in any status other than New, the system appears to allow the user to remove the Service(s), but upon refresh of the page, the Service(s) will remain.
Add/Edit Assignees
Click Add/Edit assignees in the Property Actions dropdown menu. The Add/Edit Assignees modal will open. Select a Service to assign and click Next Step to continue to the next page.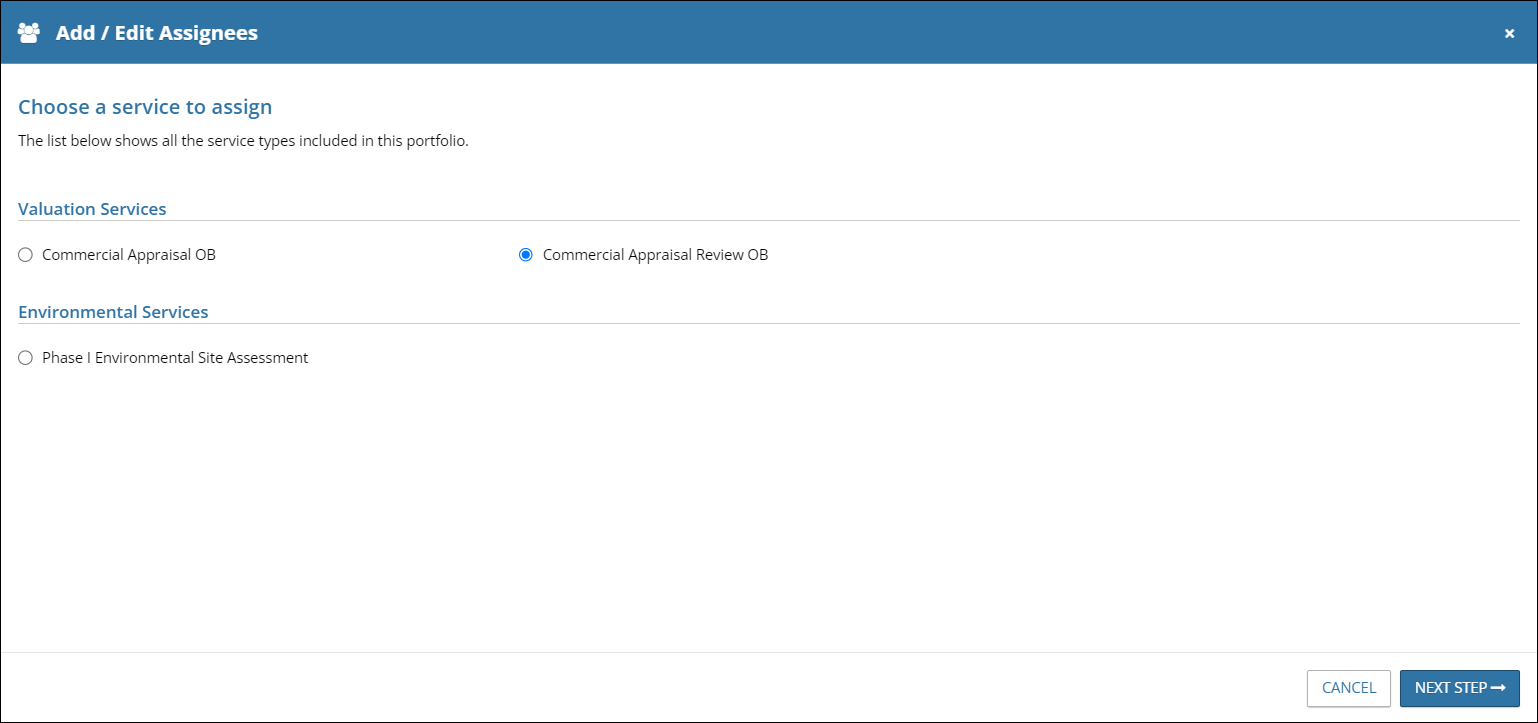
On the next page, click Select All Properties to select all Properties in the Portfolio. A green check mark will indicate the selection.
OR
Click Select Some Properties, then check the desired Properties. Note: Only Properties with the Service(s) you selected on the previous screen assigned to them are available for selection here.
Then click Next Step.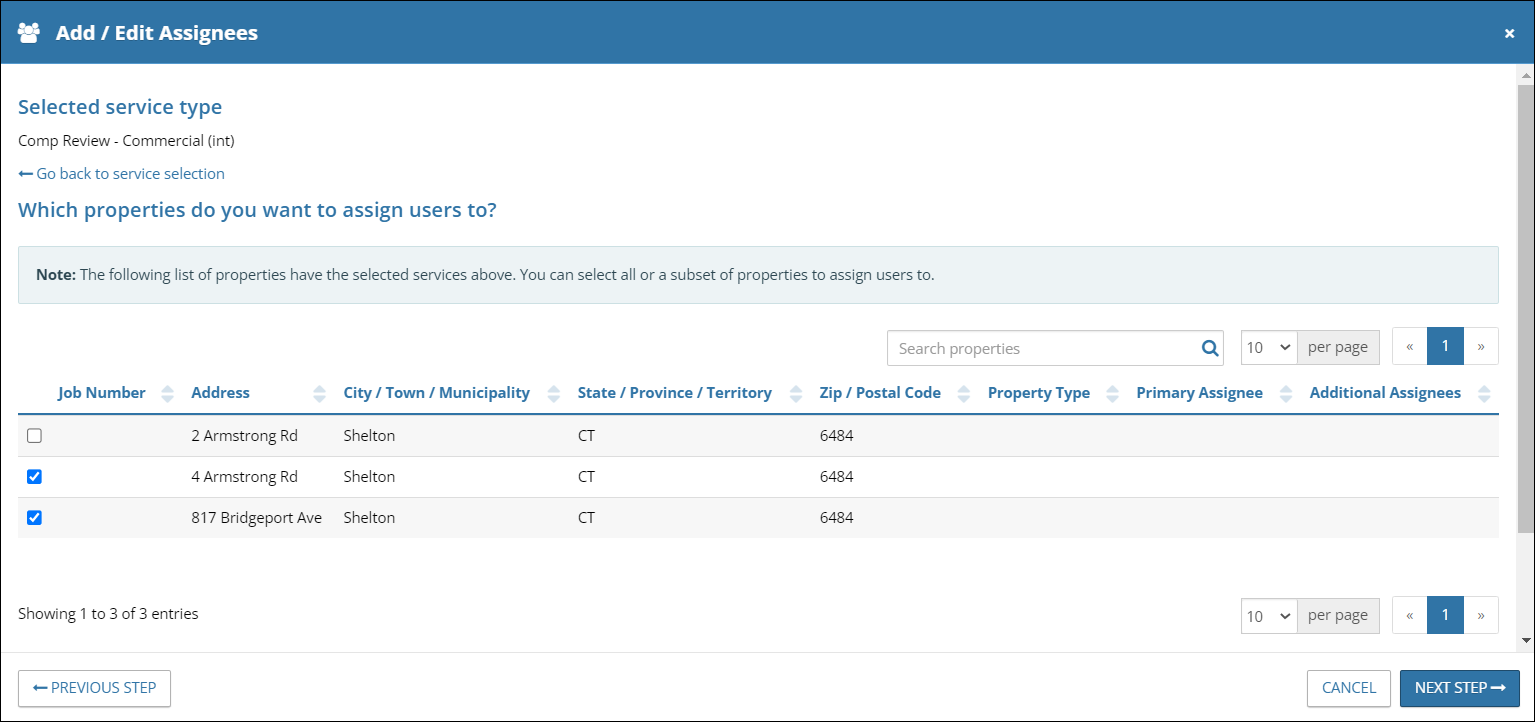
The next page allows you to add and/or remove the Primary and Additional Signees for the selected Services.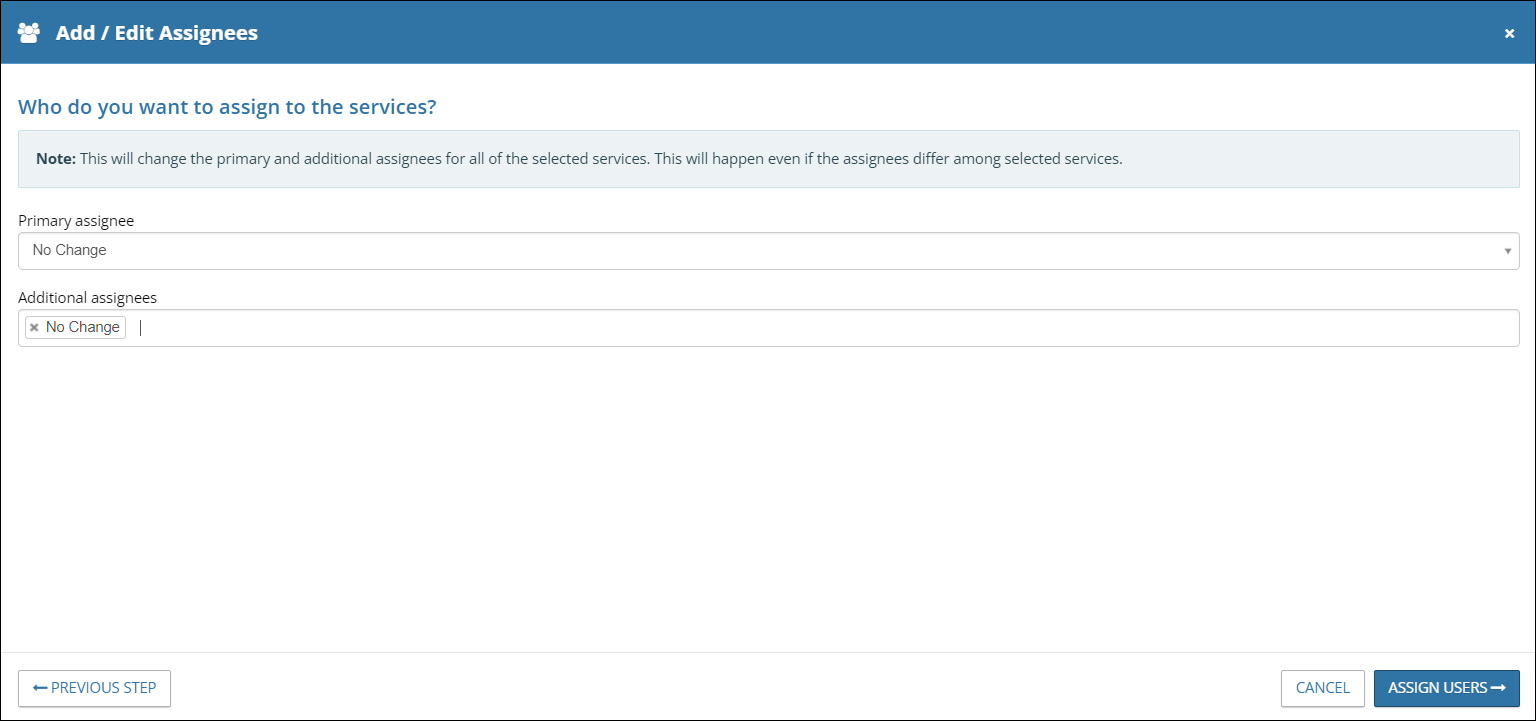
Click in one of the two fields to expose a menu containing the users that could be added as the Primary or Additional Assignee(s). The fields have type-ahead functionality, so if you know the name of the user you wish to add, begin typing it to filter the list of available options.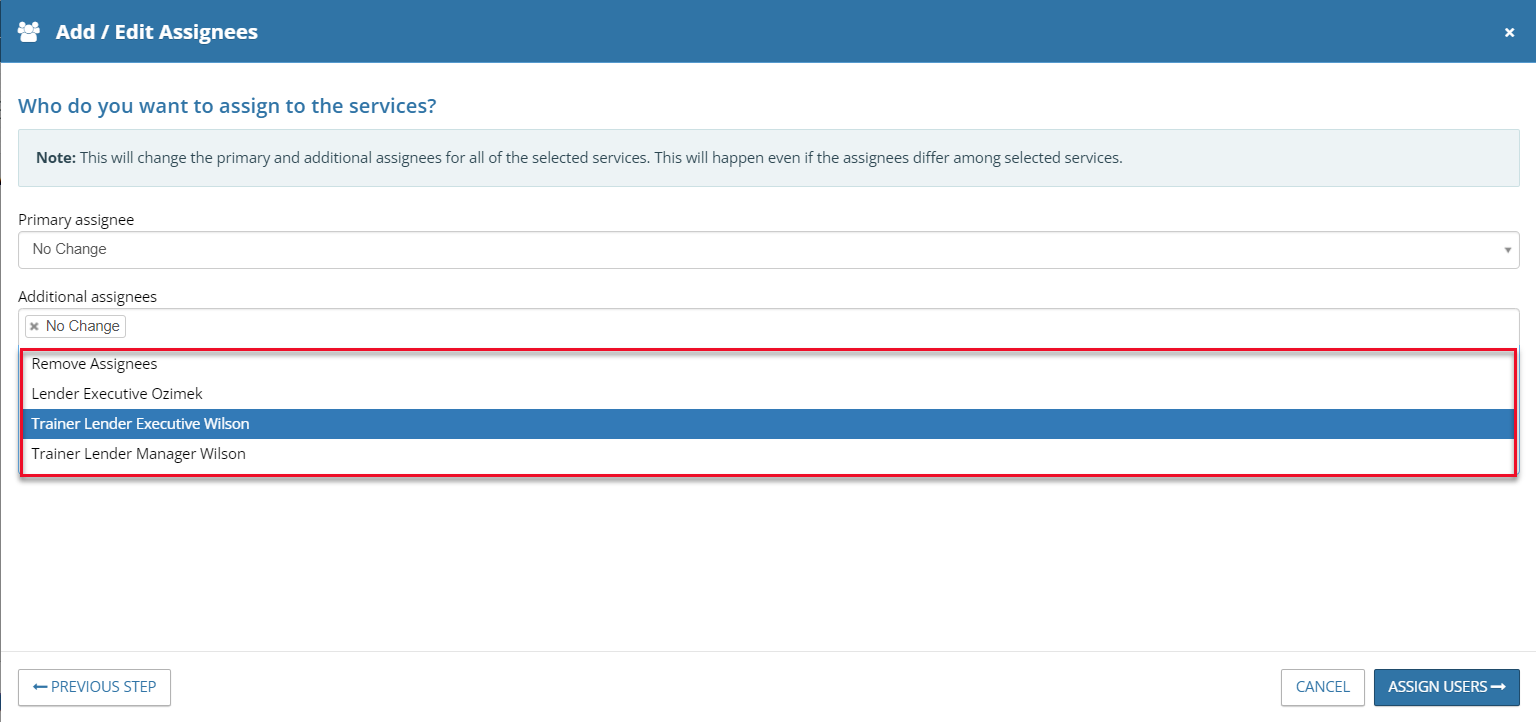
Select Remove Assignees to remove all Additional Assignees on all of the selected Properties. Note: This option is only available for Additional Assignees, not the Primary Assignee.
Change Status
The status of one or more Services can be changed using the Change Status tool. Click Change Status in the Property Actions dropdown menu. The Change Status modal will open.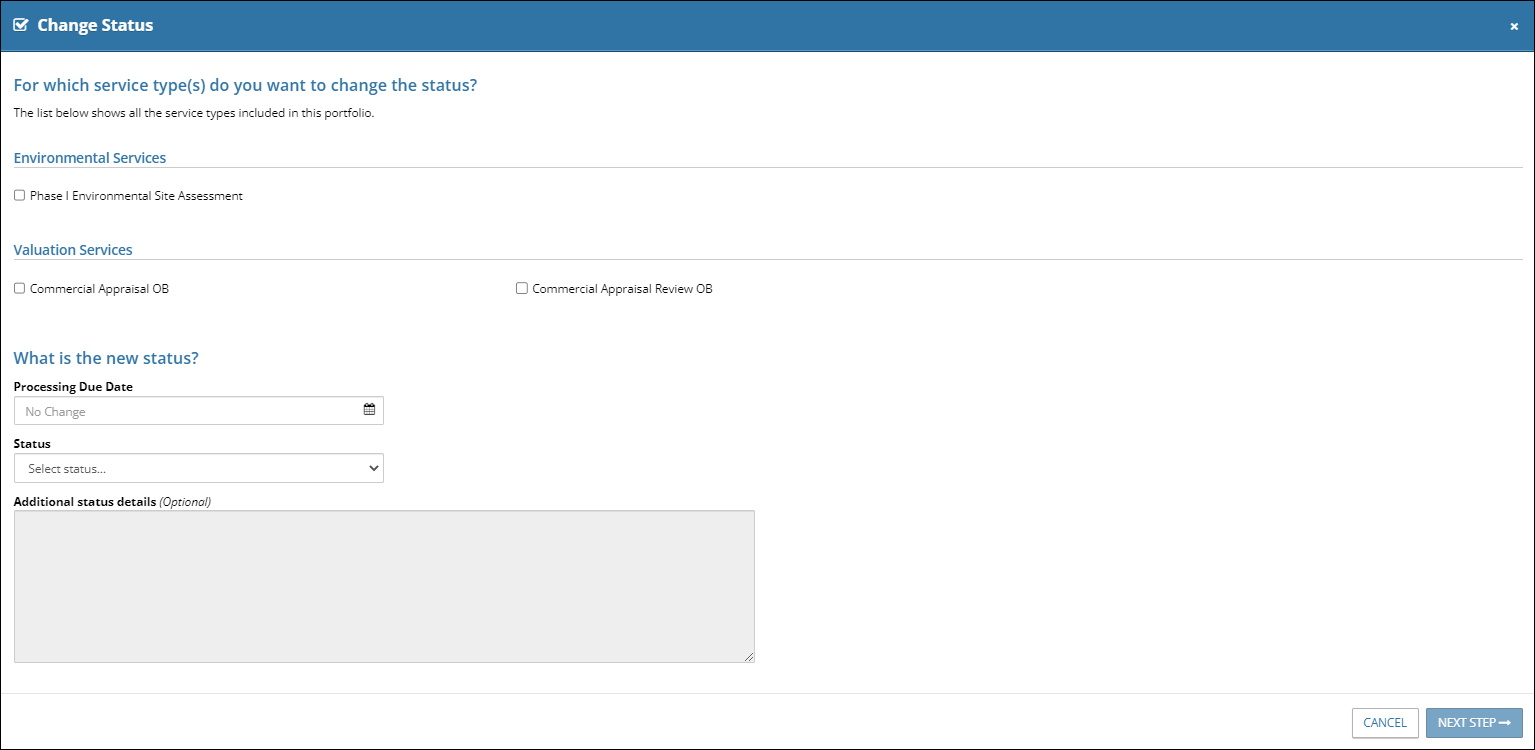
The Services available in the Portfolio will be listed. Check the box next to one or more Services to update the statuses for those Services.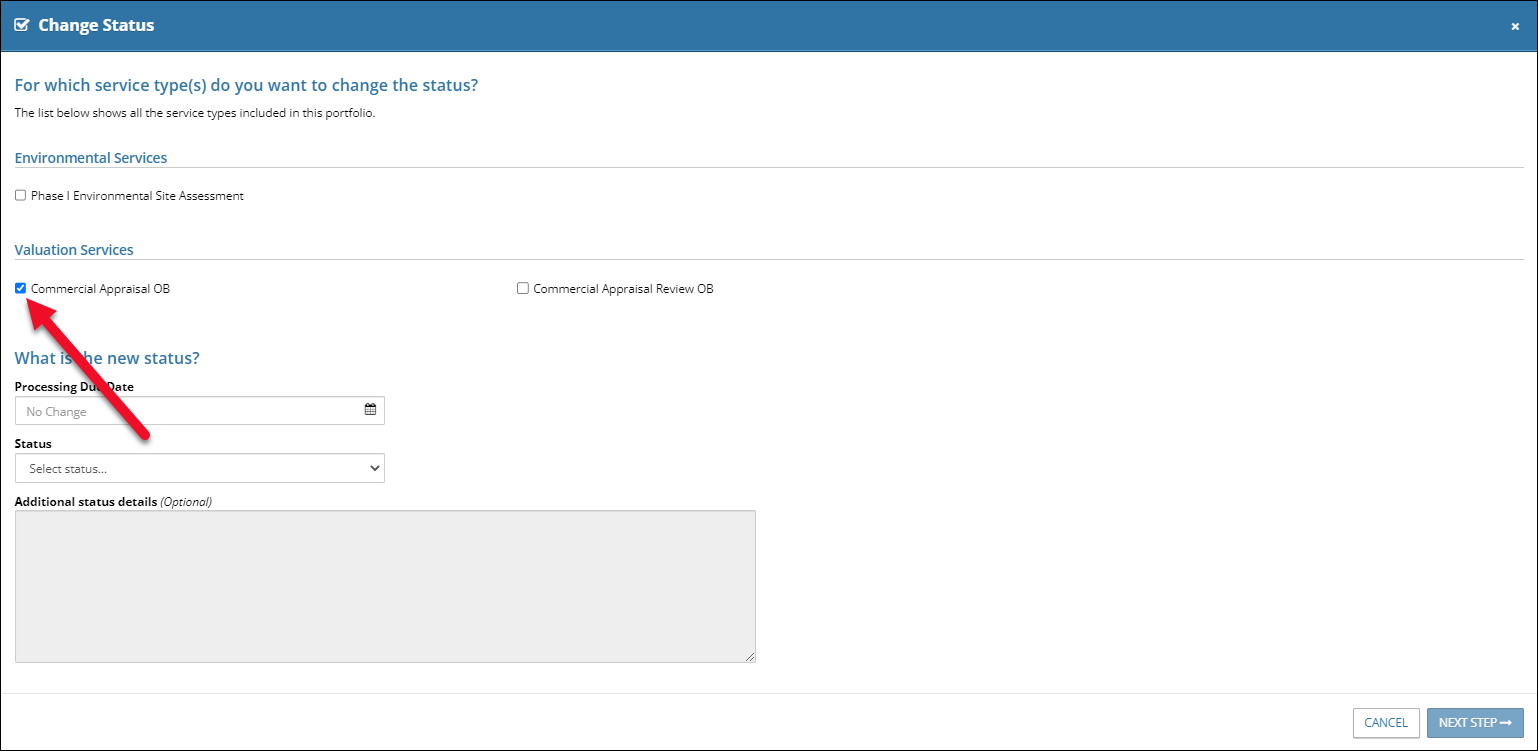
In the example above, the Commercial Appraisal OB Service was selected.
Set the new status:

a. Enter a Processing Due Date. Note that this step is only necessary if changing the status to On Hold or On Hold – Pending Approval. The date selected appears in the calendar. It is provided for internal tracking purposes and does not trigger notifications or other functionality.
b. Select the desired status from the drop-down menu. If On Hold or On Hold – Pending Approval is selected, an additional drop-down menu will appear and require you to select an On Hold reason.
c. Optionally, add additional comments.
d. Click Next Step in the bottom right-hand corner of the modal to proceed.
The next screen of the Change Status modal will load. The Service type(s) selected on the previous screen will be listed at the top.
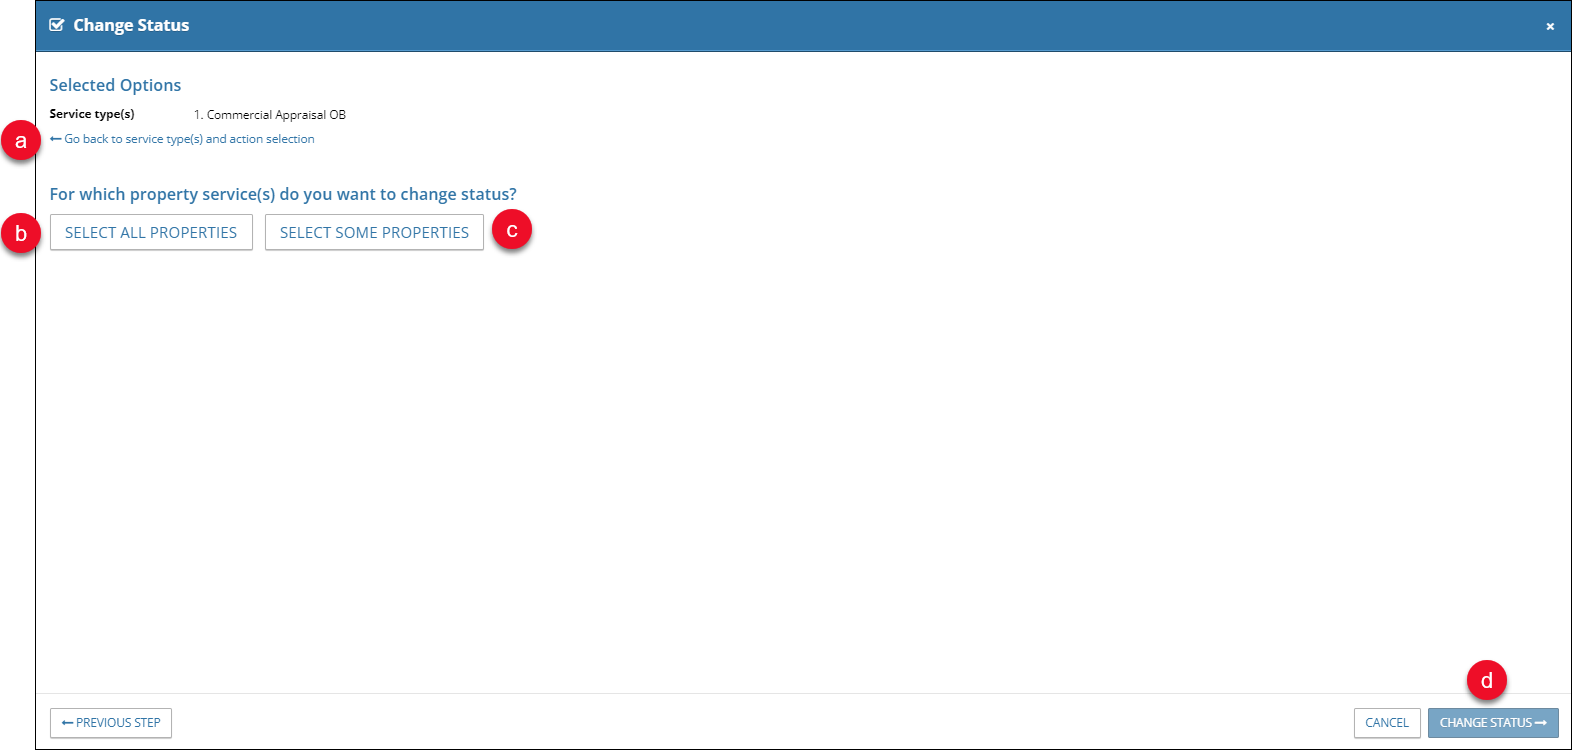
a. Click Go back to Service type(s) and action selection to return to the previous screen.
b. Click Select All Services to select all Services of the Service Type(s) defined on the previous screen.
c. Click Select Some Services to select specific Services of the defined Service Type(s). Click the checkbox next to each Service for which you wish to update the status.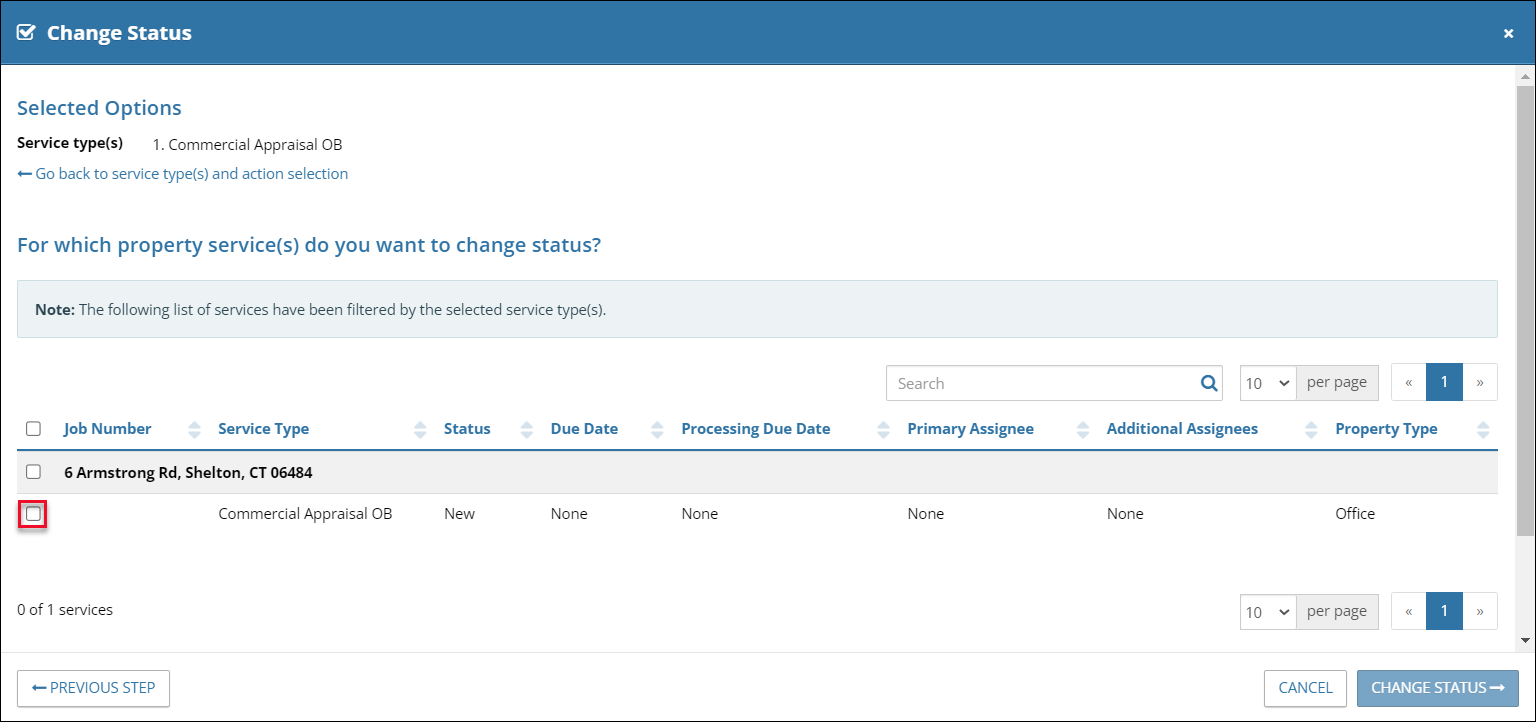
- Click the checkbox in the upper left-hand corner of the table to select all Services in the table, including those on subsequent pages.
- Use the Search Services field to search for one or more Services. Valid search criteria include the following: Job Number, Service Type, Status, Processing Due Date, Primary/Additional Assignees, Property Type.
- The number of entries displayed on each page of the table can be modified by using the per page drop-down menu in the lower right-hand corner.
- Navigate through additional pages in the table using the forward and backward arrows or click a page number to navigate to that page in the table.

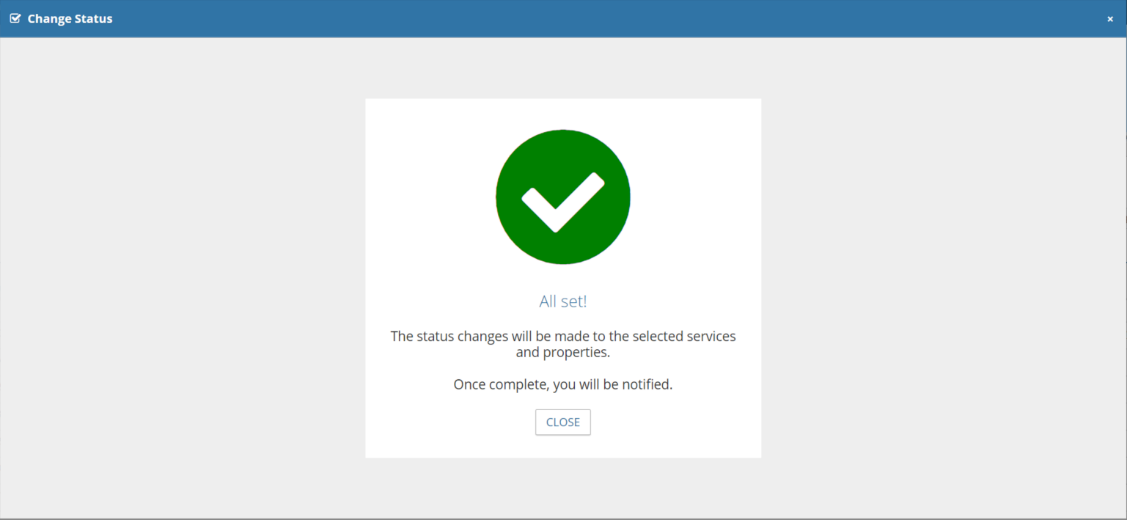
d. Click Change Status in the bottom right corner to confirm the selections. A confirmation message will appear.
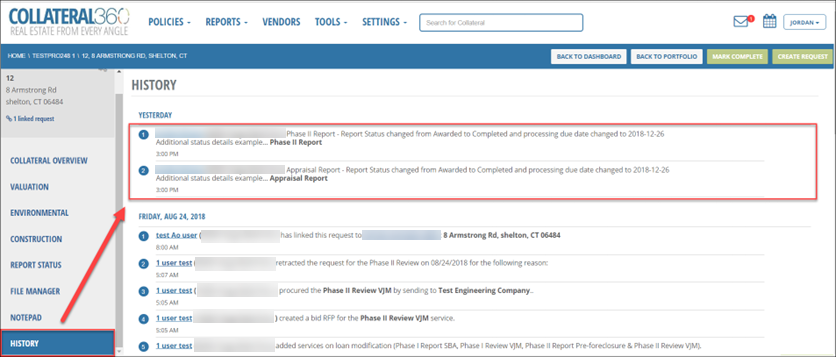
Status changes are tracked in the History tab(s) of the relevant Properties.
When the status is changed to On Hold or Cancelled, a notification is sent to the following users:
• Primary and Additional Assignees of the Portfolio
• Primary and Additional Assignees of each Portfolio Property
• SRF Participants of each Portfolio Property, including Account Officer(s)
Delete Properties
Click Delete Properties in the Property Actions dropdown menu.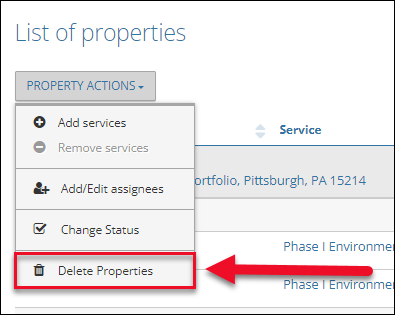
The Delete Properties modal will open.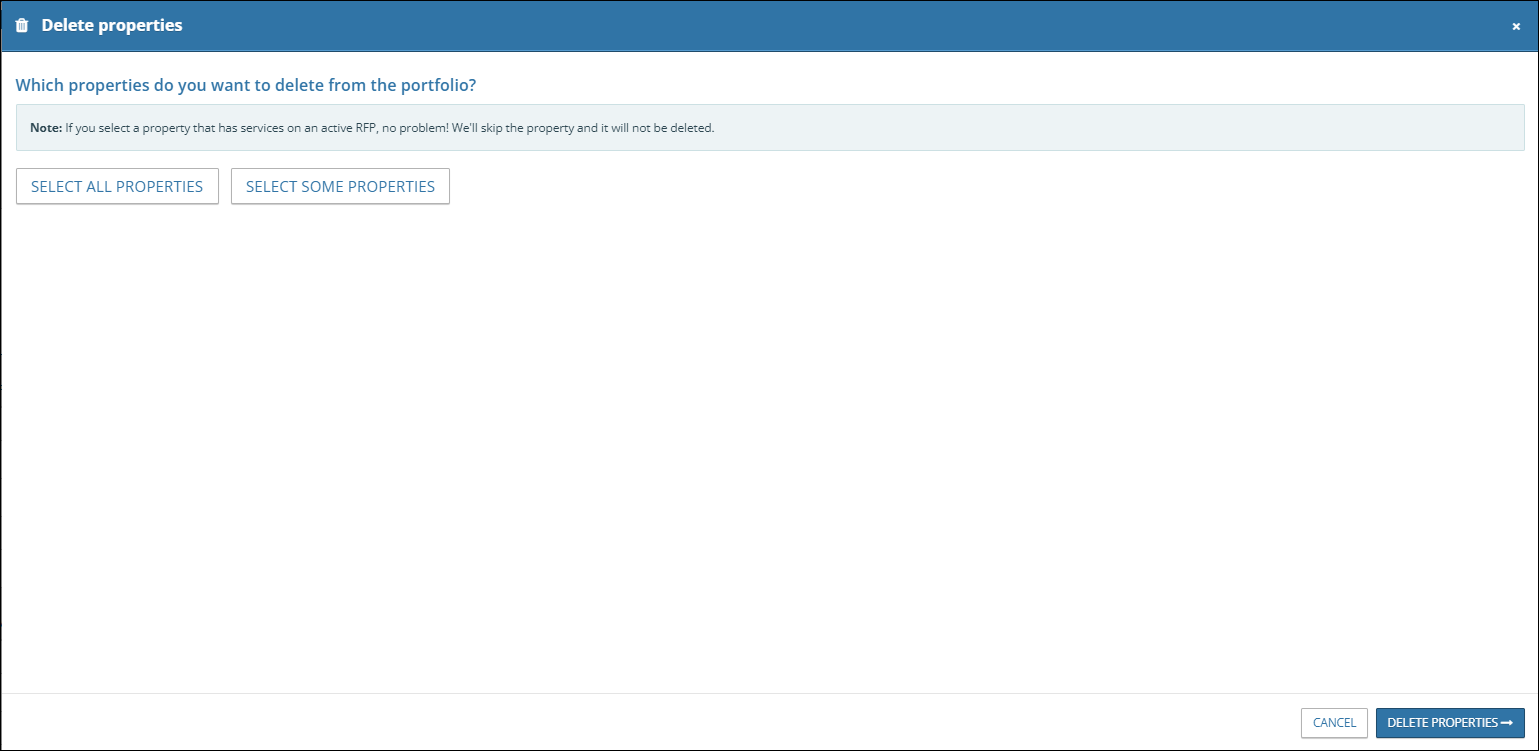
Note: The Delete Properties button is greyed out for all users except Content Administrators/Lender Executives.
To delete all Properties, click Select All Properties.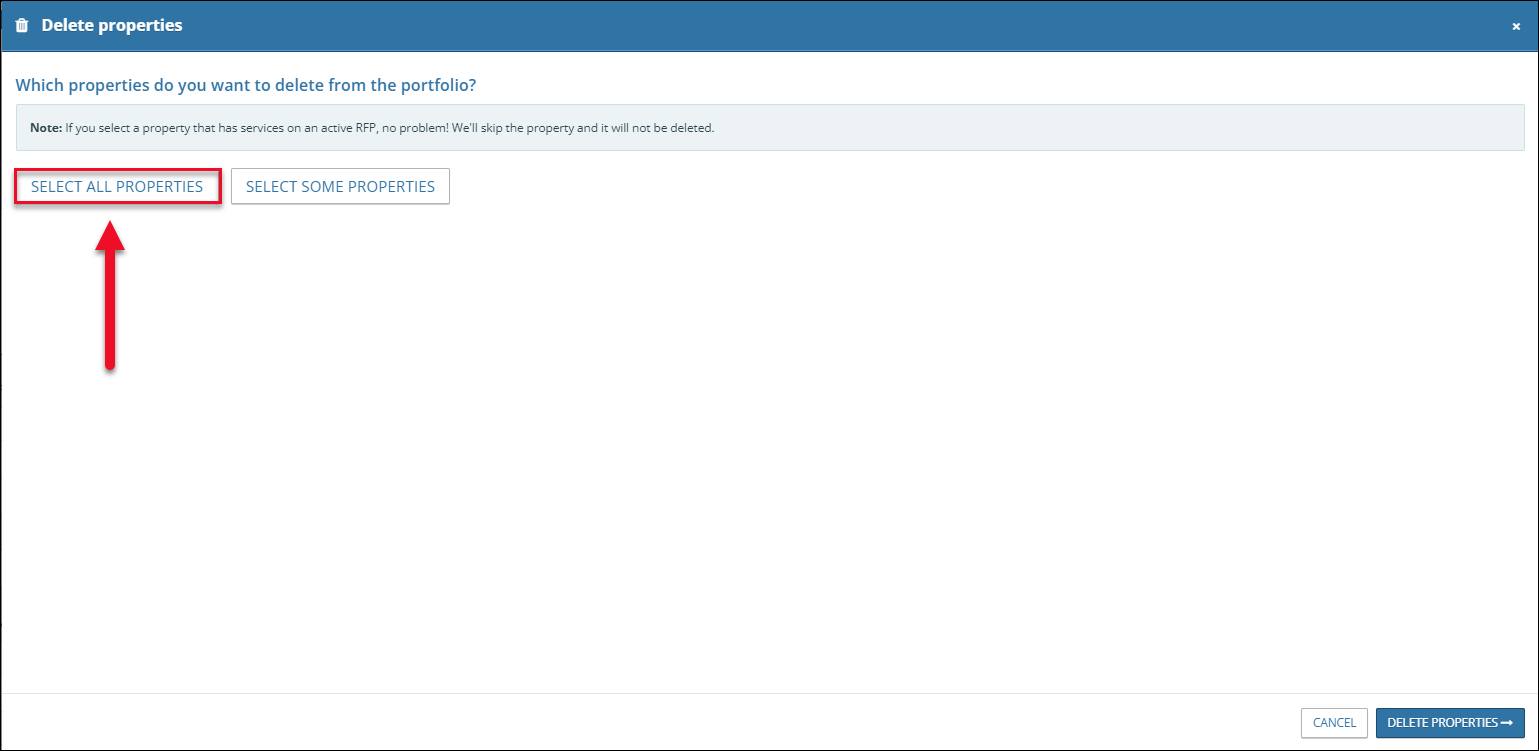
The Select All Properties button will get a checkmark. Click Delete All Properties to proceed.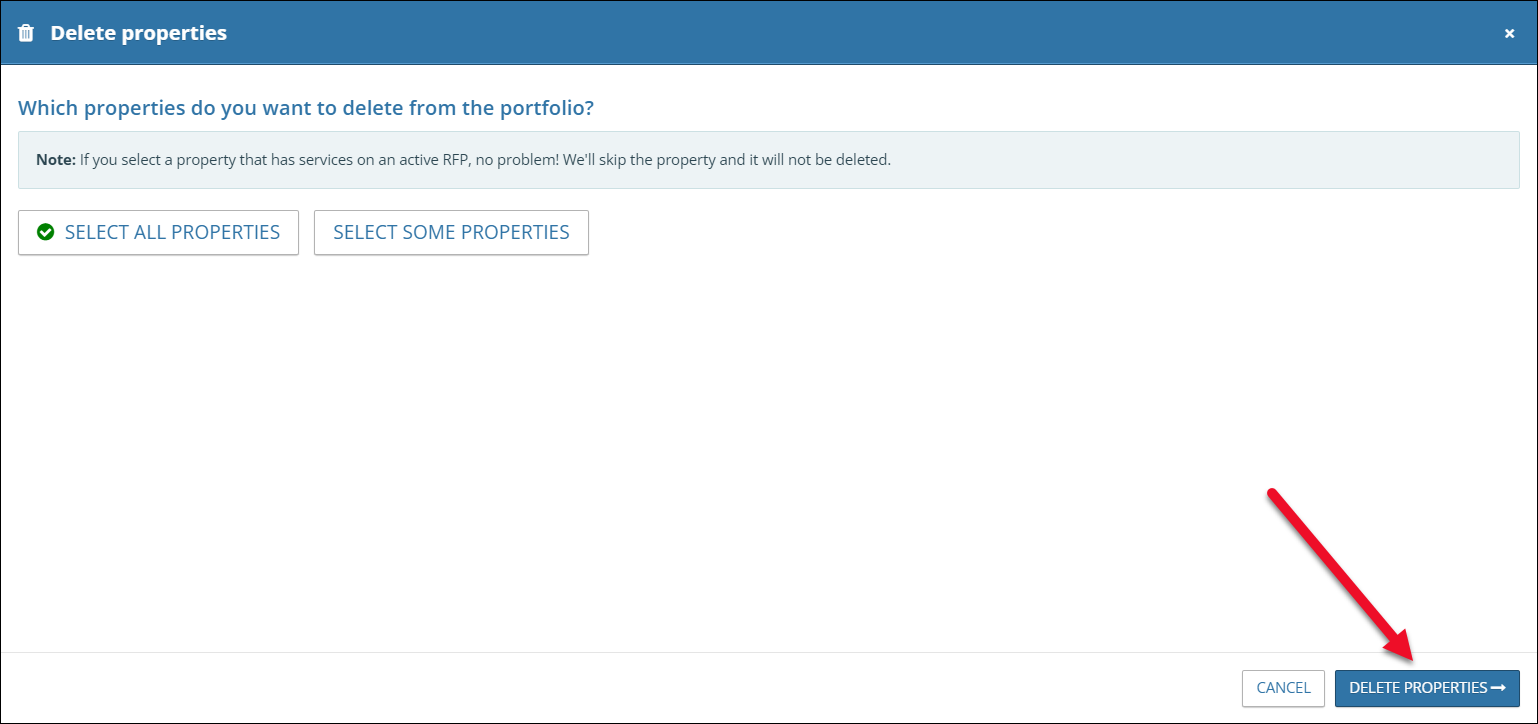
The Delete Properties modal will refresh. Click Yes, Delete Properties to delete all Properties in the Portfolio. Note: If you have selected Properties with active RFPs those Properties will NOT be deleted. All other Properties will be irrevocably deleted.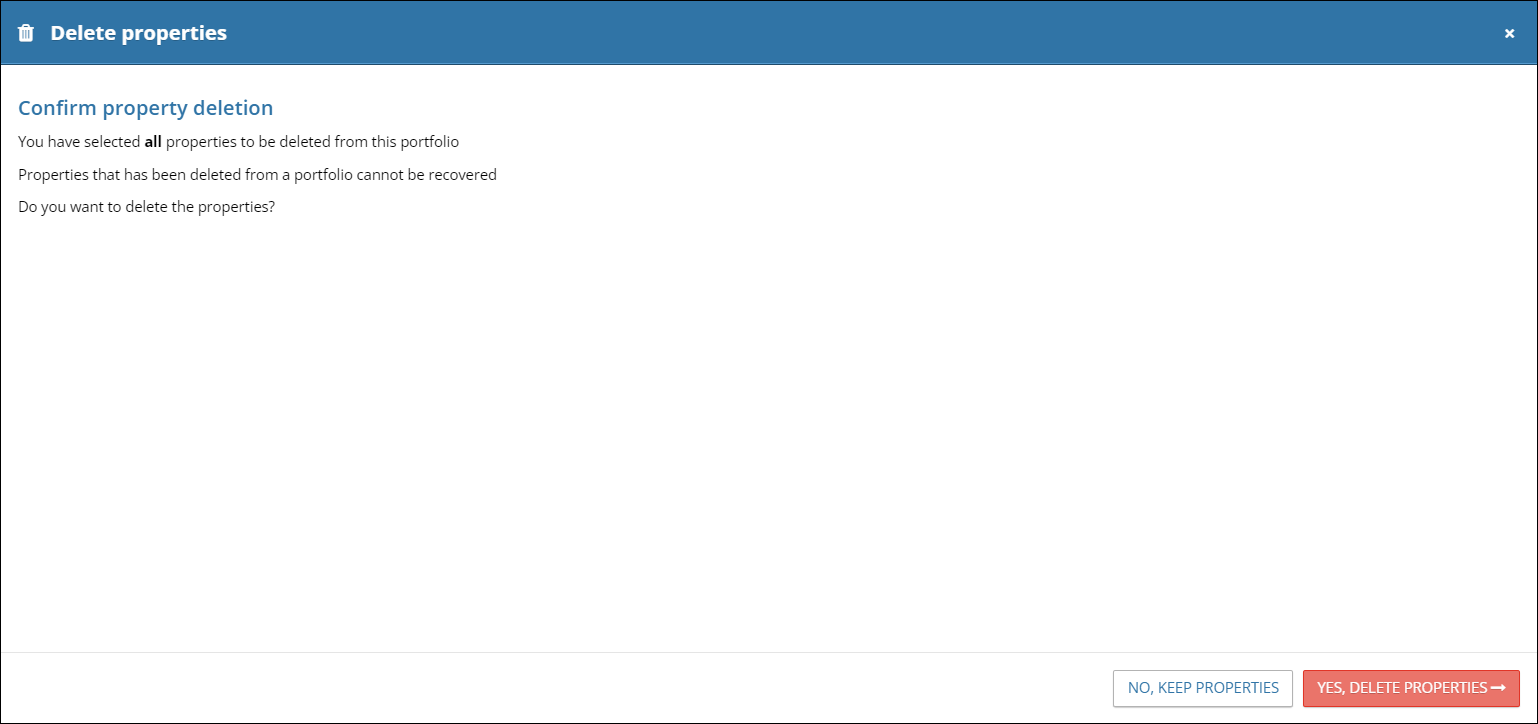
Click Select Some Properties to select individual Properties for deletion. Check the boxes next to the Properties you wish to delete, then click Delete Properties in the bottom right corner of the modal.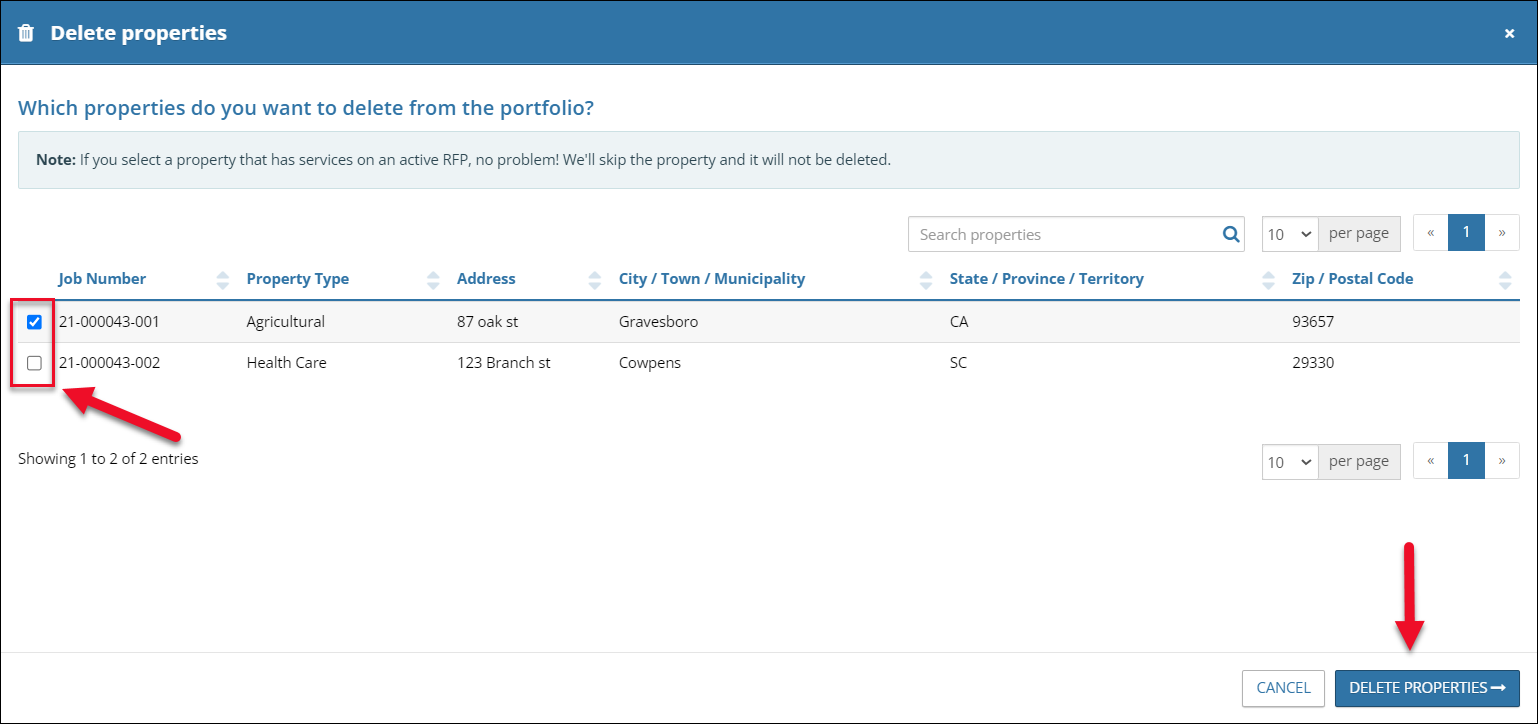
The Delete Properties modal will refresh. Click Click Yes, Delete Properties to delete the selected Properties in the Portfolio. Note: If you have selected Properties with active RFPs those Properties will NOT be deleted. All other Properties will be irrevocably deleted.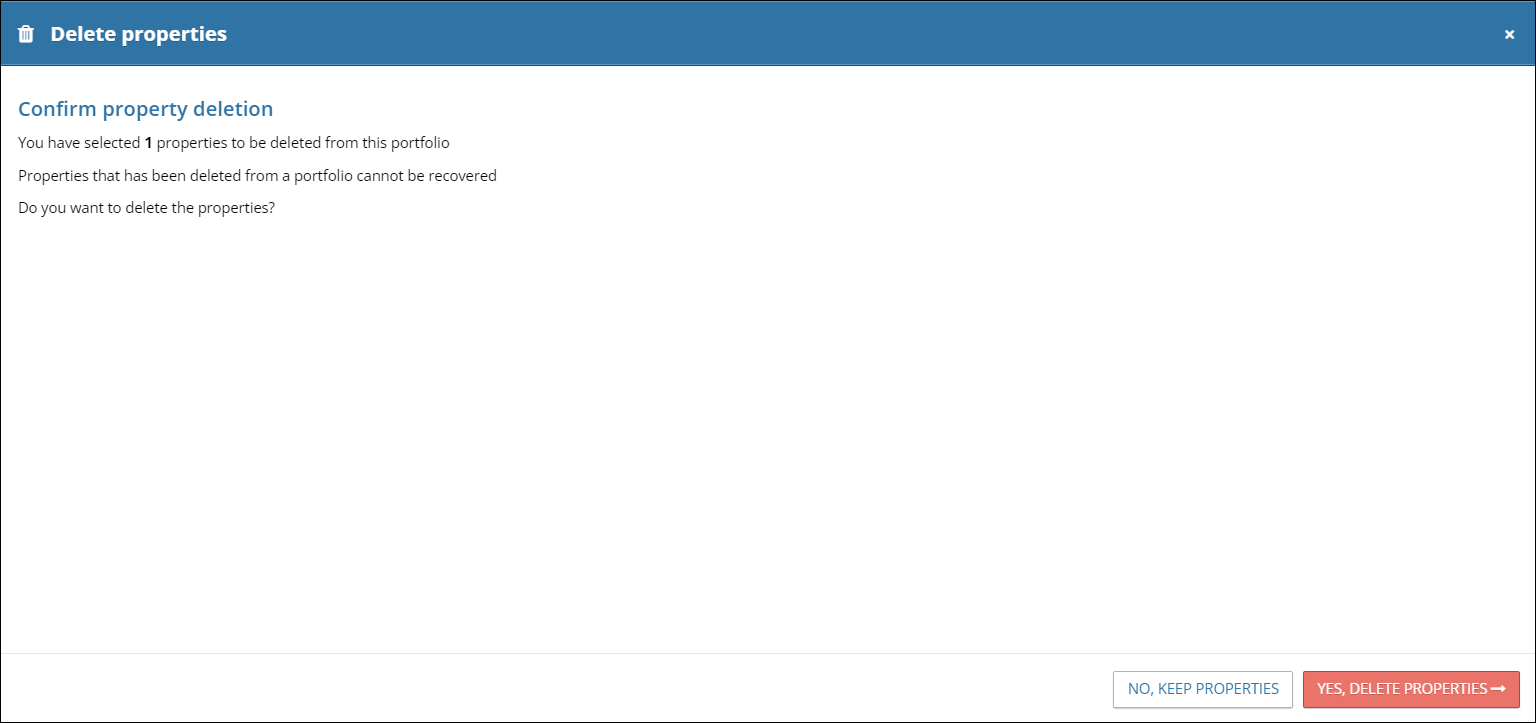
Once one or all Properties have been deleted, a message will confirm the deletion. You will also receive an email confirming the deletion.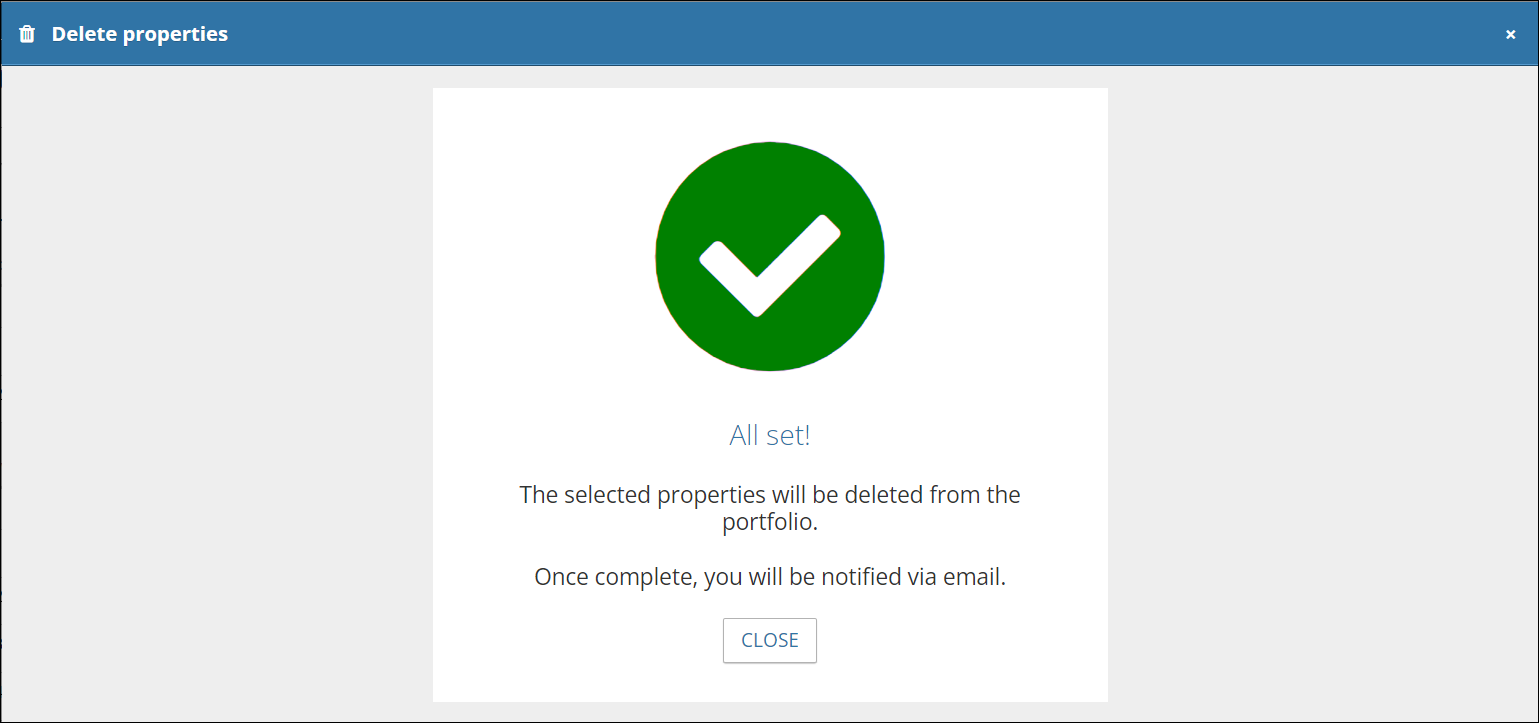
Managing the List of Properties Table
The Overview page lists the Properties included in the Portfolio in a table.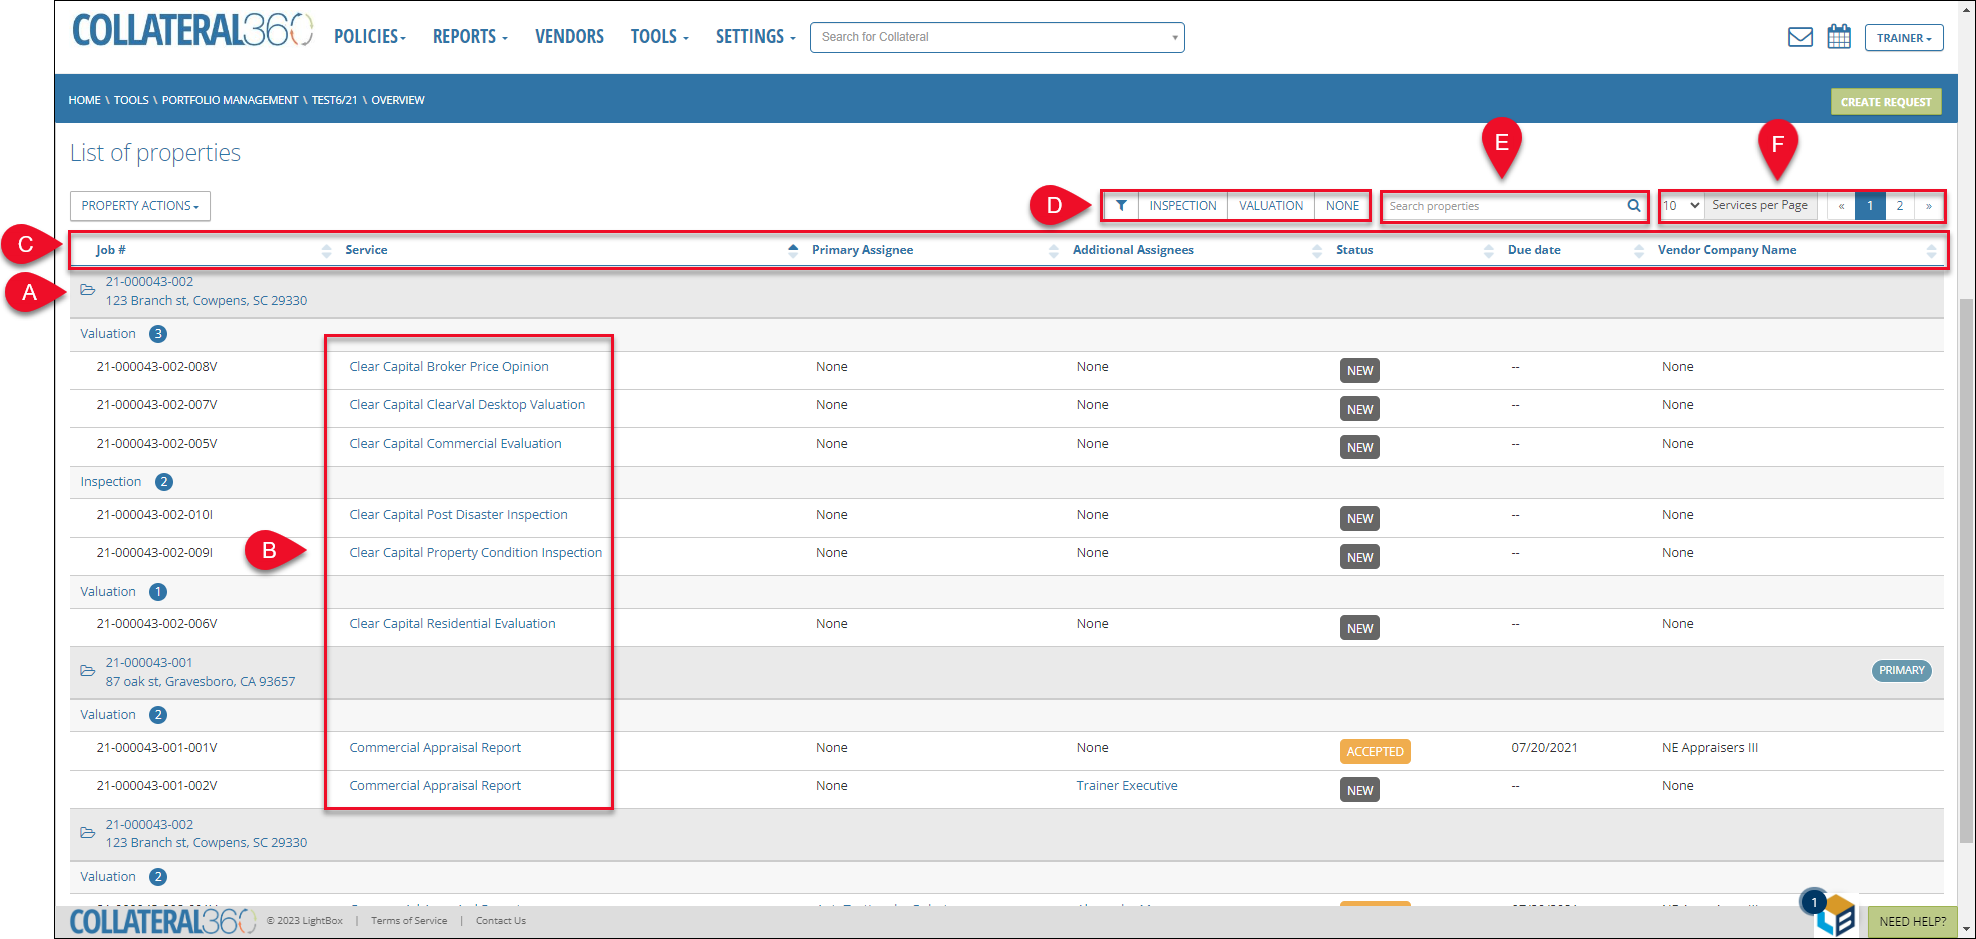
- Click the Job number to open the loan file associated with that Property.
- Click a Service to open the Service Group (Valuation, Environmental, etc.) page for that Service in the associated loan file.
- Click a column header to sort the table by that column. Click the column header a second time to reverse the sort order.
- Click a Service Group button to filter the table so only Services in that Service Group are visible. Multiple Service Group buttons can be selected simultaneously.
- Enter a search phrase to filter the table results. Only rows that contain the phrase in one or more columns will be visible in the table.
- Define the number of entries that appear on each page and navigate among the pages of the table.
RFPs
The RFP tab lists to view and manage all existing RFPs for the Portfolio, sorted by Service Group. It also includes a button to create a new RFP.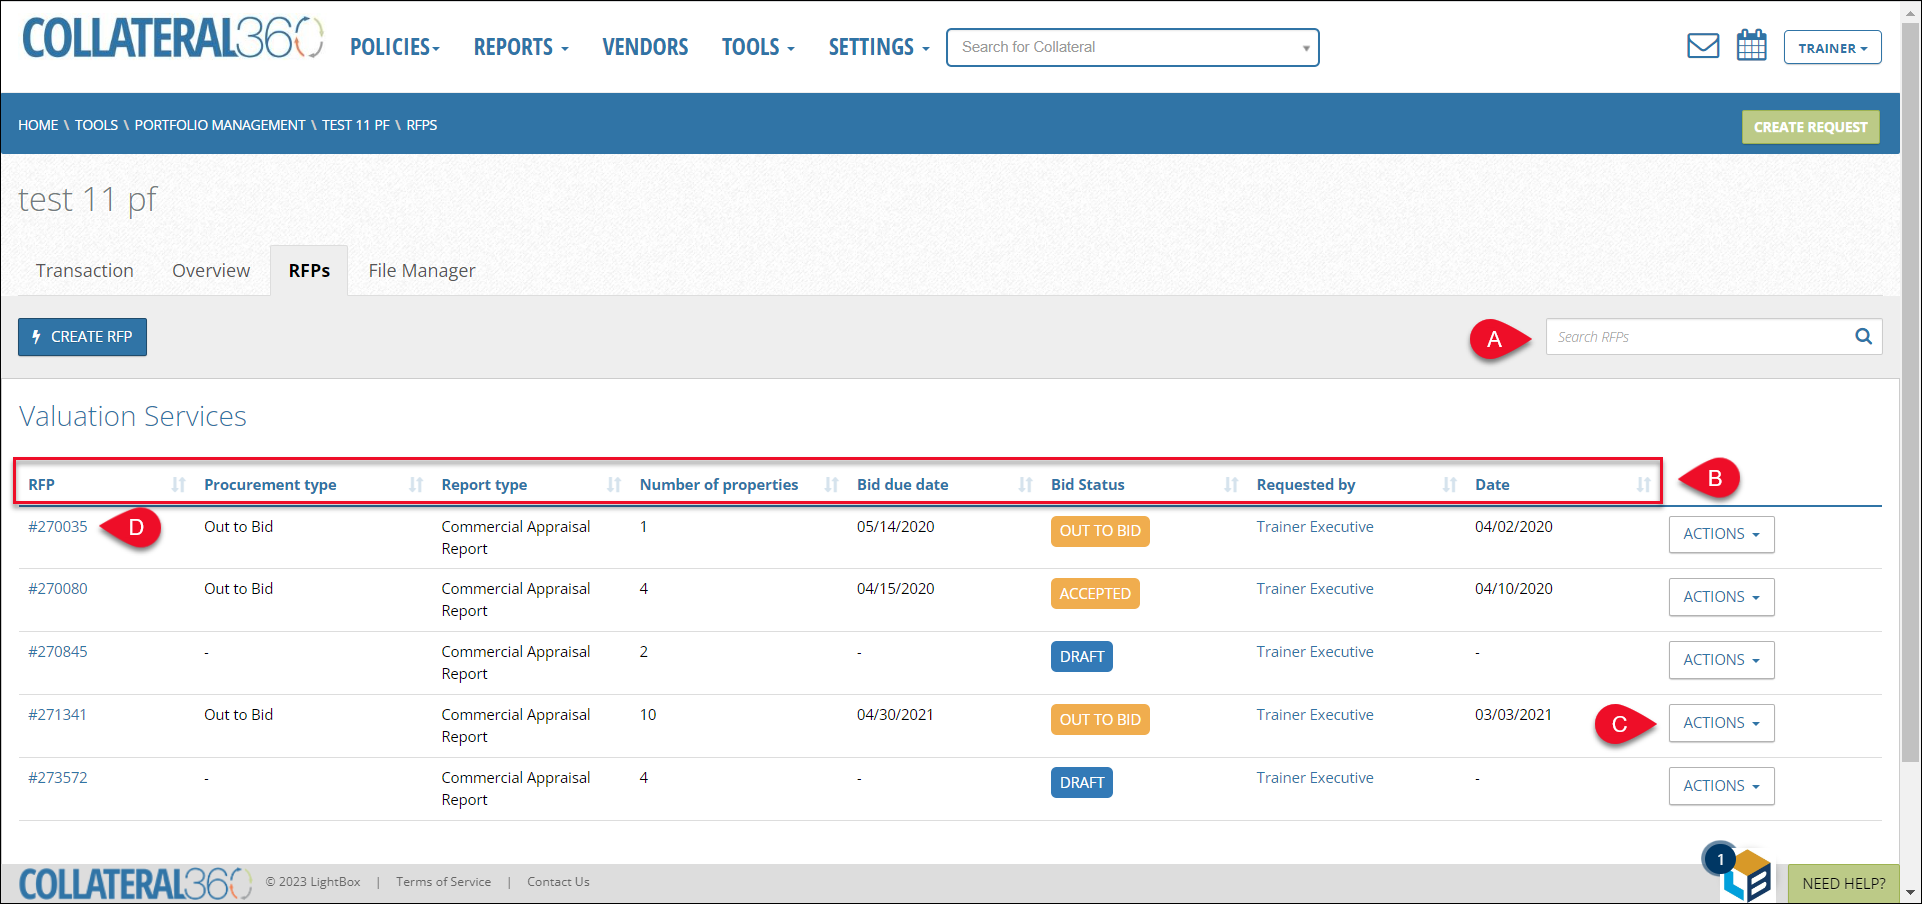
- Use the search feature to search existing RFPs. All fields in the table are searchable.
- Click a column header to sort by that column. Click again to reverse the sort order.
- Click the Actions button to expose a menu. The menu commands available are determined by the RFP’s status.
- RFPs with a status of “Draft” have the Continue RFP and Delete RFP commands.
- RFPs with a status of "Out to Bid” or “Awaiting Acceptance” have the View RFP Details command.
- RFPs with a status of “Accepted,” “Awarded,” “Request Cancelled,” or “Uploaded” have the View RFP Details and Amend Award buttons available.
Continue RFP
Click Actions, then Continue RFP to open a draft RFP in editable mode.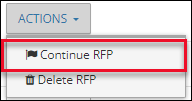
Make the desired changes, then click one of the three buttons at the bottom of the page.
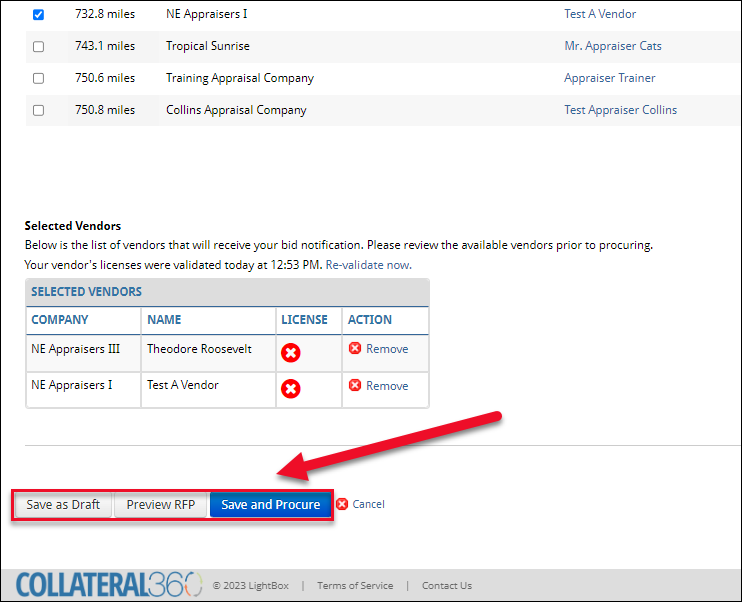
- Save as Draft: Save the changes as a draft without submitting the RFP.
- Preview RFP: View the RFP as a PDF.
- Save and Procure: Click to submit the RFP to the selected vendor(s).
View RFP Details
Click View RFP Details to open a popup containing information about the RFP, such as Award Information, Scope of Services, and Bid Summary.
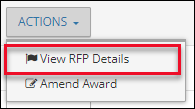
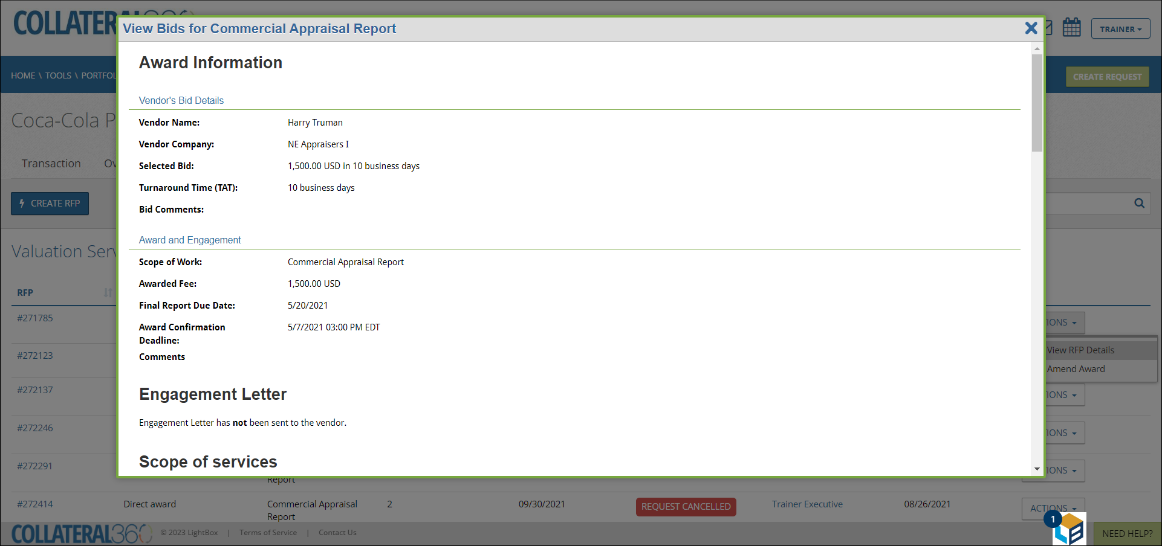
The options available in View RFP Details vary based on the status of the RFP:
Prior to Award – Update RFP
Prior to an award being made, the user can scroll to the bottom of the page and click Update RFP.
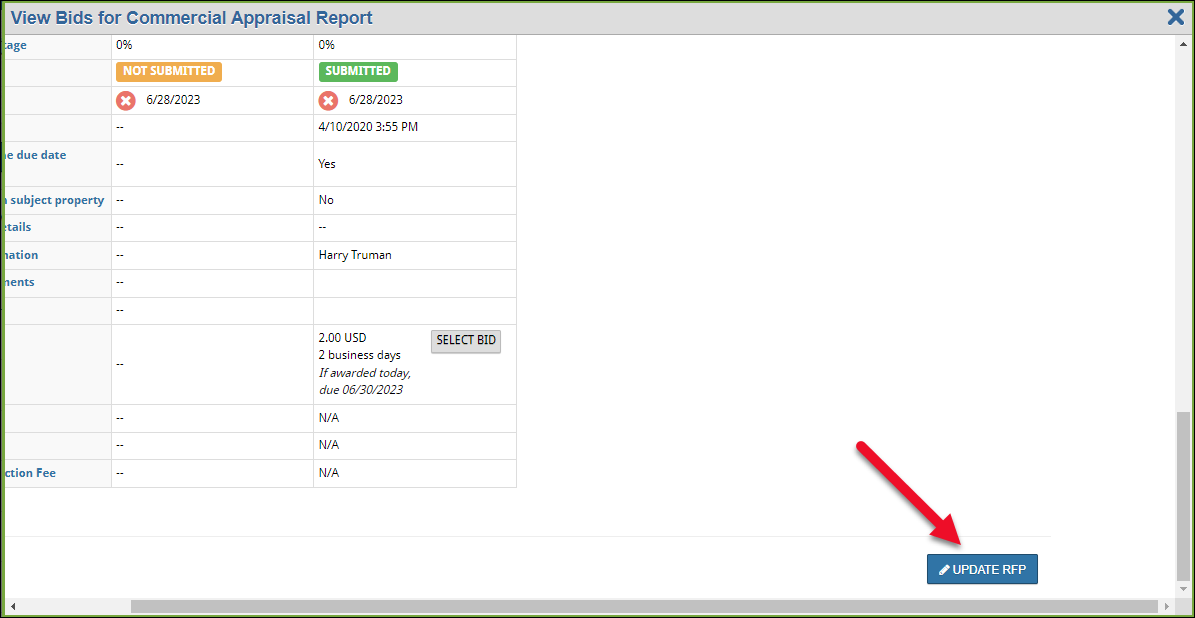
All RFP information becomes editable.
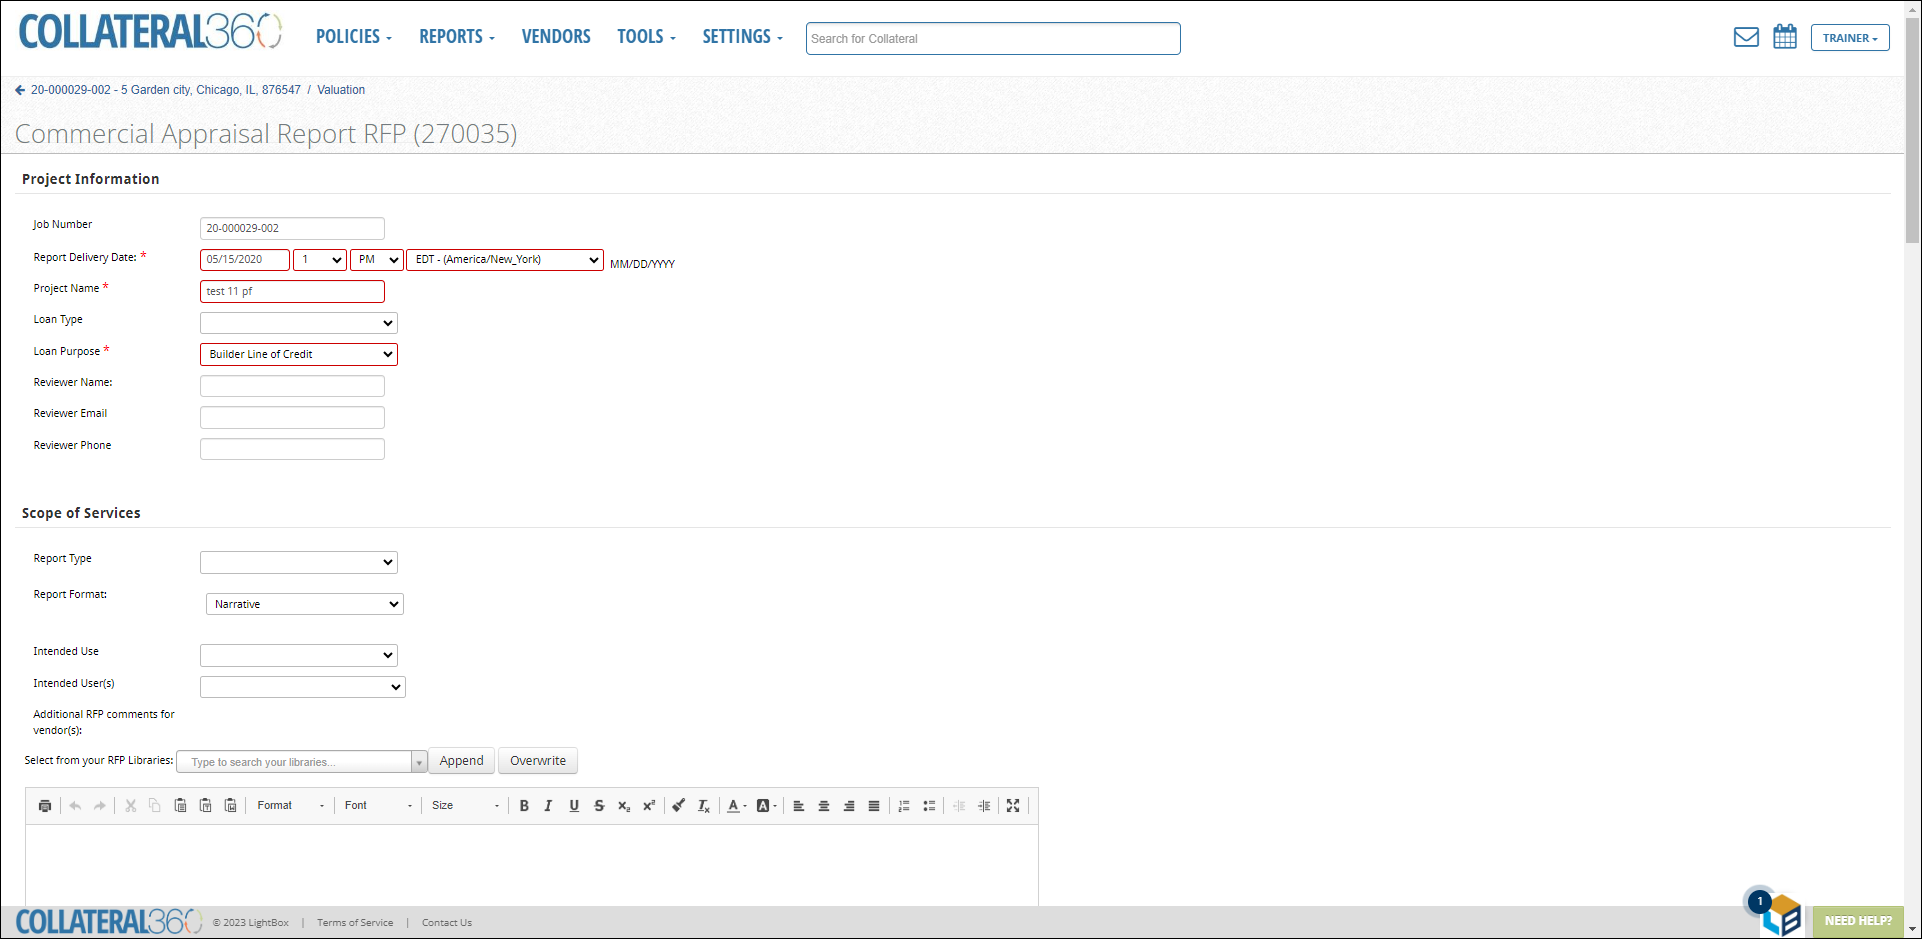
After editing the RFP details, it can be saved or resubmitted. Once it has been resubmitted, vendors receive a notification of updates.
Prior to Award Acceptance – Update RFP
After an award has been made but before the award has been accepted, parts of the RFP can be edited. Click View RFP Details.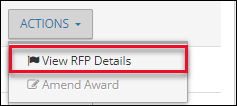
Then click Update RFP to open the RFP for editing.
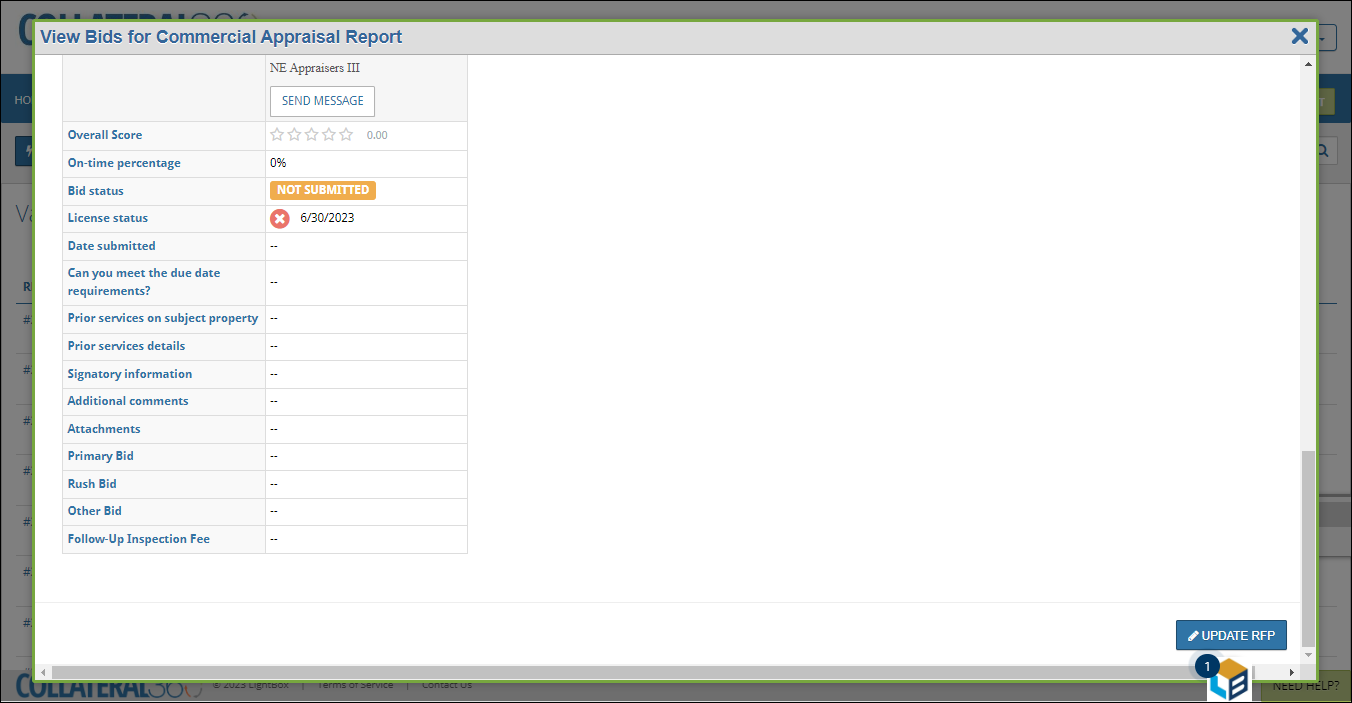
Once it has been resubmitted, vendors receive a notification of updates.
Prior to Award Acceptance - Retract RFP
Prior to the vendor accepting an award, an RFP can be retracted. Click View RFP Details.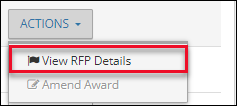
Then click Retract Request.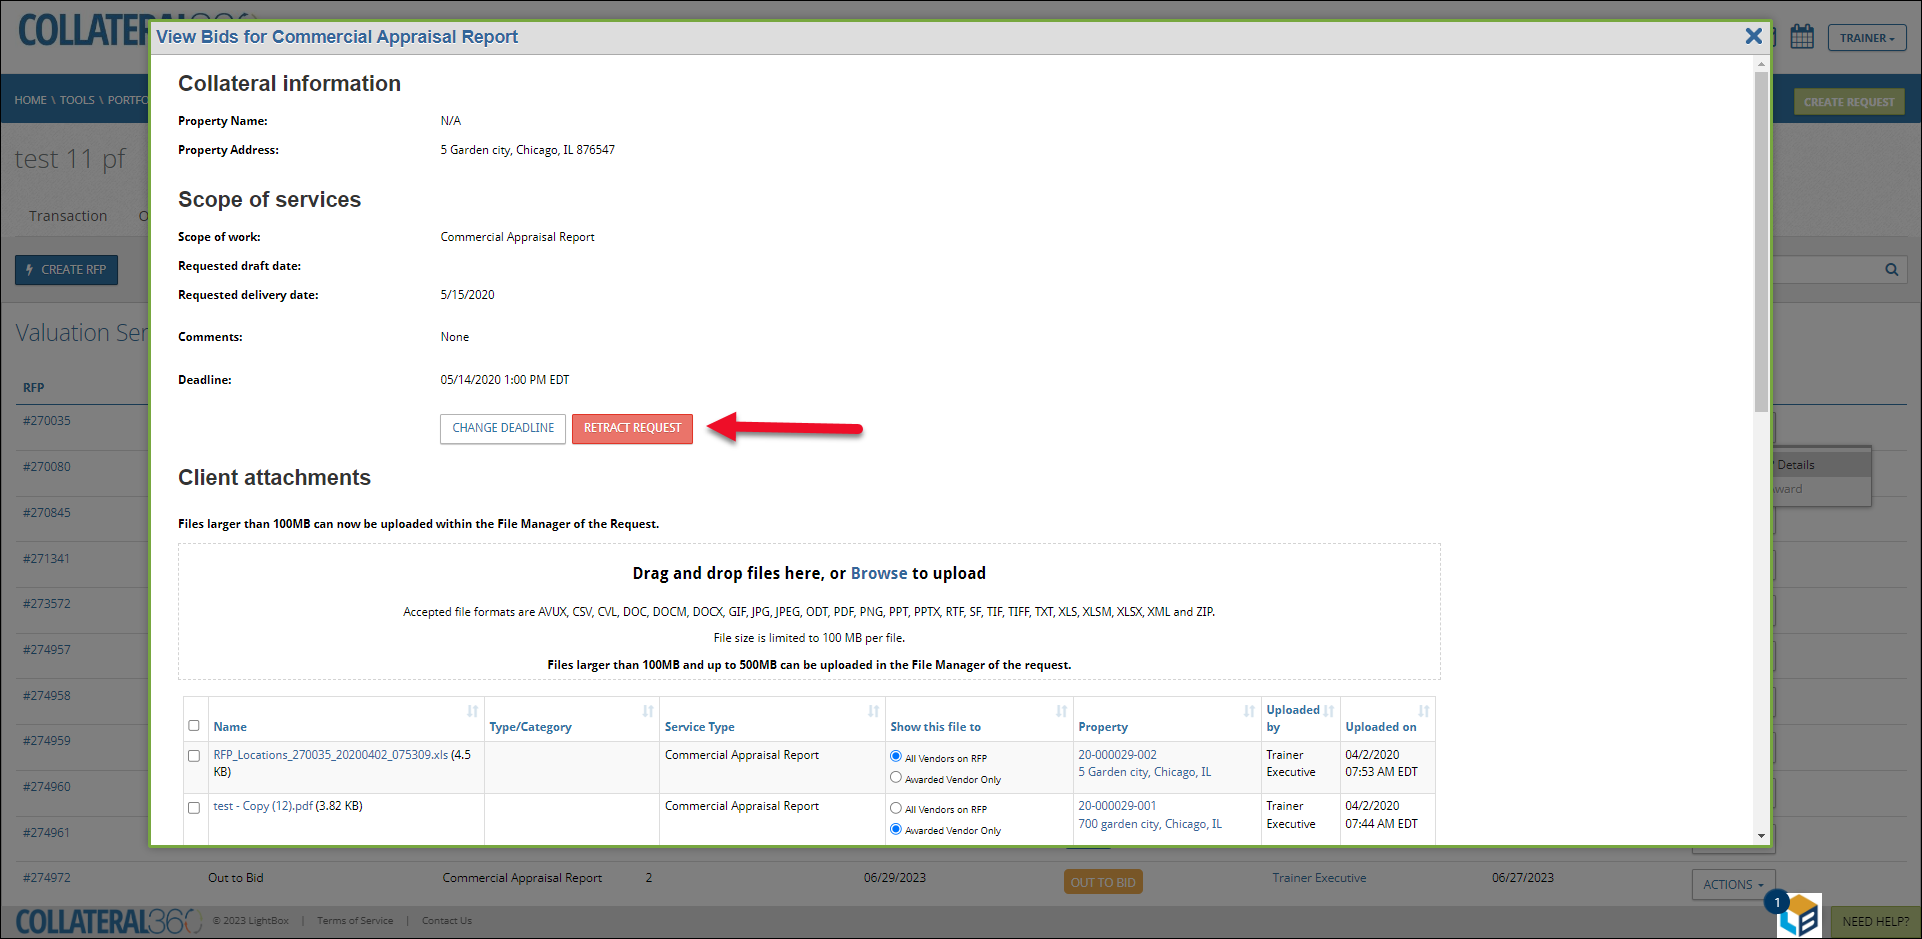
Select a Reason for retraction from the dropdown menu, optionally enter comments, then click Retract Request. Note: If “Other” is selected as the reason for retraction, the Comments field becomes required.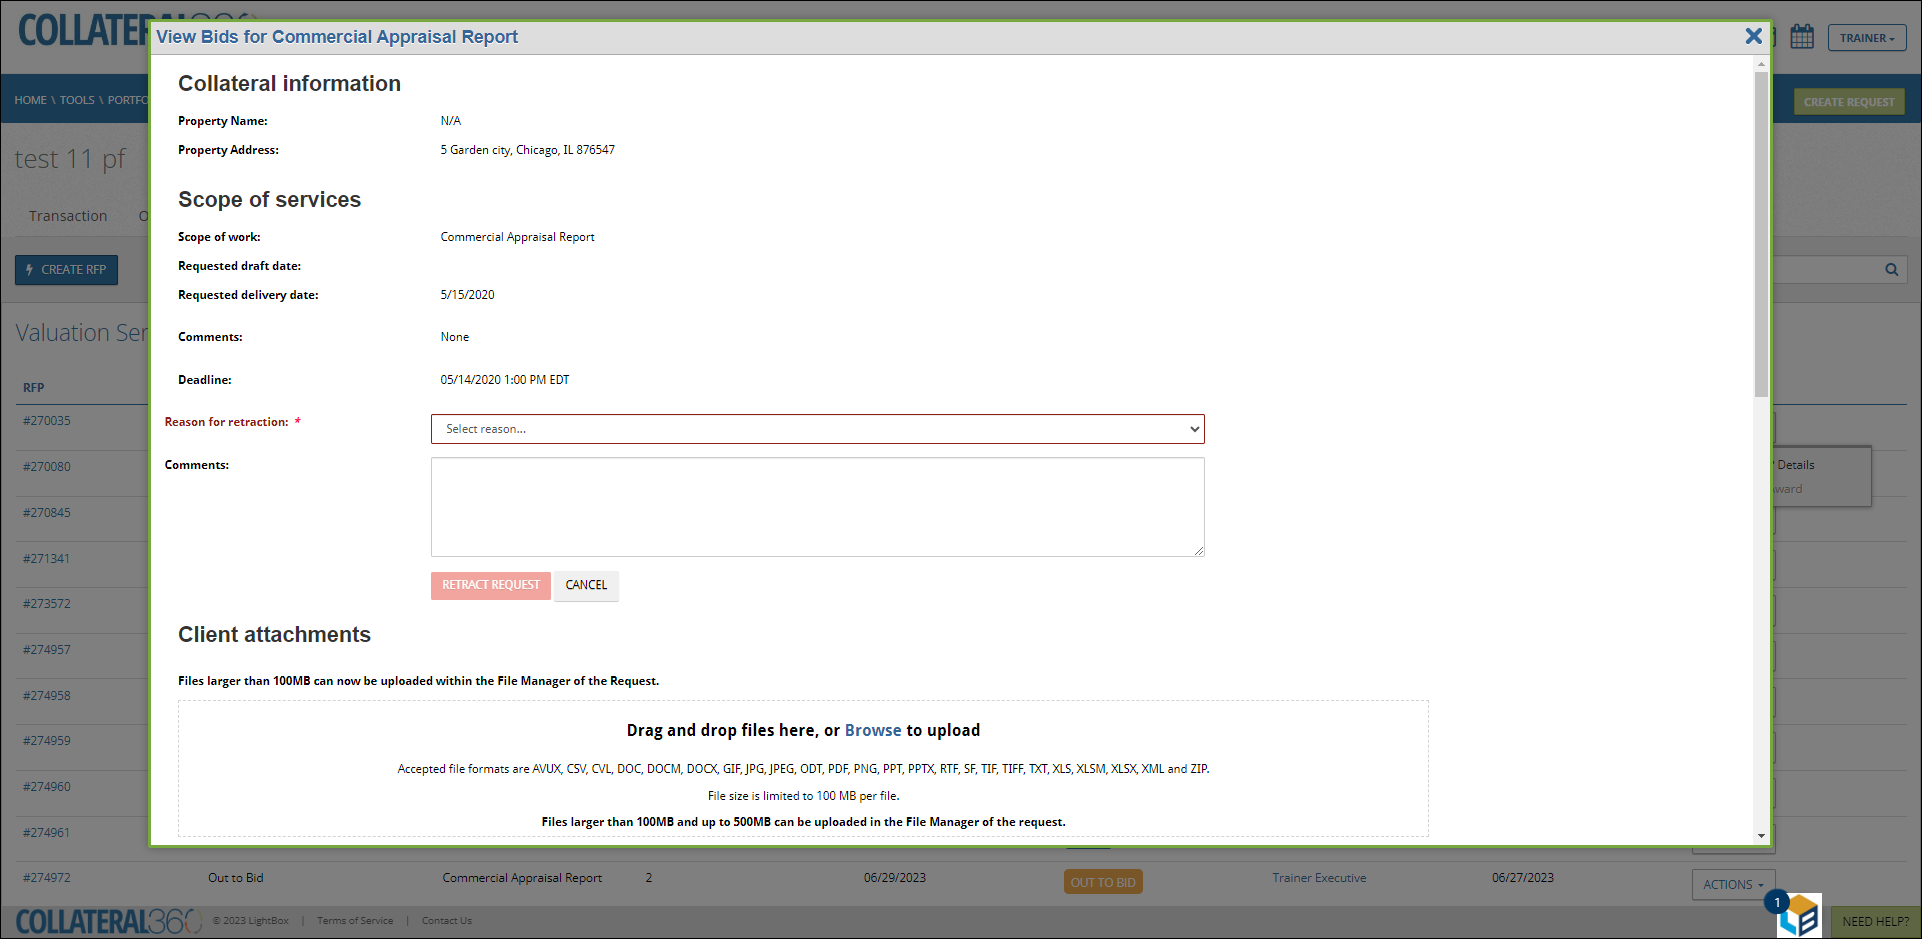
The modal closes and the RFPs table shows the RFP as “Retracted.”

Cancel RFP
After an award has been accepted, the RFP can be cancelled. Click the blue RFP link to open the primary Property.
Click the Actions dropdown on the Report Status page, then click Cancel Service.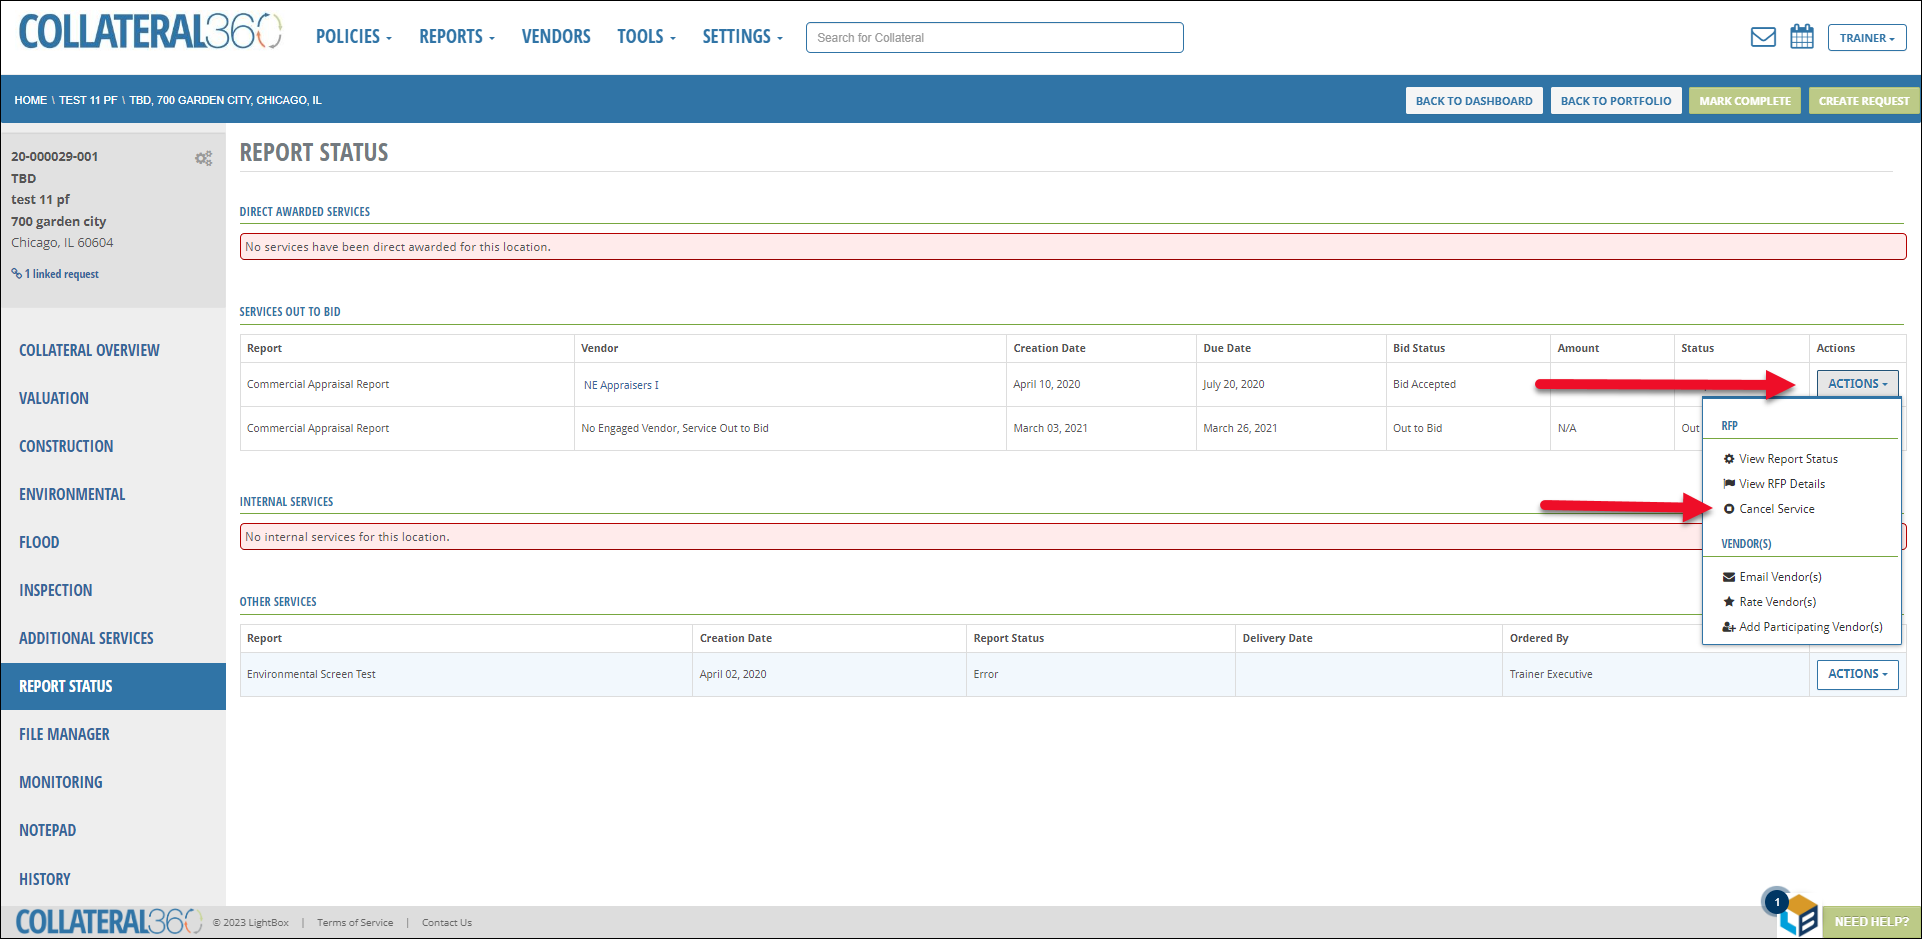
Note: If there is a fee for work to-date, do NOT cancel the Service without validating the invoice first. It is important to communicate with the vendor directly regarding the cancelation. The vendor needs to provide and invoice and finalize their work order in PARCEL. Cancelation in Collateral360 does not ‘cancel’ the PARCEL order.
A Cancel Service pop-up will appear:
Select the reason for RFP cancellation via the drop-down menu and, optionally, enter comments in the Additional Comments field. Note: If “Other” is selected as the reason for cancellation, the Additional Comments field is required.
Click Yes, Cancel to cancel the Service.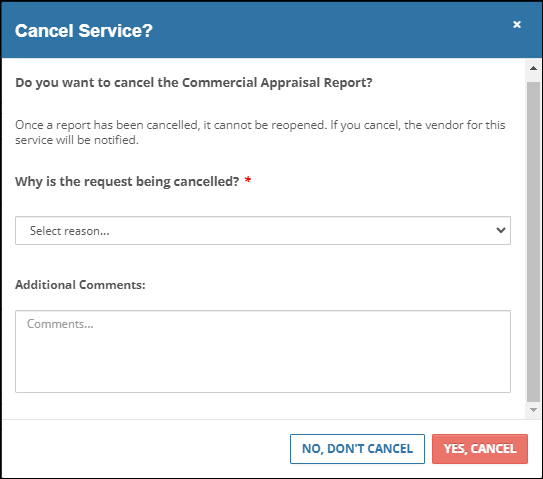
Navigate back to the Portfolio Overview page. The status on the Portfolio Overview screen will display the Service Status as “Request Canceled” for each Service within the bulk RFP that was retracted.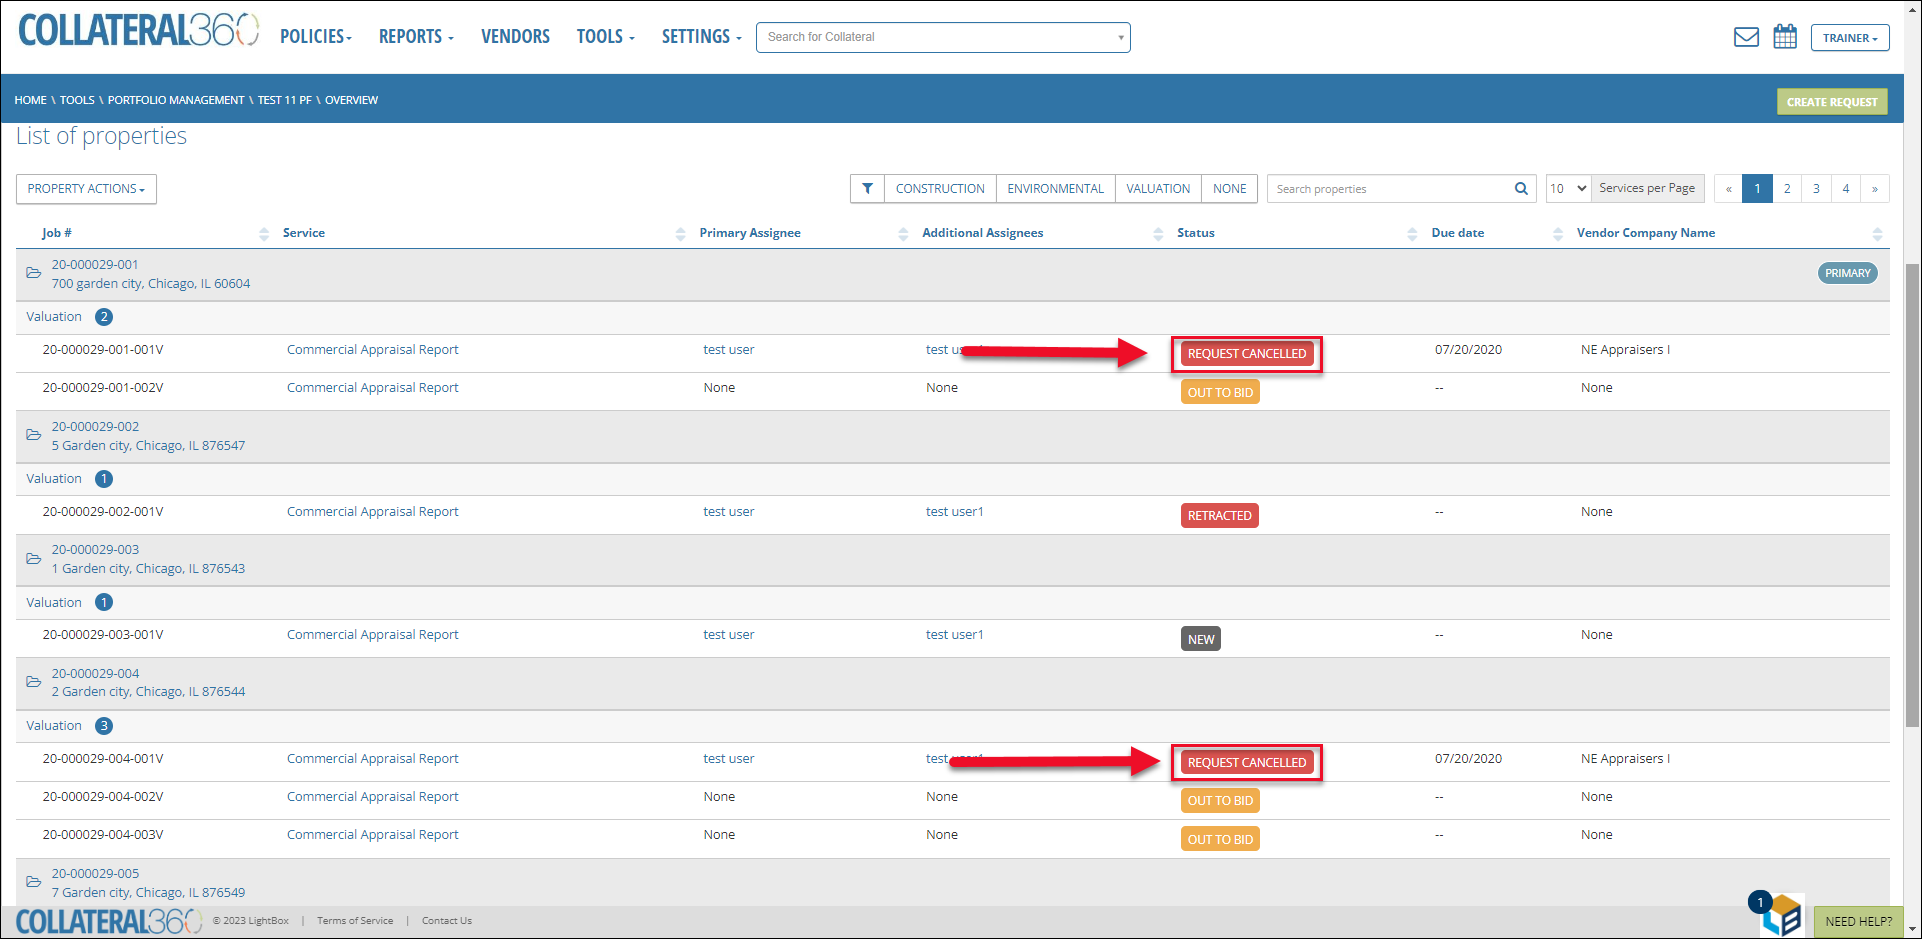
Amend Award
Click Actions, then click Amend Award to open the Amend Award modal.
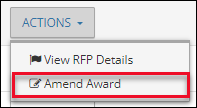
Complete the fields and make the necessary selections. Fields marked with a red asterisk are required.
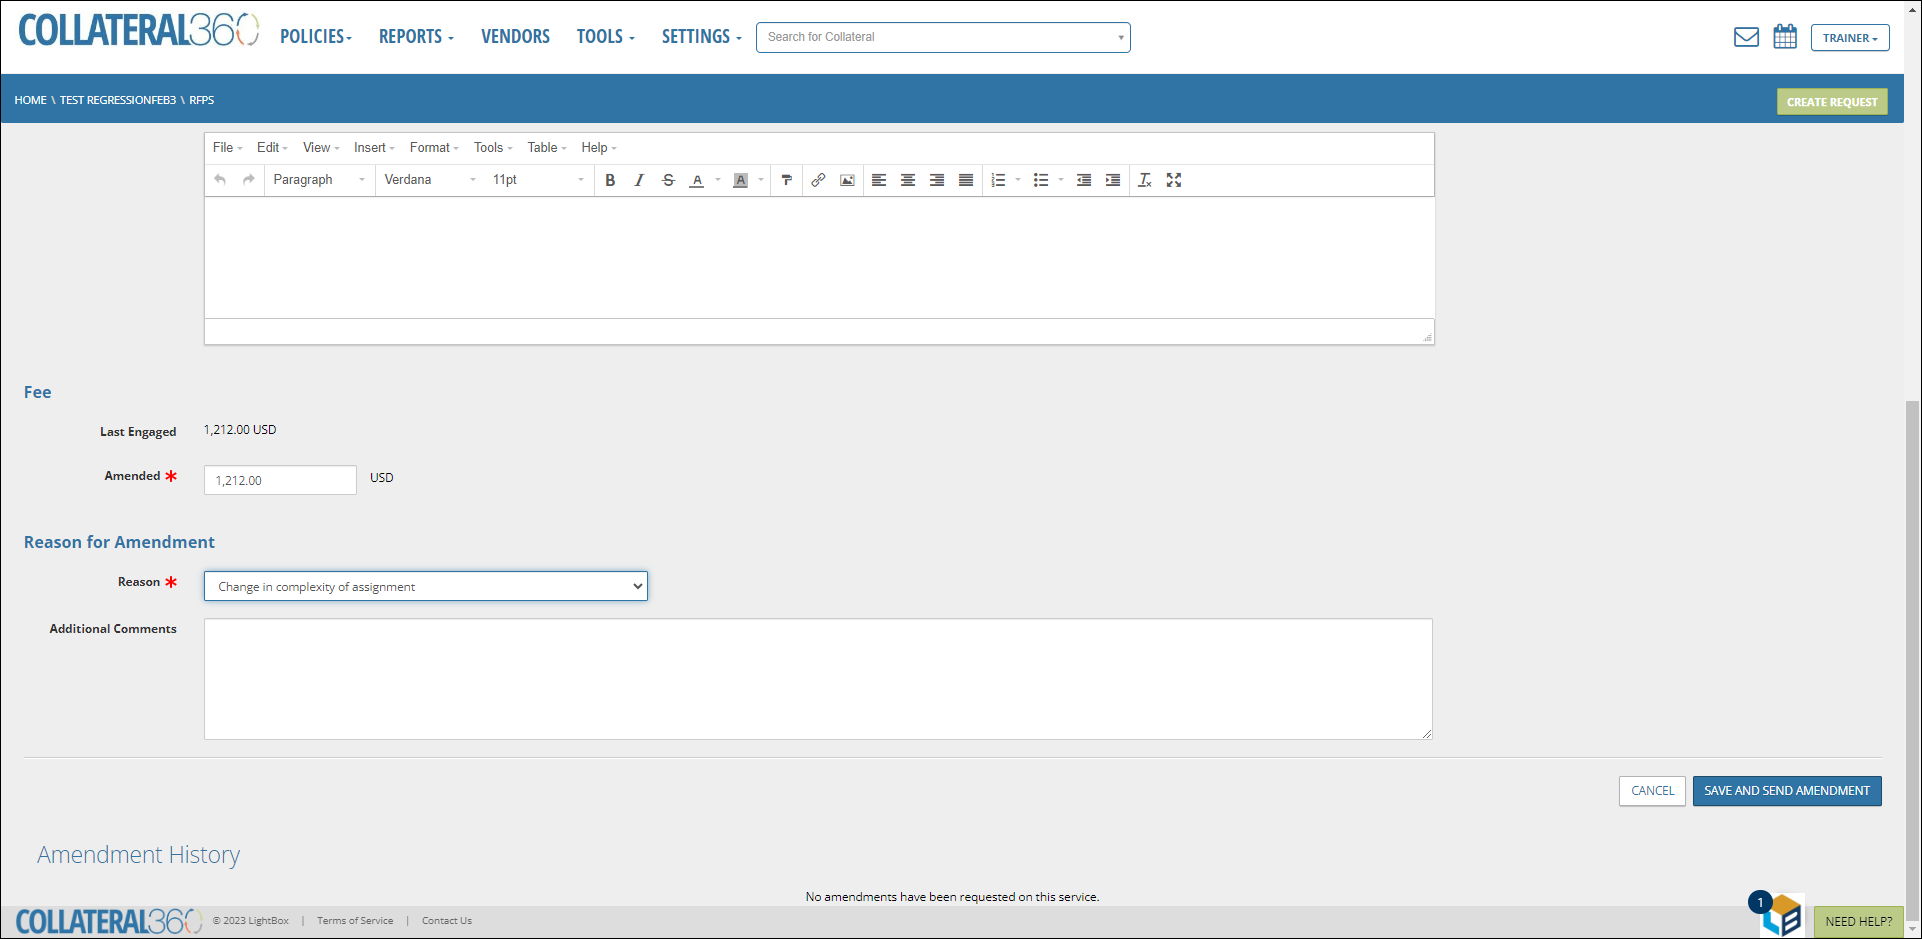
Note: Selecting ‘Other’ as the reason for amendment makes the Additional Comments field required.
Click Save and Send Amendment to submit the amendment. The vendor will receive an email notification.

Refer to the Amend Award Job Aid for more information about amending awards.
Delete RFP
Click Actions, then click Delete RFP to delete the draft RFP. 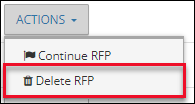
A popup will request confirmation. Click Yes, Delete RFP to proceed with the deletion.
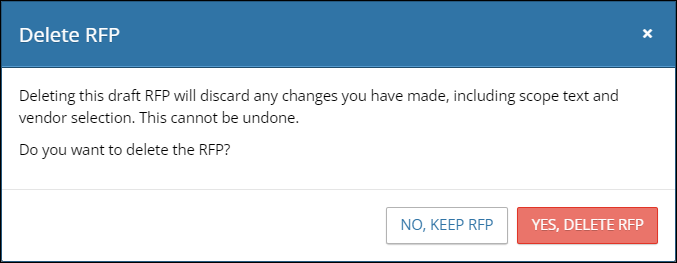
Creating an RFP
Click Create RFP to begin creating a new RFP.
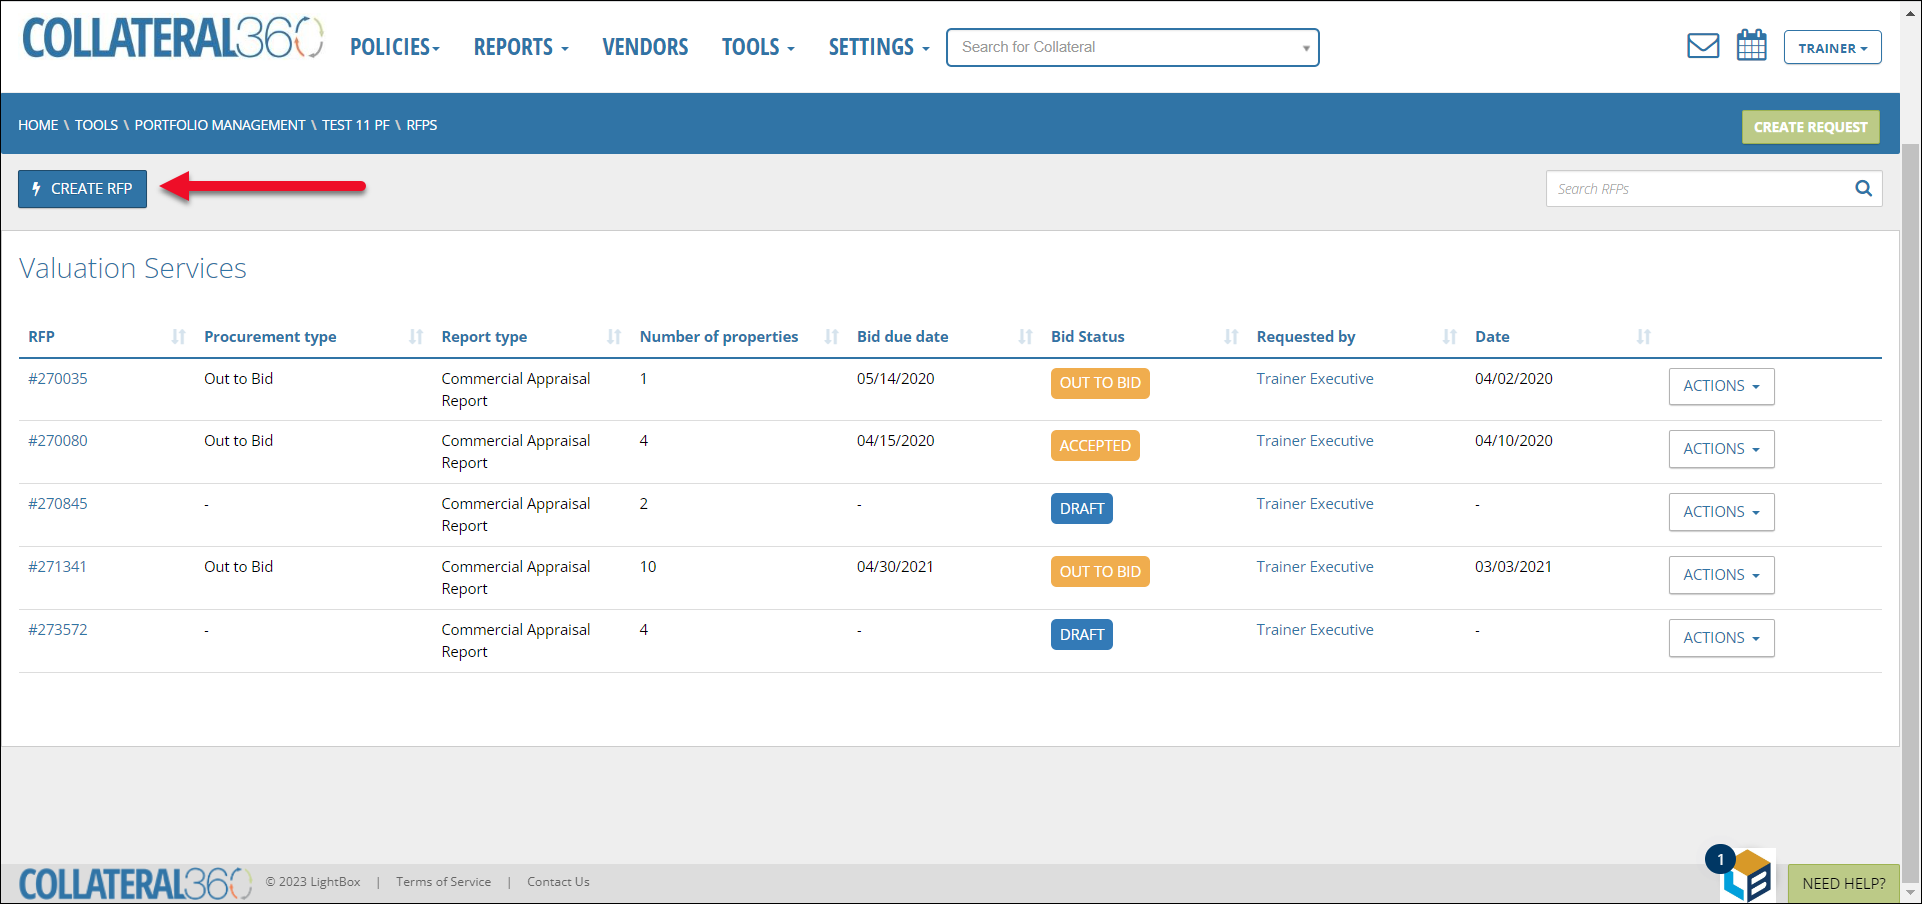
The Create RFP page will open and display all available Properties. Click the Service Type dropdown menu and select a Service Type to filter the list of Properties to only display those with the selected Service Type associated that have not already been included on an RFP for that Service Type.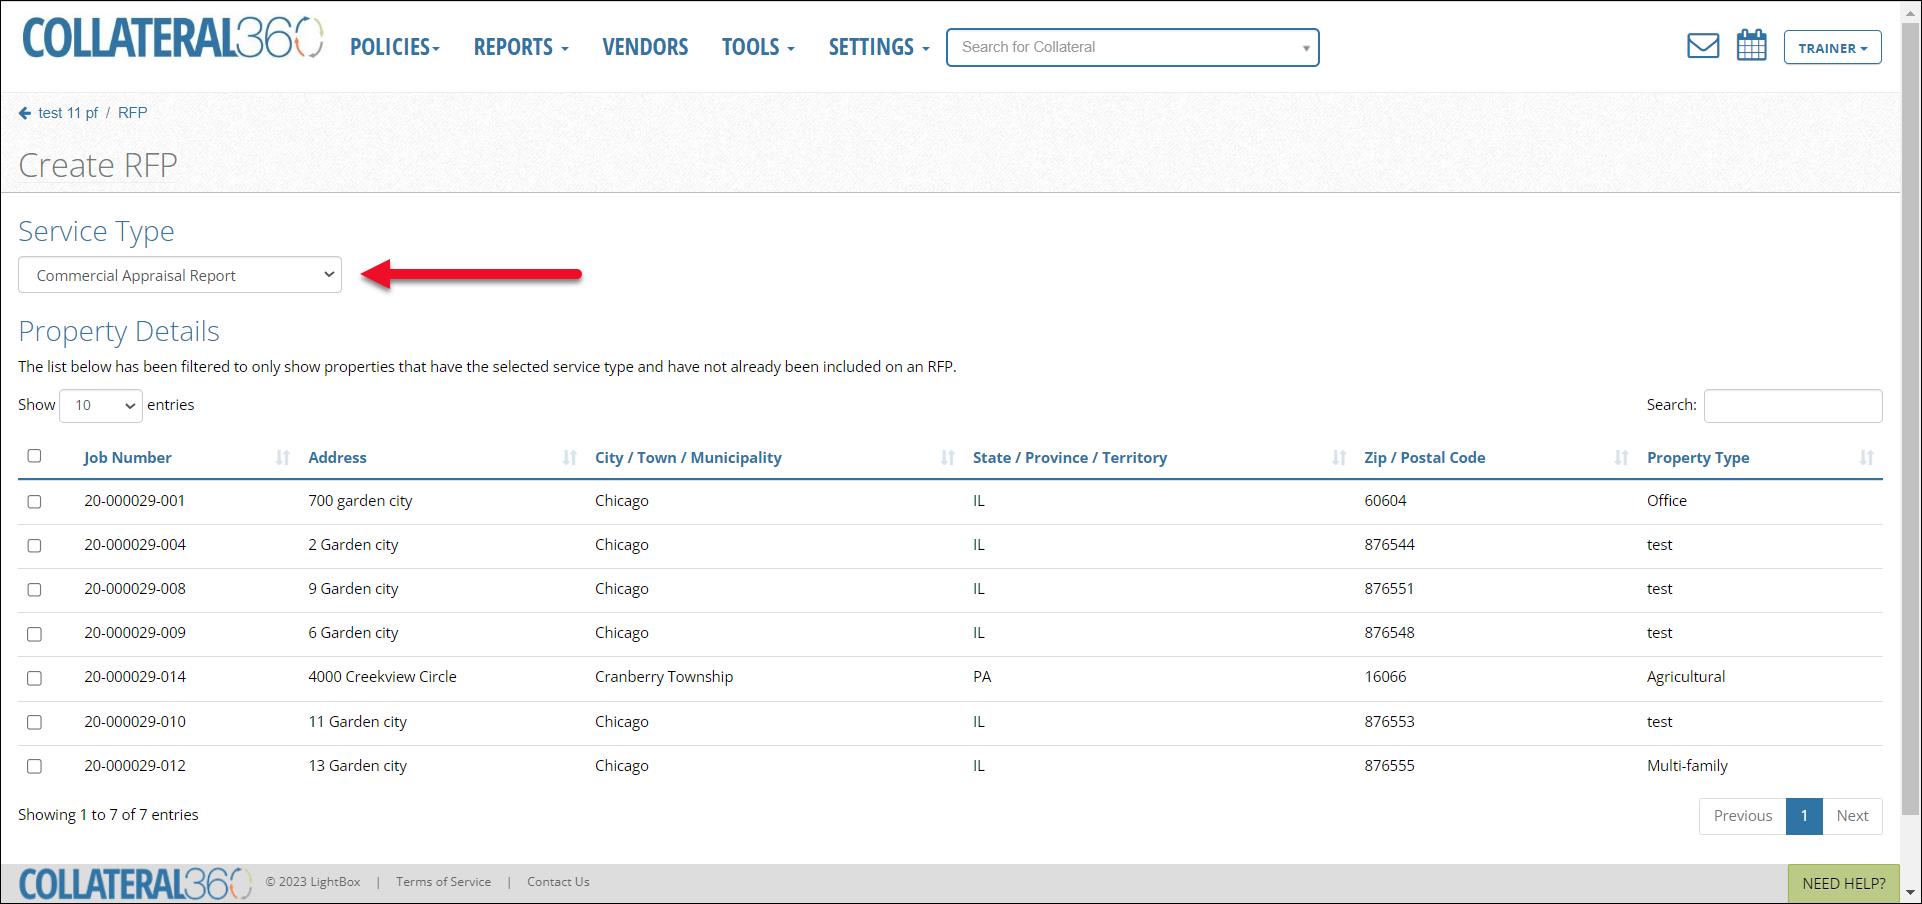
Select the desired Properties by marking the checkmark box on the left side of the table. The checkmark box above the table selects all Properties.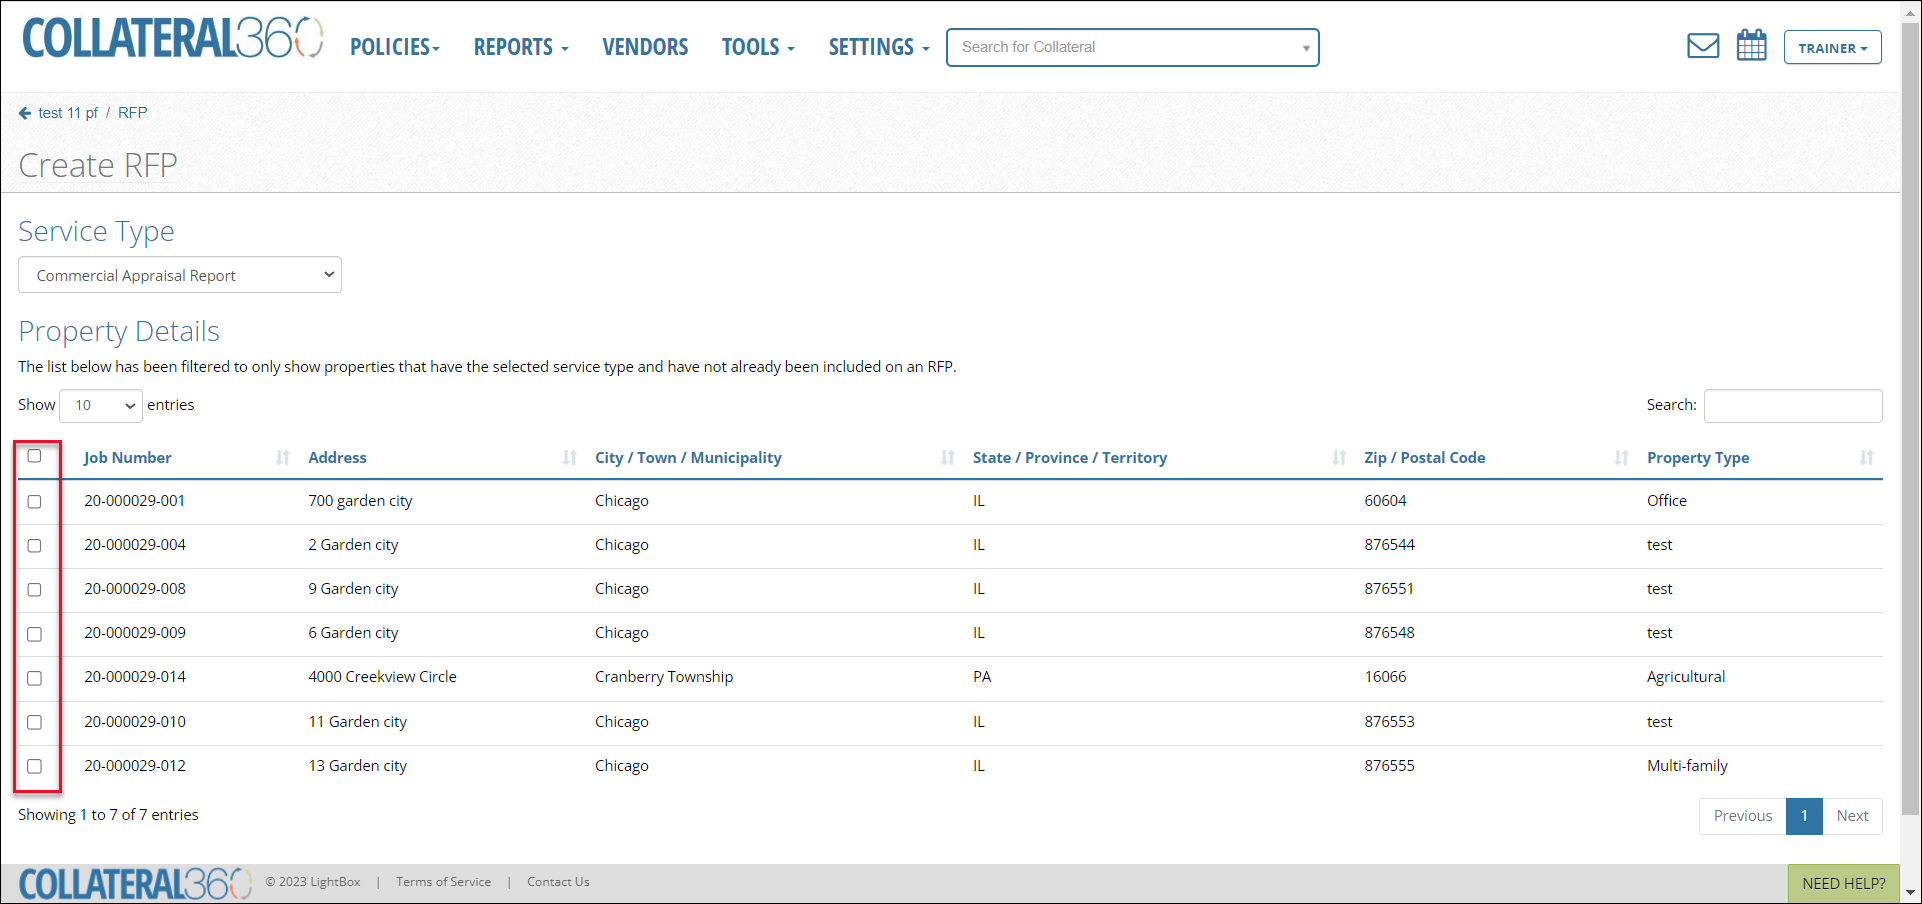
Click Next Step in the bottom right corner to proceed with the RFP creation or click Save as Draft to save the RFP and return to complete it later.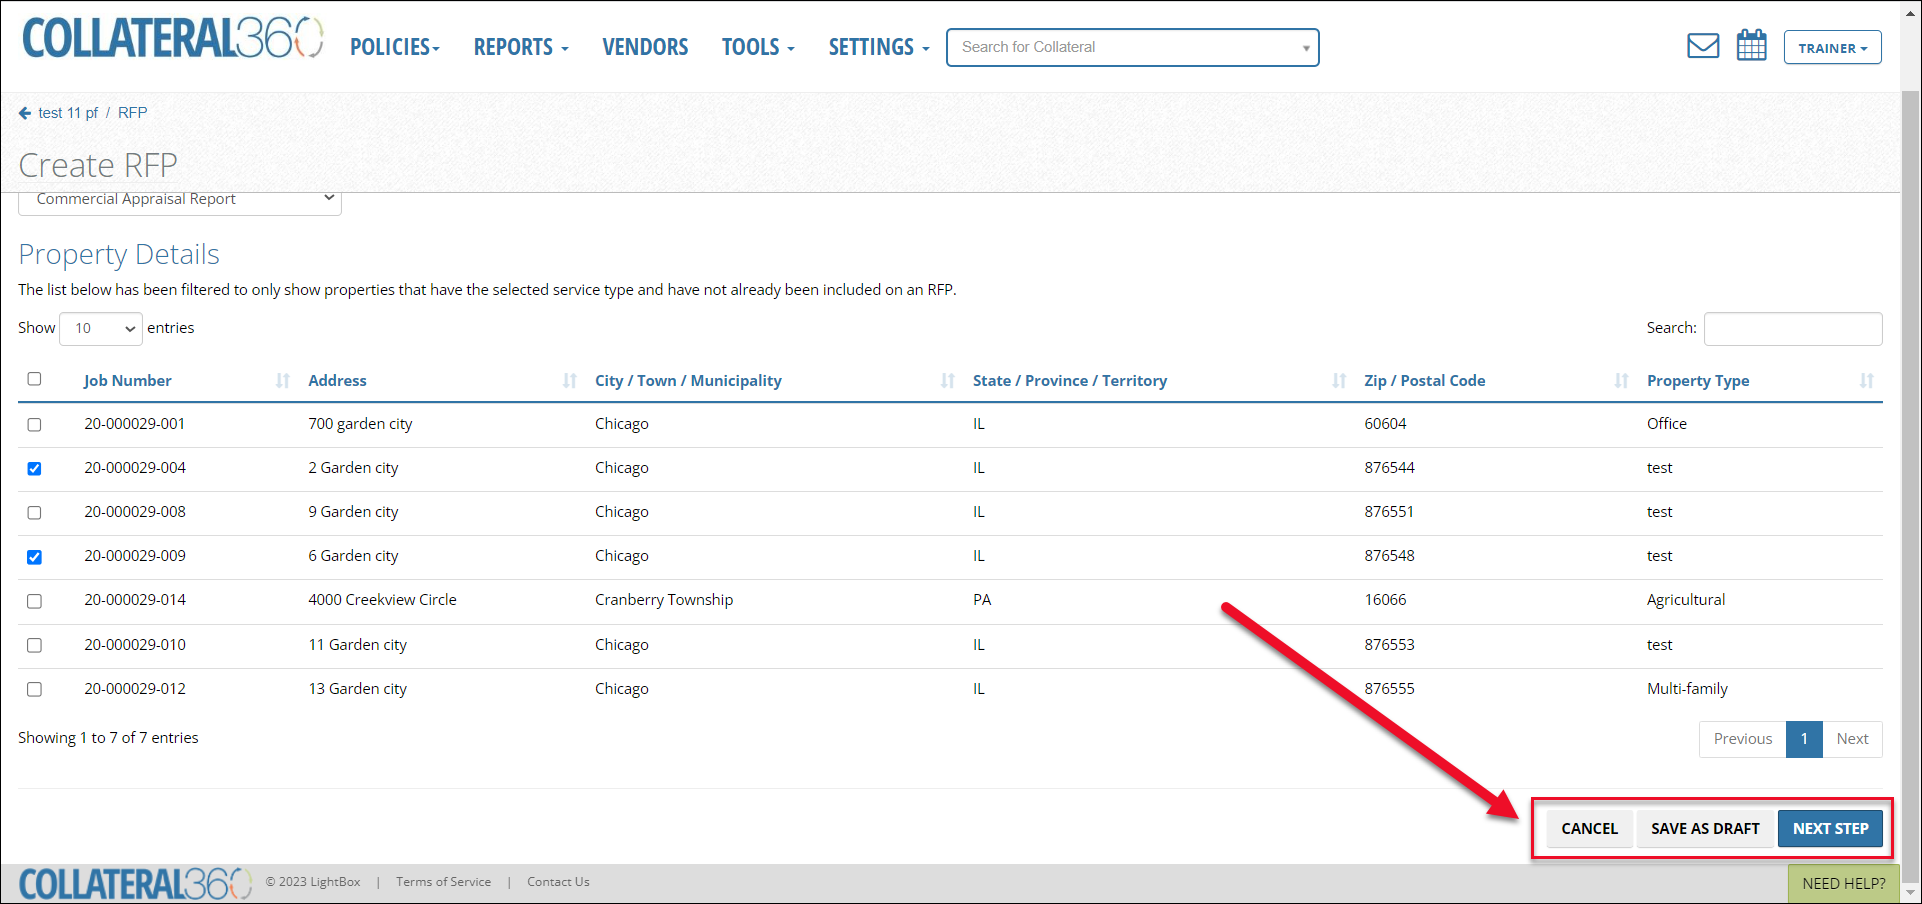
The RFP page for that Service Type will load. The workflow for this page is the same as for the single-site RFP. For more information, refer to the Creating RFPs and Selecting Vendors Job Aid.
Note: When an RFP is created, the first Property generated within the RFP is designated as the “Primary” and an RFP number will be assigned to that specific Portfolio RFP.
After submitting the RFP, the RFPs tab will load again, and a message will announce that the RFP has been saved and procured.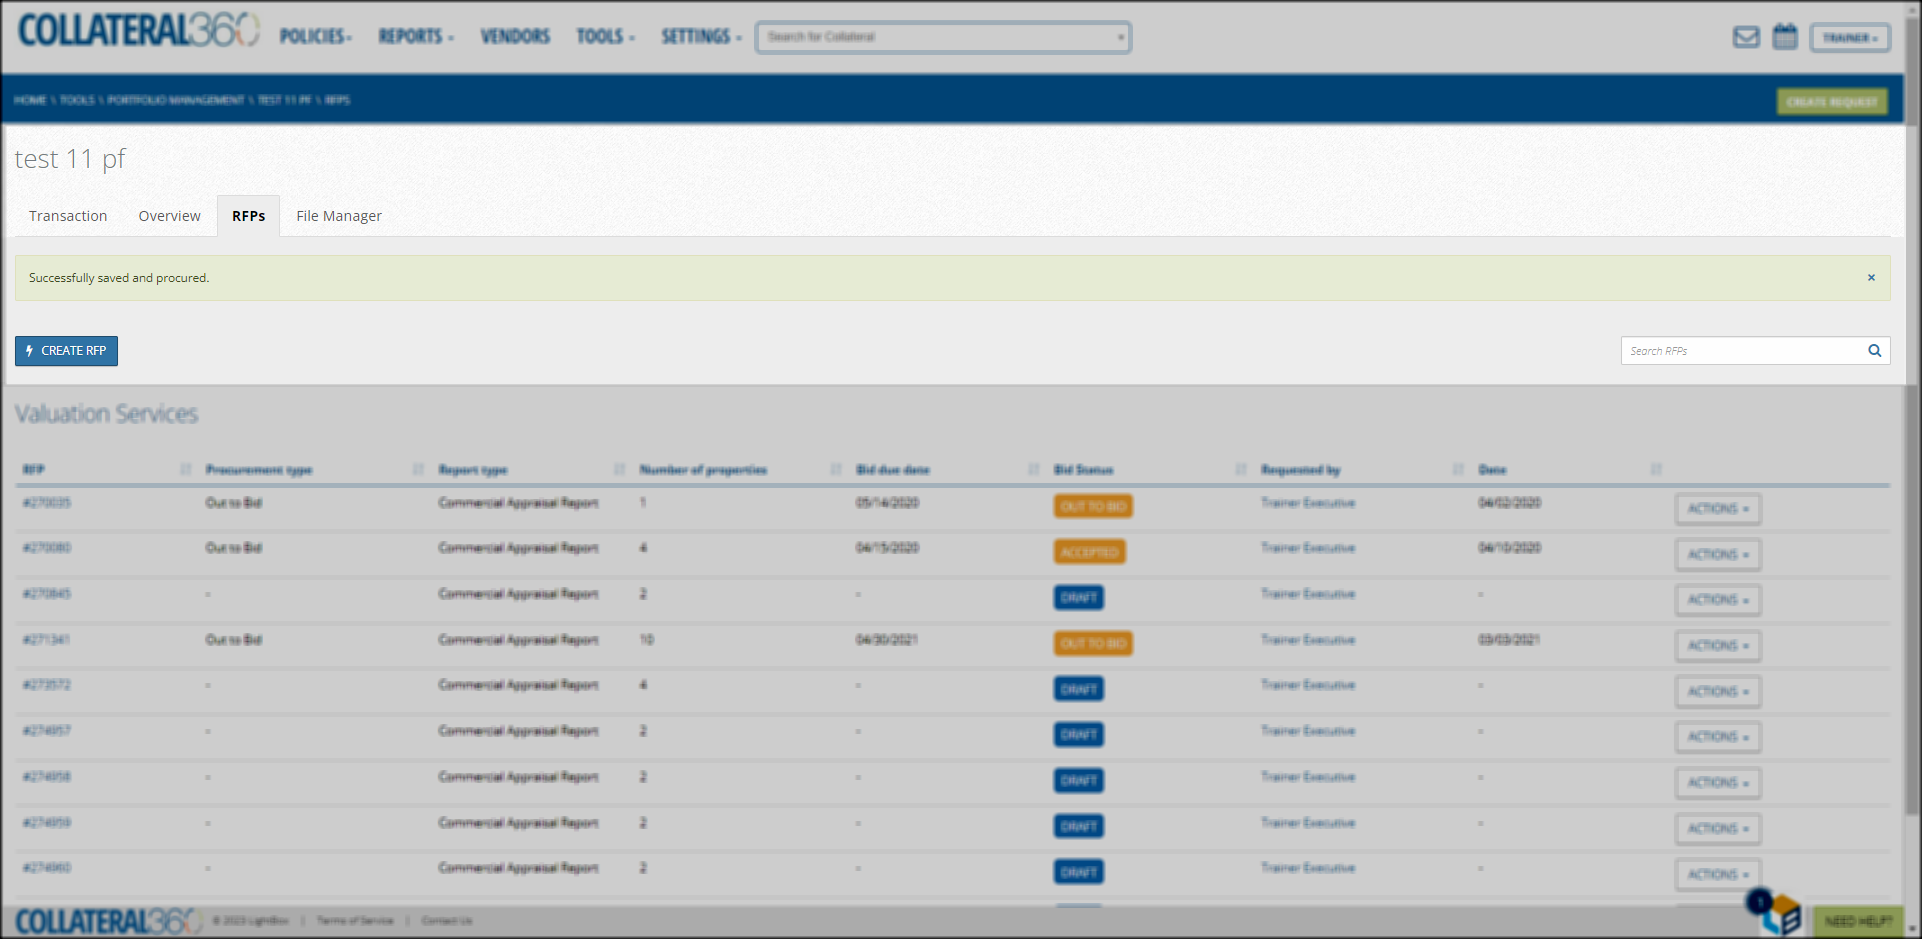
File Manager
The Portfolio File Manager allows users to manage all the files associated with every site in a Portfolio Project in one location.
To access the File Manager, click the File Manager tab at the top of any Portfolio Project.
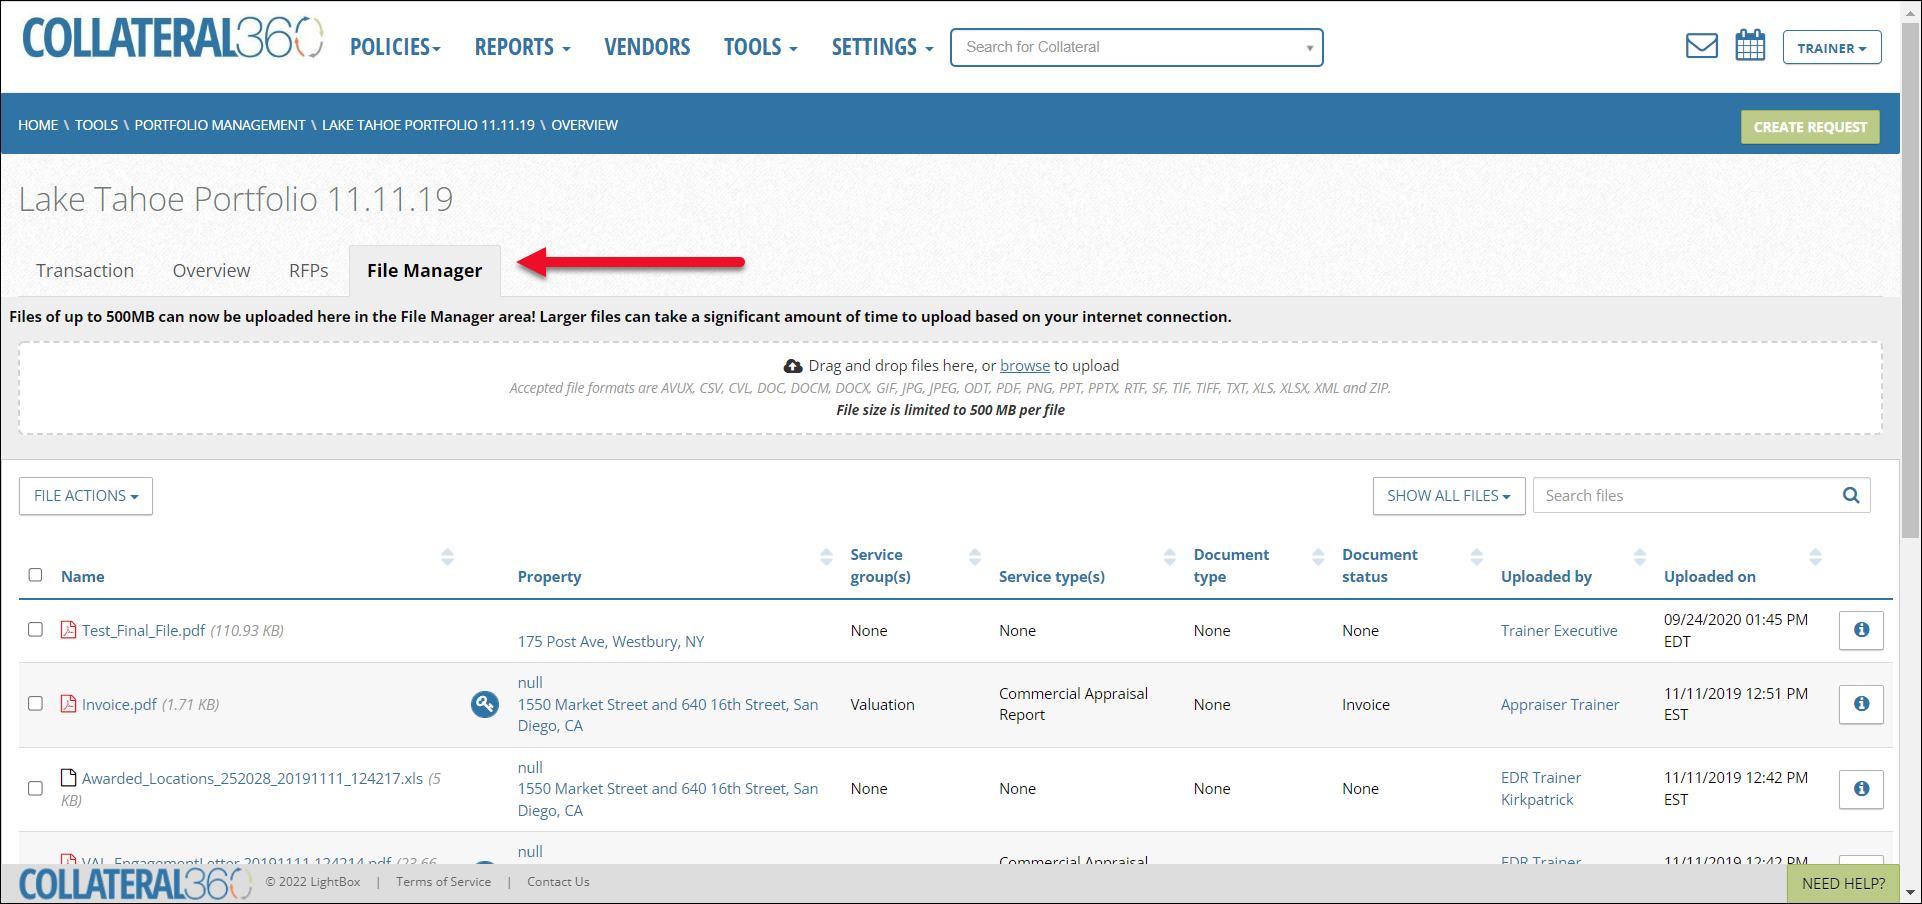
The File Manager page contains an area to upload files, and below that a table containing the files for each site in the Portfolio Project.
- File upload area: Upload files by dragging and dropping them in the file upload area or by clicking the Browse button, finding the files on your computer, and uploading that way. There is a 500 MB file size limit. Note that large files will take longer to upload.

Note that all files uploaded to loan files in a Portfolio Project will appear in the Portfolio File Manager. Files uploaded directly to the Portfolio File Manager will appear in the File Manager of the primary site.
- Managing Files: This table contains files that were attached to the SRF, added to an RFP, sent by a vendor from PARCEL, or uploaded to the loan files manually.
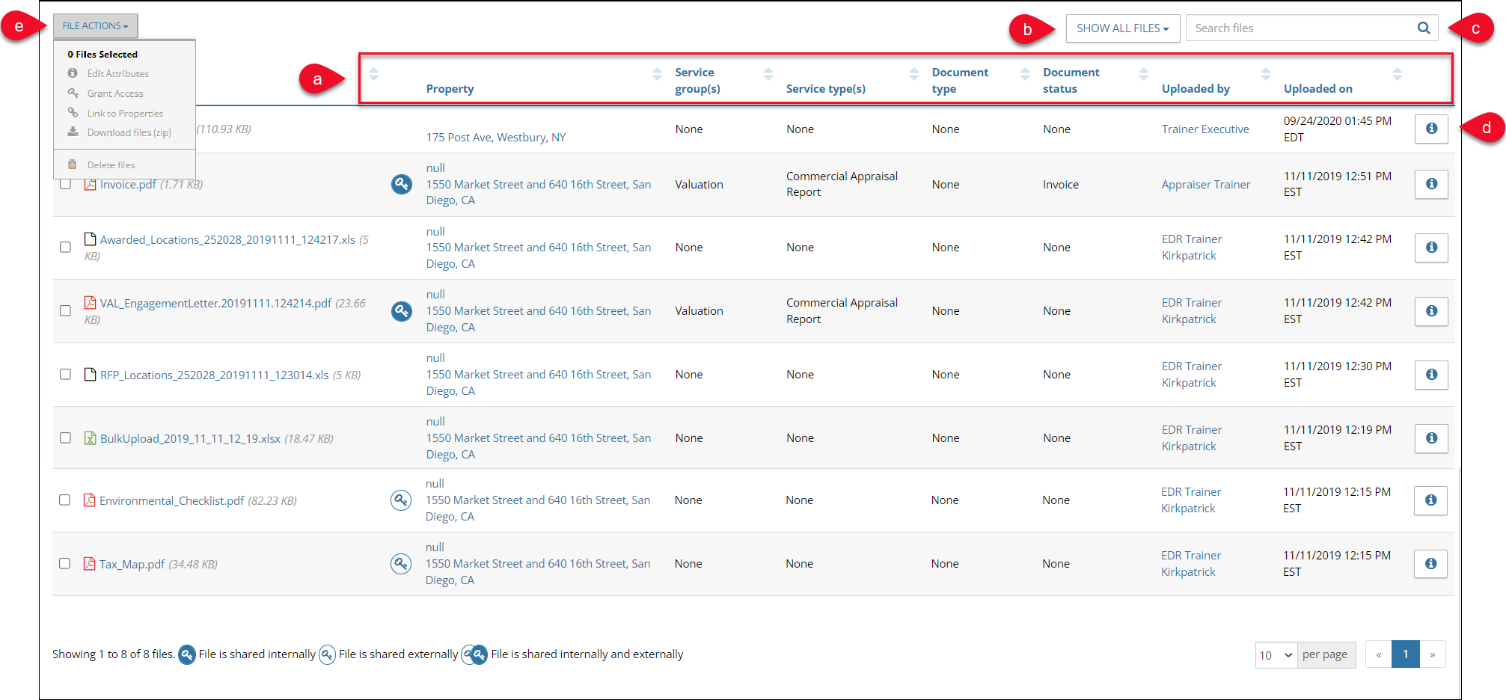
- Click the up/down arrow at the top of a column to sort the files by that column.
- Click the Show All Files drop-down to expose a menu with the following commands, which control what files are hidden/shown:
- Show all files
- Show shared files
- Show internally shared files
- Show externally shared files
- Show unshared files
- Search for files by File name, Service group, Service type, Document type, Document status, Uploaded By, Property, or Uploaded On.
- Click to view and edit attributes for a single file. Refer to Edit Single File Attributes for more information.
- Check the box next to one or more files and then click the File Actions button to apply an action to the selected file(s).
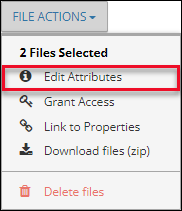
- Edit Attributes: If one file is selected, refer to Edit Single File Attributes. If two or more files are selected, refer to Edit Multiple File Attributes.
- Grant Access: Provide access to the file(s) to another user. Refer to Grant File Access for instructions.
- Link to Properties: Links a file to one or more Properties. Refer to Link to Properties below.
- Download: Compress and then download the selected file(s)
- Delete: Delete the selected file(s).
Edit Single File Attributes
Single file attributes can be edited by clicking the checkbox next to a file and then clicking Edit Attributes in the File Actions menu. The File attributes will open.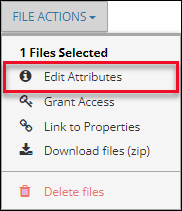
Alternatively, click the icon to open the File attributes modal for that file. The File attributes modal will open.
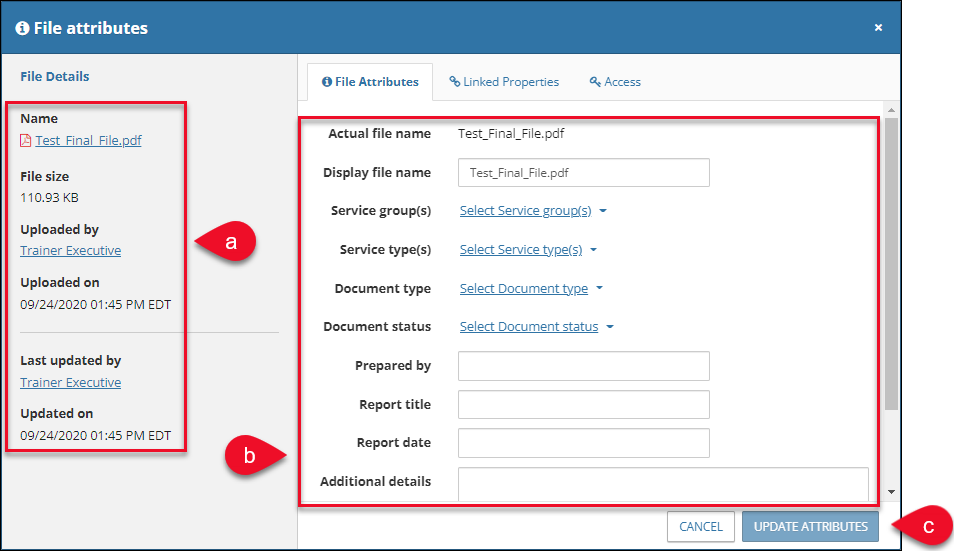
- File details are listed on the left. Click the blue file Name link to download a copy of the file. Click a user’s name to open a new tab with the user account details.
- Update file attributes
- By default, the Display file name will match the Actual file name. Modify as desired. The Display file name will appear in the File Manager and throughout Collateral360.
- One or more selections can be made for Service group(s) and Service type(s) by clicking the checkboxes.
- Only one selection can be made for Document type and Document status. The Document types available are determined by the Service group(s) selected.
- There are no required fields in this modal.
- Once all desired changes have been made, click Update Attributes to apply those changes.
Upon clicking the Update Attributes button, a notification will appear in the upper right-hand corner of the page, indicating that the changes have been queued and will be applied within a few minutes.
Edit Multiple File Attributes
File attributes can be edited for multiple files by clicking the checkbox next to two or more files and then clicking Edit Attributes in the File Actions menu. The File attributes modal will open.
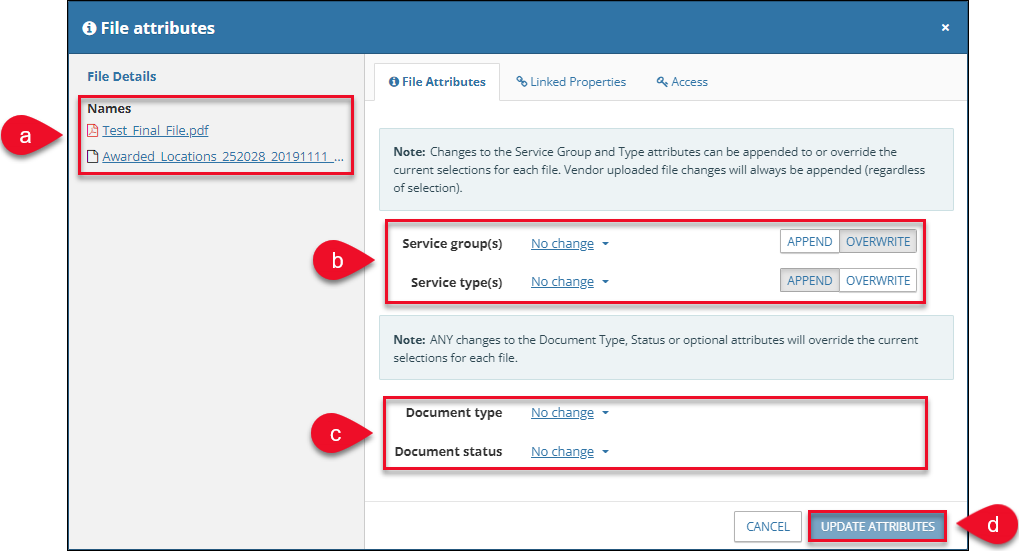
- The selected files are listed under File Details. Click on a file to download a copy.
- Select one or more Service groups or Service type(s) from the drop-down menus, then select Append or Overwrite.
- Appended Service groups and Service types are added to the existing Service group(s)/Service type(s).
- When Overwrite is selected, the existing Service group(s) and/or Service type(s) are replaced with the new selections.
- Overwrite the current selection for Document type and/or Document status by selecting from the drop-down menu(s).
- Once all desired changes have been made, click Update Attributes. A notification will state the changes have been queued and will be applied within a few minutes.
Grant File Access
If you have uploaded a file or have been granted access to a file, the key icon will indicate “This File Has Been Shared” when you hover over it. Selecting the key allows you to grant access to others, see what individuals have access to this file, and you can revoke access to the document if you were the file access grantor. For files that are linked with multiple Properties, the shared filed indicator will show the combined status of the file for all of the Properties.
Note: Portfolio File Manager only allows the user to grant access to internal users, i.e., other members of your company who have user accounts in Collateral360. Utilize the File Manager tool in the single site in which that file is located to grant access to external users. Refer to the File Management Job Aid for more information.
There are two methods for granting another user or group of users access to a file:
- Check the checkbox next to one or more files, click the File Actions button, then click Grant Access.
- Click the key icon
 or
or  next to a file. Files that have been shared both internally and externally display both icons
  .
.
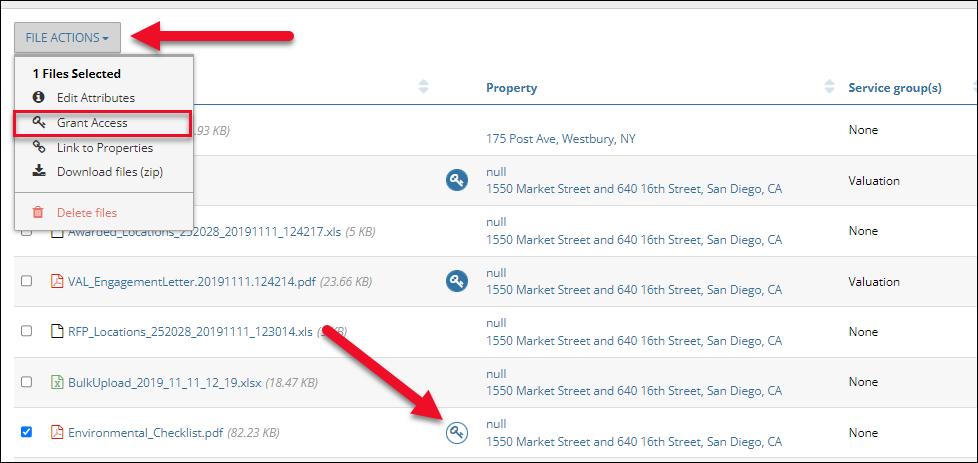
The File Attributes modal will open with the Access tab selected.
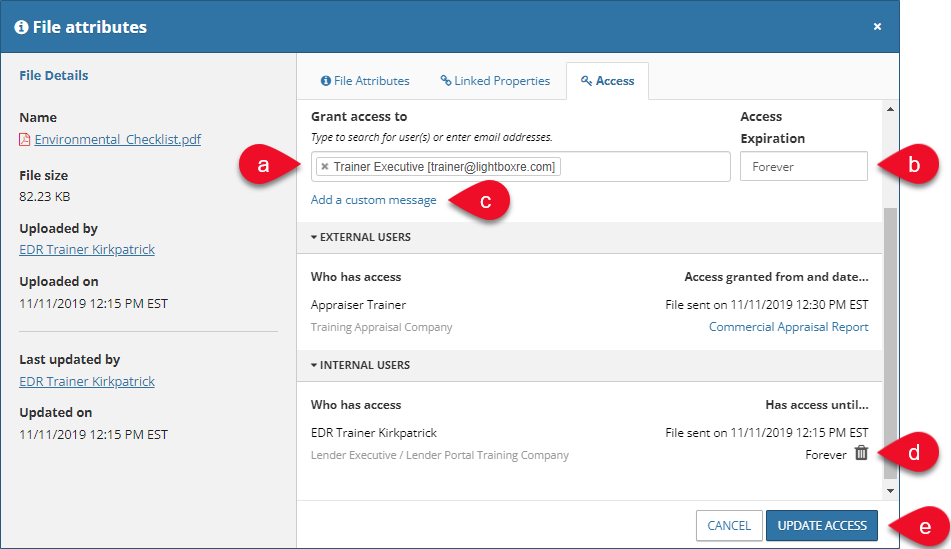
- Choose which users and/or user groups you want to have access to the file. Type to search for user(s). Remove a user/user group by clicking the x next to their name.
- Click All SRF Participants to automatically grant access to all SRF participants. Note that granting access to all SRF participants will generate an automated message indicating that access has been granted.
- Granting access to All Lender Users does not generate an automated message. Note: This option label can be customized and may be labelled ‘All Account Officers’ or something else in your organization.
- Choose which users and/or user groups you want to have access to the file. Type to search for user(s). Remove a user/user group by clicking the x next to their name.
- Set a date after which the specified user(s) will no longer have access to the file. If the field is left as ‘Forever,’ the access will not expire.
- Click Add a custom message to open a text box in which a message can be recorded.
- Click the trash can icon to remove a user’s access.
- Once all changes have been made, click Update Access to finalize the process.
Note: To access the Grant Access controls, the user must have Grant Access permissions and File Edit permissions. If those permissions are lacking, Grant Access will be unavailable. Clicking on the Grant Access command, the shared document icon, or the linked Properties address will result in an error message that states “You do not have permission to share these files.”
Important: Collateral360 provides a feature that triggers a lock under certain circumstances. If your organization has enabled this lock, then sharing a document with the status of ‘Final Review’ with any Account Officer/Lender User role will lock the associated data capture form. Once locked, the data capture can be viewed, but cannot be edited. This lock is final and cannot be undone by any user type or by LightBox. Additionally, once this lock is triggered, the Final Review document cannot be deleted.
Link to Properties
The files in a Portfolio Project can be associated with one or more of the individual sites in the Portfolio.
The Linked Properties tab of the File Attributes modal allows the user to manage those linkages. Click the  icon for a specific file, then click Linked Properties in the File Attributes modal.
Alternatively, check the checkboxes for one or more files and then click Link to Properties in the File Actions modal.
Or click the blue address link in the Property column.

The Property or Properties with which the file is linked are listed on the Linked Properties tab.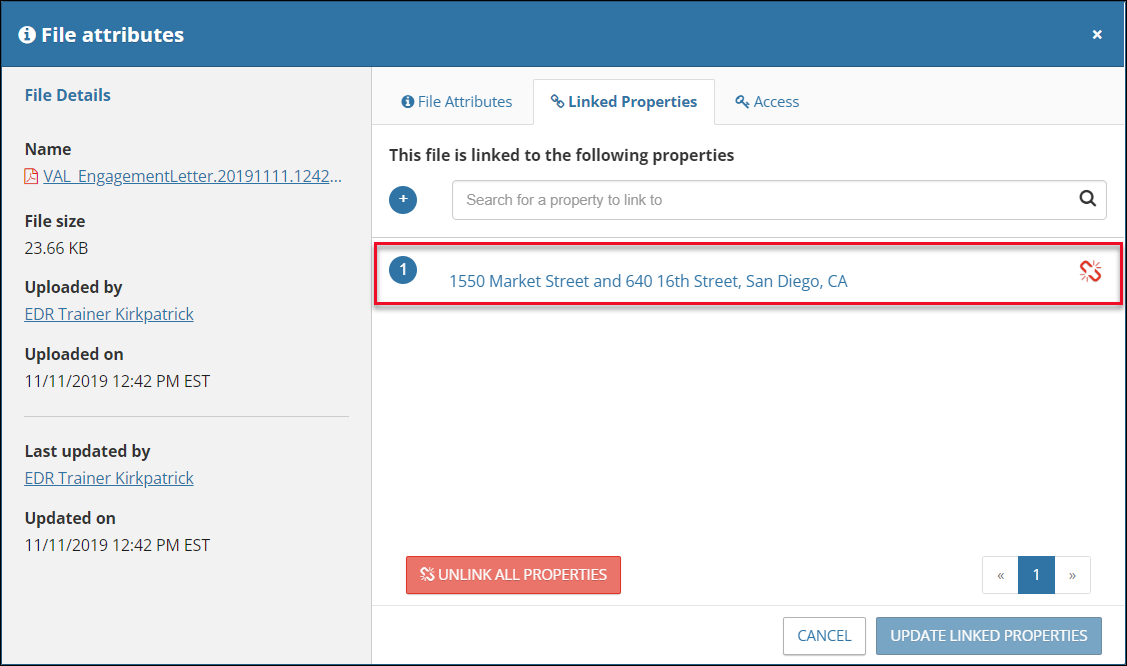
Tip: You can click on the blue address link to open the single site loan file to the Collateral Overview. This can be an easy to way to access the single site File Manager to grant file access to external users.
Click the red, broken link icon  and then click Update Linked Properties to unlink the file from the corresponding Property. A message indicating the Properties were successfully unlinked is displayed in the upper right corner of the page; the linked Properties will no longer appear on the Linked Properties tab.
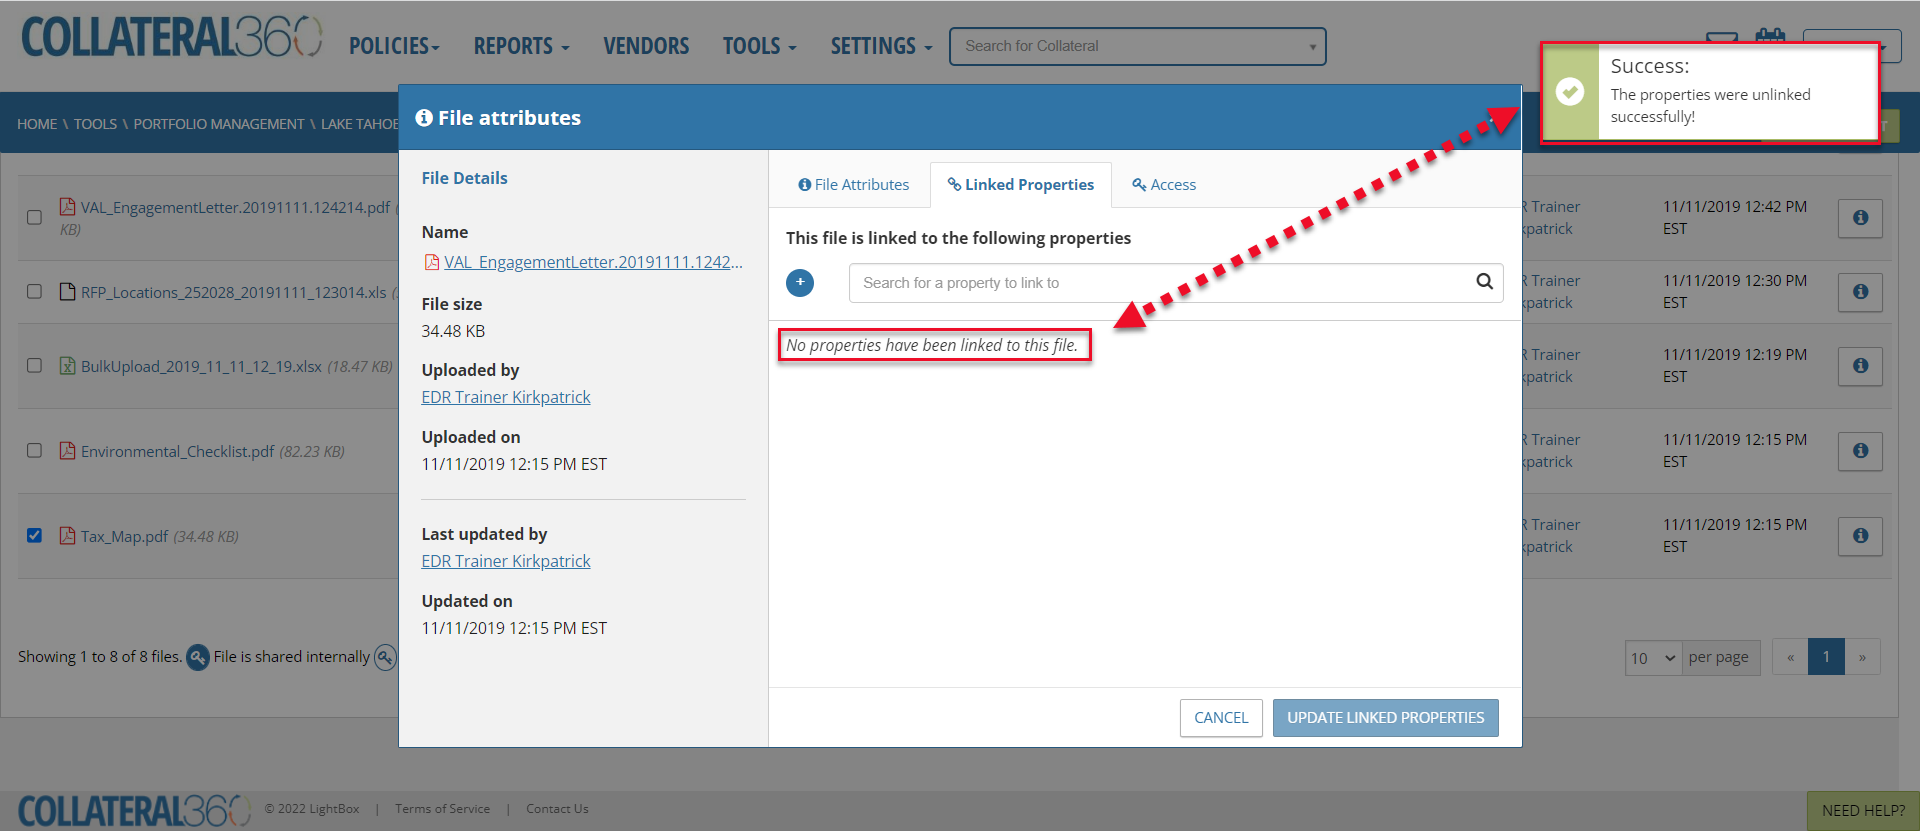
Click Unlink All Properties, then click Update Linked Properties, to remove all the linked Properties at once.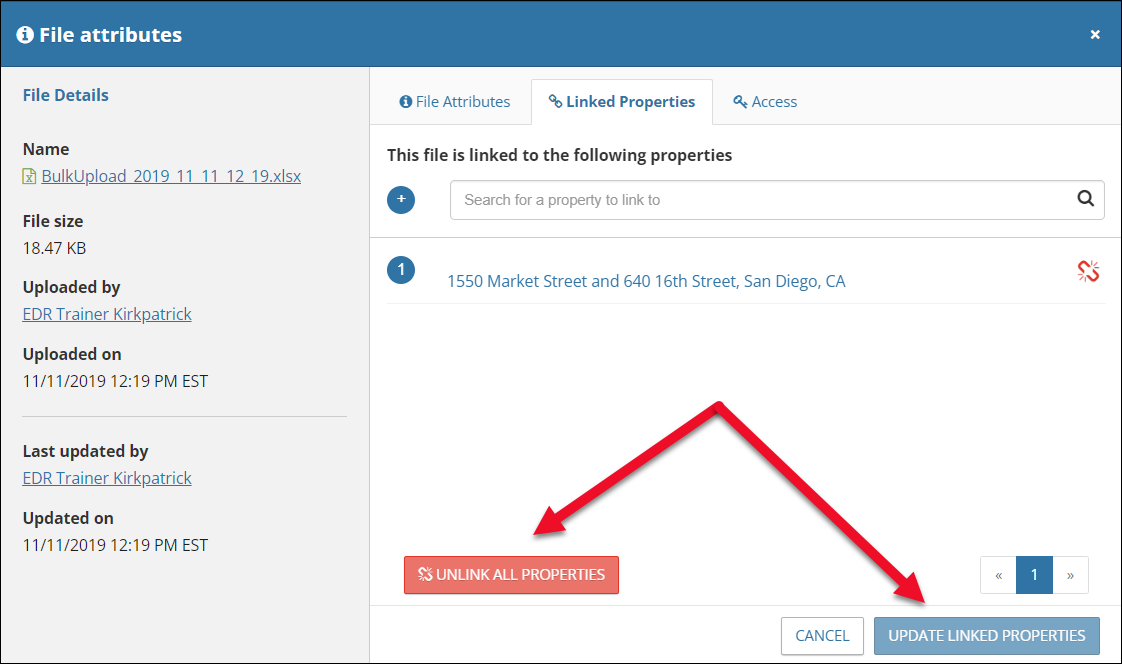
Note: Files that are not linked to any Properties in the Portfolio are still available in the Portfolio File Manager.
To link a file to one or more Properties, click in the Search for a Property to link to field. Click All Properties to link the file to every Property in the Portfolio Project or click an individual Property to add a link. The field has type-ahead functionality, so begin typing a Property address to filter the dropdown menu by that address.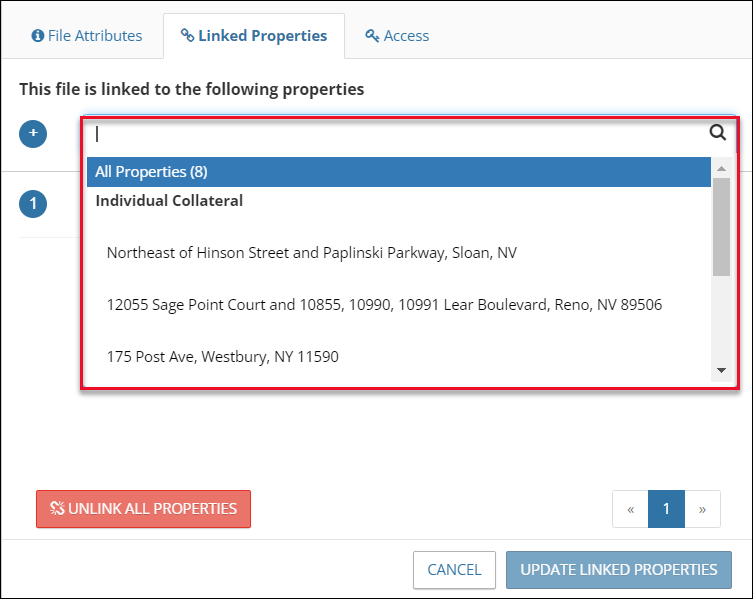
The linked Properties appear in the Search for a Property to link to field, and in the list of linked Properties beneath that. Click the X next to a Property to remove it from the list of Properties to be linked.
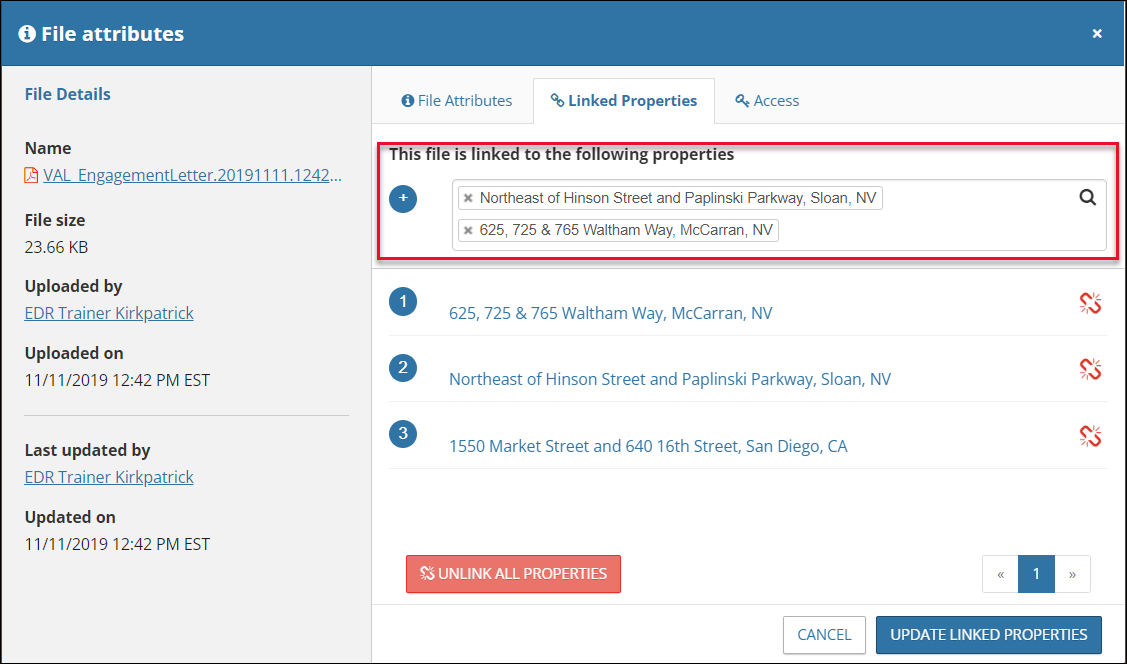
Then click Update Linked Properties to apply the changes. A success message will appear in the upper right corner of the page and the Properties are linked.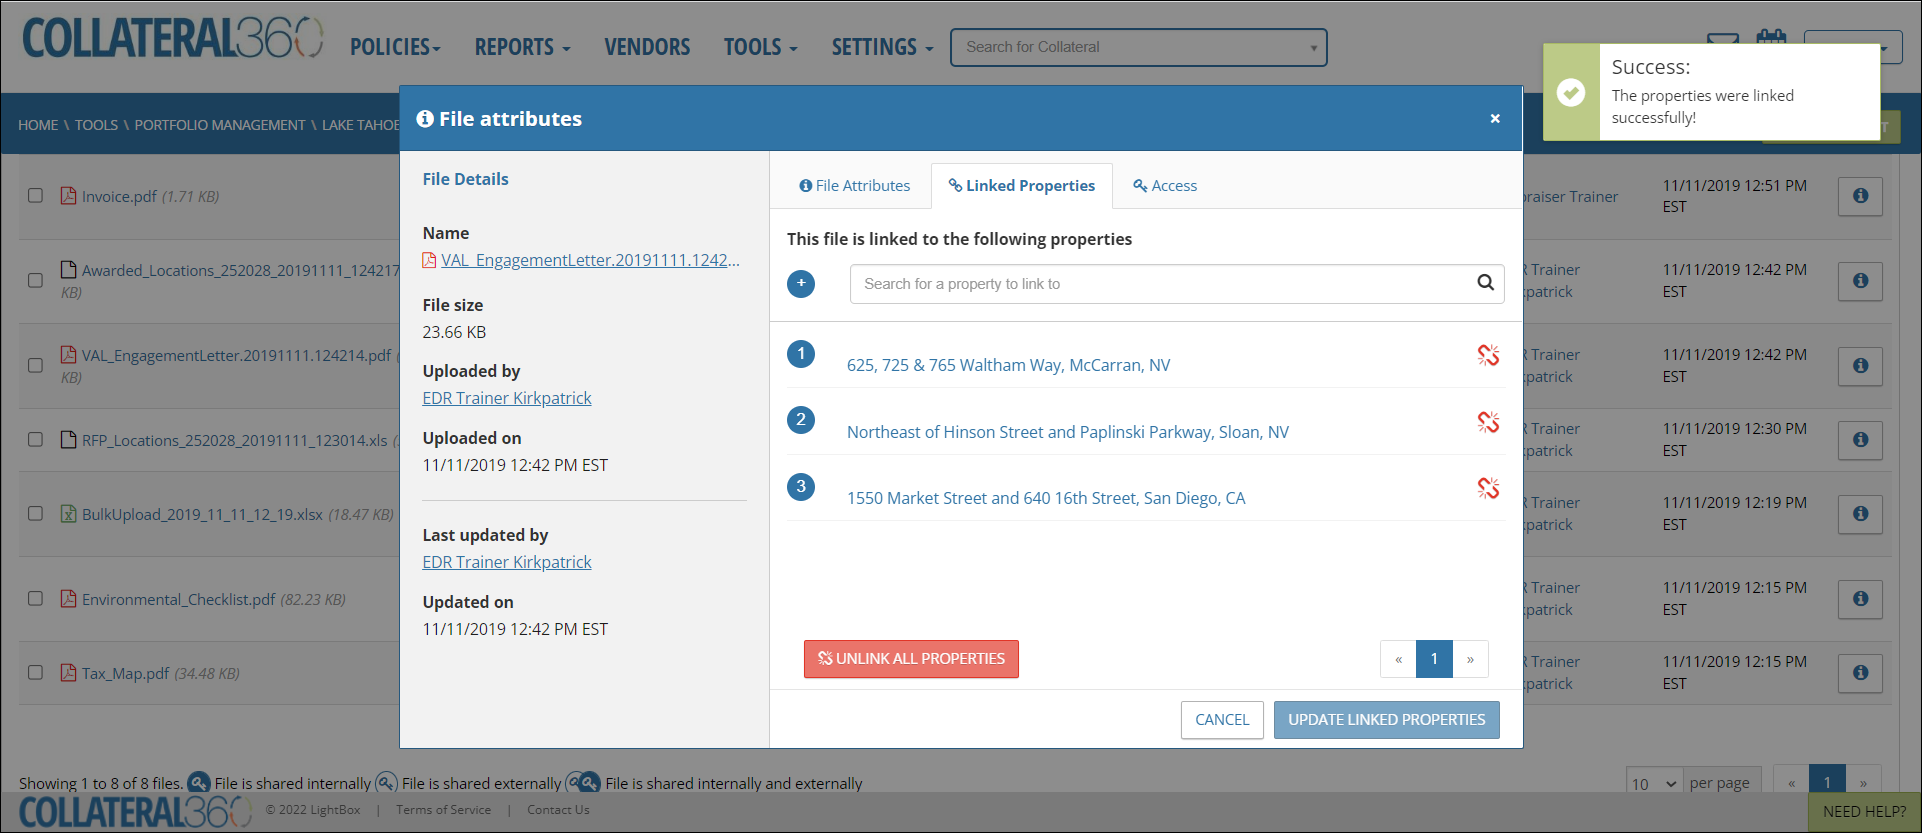
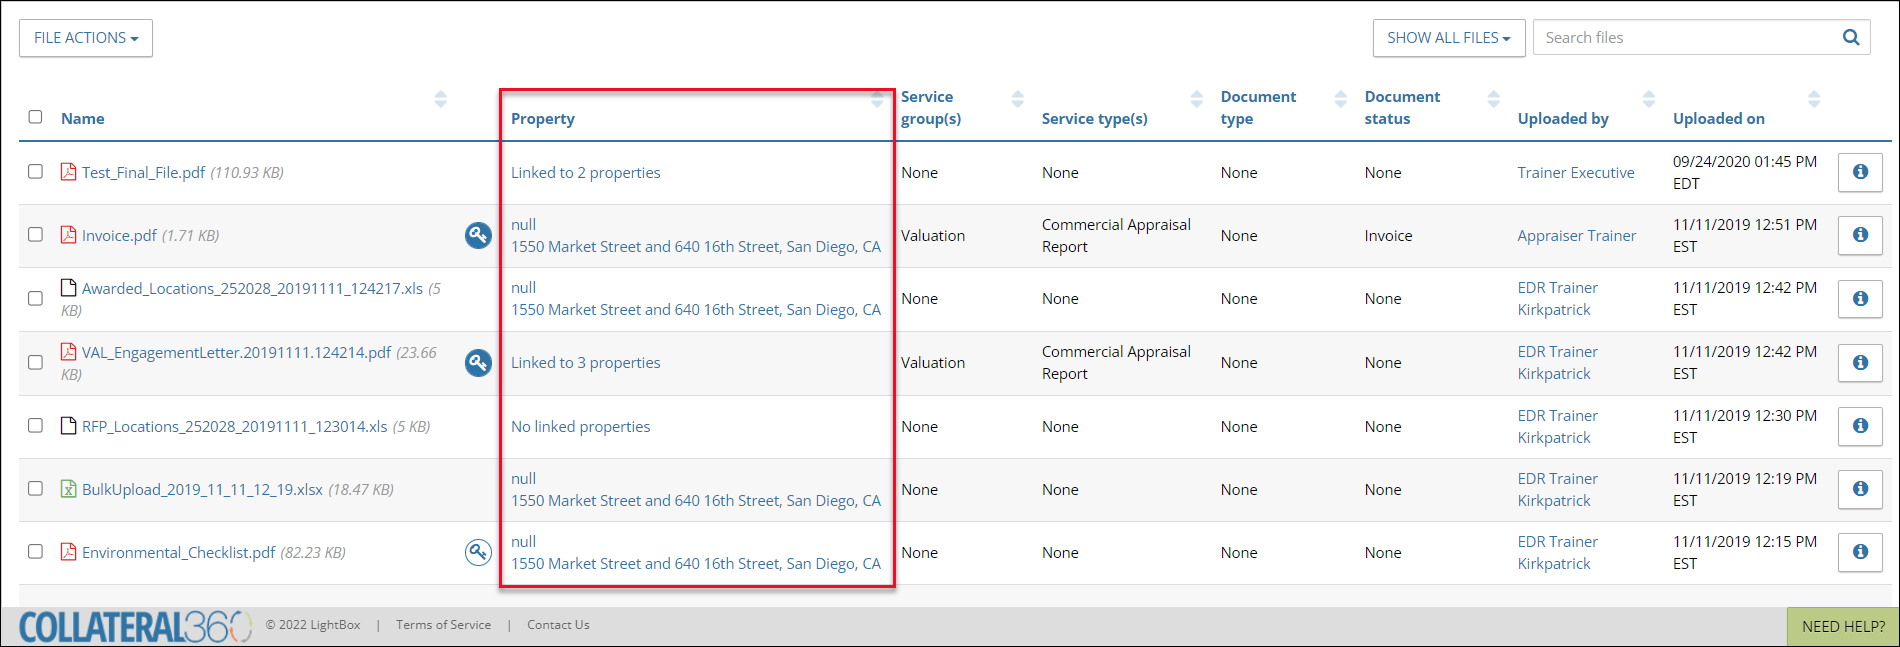
The Properties to which a file is linked can be viewed in the Property column of the table. Click on the blue text of a linked Property to open the Link Properties tab of the File Attributes modal. If a file is linked to more Properties than can be displayed in the Property column, instead of an address a blue link stating “Linked to X Properties” will appear, where X is the number of linked Properties.
.png)

.png)