- Print
- DarkLight
- PDF
Message Center
- Print
- DarkLight
- PDF
Purpose
This documentation describes how to use the Message Center to send and receive messages within Collateral360.
Audience
Lender Users, Lender Managers, and Lender Executives.
Message Center Overview
The Collateral360 Message Center allows you to communicate with vendors and individuals inside your organization.

• Access the Message Center
• Manage Your Messages
• Read and Reply to Messages
• Draft a New Message
• View Message History
Note: The Message Center is distinct from the Vendor Messaging tool found on the Collateral360 dashboard. The Vendor Messaging tool is solely for the purpose of communicating with engaged vendors.

Access the Message Center
When you have an unread message, a red, numbered badge appears next to the envelope icon in the upper right-hand corner of the screen.
In this example, there are two unread messages
Once the message(s) have been read, the badge will go away.
Click on the envelope icon to open the Message Center.

The Message Center will open. Unread messages are highlighted blue and bolded.

Manage Your Messages
The Message Center’s layout and functionality are similar to Outlook and other mail clients. The navigation bar on the left-hand side of the page organizes the mail.

• Inbox: Contains all mail that has been received and not yet deleted or archived. A blue, numbered badge indicates the number of unread messages.
• Deleted Items: Contains messages you have deleted.
• Sent Items: Contains messages you have sent.
• Drafts: Contains messages you’ve started but not yet sent.
• Archived Items: Contains messages you’ve manually archived.
Mail can be moved from the Inbox to the Deleted Items and Archived Items folders. Click the check box next to one or more messages.

Click Delete to send the selected message(s) to the Deleted Items folder. Click Archive to send the selected message(s) to the Archive folder.

Messages that have been read can be marked as unread. This will highlight the message in blue and update the Inbox and mail icon badges accordingly. Click the check box next to one or more read messages.

Click Mark read/unread. The message will be marked as unread.

The same process can be repeated to mark unread messages as read: Select an unread message, then click Mark read/unread.
Mail can be sorted by the From, Subject, and Date Received columns. Click on a column header to sort by that column. Click a second time to reverse the sort order.

Read and Reply to Messages
To reply to a message, check the check box and then click Reply.

The reply modal will appear.

A. Every message in the Message Center must be associated with a piece of collateral. When replying to a message, the associated collateral cannot be changed. To view the collateral, click on the blue address link. You will navigate to the Collateral Overview page for that piece of collateral.
B. When replying to a message, the To field is pre-populated. Add another recipient by entering their email address and then clicking the enter key on your keyboard. Remove a recipient by clicking the x next to their name.
C. Add a recipient to the Cc field by entering their email address and then clicking the enter key on your keyboard. Remove a recipient by clicking the x next to their name.
D. Click High Priority to flag the message as high priority in the recipient’s Message Center.
E. Review the original message and type the body of the message.
F. Drag and drop files from your computer to attach them to the email.
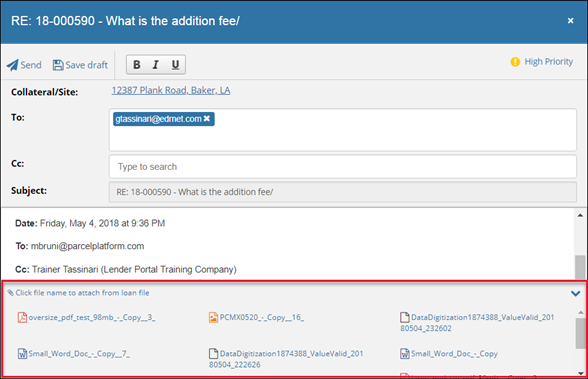
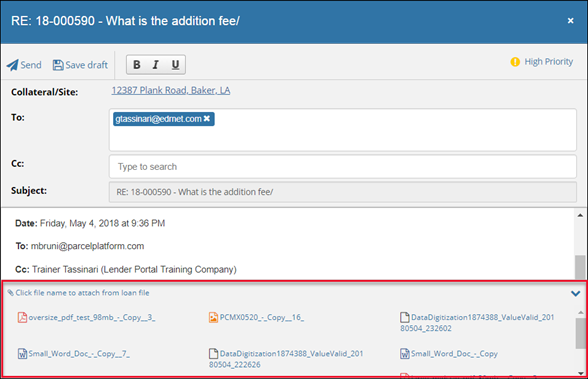
To attach a document from the linked collateral, click the up-arrow icon to expose a menu containing the files from the project. Click one or more files, then click the down-arrow to hide the menu again.

Documents larger than 100MB cannot be attached. A best practice when sending large files is to limit the number of files attached to any one message. If you’re planning to add multiple large files, be aware that it may take longer than usual to process and send the message.
G. Click Send to send the email. Click Save draft to save the email to the Drafts folder.
A notification will appear in the upper right-hand corner of the screen when the message has been sent.

The recipient(s) will receive an email notification of the new message, with a link to log into Collateral360 to view the message.
Draft a New Message
Drafting a new message is similar to replying to a message, with three key differences:
• The Collateral/Site field is editable
• The Subject field is editable
• The To and CC fields allow you to search for users
Click New Message to start a new message.

The new message modal will open.

A. Every message in the Message Center must be associated with a piece of collateral. Enter text to search for a piece of collateral to associate with the message.
B. Click in the To field to expose a list of users who are associated with the collateral. Select a user or click All SRF Participants to add all SRF participants. You can also add a recipient by entering their email address and then clicking the enter key on your keyboard. Remove a recipient by clicking the x next to their name.
C. Click in the CC field to expose a list of users who are associated with the collateral. Select a user or click All SRF Participants to add all SRF participants. You can also add a recipient by entering their email address and then clicking the enter key on your keyboard. Remove a recipient by clicking the x next to their name.
D. Enter a subject in the Subject field.
E. Type the body of the message.
F. Drag and drop files from your computer to attach them to the message.
To attach a document from the linked collateral, click the up arrow icon to expose a menu containing the files from the project. Click one or more files, then click the down arrow to hide the menu again.
 Documents larger than 100MB cannot be attached. A best practice when sending large files is to limit the number of files attached to any one email. If you’re planning to add multiple large files, be aware that it may take longer than usual to process and send the email.
G. Click High Priority to flag the message as high priority in the recipient’s Message Center.
H. Click Send to send the email. Click Save draft to save the email to the Drafts folder. A notification will appear in the upper right-hand corner of the screen when the message has been sent.

The recipient(s) will receive an email notification of the new message, with a link to log into Collateral360 to view the message.
View Message History
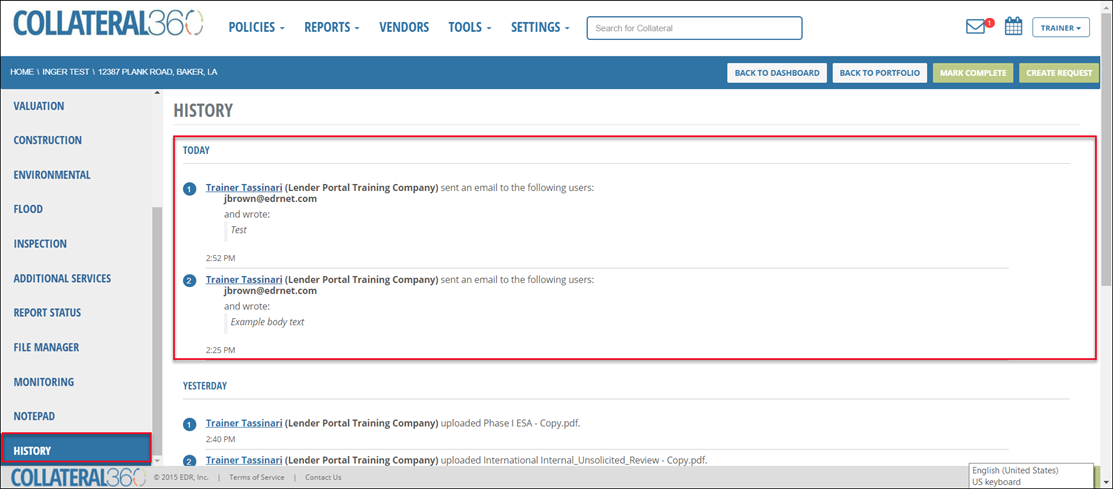
All Message Center messages are logged in the History of the associated collateral project. Navigate to the project and click the History tab.
.png)

.png)