- Print
- DarkLight
- PDF
File Management
- Print
- DarkLight
- PDF
Purpose
This documentation describes how to use the File Management tool to upload, view, and manage files.
Audience
Job Managers, Lender Managers, Content Administrators, and Lender Executives.
Upload and Manage Files
The File Manager allows users to manage all the files associated with a loan file in one place.
To access the File Manager, click the File Manager button in the menu on the left side of any loan file.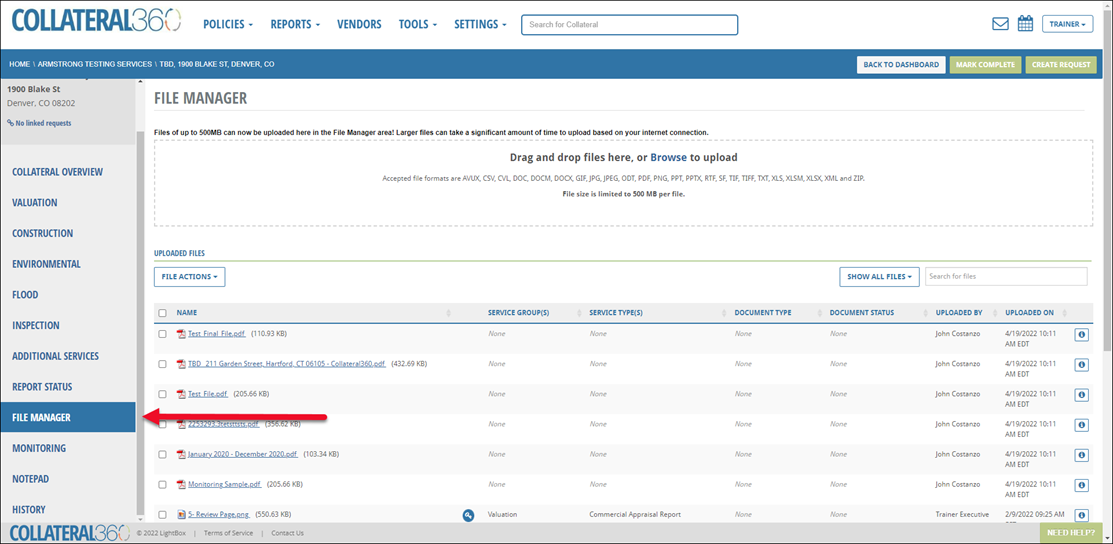
The File Manager screen will open. The page is divided into five sections (from top to bottom):
File upload area: Upload files by dragging and dropping them in the file upload area or by clicking Browse , finding the files on your computer, and uploading that way. There is a 500 MB file size limit. Note that large files will take longer to upload.

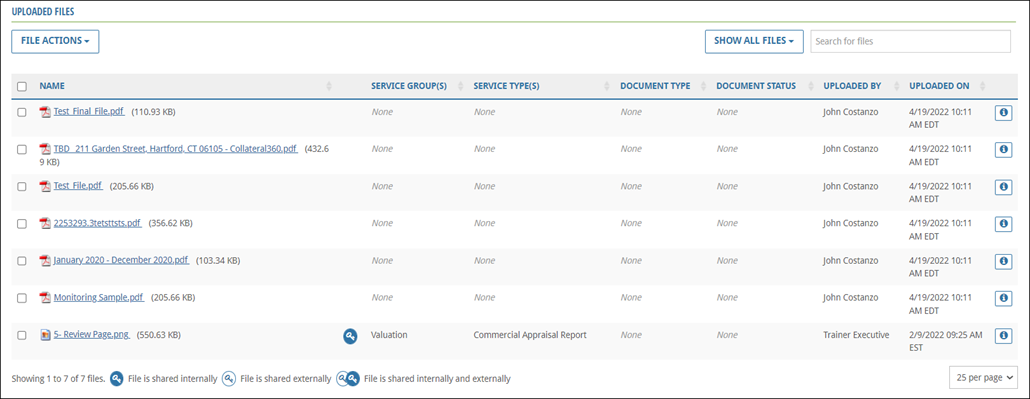
Uploaded Files: Contains files that were attached to the SRF, added to an RFP, sent by a vendor from PARCEL, or uploaded to the loan file manually.
EDR Orders: Lists any files ordered from an EDR third-party service.

Invoices: This area lists all vendor invoices. For more information about managing invoices, refer to the Validating and Creating Invoices from the Service Tab video.

XML Data Feed: An XML file is automatically generated when a vendor in PARCEL submits their final report.

Managing Files

Click the up/down arrow at the top of a column to sort the files by that column.
Click the Show All Files drop-down to expose a menu with the following commands, which control what files are hidden/shown:
Show all files
Show shared files
Show internally shared files
Show externally shared files
Show unshared files
Search for files by File name, Service group, Service type, Document type, Document status, Uploaded By, or Uploaded On.
Click to view and edit attributes for a single file. Refer to Edit Single File Attributes for more information.
Check the box next to one or more files and then click File Actions to apply an action to the selected files.
Edit Attributes: If one file is selected, refer to Edit Single File Attributes. If two or more files are selected, refer to Edit Multiple File Attributes.
Grant Access: Provide access to the file(s) to another user. Note that the grantor can only grant access to files they uploaded themselves. Refer to Grant File Access for instructions.
Download: Compress and then download the selected file(s)
Delete: Delete the selected file(s).
Edit Single File Attributes
Single file attributes can be edited by clicking the checkbox next to a file and then clicking Edit Attributes in the File Actions menu. The File attributes modal will open.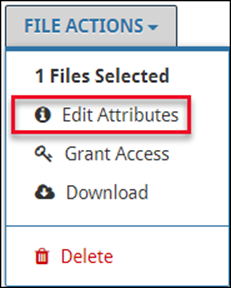
Alternatively, click the information icon to open the File attributes modal for that file. The File attributes modal will open.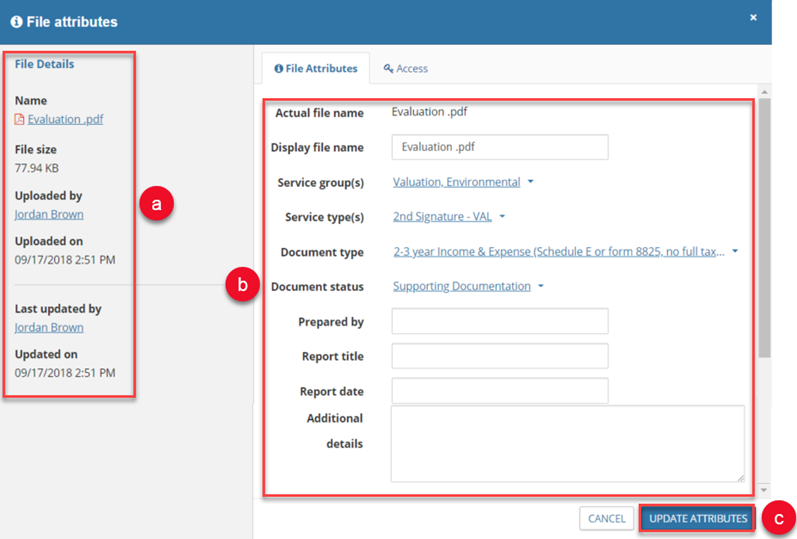
File details are listed on the left. Click the blue file Name link to download a copy of the file.
Update file attributes.
By default, the Display file name will match the Actual file name. Modify as desired. The Display file name will appear in the File Manager and throughout Collateral360.
One or more selections can be made for Service group(s) and Service type(s) by clicking the checkboxes.
Only one selection can be made for Document type and Document status. The Document types available are determined by the Service group(s) selected.
There are no required fields in this modal.
Once all desired changes have been made, click Update Attributes to apply those changes.
Upon clicking Update Attributes, a notification will appear in the upper right-hand corner of the page, indicating that the changes have been queued and will be applied within a few minutes.
Edit Multiple File Attributes
File attributes can be edited for multiple files by clicking the checkbox next to two or more files and then clicking Edit Attributes in the File Actions menu. The File attributes modal will open.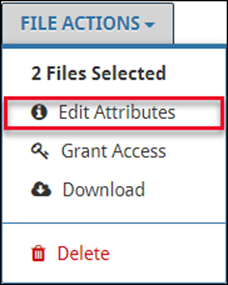

The selected files are listed under File Details. Click on a file to download a copy.
Select one or more Service groups or Service type(s) from the drop-down menus, then select Append or Overwrite.
Appended Service groups and Service types are added to the existing Service group(s)/Service type(s).
When Overwrite is selected, the existing Service group(s) and/or Service type(s) are replaced with the new selections.
Overwrite the current selection for Document type and/or Document status by selecting from the drop-down menu(s).
Once all desired changes have been made, click Update Attributes. A notification will state the changes have been queued and will be applied within a few minutes.
Grant File Access
If you have uploaded a file or have been granted access to a file, the key icon will indicate “This File Has Been Shared” when you hover over it. Selecting the key allows you to grant access to others, see what individuals have access to this file, and you can revoke access to the document if you were the file access grantor.

There are two methods for granting another user or group of users access to a file:
Check the checkbox next to one or more files, click File Actions, then click Grant Access.
Click the key icon next to a file.

The File Attributes modal will open with the Access tab selected. 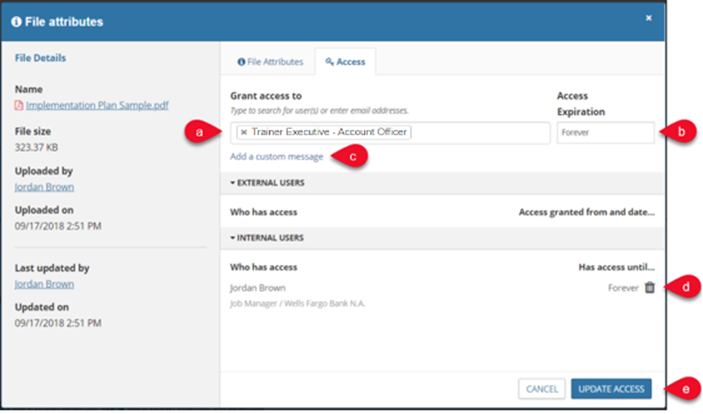
Choose which users and/or user groups have access to the file. Type to search for user(s). Remove a user/user group by clicking the x next to their name.
Click All SRF Participants to automatically grant access to all SRF participants. Note that granting access to all SRF participants will generate an automated message indicating that access has been granted.
Granting access to All Account Officers does not generate an automated message.
Set a date after which the specified user(s) will no longer have access to the file. If the field is left blank, the access will not expire.
Click Add a custom message to open a text box in which a message can be recorded.
Click the trash can icon to remove a user’s access.
Once all changes have been made, click Update Access to finalize the process.
Note: To access the Grant Access controls, the user must have Grant Access permissions and File Edit permissions. If those permissions are lacking, Grant Access will be unavailable. Clicking on the Grant Access command, the shared document icon, or the linked properties address will result in an error message that states, “You do not have permission to share these files.”
Note:
To access the Grant Access controls, the user must have Grant Access permissions and File Edit permissions. If those permissions are lacking, Grant Access will be unavailable. Clicking on the Grant Access command, the shared document icon, or the linked properties address will result in an error message that states “You do not have permission to share these files.” Lender Users, including Lender User w/ Access to All Files, does not have the permissions required to use Grant Access.
Important:
Collateral360 provides a feature that triggers a lock under certain circumstances. If your organization has enabled this lock, then sharing a document with the status of ‘Final Review’ with any Account Officer/Lender User role will lock the associated data capture form. Once locked, the data capture can be viewed, but cannot be edited. This lock is final and cannot be undone by any user type or by LightBox. Additionally, once this lock is triggered, the Final Review document cannot be deleted.
.png)

.png)