- Print
- DarkLight
- PDF
Engagement Letter Builder
- Print
- DarkLight
- PDF
Purpose
The purpose of this documentation is to describe how to create, modify, and manage Engagement Letter Templates.
Audience
Content Administrators and Lender Executives.
Engagement Letter Builder Overview
The Engagement Letter Builder allows Lender Executives and Content Administrators to create and modify the Engagement Letter Templates that are sent to vendors along with RFPs.
To access the Engagement Letter Builder, click the Settings button in the upper navigation menu, then click Form Settings.

On the Form Settings page, in the Templates section, click the View Templates button.
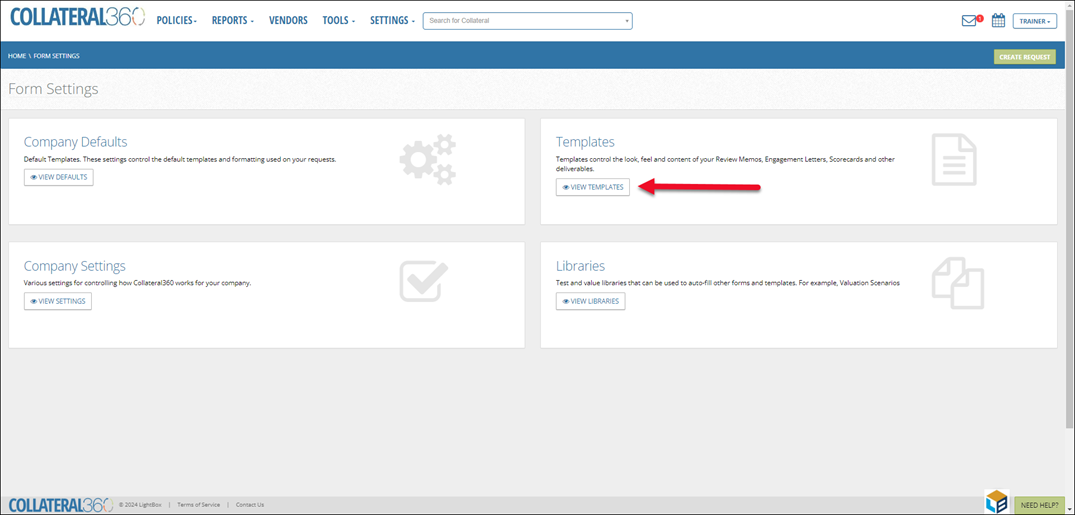
On the Templates page, click View Templates in the Engagement Letter Templates section.
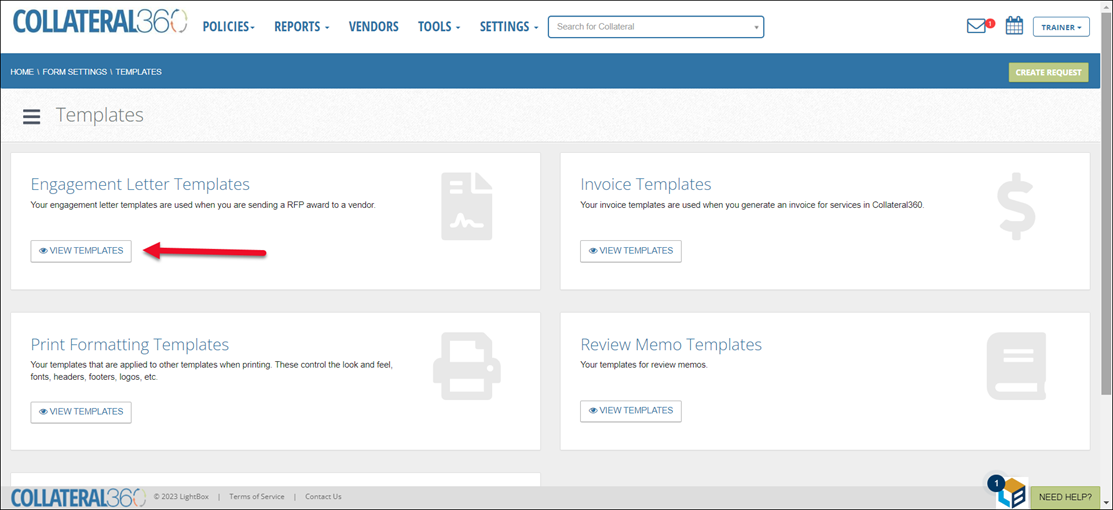
The Engagement Letter Templates page will open.
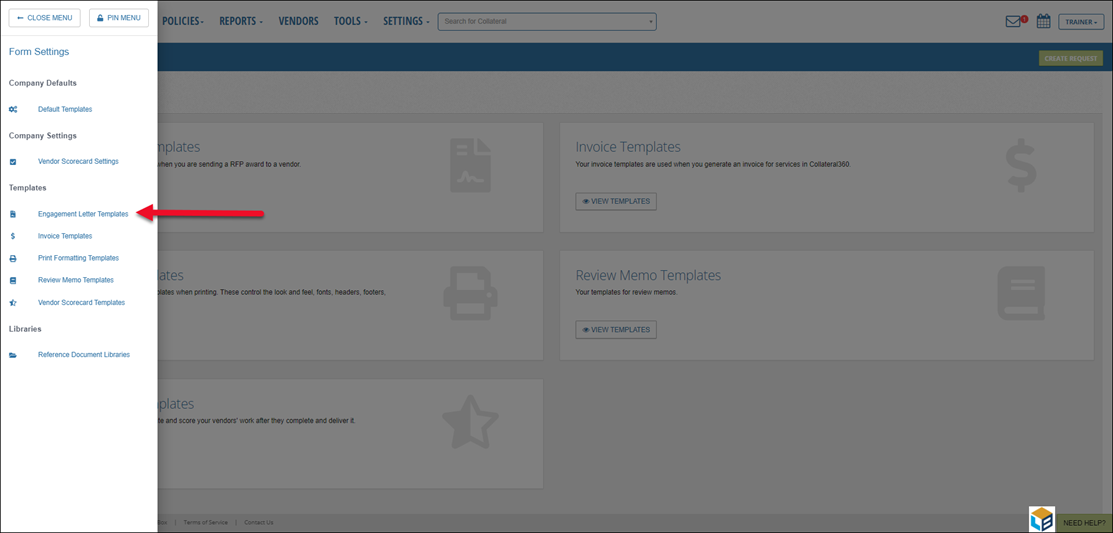
The Engagement Letter Templates page can also be reached via the slide-out menu found on the Company Defaults, Company Settings, and Templates pages and sub pages. Click on the three-lines icon in the upper left-hand corner of the page to expose the slide-out menu.

The slide-out menu will be exposed. Click Engagement Letter Templates to open the Engagement Letter Builder page.
The Engagement Letter Templates page will open.
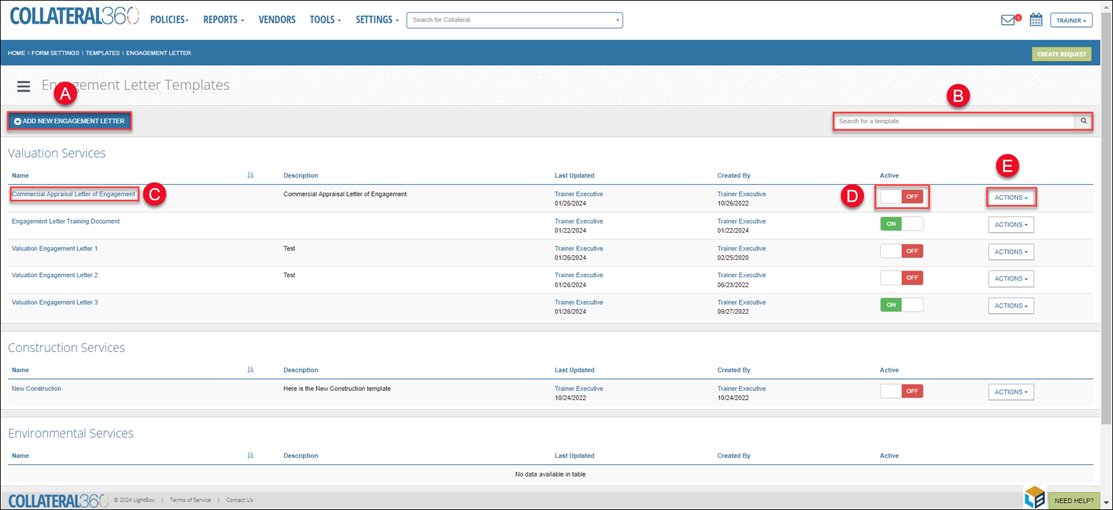
A. Add New Engagement Letter: Click to create a new Engagement Letter Template.
B. Search for a template: Filters the results on the page by the characters entered. The search scans the Name, Description, Last Updated, and Created By fields.
C. Name: Click the blue Name text to open the Engagement Letter Template in the editor tool.
D. Active: Set an Engagement Letter Template status to active or inactive. Active templates are available for selection within Company Defaults and are also available for use to with RFPs.
a. Click to change the Active/Inactive status.
b. When an Active/Inactive status switch is grayed out, it means that template is a set as a default in the Company Defaults tool and the status cannot be changed to inactive without first removing it as a default.
c. When a new Engagement Letter Template is created, its status is automatically set to inactive.
E. Actions: Click the Actions drop-down menu to expose three commands:
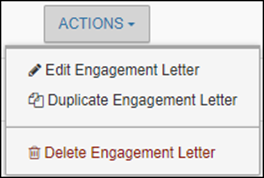
a. Edit Engagement Letter: Opens the Engagement Letter Template for editing.
b. Duplicate Engagement Letter: A new Engagement Template will open for editing. The template will be prepopulated with the format and settings from the Engagement Letter Template that was copied.
c. Delete Engagement Letter: Will delete the Engagement Letter Template. A confirmation modal will appear.
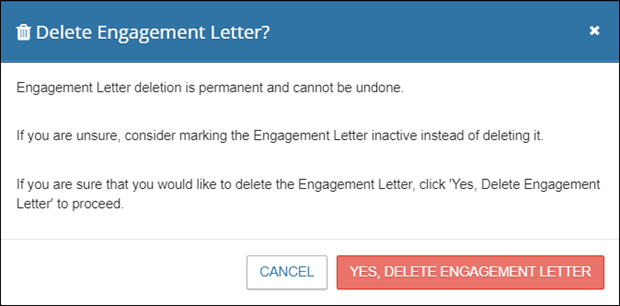
Click Yes, Delete Engagement Letter to permanently delete the template. Note that Engagement Letter Templates that are set as defaults cannot be deleted – the Delete Engagement Letter button will be grayed out.
Create a New Engagement Letter Template
Click Add New Engagement Letter to create a new Engagement Letter Template.

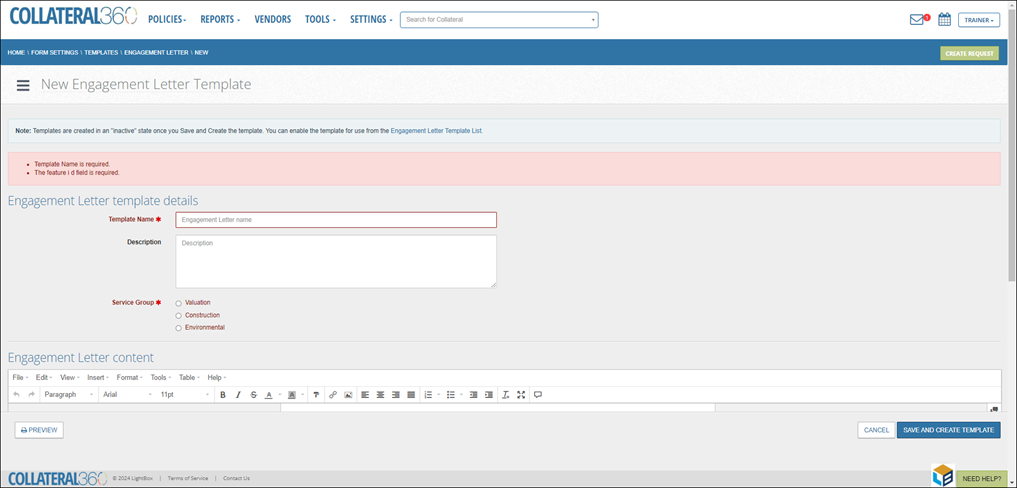
The New Engagement Letter Template page will open.
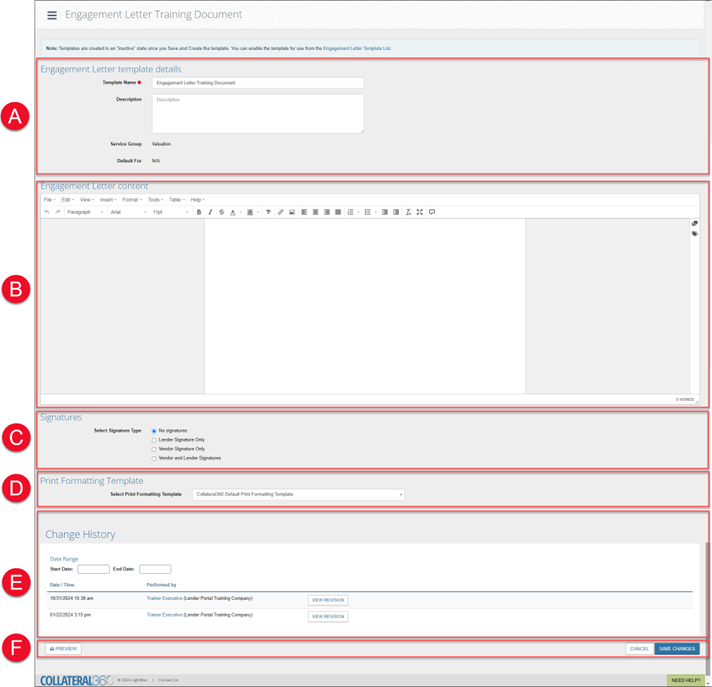
The page is broken up into four sections (from top to bottom):
A. Engagement Letter template details: This section includes the Template Name, Description, and Service Group.
B. Engagement Letter content: This is the body of the Engagement Letter Template. It includes the text, tables, questions, and more that will appear in the engagement letter that Job Managers and Lender Managers send to vendors.
C. Signatures: The Signatures section defines who, if anyone, is required to sign the Engagement Letter.
D. Print Formatting Template: Define the template
E. Change History: Logs all changes made to the Engagement Letter Template. Note It will not appear until you click Save and Create Template at the bottom of the page.
F. There are three additional buttons in a sticky footer: Preview, Cancel, and Save and Create Template.
Engagement Letter Template Details
The Engagement Letter Template Details section contains two text boxes and one radio-button selection list.
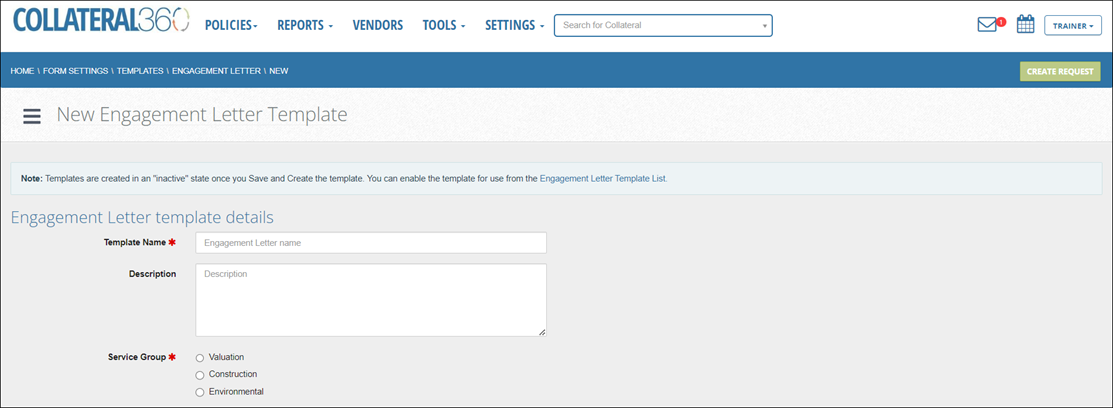
• Template Name: This is a required field. The Template Name must be unique; if the Template Name is a duplicate, you will be unable to save.
• Description: The Description field is not required. The field is limited to 255 characters.
• Service Group: This is required; you will be unable to save until a Service Group selection has been made. The selection made here defines which Service Types can use the Engagement Letter Template. For example, a Lender Manager/Job Manager will be unable to use an Engagement Letter Template in the Environmental Service Group for an Appraisal Report.
Engagement Letter Content
The Engagement Letter Content section contains the body of the Engagement Letter Template itself.

It includes the following important functionality:
Variables: Variables can be inserted in the Engagement Letter Template. A Variable will dynamically display the relevant value for that Variable. For example, the “Property name” Variable will display the Property Name of the Property for that Job.
Comments: Comments can be added to an Engagement Letter for other users to see. They are a tool for communicating internally with other Lender Executive/Content Administrator users about the Engagement Letter Template.
Toolbar: The top toolbar includes the File, Edit, View, Insert, Format, Tools, Table, and Help menus.
Lower Toolbar: The Lower Toolbar includes buttons for defining fonts, aligning text, inserting images, and more.
Tables: Tables can be inserted via the Insert button on the Toolbar and via the Table button on the Toolbar.
Forms: Forms can be added to the document via the Insert button on the Toolbar. The following types of forms are supported:
Checkbox
Drop Down List
Radio Button
Textbox
Textarea
Variables
Variables appear as yellow fields in the Engagement Letter Template.

In the example above, Broker Name, Address, Delivery Date, and Delivery Method are Variables.
When an Engagement Letter is being completed by a Lender Manager, each Variable will populate the relevant, Job-specific information for that Variable type. For example, the Variable in the Copies To cell in the screenshot above is Requester. When the Lender Manager is completing the Engagement Letter, that Variable will be populated with that Job’s Requester’s name.
Note: When an Engagement Letter is being completed for a Portfolio Project, site-specific Variables will state ‘N/A,’ rather than be populated with values from the Primary site.
Variables can be inserted by clicking the tag symbol in the upper right-hand corner of the document.

Click on a Variable header, such as Collateral Information or Service Information, to expose the Variables nested beneath it. Click on a Variable to insert it in the Engagement Letter Template in the current location of the cursor.
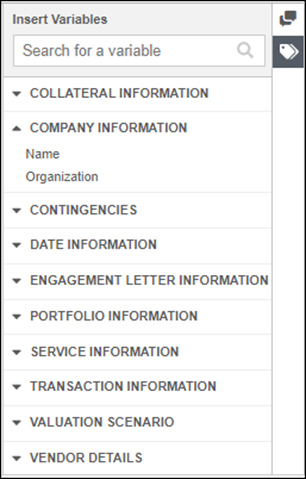
The appearance of some Variables can be modified. The appearance options available are based on the type of Variable – text or numerical.
Click on a Variable and then click the gear symbol to open a modal.
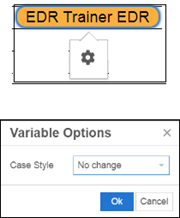
Text Variables have the following four options:
No change (Maintains the existing formatting from the source, such as the SRF or RFP)
All uppercase
Capitalize first word
Title style
Numerical Variables have the following eight options:
$1,234 (currency symbol and thousands separator)
$1234 (currency symbol and no thousands separator)
$1234.00 (currency symbol and two decimal points)
$1,234.00 (currency symbol, thousands separator, and two decimal points)
1234 (no currency symbol, thousands separator, or decimal points)
1,234 (thousands separator)
1234.00 (two decimal points)
1,234.00 (thousands separator and two decimal points)
Any change made to a Variable’s options will be applied solely to the current Engagement Letter Template.
Comments
Comments can be inserted in the body of an Engagement Letter Template. These Comments allow you to communicate with other users who can view the Engagement Letter Template or use the template to complete an Engagement Letter.
To insert a Comment, click the Comment bubble icon in the upper right-hand corner of the Engagement Letter Template document.

The Comment interface will open in the right-hand side of the screen.
When the Comment interface has been opened, existing Comments will be represented in the body of the document by blue highlighting.

Click on a highlighted section to open the comment in the Comment interface on the right.

The original Comment can be responded to by entering text in the text box below the original Comment and then clicking Save.
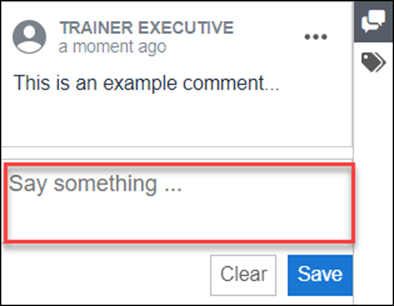
Once the Comment response has been saved, it will then appear beneath the original Comment whenever the Comment bubble is clicked in the document.
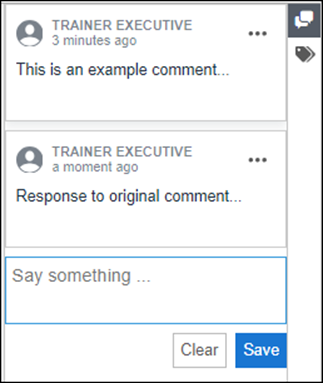
A Comment you have posted can be edited or deleted. Click on the three dots in the upper right-hand corner of the Comment to expose a menu with two options:
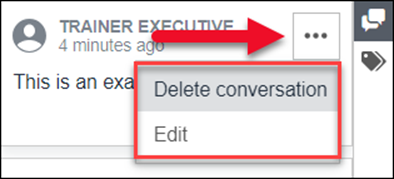
Delete conversation OR Delete: One of two button labels will be listed.
If there is a single Comment, or if attempting to delete the first Comment in a multi-Comment thread, the button will read ‘Delete conversation.’ Note that deleting the first Comment in a multi-Comment thread will delete all Comments in the thread, including those made by other users.
If clicking on a secondary, tertiary (etc.) comment, the button will be labelled ‘Delete.’
Edit: Opens the Comment for editing. Click Save to save the changes after editing or click Cancel to discard the changes.
To insert a Comment, click a location in the template, or highlight text or an image. Then, click the Comments icon to open the Comments interface.
Enter the desired text, then click Save. The Comment will be inserted at the location selected/on the text or image highlighted.
There are two additional methods for inserting a Comment:

A. Click the Insert button in the toolbar at the top of the document, then click Add Comment. The Comments interface will open.
B. Click the Comment icon in the toolbar at the top of the document. The Comments interface will open.
Toolbar
There’s an extensive suite of tools for working with the Engagement Letter Template.

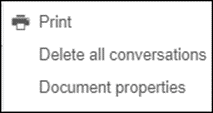
1. | File Print: Opens a printable version of the document. Delete all conversations: This deletes all Comments that have been added to the template. Document properties: View/edit document properties, such as the title, description, and author. |
|
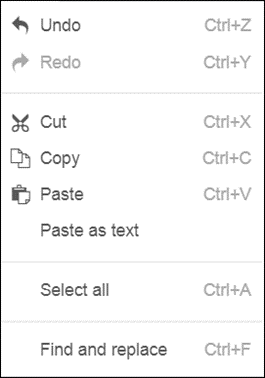
2. | Edit Undo: Undoes the last change made to the document. Redo: Reverses the action of the last Undo. Cut: Cuts the currently selected text or Variable in the template. Copy: Copies the currently selected text or Variable in the template. Paste: Pastes text or a Variable that has been cut or copied from within the Engagement Letter Template. Paste as text: Pastes text without formatting. Select all: Selects all text, images, and Variables within the template. Find and replace: Opens a modal that allows the user to find a word or phrase within the template. Optionally, the user can enter a word or phrase to replace one or more instances of the original, searched for word or phrase. |
|
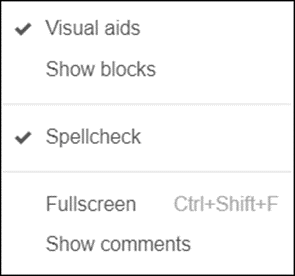
3. | View Visual aids: Shows/hides the outline around sections within the Engagement Letter document. Show blocks: Shows/hides the CSS elements that define the layout of the Engagement Letter document. Spellcheck: Turns spellcheck on/off. Fullscreen: Displays the template in full-screen mode. This will hide everything but the template itself, the toolbar at the top of the screen, and Variables and Comments. Show comments: Opens the Comment menu on the right and also show where Comments have been added to the template. |
|
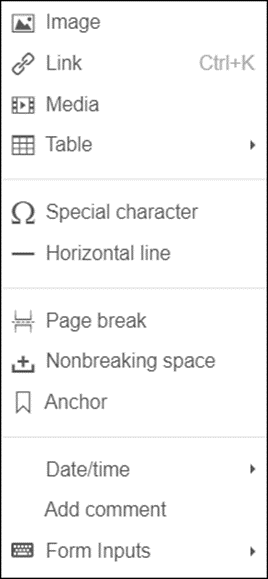
4. | Insert Image: Opens a modal that allows the user to upload or link to an image, apply a description, and define its dimensions. The image will be inserted wherever the cursor was placed when Insert>Image was clicked. Link: Opens a modal that allows the user to insert a link in the template. Before inserting a link, highlight text or an image. If no text or image is highlighted, the link will not be visible or clickable. Media: Opens a modal that allows the user to link to or embed a video. Table: Opens a secondary menu which allows the user to select a number of cells and then insert a table of that size. Special character: Opens a modal that allows the user to insert a special character. Horizontal line: Inserts a horizontal line at the current location of the cursor within the template. Page break: Inserts a page break at the current location of the cursor within the template. Nonbreaking space: Inserts a nonbreaking space at the current location of the cursor within the template. Anchor: Open a modal that allows the user to insert an anchor at the current location of the cursor within the Engagement Letter Template. Date/time: Exposes a menu with four options for inserting the date and time at the current location of the cursor within the template. Add comment: Inserts a Comment at the current location of the cursor within the template. Upon clicking the Add comment button, a new Comment text box is opened in the Comments menu on the right-hand side of the screen. Enter the Comment text and then click Save to add the Comment. Form inputs: Exposes a menu with buttons for inserting five different types of form input:
|
|
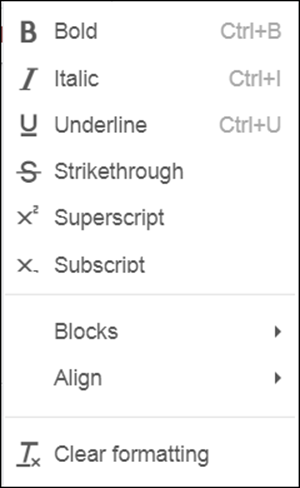
5. | Format Bold: Applies bold formatting to selected text. Italic: Applies italic formatting to selected text. Underline: Applies underline formatting to selected text. Strikethrough: Applies strikethrough formatting to selected text. Superscript: Applies superscript formatting to selected text. Subscript: Applies subscript formatting to selected text. Blocks: Exposes a menu with options for formatting selected text. Options include headers, paragraph, and preformatted. Align: Exposes a menu with options for formatting selected text. Options include left, center, right, and justify. Clear formatting: Clears any formatting on the selected text. |
|
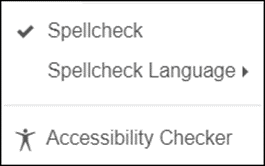
6. | Tools Spellcheck: Enables/disables the spellcheck tool. Spellcheck Language: Selects the language that the spellcheck tool should use. Accessibility Checker: Checks the HTML of the template to ensure it complies with Web Content Accessibility Guidelines.
|
|
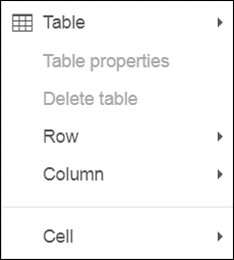
7. | Table Table: Opens a secondary menu which allows the user to select a number of cells and then insert a table of that size. Table Properties: Opens a modal that allows the user to define table properties, such as width, height, border, and alignment. Delete Table: Deletes the table in which the cursor is currently located in the Engagement Letter Template. Row: Allows the user to insert, delete, cut, copy, and paste rows. Also allows the user to define the properties of the row that is currently selected. Column: Allows the user to insert or delete a column. Cell: Allows the user to split and merge cells. Also allows the user to define cell properties and wrap styling. |
|
8. | Help Help: Opens a modal that lists shortcut keys for common actions. |
|
Lower Toolbar
The Lower Toolbar includes buttons for formatting text, inserting images, adding Comments, and more.

From left to right:
Undo: Undoes the last change made to the document. |
|
Redo: Reverses the action of the last Undo. |
|
Text Formatting: Applies formatting to selected text and/or type new text in the chosen format. Options include paragraph, headings 1 – 6, and preformatted. |
|
Font Family: Applies a font type to selected text and/or type new text in the chosen font family. |
|
Font Sizes: Applies a font size to selected text and/or type new text in the chosen font size. |
|
Bold: Applies bold formatting to selected text and/or type new text in with bold formatting applied. |
|
Italic: Applies bold formatting to selected text and/or type new text with italic formatting applied. |
|
Strikethrough: Applies bold formatting to selected text and/or type new text with italic formatting applied. |
|
Text color: Applies a color to selected text and/or type new text in the color chosen.
|
|
Background color: Applies a background color to selected text and/or type new text with the background color applied. |
|
Format Painter: Allows the user to apply the formatting of one block of text to another block of text. Select text with the desired formatting, click the Format Painter button, then select text to apply the formatting to. |
|
Insert/edit link: Opens a modal that allows the user to insert a link in the Engagement Letter document. Before inserting a link, highlight text or an image. If no text or image is highlighted, the link will not be visible or clickable. |
|
Insert/edit image: Opens a modal that allows the user to upload or link to an image, apply a description, and define its dimensions. The image will be inserted wherever the cursor was placed when Insert>Image was clicked. |
|
Align left: Left-aligns a block of text. |
|
Align center: Center-aligns a block of text. |
|
Align right: Right-aligns a block of text. |
|
Justify: Justifies a block of text. |
|
Numbered list: Formats selected text as a numbered list. If no text is selected, it will start a new numbered list. |
|
Bullet list: Formats selected text as a bulleted list. If no text is selected, it will start a new bulleted list. |
|
Decrease indent: Decreases the indent of a block of text. |
|
Increase indent: Increases the indent of a block of text. |
|
Clear formatting: Clears the formatting of a block of text. |
|
Fullscreen: Expands the Engagement Letter document into full-screen mode. |
|
Add comment: Add Comment: Inserts a Comment at the current location of the cursor within the Engagement Letter Template. Upon clicking the Add comment button, a new Comment text box is opened in the Comments menu on the right-hand side of the screen. Enter the Comment text and then click Save to add the Comment. |
|
Tables
Click within a table in the template to expose a menu of table options.
![]()
| Table Properties: Opens a modal that allows the user to define table properties, such as width, height, border, and alignment. |
| Delete table: Deletes the table in which the cursor is currently placed. |
| Insert row before: Inserts a row above the row in which the cursor is currently placed. |
| Insert row after: Inserts a row below the row in which the cursor is currently placed. |
| Delete row: Deletes the row in which the cursor is currently placed. |
| Insert column before: Inserts a column to the left of the column in which the cursor is currently placed. |
| Insert column after: Inserts a column to the right of the column in which the cursor is currently placed. |
| Delete column: Deletes the column in which the cursor is currently placed. |
Forms
There are five types of form input that can be added to an Engagement Letter Template:
Checkbox
Drop Down List
Radio Button
Textbox
Textarea
Checkbox
While checkboxes can be inserted anywhere, creating a table, and then adding the checkboxes to the table will create a more organized Engagement Letter Template.
Click the Insert button in the toolbar.

Place the cursor on the Table button, then drag the cursor in the table submenu to create a table of the desired size.
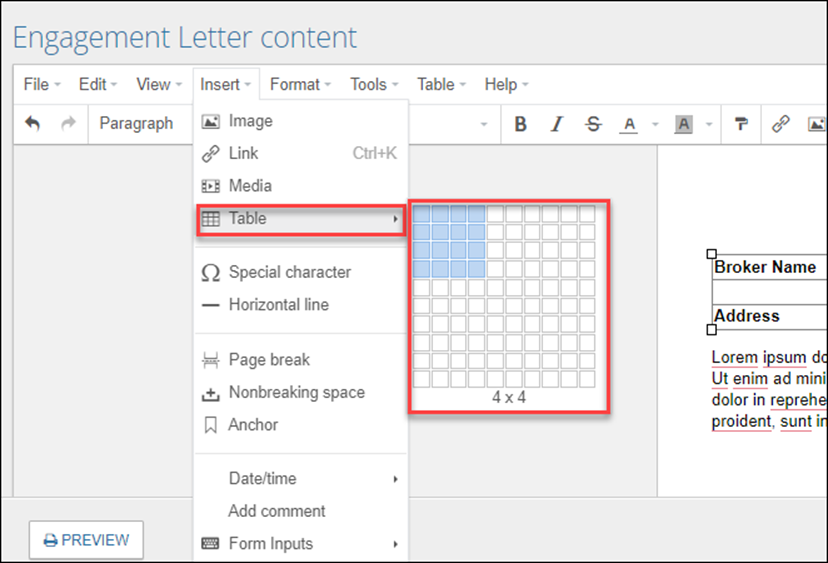
Highlight the cells in which you’d like to place checkboxes.

In this example, three of the four columns in the table have been selected.
Click the Insert button.

Highlight the Form Inputs button, then click the Checkbox button.
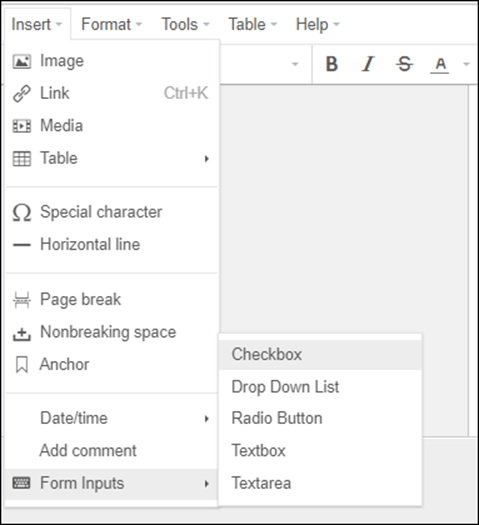
A pop-up message will ask if you want the checkboxes to be mutually exclusively.
a. Yes: Only one checkbox in each row can be checked. Checking a second checkbox will uncheck the first checkbox.
b. No: Multiple checkboxes in a single row can be checked concurrently.
The checkboxes will be added to the table.

Drop Down List
Click the Insert button in the toolbar.

2.Highlight the Form Inputs button, then click the Drop Down List button.
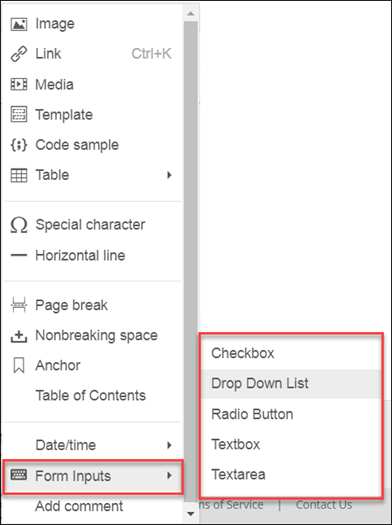
The Drop Down List modal will open. Enter the items you would like in the drop-down menu, with a line in between each item. Then click OK.
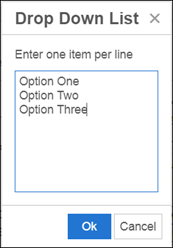
4.The drop-down menu will be added to the Engagement Letter Template.
Radio Button
While radio buttons can be inserted anywhere, creating a table and then adding the radio buttons to the table will create a more organized Engagement Letter Template.
1. Click the Insert button in the toolbar.

2. Place the cursor on the Table button, then drag the cursor in the table submenu to create a table of the desired size.
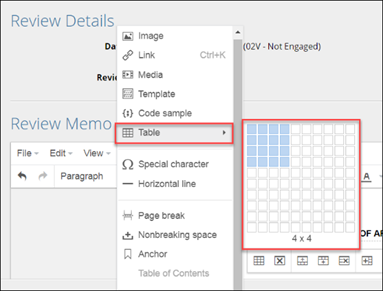
3. Highlight the cells in which you’d like to place radio buttons.

In this example, three of the four columns in the table have been selected.
4. Click the Insert button.

5. Highlight the Form Inputs button, then click the Radio Button button.
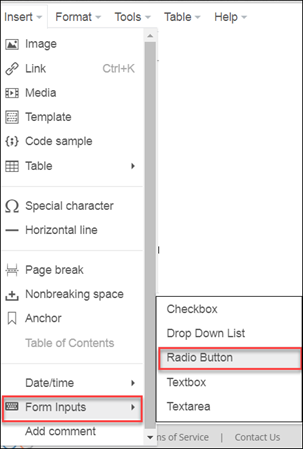
6. A pop-up message will ask if you want the radio buttons to be mutually exclusively.
a. Yes: Only one radio button in each row can be checked. Checking a second radio button will uncheck the first radio button.
b. No: Multiple radio buttons in a single row can be checked concurrently.
7.The checkboxes will be added to the table.

Textbox
The textbox form type is a text-entry field that allows the user to enter up to 50 characters. Note that Variables cannot be placed in textboxes.
1. Click the Insert button in the toolbar.

2. Highlight the Form Inputs button, then click the Textbox button.
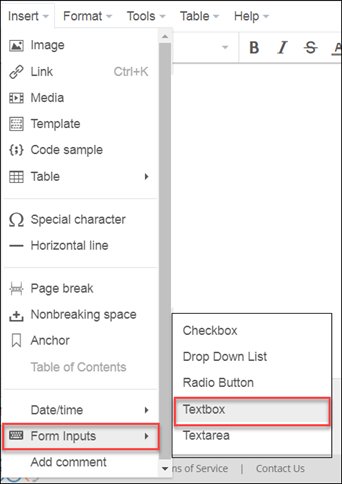
3. The textbox will be placed in the template.
![]()
Textarea
The textarea form type is a text-entry field. Unlike the textbox field, the textarea field does not have a character limit. Note that Variables cannot be placed in text areas.
1. Click the Insert button in the toolbar.

2. Highlight the Form Inputs button, then click the Textarea button.
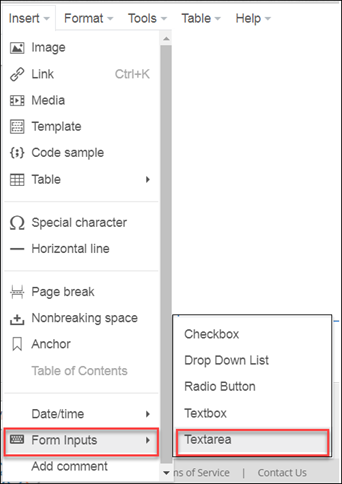
3. The textarea field will be placed in the template.
![]()
Signatures
Click to define who will be required to sign the Engagement Letter. The default is “No Signatures.”

Print Formatting Templates
The Print Formatting Template defines how the Engagement Letter will be displayed in PDF format, defining such things as margins and whether the company logo appears. Click the drop-down menu and select the desired template. 
Change History
The Change History logs all changes made to the Engagement Letter Template. It will not appear until you click Save and Create Template, at which point it will appear at the bottom of Template Editor with an entry listing the creation date and time and the user who created the template (or made the change).

Click in the Start Date and End Date fields to filter the Change History entries by a specific date range. Dates can be entered manually (Format: 00/00/0000) or by clicking in the box and then selecting a date in the calendar modal.
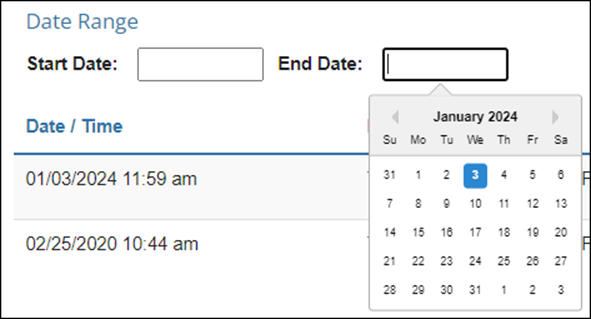
When a change is made to a template and the Save Changes button is clicked, a new entry is created in the Change History. Entries are arranged from newest to oldest, with the current version of the template at the top.
To see a previous version of the template, click View Revision.

The Revision history modal will open.
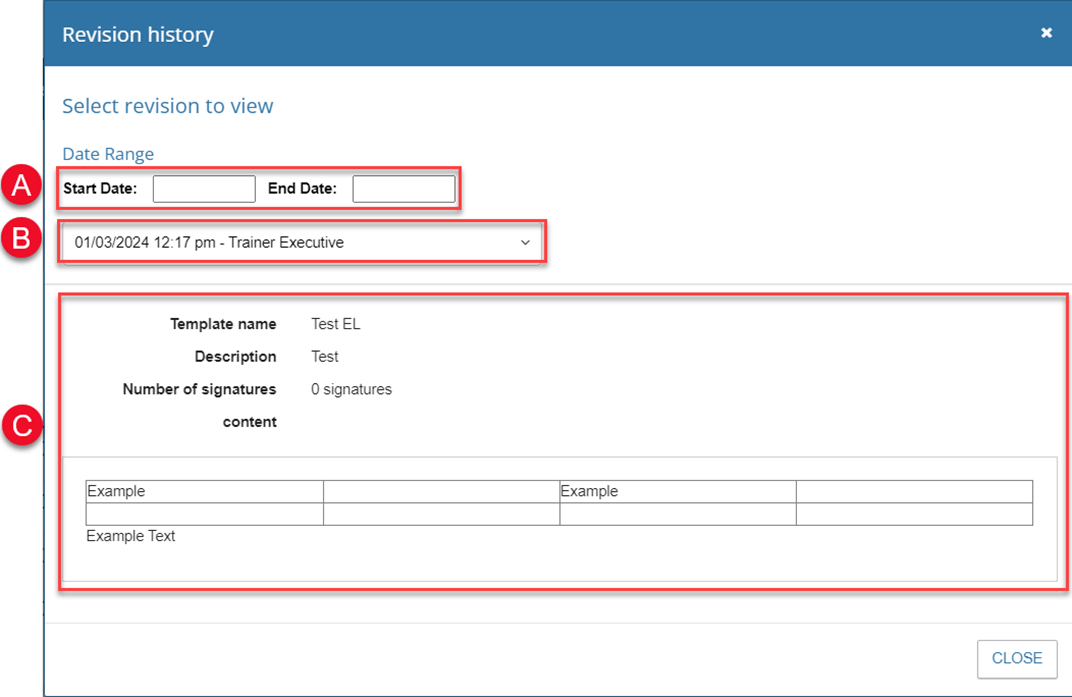
A. Filter the available revision items in B by a specific date range.
B. Select a revision entry from the drop-down menu to display that revision snapshot.
C. View the Engagement Letter Template at the time of the snapshot. This includes Template Name, Description, Number of Signatures, and the body of the template.
Sticky Footer
The sticky footer contains three buttons.

Preview: Click to open a modal that allows you to select a Print Formatting Template.
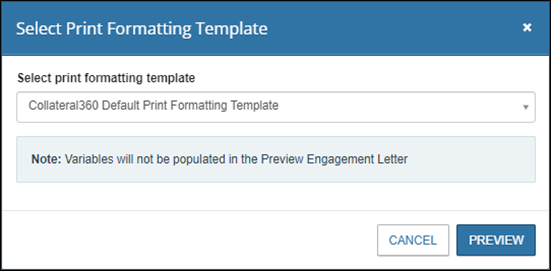
Select a Print Formatting Template from the drop-down menu then click Preview.
A pop-up will appear to the right of the modal and state that the PDF is loading.

Once it has finished loading, a PDF version of the Engagement Letter Template will open in a new browser tab.
Cancel: Click to discard the Engagement Letter Template and return to the Engagement Letter Templates page. Note that you will NOT be prompted for confirmation.
Save and Create Template: Click to save the new Engagement Letter Template and close the page. If any required fields have not been completed, a warning will appear at the top of the screen; you will be unable to save until the required fields have been completed.
.png)



.png)