- Print
- DarkLight
- PDF
Dashboard
- Print
- DarkLight
- PDF
Purpose
This documentation describes how to navigate the Collateral360 dashboard.
Audience
Lender Users, Account Officers, Lender Managers, Job Managers, Lender Executives, and Content Administrators.
Video
View a video of this feature and its workflows here.
Dashboard Overview
The dashboard is the first screen displayed when you log into Collateral360.

Click on an item below to navigate to the documentation covering that topic.
A. Dashboard table: Lists pieces of collateral and the services associated with them.
B. Tabs: Display collateral and service information organized by status and relationship to the user.
C. Settings: Show/hide information in the table.
D. Filters: Filter the table by one or more criteria.
E. Search: Search for a piece of collateral.
F. Page Navigation: Define the number of service rows displayed on each page and navigate between pages.
Dashboard Table
The dashboard table displays the collateral and associated services for the dashboard tab you are currently on.

A. Each collateral address is represented by a blue row.
B. The services requested for a piece of collateral are displayed beneath it. In the example below, three services are associated with the 900 E Hamilton Ave address.

C. By default, services are displayed beneath each collateral address. To display the collateral address bars only, click Collapse all groups.
 Click Expand all groups to expand each group, displaying the nested services.
D. Click the magnifying glass icon next to a service to navigate to the Collateral Overview page for the piece of collateral it is associated with. Note that the user can also double click on any row on the dashboard to open the file.

The columns in the dashboard table can be moved. Click and hold a column header, drag it to the desired location in the dashboard table, then release the mouse button. Click on the Settings button and then click Save table state to retain the view.

Tabs
The dashboard tabs categorize the collateral and service requests by status and relationship to the logged-in user. The specific tabs displayed are based on your role.
Lender Managers, Job Managers, Content Admins and Lender Executives see the following: 
• My Tasks (displays work that has been assigned to you)
• Open
• Closed
• Upcoming Due Dates
• Open Bids
• Awarded Bids
• Accepted Awards
• Draft Service Request (service requests that are in a draft state for your entire organization)
Lender Users and Account Officers see the following: 
• Open
• Closed
• Upcoming Due Dates
• Draft Service Request
Settings
Click Settings above the dashboard table to expose four menu commands.
 • Show/hide columns: Click to open the Edit column settings modal. Check/uncheck the boxes to show/hide columns in the current tab, then click Save Tab Settings to apply the changes. Click Close to close the modal.

• Freeze/Unfreeze table headers: By default, the column headers will remain visible at the top of the page when scrolling down the page. Click the Unfreeze table headers button to disable this feature; click the Freeze table headers button to enable it.
• Save table state: Click to save the settings for the tab you are currently on, including: the columns displayed and their location in the dashboard table; frozen/unfrozen table headers; the number of service rows displayed. Filter settings are not saved. The saved table state will persist after you have logged out.
• Clear saved settings: Click to delete the saved table state settings.
Filters
Filters allow you to limit the results displayed in the dashboard table by one or more criteria. Note that filters only limit the dashboard results and are not analogous to a search tool. Refer to Search for information about the Search for Collateral tool.

There are three types of filters:

• Textbox: Enter alphanumeric characters to filter the dashboard results by those characters. 
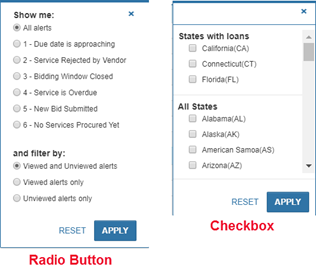
• Drop-down menu: Click to expose a menu containing checkboxes or radio buttons.
 Check boxes allow you to select multiple items. Radio buttons allow a single selection. After making your selection(s), click Apply to apply the filter. Click Reset to clear all selections.
• Date filter: Click in the blank field to expose calendar and then select a date. Click to expose a menu and select one of three commands:

The dashboard can also be sorted. Click on the gray arrow icons at the top of a column to sort the table in ascending or descending alphabetical or numerical order.
Filter selections and sorting are only applied to the current tab. Changes made will persist until you log out of Collateral360.
Search
The Search for Collateral bar is located above the dashboard.

You can search all open and closed jobs in the system using the following search criteria:
• Collateral address (Street address, City, State & Zip Code)
• Borrower’s name (First or Last)
• Job number
• Project name
• Date of creation
Note that the search query logic is based on a ‘Contains’ approach, meaning that you do not need to search for the exact keyword.
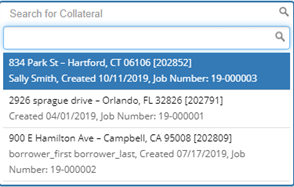
The Search for Collateral bar has type-ahead functionality, which will display results as you are typing. Click on a result to navigate to the Collateral Overview page for that project.

The Search for Collateral bar also displays recently viewed requests. 
Page Navigation
The number of service rows displayed on the current tab is controlled by menus in the upper and lower right-hand corners.

Page navigation controls are in the bottom right-hand corner of the dashboard. Click Previous, Next, or a page number button to navigate to that page.

.png)

.png)