- Print
- DarkLight
- PDF
Creating and Managing RFP Vendor Filter Rules
- Print
- DarkLight
- PDF
Purpose
This documentation describes how to create and manage RFP Vendor Filter Rules.
Audience
Content Administrators and Lender Executives.
Creating and Managing RFP Vendor Filter Rules
RFP Vendor Filter Rules allow an organization to define what filters appear by default in the Vendor Selection section of RFPs. The Vendor Filters are criteria applied to the Vendor Selection table, limiting the Vendors that appear.
The user completing an RFP can add, remove, and edit filters.
To access RFP Vendor Filter Rules, click on Settings and then click on Platform Settings in the dropdown menu.

On the Platform Settings page, click RFP Vendor Filter Rules.

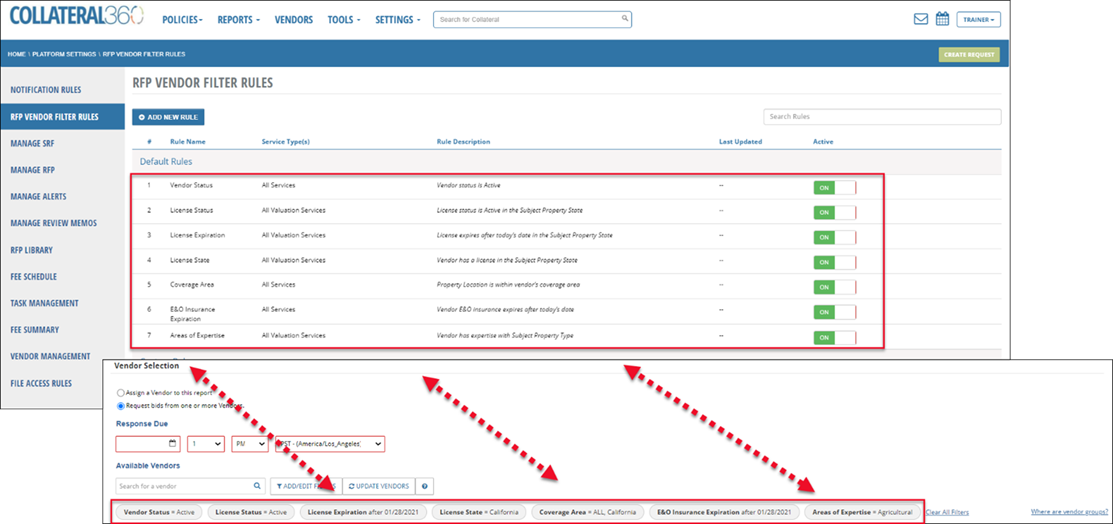
The RFP Vendor Filter Rules page will open. All organizations begin with seven Default Rules, which appear on every RFP of the defined Service Type(s).

The example above includes the seven Default Rules above and the filters those Rules trigger on a Commercial Appraisal Report RFP below. Note: If this were a Phase I ESA RFP instead, only three of the seven Default Rules would trigger; four would not trigger, as they are limited to all Valuation Services and therefore would not appear on the RFP for an Environmental Service.
A Rule can be activated/deactivated by clicking the On/Off toggle. In the example below, the bottom Default Rule – Area of Expertise – is deactivated.

To create a Custom Rule, click Add New Rule.

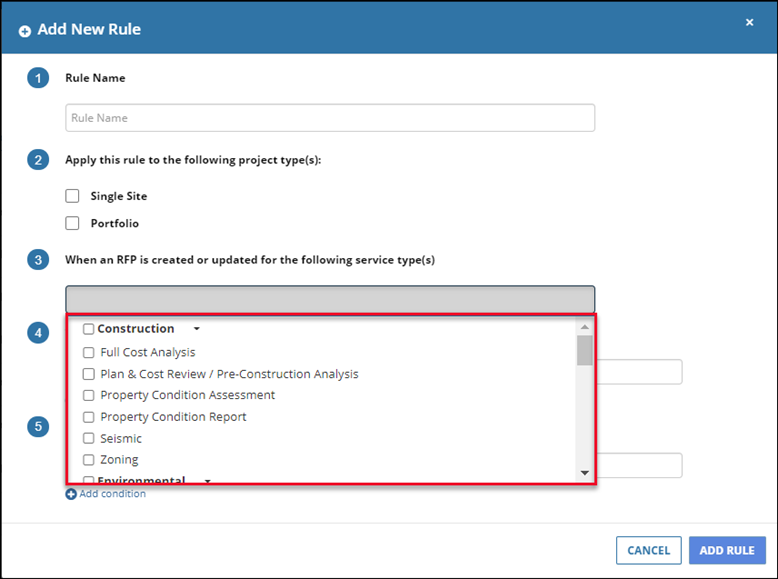
The Add New Rule model opens.

Enter a descriptive name for the new Custom Rule.
Select whether to apply the new Rule to Single Site RFPs, Portfolio RFPs, or both. Note: This question only appears if your organization uses the Portfolio Management feature.
Click in the When an RFP is created or updated for the following service type(s) box to expose a menu of available Service Types, sorted by Service Group. Select one or more Service Types on which the newly defined filter should appear.

Add one or more conditions to define the circumstances under which the Rule can be triggered. This determines when the filter appears on an RFP by default, but it does not define the filter itself – that is defined in step 5.

Select whether all conditions defined below must be met for the rule to be applied or a minimum of one.
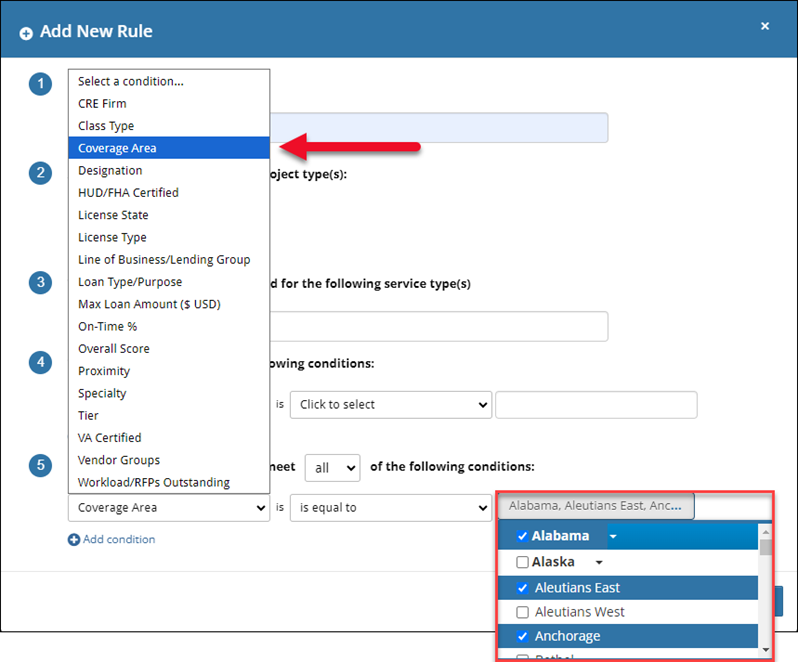
Select a condition from the drop-down list. This list is dynamic - it is derived from the fields your organization has active on its SRF and RFP. The field labels will mirror the labels used by your organization.
Choose a qualifier (e.g., “is equal to,” “greater than,” etc.). The condition selected determines what qualifiers are available. For example, when the “Loan Amount” condition is selected, the full list of qualifiers is available. When the “Property Type” condition is selected, only the “is equal to” and “is not equal to” qualifiers are available.
Enter a value or make selection(s) from the drop-down menu. The type of input required and the selections available, if a drop-down menu is present, are determined by the condition selected.
Click to add a new, blank condition row. Proceed through the steps outlined above. When a second condition has been added, the ability to delete a condition becomes available. Click the red minus icon to the right of a condition row to delete that condition.
Define the filter criteria. 
A. Select whether available Vendors must meet all or only a minimum of one of the conditions defined below.
B. Select a condition from the drop-down list. This list is dynamic - it is derived from the fields your organization has active on Vendor profiles.
C. Choose a qualifier (e.g., “is equal to,” “greater than,” etc.). The condition selected determines what qualifiers are available. For example, when the “Overall Score” condition is selected, the full list of qualifiers is available. When the “VA Certified” condition is selected, only the “is equals” qualifier is available.
D. Enter a value or make selection(s) from the drop-down menu. The type of input required, and the selections available, if a drop-down menu is present, are determined by the condition selected.
E. Click to add a new, blank condition row. Proceed through the steps outlined above. When a second condition has been added, the ability to delete a condition becomes available. Click the red minus icon to the right of a condition row to delete that condition.
If the Coverage Area condition is selected, an entire state can be selected, and/or individual counties within a state. To select an entire state, click the checkbox next to the state name. Click the arrow next to a state name to expose the list of counties within the state and select one or more counties individually.
In the example above, all counties in the state of Alabama have been selected, as well as the counties of Aleutians East and Anchorage within Alaska.
Refer to Custom Rule Example to see an example.
Click Add Rule to create the new Custom Rule. The modal will close and the new Custom Rule will be visible on the RFP Vendor Filter Rules page. The new Custom Rule will be active/on by default.

Custom Rules can be modified or deleted. Additionally, a change log is available. Click Actions to view the three commands:

Modify Rule: Opens the Custom Rule for editing.
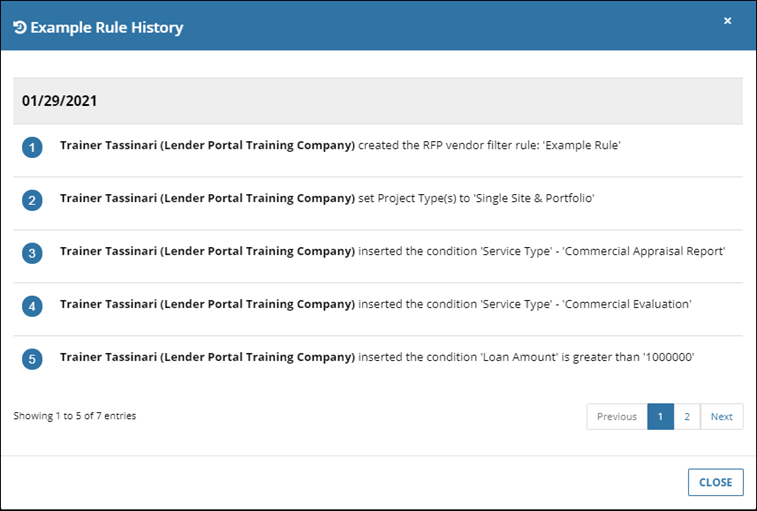
View Change History: Click to open a new Modal listing all changes made to the Custom Rule.

Delete Rule: Click to delete the Custom Rule. A pop-up will request confirmation.

Custom Rule Example

This Custom Rule, titled “Example Rule,” will apply to both Single Site and Portfolio RFPs for the Commercial Appraisal Report and Commercial Evaluation Service Types that meet the conditions outlined below. For the Rule to be triggered and the filter to appear, the RFP must have a Loan Amount greater than $1,000,000 and the Property Type must be Health Care. When those conditions are met, a filter will appear on the RFP. That filter will define that only Vendors with an Overall Score greater than or equal to “4” should appear in the Vendor Selection table.
.png)

.png)