Bid Authorization Process
- Print
- DarkLight
- PDF
Bid Authorization Process
- Print
- DarkLight
- PDF
Article summary
Did you find this summary helpful?
Thank you for your feedback!
Purpose
This documentation describes how to send bids to the requester for authorization then make an award.
Audience
Job Manager, Lender Manager, Content Administrator, Lender Executive.
Send Bids for Authorization
Once bids have been received from one or more Vendors, those bids can be sent to the requester for authorization. When a bid is received, you will receive an email notification. To view bids, click Report Status. 
On the Report Status page, click Actions for the Service whose bids you wish to view. Then click the View RFP Details command.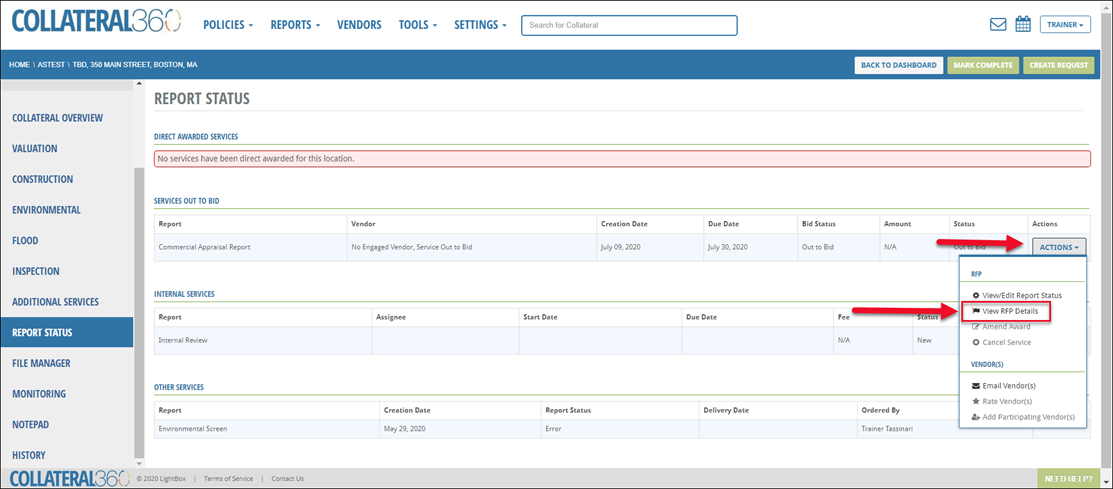
When the View Bids modal opens, scroll down to view the bids received.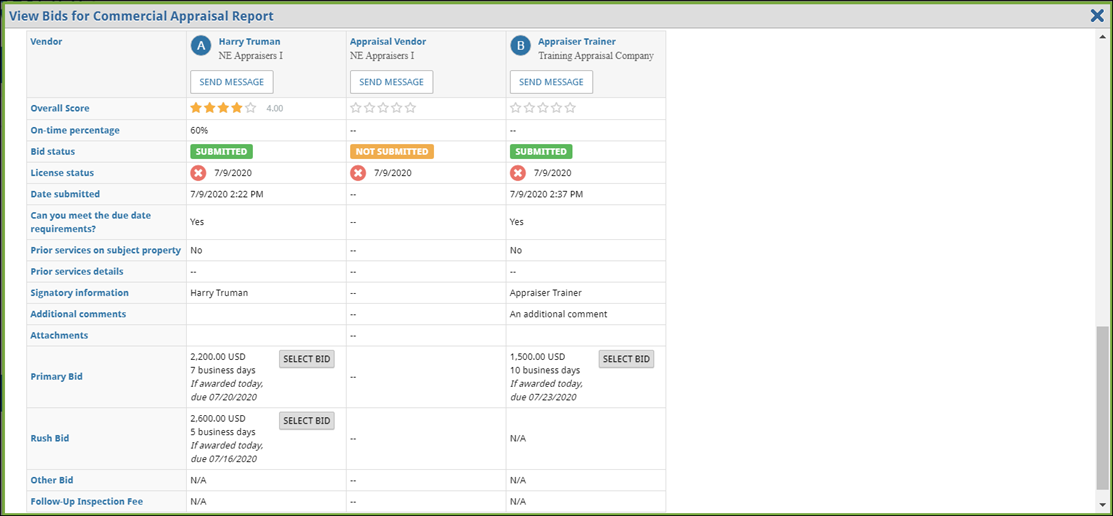
To send bids to the requester (typically Account Officer or Lender User) for approval, click Email Bid Summary.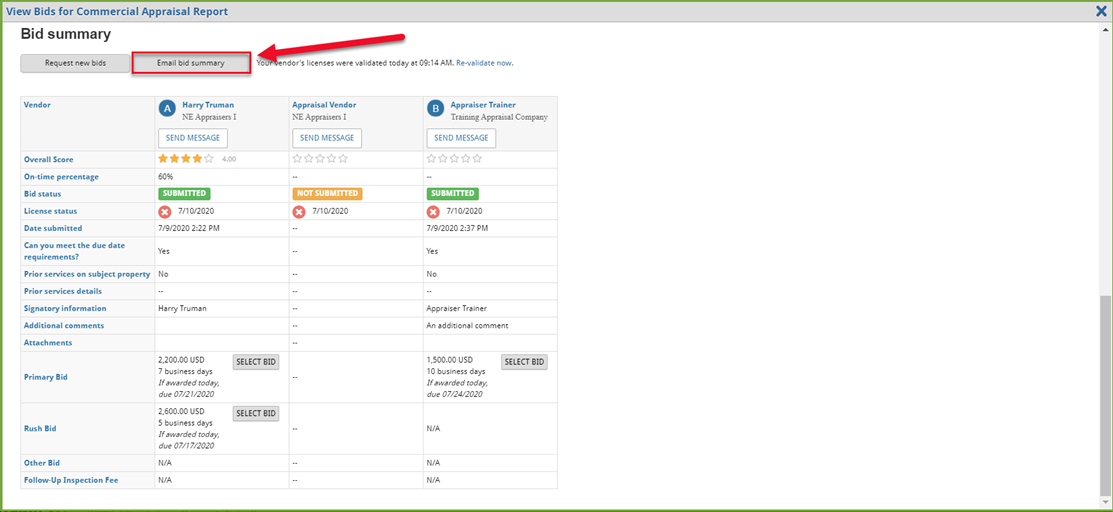
The Email Bid Summary modal will open.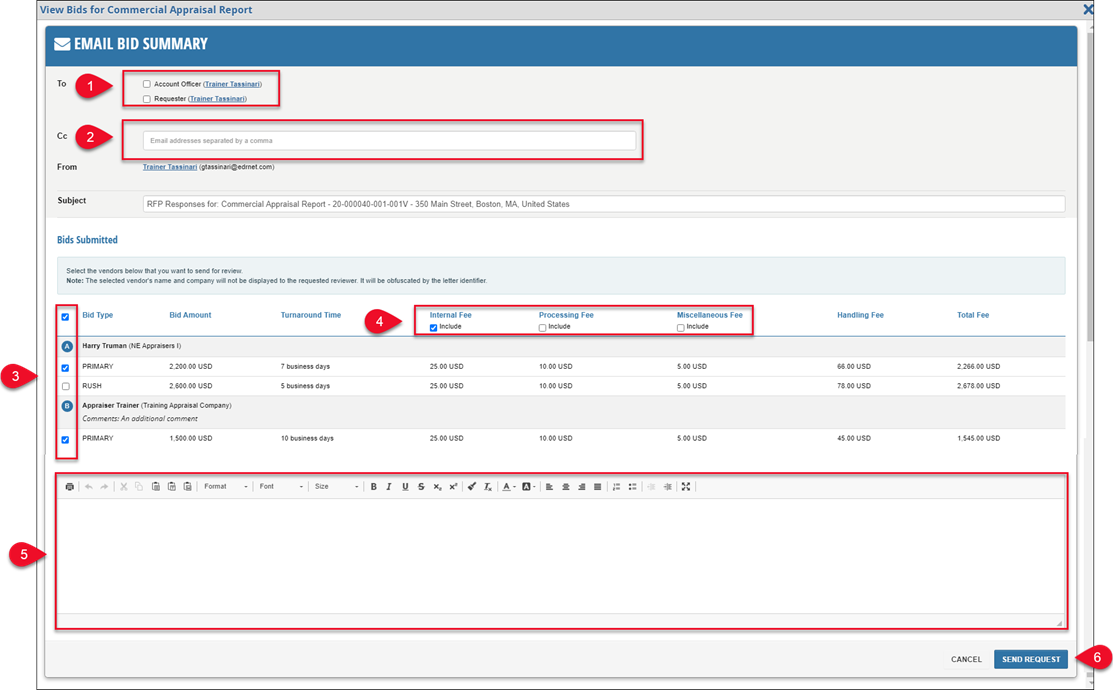
Select recipient(s).
Optionally, add additional recipients by entering their email address(es).
Select which bids to send by checking/unchecking the boxes. In the example above, three bids have been received from two Vendors; the primary bid from each Vendor will be included, but the rush bid is unchecked and will therefore not be included in the Bid Summary email.
Check/uncheck boxes to choose which fees to include in the email.
Optionally, enter a message for the recipient(s).
Click Send Request to send the Bid Summary email.
The requester(s) will receive an email listing the bids you have chosen to include. The Vendor's name will be hidden, but the requester(s) will see all other relevant information, such as bid, fees, and turnaround time. They will be able to authorize a bid or select that none are acceptable.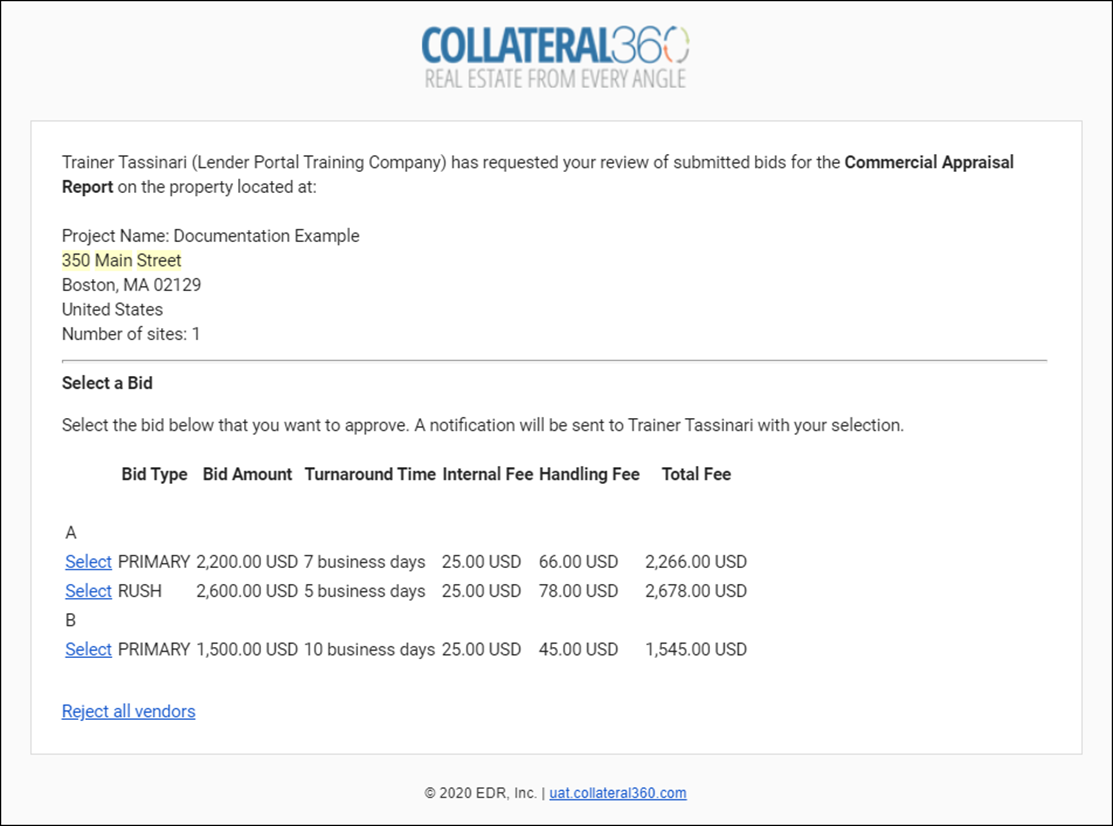
When the requester has authorized a bid, the Status of the Service will change from Out to Bid to Bid Authorized.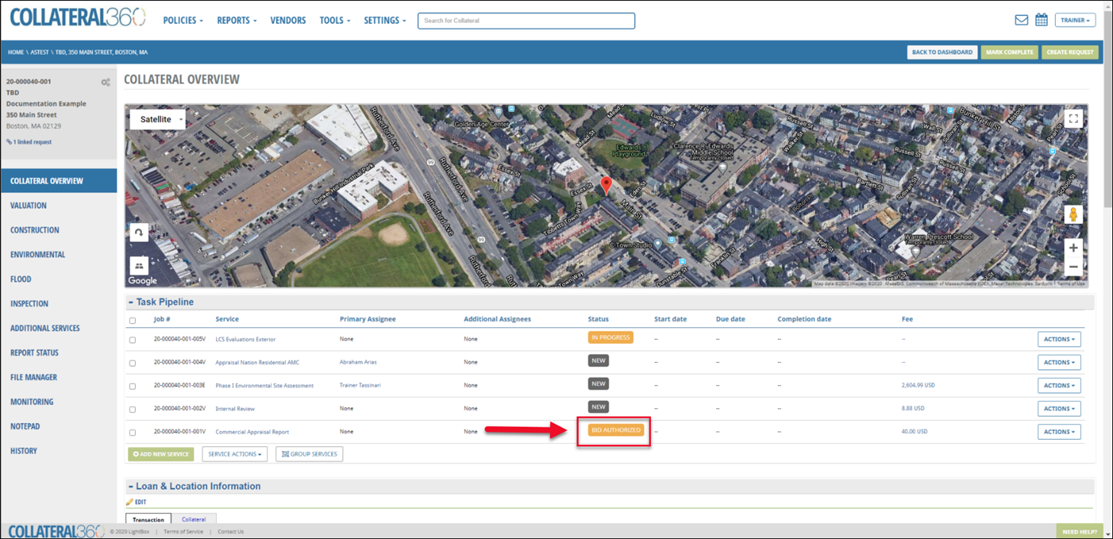
Click on the Report Status tab.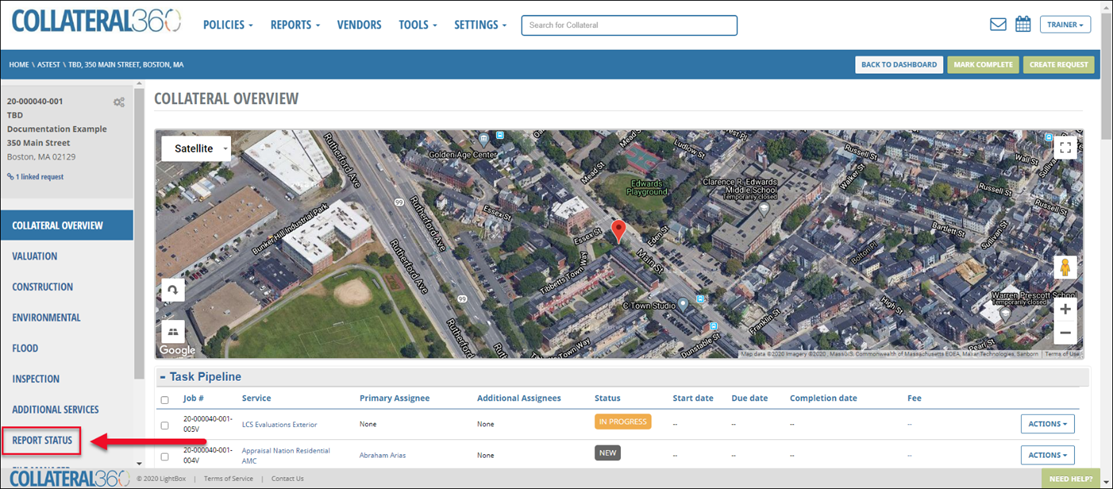
On the Report Status page, click Actions and then View RFP Details.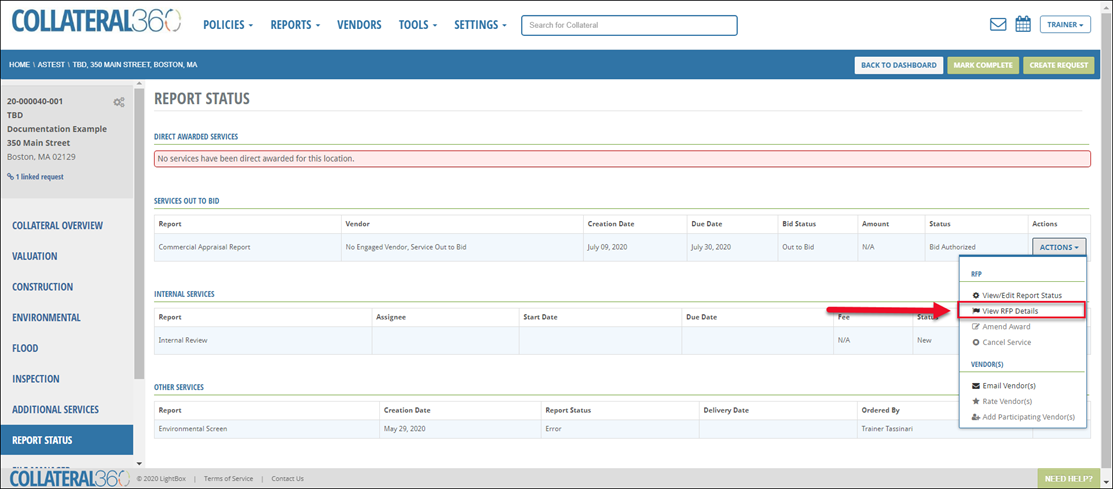
The authorized bid is highlighted green. Click Select Bid to select the bid.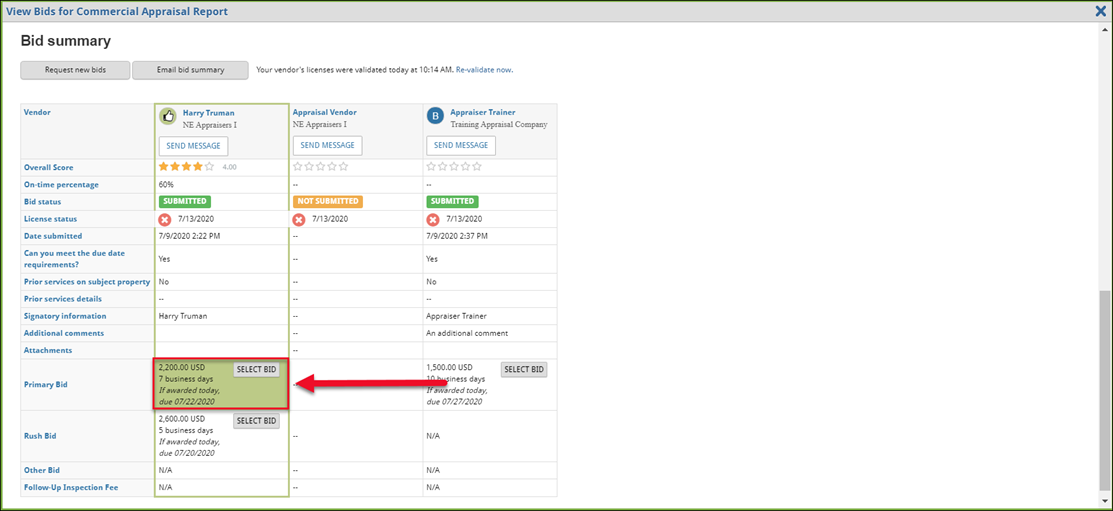
In the example above, the Primary Bid for the Harry Truman Vendor has been authorized. The Rush Bid has not been authorized.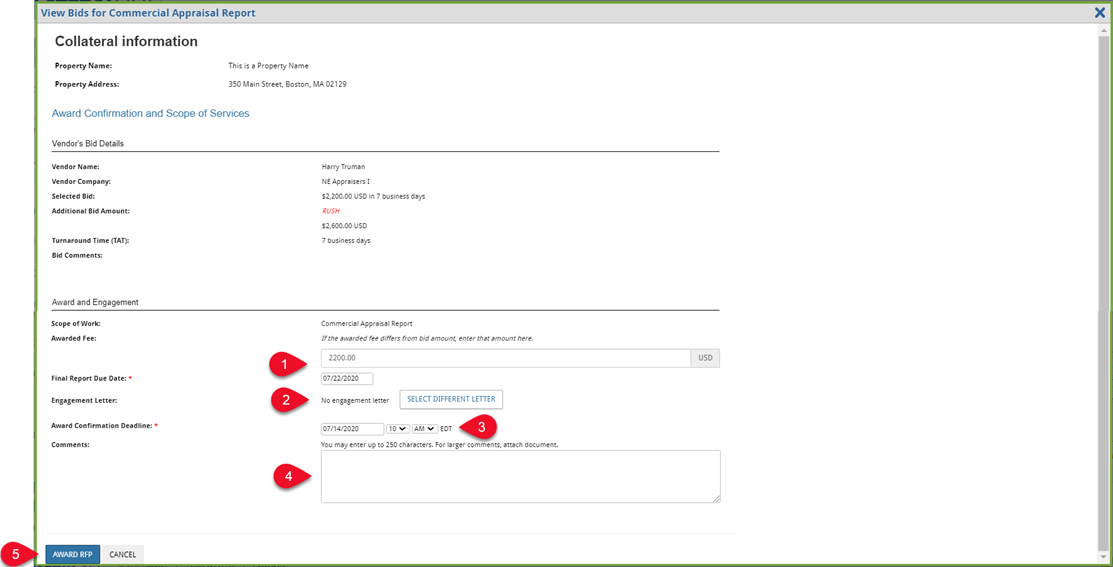
Verify the Awarded Fee and Final Report Due Date
Click Select Different Letter and select an Engagement Letter from the drop-down menu.
Verify the Award Confirmation Deadline.
Optionally, enter Comments for the Vendor.
Click Award RFP to make the award.
Engagement Letter Modal
Organizations have two options for utilizing Engagement Letters at the company level:
Auto-attach
Non-auto-attach
When auto-attach is enabled, the Engagement Letter is automatically included with every direct-award RFP, and every award made to a Vendor during the typical bidding and award process. The user does not see any Engagement Letter when submitting an award or direct award.
For non-auto-attach, the Job Manager or Lender Manager decides whether or not to attach the Engagement Letter.
If auto-attach is not enabled at the company level, and the Job Manager or Lender Manager has elected to attach an Engagement Letter, the Engagement Letter modal will open upon clicking Award RFP.
The Engagement Letter page includes the content defined in the Engagement Letter template used. Orange fields are variables. Variables are defined in the template, then populated with the data specific to that loan file and the Service being procured.

The Engagement Letter can be modified by typing directly in the Engagement Letter or using the commands in the toolbar.

Variables which do not have data from the loan file will display ‘N/A.’

Variables can be deleted by clicking on the Variable to select it and then clicking the delete key on your keyboard.
A new Variable can be inserted by clicking the location in the Engagement Letter in which you would like to place the Variable, then clicking the Variables icon on the right side of the editor panel.

Click the arrow next to a section to expose the Variables nested beneath it.

Click a Variable to insert it in the Engagement Letter at the location of the cursor.
In the example below, the Award Comments Variable has been inserted. When the Vendor views the Engagement Letter, this Variable will populate any Award Comments entered on the Direct-Award RFP.

For more information about editing the Engagement Letter, please refer to the Engagement Letter Builder documentation.
Engagement Letter templates can be configured to require no signature, Lender signature only, Vendor signature only, or both Lender and Vendor signatures. If a Lender Signature is required, click Sign Engagement Letter. Note: If no signature is required the Sign Engagement Letter button will not appear.

The Signatures tool will expand.

By default, the logged in user will sign as themselves. To sign on behalf of another user, click Edit Signature and then select a user from the dropdown menu.

Then click Update Signature.

On the Engagement Letter, both names will appear: the current signer and the user for whom they are signing.
Click the Wet Sign checkbox to leave the digital signature off the Engagement Letter. In its place, a line will appear, allowing the user to print and sign a physical copy. Note: This option is not available when Sign on Behalf has been selected.

Click Update Signature to apply the Wet Sign setting.
To remove a signature, such as when an incorrect Sign on Behalf user was selected, click Remove Signature. The Signatures tool will reset.

Note: If another user removes your signature, you will receive an email notification.
Once any desired changes have been made, click Preview Engagement Letter in the bottom left corner of the screen to view the Engagement Letter as a PDF.

Note: The margins and other print formatting settings applied to the Engagement Letter are defined in Settings>Templates>Print Formatting Templates.
Click Cancel Changes and Go Back in the bottom right corner to discard any changes made to the Engagement Letter and submit the RFP. Or click Save and Attach to Award to submit the RFP, including the Engagement Letter with any modifications, to the Vendor.

If the Engagement Letter template specifies that a lender signature is required and one has not be set a popup will warn the user. Click OK to send the RFP anyway or Cancel to close the popup and return to the Engagement Letter screen.

Upon submitting, a notification will appear in the upper right corner of the page, stating the following:

The Engagement Letter will become available in the File Manager. A new version of the Engagement Letter will appear every time a signature has been applied from a Lender or Vendor.
Vendor Experience – Accepting or Rejecting the Award
When a Vendor has been awarded a Job, either after bidding and being selected or being directly awarded, they must accept or reject the award.
As the awarded Vendor, navigate to the Awaiting Acceptance tab in PARCEL. Click Accept to open the Job.

The Job will open. The page lists information about the request and the subject property, as well as any documents provided by the Lender.

A. Click Download full RFP details to download a copy of the RFP details as a PDF.
B. Click View Engagement Letter to view the Engagement Letter as a PDF.
Click Reject RFP to reject the award. A popup will request confirmation. Click Yes, Reject to confirm.

The lender will be notified.
Click Accept RFP to accept the award.

If the Lender included an Engagement Letter it will appear in a modal where it can be viewed and downloaded.

If the Lender does not require a signature, the signature area will state “No signature required from Lender, proceed with Award Acceptance.”
If the Engagement letter requires a signature and one has been uploaded to your profile, it will be displayed in the lower left corner of the modal.

If the Engagement letter requires a signature and one has not been uploaded to your profile, you will be prompted to upload one in order to proceed. Click Upload Signature and then select an image file of your signature on your computer.

Once the signature file has been uploaded, click Accept Terms & Award to apply your signature to the Engagement Letter and accept the award.

A confirmation message will appear on the page and the modal will close.

The Lender will be notified.
To view the Engagement Letter after the award has been accepted, navigate to the Accepted Awards tab, then click View Details for the Job you wish to view.

Click View Executed Engagement Letter at the top of the page to view the letter in PDF format.

Was this article helpful?