Results List
- Print
- DarkLight
- PDF
Results List
- Print
- DarkLight
- PDF
Article summary
Did you find this summary helpful?
Thank you for your feedback!
The Results List is a tabular listing of your search results that appear on the map. In LightBox Vision™, your Results List provides you with a convenient way to view the attributes of the properties that match your search criteria. You can export your Results List to a csv spreadsheet to be viewed in programs such as Microsoft Excel® or to your contact management system.
Adding Search Results to the Results List
When you run a search based on your search criteria:
The map displays your search results. Green outlines on polygons or blue highlights on point results show the features that match your search criteria.
The Search Results box in the top right corner of the map screen displays the number of search results.
Pan the map, zoom in or zoom out, and LightBox Vision™ dynamically updates the search results on the map and in the Search Results box.
Note:
View the related article on the different kinds of search filters and how they work here.
Adding Search results to the Results List & Opening Existing Lists:
1. After you run a search that contains your desired results, click the Add to List button in the Search Results box:
An animation moves to the Results List icon on the Main Toolbar.
The features on the map that match your search results are numbered with blue outlines by default and the upper right corner shows the result and Add to List option.
.png)
Note:
If you pan the map or zoom out, LightBox Vision dynamically updates the map. The features with green boundaries match your polygon search results (if point results then they highlight blue), but are not part of your Results List. The features in your Results List remain on the map, numbered with blue boundaries until Add to List is chosen again to include newer results.

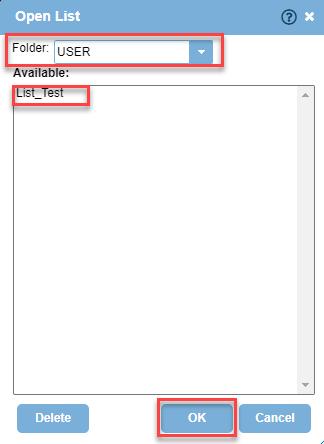
2. To open a previously saved list, click the Results List icon from the main toolbar to open the Results List and you are met with the option to Browse Lists or Layers (Viewing layers as a list will show the outline of the shapes and attributes tied to that layer).

4. Choose the folder the list was saved in (usually lists are saved in either USER or SHARED folders) and then pick out a saved list name to open by pressing OK
Using the Results List
Zooming to a Specific Search Result:
The number of each record in the # column matches a numbered feature on the map. Click on a record and the map zooms to that numbered feature if it isn't in your current map view. The Location Information panel displays for that record.
Note:
In the Results List, records that you hover over are highlighted in blue. After you click on a record it also highlights in blue and will take you to its location on the map view.
Only one list’s data can be visible at a time on the map so you will have to tab through multiple lists that you have open to show the associated points on the map for each list.
Sorting the Results List:
Click on a column heading to sort the Results List on the lowest or highest numerical or alphabetical value in that column. The numbered search results on the map will update to reflect your new sort method. LightBox Vision does not allow for range filtering in the columns but the list can be exported to Excel in order to do deeper filtering. It is not possible to re-order rows of data on lists unless each parcel (or other value of data) is selected at a time for “Add to List” individually as the list is getting built.
Full Screen Results List:
Click the Full Screen icon on the right of the Results List header for full screen viewing of the list.

Minimizing or Displaying the Results List:
There are two ways to toggle the list open and closed:
Click the Results List icon on the Main Toolbar.
Click Hide Results List icon on the right of the Results List header.
Minimizing or maximizing the results list is represented by an arrow icon in the toolbar right above the list.

Saving Your Results List:
You can save your results lists for future reference by selecting the floppy disk icon in the toolbar right above the list. See Save And Open Results List in Related Documents for instructions.

Hide List Labels/Numbers:
Click the “123” icon within the toolbar directly above the list results. Use this icon to toggle the results list numbers ON or OFF on the map.

Heatmap:
Choose this option within the toolbar right above the list to display a heatmap for your results list records. Learn more.

Bulk Actions:
Select the button called “Bulk Actions” on the toolbar immediately above the list after specified records in a list have been check-marked to do a bulk delete of the checked rows.

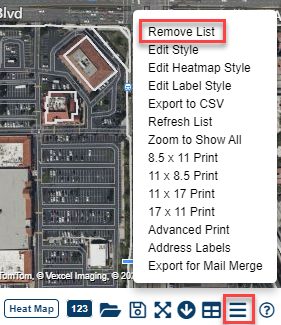
Removing Your Results List:
Click the Options icon of 3 horizontal lines on the right of the Results List toolbar, and select Remove List from the menu options. If you have not saved your results list, you will not be able to retrieve it.
Results List Options
You can apply a variety of options to the Results List. Click the Options icon on the right of the Results List header to open the Results List Options menu.
Remove List | This option removes the list from view. |
Edit Style | Use this option to edit the style of the highlighed features in your results list on the map. See Related Documents |
Edit Heat Map Style | Edit Heat Map Style: Use this option to change the appearance of the heatmap. See Related Documents |
Edit Label Style | Use this option to change the size, and color of the number labels on the map. See Related Documents |
Refresh List | Use this option when you need to refresh the data, or after removing a record. |
Zoom to Show All | LightBox Vision™ zooms to show you all of your search results on the map. |
Export to CSV | Choose this option to export to export the results list to a csv file. A csv (comma-separated values) file can be opened in spreadsheet programs, such as Microsoft Excel® |
Export for Mail Merge | Export search results to a csv file so a mail merge can be performed. |
Select the print size for a pdf map report that includes your search results on a map and in tabular form. For more print features, select Advanced Print. | |
Address Labels | Export your search results as address labels. |
Record Options
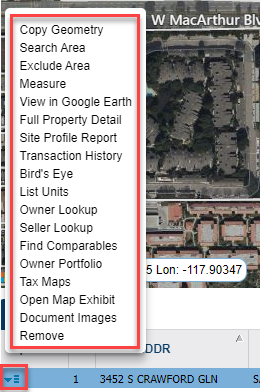
You can apply a variety of options to each record in the Results List. The Options column is the first column in the Results List row. Click the Options field (which looks like a downwards arrow to the left of the records) of your desired record to open the Record Options menu.
Note:
The options that appear on the menu depend on your record. For example, Seller Entity Lookup may not appear on the menu if your selected record contains no data about the seller.
Copy Geometry | Copies the selected record's geometry to another layer. |
Search Area/Exclude Area | Allows search capabilities in proximity to a site. See Related Document. |
Measure | Measures the geometry of the subject parcel. |
View in Google Earth | View the site in Google Earth. See Related Document. |
Full Property Detail | Displays a printable report of the full property details. |
Transaction History | Displays a printable report of the transaction history. |
Bird's Eye | Opens a bird's eye view of the selected record in a separate window (from Microsoft Bing if available) |
List Units | Opens a new tab which displays additional records associated with the selected property. This command is useful when multiple records are associated with a master parcel. Some examples of this include shopping centers with a range of addresses, or some condo parcels. |
Owner Lookup | Selecting this option takes you to the website: www.CorporationWiki.com which provides Owner information from the Secretary of State. |
Site Profile Report | Customize your reports by selecting its features in the Report Settings window. *Only available in the Builder and Commercial editions of LightBox Vision. |
Tax Maps | This is an add-on feature that will open the county's assessor map for the selected property. |
Create Target Site | Creates a Target Site on the selected property. See Related Document. |
Find Comparables | Opens up the window for this feature to execute additional searches. See Related Document. |
Owner Portfolio | Opens a new list that contains parcels that share the same owner address nationwide. See Related Document. |
Open Map Exhibit | Opens up a Map Exhibit for the selected property. See Related Document. |
Document Images | This is an add-on feature that can be accessed. See Related Document. |
Remove | Removes the record from the list and final step for removal means refreshing the list. See below steps. |
Remove/Refresh:
There are 2 methods of removing records on a list. See below for the details.
1st Removal Option:
1. Select the box(es) next to the record to pick out the ones for removal (deselect a box if it should not be removed).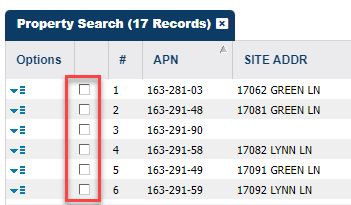
2. Click Bulk Actions button next to the list options and choose to Remove Selected.

2nd Removal Option:
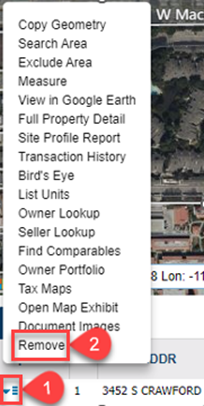
1. Click the Options field of the record you'd like to remove.
2. Select Remove from the Record Options menu. The record is grayed out.
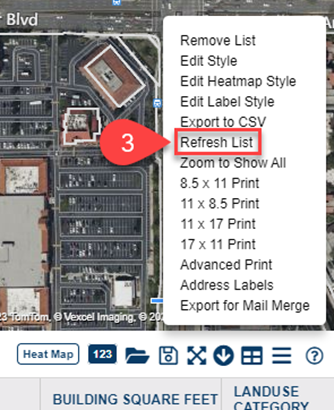
3. Select Refresh List from the Results List Options menu. To open the menu, click the Options icon on the right of the Results List header.
Note: Once you select Refresh List, the selected record is removed. Before you refresh the list, you can restore the grayed out record. Open the Record Options menu and click on Restore.
Note:
Once you select Refresh List, the selected record is removed. Before you refresh the list you can restore the grayed out record. Open the Record Options menu and click on Restore.
Modifying the Fields of your Results List
There are up to 80 fields that can be visible on a list. Use the Modify Fields option to add or remove fields.
Disclaimer: If a saved list appears to have no records in it, it may be because all fields have been deselected. Read the steps below to learn how to bring fields you need back on to your list.
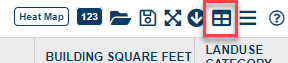
1. Click the Modify Fields icon on the right of the Results List header. The Edit Fields window opens.
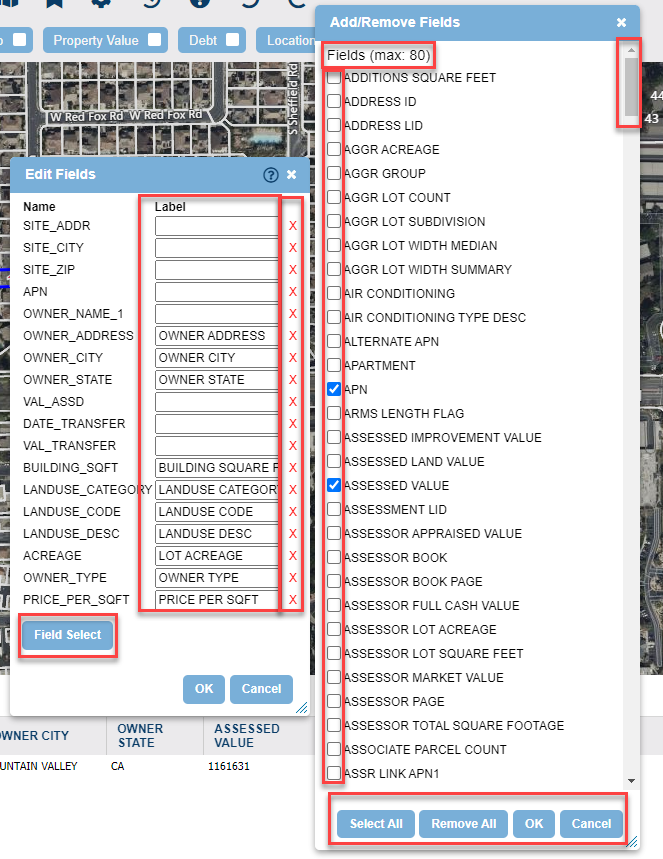
2. In the Edit Fields window, you can edit field names, move fields, and remove fields:
Edit Field Names: If the meaning of a column heading in the Results List is not easy to understand, enter a replacement field name in the Label field to reflect on the list interface (edit is not exportable)
Move Position of Field: Drag and drop any field to another location in the list. This re-orders the columns in the Results List.
Remove Field: Click the Red x to remove a field from the Results List.
Tip:
If you remove a field by mistake, use the Add/Remove Fields window to add the field to the Results List.
3. Click the Field Select button at the bottom of the window to add or remove fields in the Results List. The Add/Remove Fields window opens.
4. In the Add/Remove Fields window, you can add or remove individual fields by clicking a check box. Or you can select or remove all fields by clicking the buttons at the bottom of the window.
5. Click OK in the Add/Remove Fields window to accept your selections. The Edit Fields window appears.
6. Click OK. All of your modifications appear in the Results List.
Was this article helpful?